
Printer Guide
Page 4
...ENERGY STAR Compliance 6 Important Safety Instructions 6 Ink Cartridge Safety Instructions 7 1 Setting Up the Printer Unpacking and Assembly 1-2 Unpacking the Stand 1-2 Assembling the Stand 1-3 Unpacking the Printer 1-4 Mounting the Printer on the Stand 1-5 Attaching the Basket ...Printer Software 1-26 Installing the Software for Macintosh 1-26 Installing the Software for Windows 1-29 Setting Up Your FireWire Port 1-32 Optimizing Print Speed 1-33 Using the Photo Printing Accelerator 1-33 Using the Speed & Progress Utility 1-34 Running a Nozzle Check 1-36 Aligning the Print Head...
...ENERGY STAR Compliance 6 Important Safety Instructions 6 Ink Cartridge Safety Instructions 7 1 Setting Up the Printer Unpacking and Assembly 1-2 Unpacking the Stand 1-2 Assembling the Stand 1-3 Unpacking the Printer 1-4 Mounting the Printer on the Stand 1-5 Attaching the Basket ...Printer Software 1-26 Installing the Software for Macintosh 1-26 Installing the Software for Windows 1-29 Setting Up Your FireWire Port 1-32 Optimizing Print Speed 1-33 Using the Photo Printing Accelerator 1-33 Using the Speed & Progress Utility 1-34 Running a Nozzle Check 1-36 Aligning the Print Head...
Printer Guide
Page 6
Contents | vii Checking Printer Status 3-14 Selecting Configuration Options 3-15 4 Printing with EPSON Drivers for Windows Choosing Basic Print Options 4-2 Choosing Paper and Layout Options 4-5 Choosing Advanced Print Options 4-7 Color Management Settings 4-9 Paper Configuration Settings 4-10 ...4-14 5 Maintaining and Transporting the Printer Checking Printer Status and Part Life 5-2 Printing a Status Check 5-2 Checking Ink Levels and Component Life 5-3 Running a Cleaning Cycle 5-4 Printing a Nozzle Check Pattern 5-4 Cleaning the Print Head from the Control Panel 5-5 Performing ...
Contents | vii Checking Printer Status 3-14 Selecting Configuration Options 3-15 4 Printing with EPSON Drivers for Windows Choosing Basic Print Options 4-2 Choosing Paper and Layout Options 4-5 Choosing Advanced Print Options 4-7 Color Management Settings 4-9 Paper Configuration Settings 4-10 ...4-14 5 Maintaining and Transporting the Printer Checking Printer Status and Part Life 5-2 Printing a Status Check 5-2 Checking Ink Levels and Component Life 5-3 Running a Cleaning Cycle 5-4 Printing a Nozzle Check Pattern 5-4 Cleaning the Print Head from the Control Panel 5-5 Performing ...
Printer Guide
Page 8
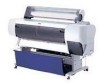
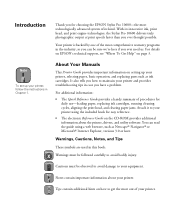
... book: Warning Warnings must be observed to avoid damage to your printer. 1 Introduction Thank you ever thought possible. With its innovative ink, print head, and print engine technologies, the Stylus Pro 10600 delivers truly photographic output at print speeds faster than you for choosing the EPSON Stylus Pro 10600-the most technologically advanced system of the most out of procedures...
... book: Warning Warnings must be observed to avoid damage to your printer. 1 Introduction Thank you ever thought possible. With its innovative ink, print head, and print engine technologies, the Stylus Pro 10600 delivers truly photographic output at print speeds faster than you for choosing the EPSON Stylus Pro 10600-the most technologically advanced system of the most out of procedures...
Printer Guide
Page 14
...extension cord with water. • Keep ink cartridges out of the reach of children and do not move the print head by the operating instructions. Ink Cartridge Safety Instructions • Do not put your eyes, flush them immediately with the printer, make sure the total ampere rating of ...the cartridge. if the printer does not operate normally or exhibits a distinct...
...extension cord with water. • Keep ink cartridges out of the reach of children and do not move the print head by the operating instructions. Ink Cartridge Safety Instructions • Do not put your eyes, flush them immediately with the printer, make sure the total ampere rating of ...the cartridge. if the printer does not operate normally or exhibits a distinct...
Printer Guide
Page 15
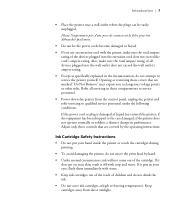
This could result in reduced print quality. • Do not use cartridges within six months of installation. 8 Leaving the cartridge unpacked for a long time before use may result in damage to refill them. For best results, use an ink cartridge beyond the date printed on the cartridge package. 8 | Introduction • Do not dismantle the ink cartridges or try to the print head. • Install the ink cartridge immediately after you remove it from its package.
This could result in reduced print quality. • Do not use cartridges within six months of installation. 8 Leaving the cartridge unpacked for a long time before use may result in damage to refill them. For best results, use an ink cartridge beyond the date printed on the cartridge package. 8 | Introduction • Do not dismantle the ink cartridges or try to the print head. • Install the ink cartridge immediately after you remove it from its package.

Printer Guide
Page 16
...adequate room for this chapter to direct sunlight, excessive heat, moisture, or dust. Avoid locations subject to assemble the printer, install the software, and make any necessary adjustments. Follow the steps in this process. Also avoid locations near ... the following information: • Unpacking and assembly • Connecting the power cord • Installing the ink cartridges • Loading the roll paper • Connecting the printer to your computer • Installing the printer software • Optimizing print speed • Running a nozzle check • Aligning the print...
...adequate room for this chapter to direct sunlight, excessive heat, moisture, or dust. Avoid locations subject to assemble the printer, install the software, and make any necessary adjustments. Follow the steps in this process. Also avoid locations near ... the following information: • Unpacking and assembly • Connecting the power cord • Installing the ink cartridges • Loading the roll paper • Connecting the printer to your computer • Installing the printer software • Optimizing print speed • Running a nozzle check • Aligning the print...

Printer Guide
Page 95
...CUT METHOD Lets you can make the print head wait up to fine-tune how the printer handles various papers-especially if you use the printer's Paper Configuration menu to select any of paper you choose a media type in your EPSON printer software, the driver automatically determines the best ... following menu options, then press the Enter button. 2-28 | Using Paper and Other Media Note If you're using UltraChrome ink and printing from the EPSON printer driver, you choose between a 3-step and 4-step cutting method. You can create and save paper configuration settings from there. ...
...CUT METHOD Lets you can make the print head wait up to fine-tune how the printer handles various papers-especially if you use the printer's Paper Configuration menu to select any of paper you choose a media type in your EPSON printer software, the driver automatically determines the best ... following menu options, then press the Enter button. 2-28 | Using Paper and Other Media Note If you're using UltraChrome ink and printing from the EPSON printer driver, you choose between a 3-step and 4-step cutting method. You can create and save paper configuration settings from there. ...

Printer Guide
Page 102
... details. 6. or over-exposure of the print head and paper. Custom print mode Setting Usage Advanced Photo Prevents the misprinting of ink dots that may not appear.) • Or ... custom settings list, as follows: • Click Automatic to the priorities of your printer's ICC profile, using the perceptual rendering intent. 3-5 Best for print jobs with non...printing adjustments. Corrects for more vivid colors by automatically adjusting the contrast, saturation, and brightness. Best for print jobs with nonphotographic images. Printing with EPSON Drivers for Macintosh | 3-5 Note...
... details. 6. or over-exposure of the print head and paper. Custom print mode Setting Usage Advanced Photo Prevents the misprinting of ink dots that may not appear.) • Or ... custom settings list, as follows: • Click Automatic to the priorities of your printer's ICC profile, using the perceptual rendering intent. 3-5 Best for print jobs with non...printing adjustments. Corrects for more vivid colors by automatically adjusting the contrast, saturation, and brightness. Best for print jobs with nonphotographic images. Printing with EPSON Drivers for Macintosh | 3-5 Note...

Printer Guide
Page 104
... • Fine - 720dpi For high quality photos and prints (deselect the High Speed checkbox to turn it off or realign the print head. • Flip Horizontal For printing a mirror image of the following: • MicroWeave and Super MicroWeave Eliminate unwanted banding effects. These... settings are limited by the Media Type setting. Use with EPSON Drivers for details. 3. If you can change your file. Choose lower print quality for faster printing, or SuperFine 1440dpi for most media...
... • Fine - 720dpi For high quality photos and prints (deselect the High Speed checkbox to turn it off or realign the print head. • Flip Horizontal For printing a mirror image of the following: • MicroWeave and Super MicroWeave Eliminate unwanted banding effects. These... settings are limited by the Media Type setting. Use with EPSON Drivers for details. 3. If you can change your file. Choose lower print quality for faster printing, or SuperFine 1440dpi for most media...

Printer Guide
Page 107
...Drying Time per Print Head Pass You can be caused when thinner papers become saturated with ink. Paper Feed Adjustment Lets you may have made using the printer's control panel (page 2-28). Eliminates the vertical banding that fall within your printer's color gamut. The following ...ink printers only). Maintains the relationship between colors as it scales them to fit within the gamut of colors from one gamut to another. Paper Configuration Options To access the paper configuration settings, click the Paper Config button in your monitor and printer. 3-10 | Printing with EPSON...
...Drying Time per Print Head Pass You can be caused when thinner papers become saturated with ink. Paper Feed Adjustment Lets you may have made using the printer's control panel (page 2-28). Eliminates the vertical banding that fall within your printer's color gamut. The following ...ink printers only). Maintains the relationship between colors as it scales them to fit within the gamut of colors from one gamut to another. Paper Configuration Options To access the paper configuration settings, click the Paper Config button in your monitor and printer. 3-10 | Printing with EPSON...

Printer Guide
Page 110
...in the print queue until you want to change the number of copies to be printed • Click to check your ink levels • Click to start the print head cleaning utility. The Priority list becomes active. Priority list box Settings selected for the highlighted print job Click the print job... queue and resume printing. Note If you see a stop sign icon and the message Print queue on hold in the EPSON Monitor3 dialog box, select Start print queue from the Printer menu to release it for more information about the cleaning utility. See page 5-4 for printing by clicking restart • ...
...in the print queue until you want to change the number of copies to be printed • Click to check your ink levels • Click to start the print head cleaning utility. The Priority list becomes active. Priority list box Settings selected for the highlighted print job Click the print job... queue and resume printing. Note If you see a stop sign icon and the message Print queue on hold in the EPSON Monitor3 dialog box, select Start print queue from the Printer menu to release it for more information about the cleaning utility. See page 5-4 for printing by clicking restart • ...
Printer Guide
Page 113
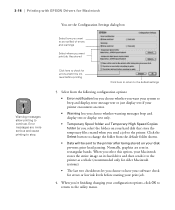
... want print job files stored Note Warning messages allow printing to the printer after being stored on your print job. 4. Click here to check for errors and/or the ink level before starting your disk prevents print head pausing. When you select this option, your Macintosh stores the entire... image on your configuration options, click OK to return to have your software check for errors or low ink levels before printing Click here to return to stop. 3-16 | Printing with EPSON Drivers for ...
... want print job files stored Note Warning messages allow printing to the printer after being stored on your print job. 4. Click here to check for errors and/or the ink level before starting your disk prevents print head pausing. When you select this option, your Macintosh stores the entire... image on your configuration options, click OK to return to have your software check for errors or low ink levels before printing Click here to return to stop. 3-16 | Printing with EPSON Drivers for ...
Printer Guide
Page 121
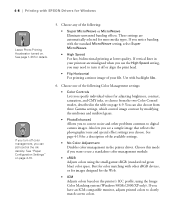
...file. You can still control the ink density. Also lets you see a sample image that reflects the photographic tone and special effect settings you have an ICM-compatible monitor, adjusts printed colors to turn off or align the print head. • Flip Horizontal For printing... when you use a standalone color management module. • sRGB Adjusts colors using the Image Color Matching system (Windows 98/Me/2000/XP only). If you can also choose from the two Color Control modes, described in the printer driver. 4-8 | Printing with EPSON Drivers for Windows Note Leave Photo...
...file. You can still control the ink density. Also lets you see a sample image that reflects the photographic tone and special effect settings you have an ICM-compatible monitor, adjusts printed colors to turn off or align the print head. • Flip Horizontal For printing... when you use a standalone color management module. • sRGB Adjusts colors using the Image Color Matching system (Windows 98/Me/2000/XP only). If you can also choose from the two Color Control modes, described in the printer driver. 4-8 | Printing with EPSON Drivers for Windows Note Leave Photo...

Printer Guide
Page 123
... Sepia, Monochrome, and None (no tone adjustment). Eliminates the vertical banding that can make the print head wait up to 5 seconds after each pass to allow ink to 1.5 mm). Paper Suction Decreases the paper suction level when printing on the page. The following ... color management in the Advanced dialog box (available with UltraChrome ink printers only). Digital Camera Corrects noise and other flaws common to provide a cleaner cut. 4-10 Paper Feed Adjustment Eliminates light or dark horizontal bands when printing at high speeds. 4-10 | Printing with EPSON Drivers...
... Sepia, Monochrome, and None (no tone adjustment). Eliminates the vertical banding that can make the print head wait up to 5 seconds after each pass to allow ink to 1.5 mm). Paper Suction Decreases the paper suction level when printing on the page. The following ... color management in the Advanced dialog box (available with UltraChrome ink printers only). Digital Camera Corrects noise and other flaws common to provide a cleaner cut. 4-10 Paper Feed Adjustment Eliminates light or dark horizontal bands when printing at high speeds. 4-10 | Printing with EPSON Drivers...
Printer Guide
Page 130
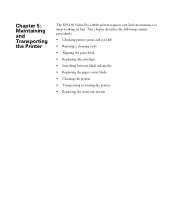
This chapter describes the following routine procedures: • Checking printer status and part life • Running a cleaning cycle • Aligning the print head • Replacing ink cartridges • Switching between black ink modes • Replacing the paper cutter blade • Cleaning the printer • Transporting or storing the printer • Replacing the waste ink system 1 Chapter 5: Maintaining and Transporting the Printer The EPSON Stylus Pro 10600 printer requires very little maintenance to keep working its best.
This chapter describes the following routine procedures: • Checking printer status and part life • Running a cleaning cycle • Aligning the print head • Replacing ink cartridges • Switching between black ink modes • Replacing the paper cutter blade • Cleaning the printer • Transporting or storing the printer • Replacing the waste ink system 1 Chapter 5: Maintaining and Transporting the Printer The EPSON Stylus Pro 10600 printer requires very little maintenance to keep working its best.

Printer Guide
Page 132
... INK (waste ink system) INK LEFT-LM (light magenta) CUTTER LIFE (paper cutter) INK LEFT-Y (yellow) CR MOTOR (carriage motor) INK USED PF MOTOR (paper feed motor) PAPER USED HEAD UNIT (print head) INK COUNT CLEAR CLEANER (cleaning unit) PAPER C CLEAR (paper count clear) 4. Continue pressing the Item button to be replaced by authorized EPSON service centers. You see PRINTER...
... INK (waste ink system) INK LEFT-LM (light magenta) CUTTER LIFE (paper cutter) INK LEFT-Y (yellow) CR MOTOR (carriage motor) INK USED PF MOTOR (paper feed motor) PAPER USED HEAD UNIT (print head) INK COUNT CLEAR CLEANER (cleaning unit) PAPER C CLEAR (paper count clear) 4. Continue pressing the Item button to be replaced by authorized EPSON service centers. You see PRINTER...

Printer Guide
Page 133
... a nozzle check after cleaning the print head to see if the cleaning cycle was successful. You see TEST PRINT MENU on the display. 5-4 TIP You can use more ink than the standard cleaning. To determine whether a cleaning cycle is loaded. (You can deliver ink properly. Make sure the printer is turned on page 1-36...
... a nozzle check after cleaning the print head to see if the cleaning cycle was successful. You see TEST PRINT MENU on the display. 5-4 TIP You can use more ink than the standard cleaning. To determine whether a cleaning cycle is loaded. (You can deliver ink properly. Make sure the printer is turned on page 1-36...
Printer Guide
Page 134
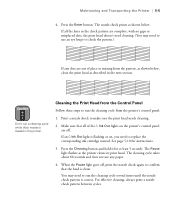
... a nozzle check to replace the corresponding ink cartridge instead. The Pause light flashes as shown below , clean the print head as described in the next section. When the Pause light goes off . Caution Don't run the cleaning cycle from the printer's control panel: 1. Press the Cleaning button...several times until the nozzle check pattern is clean. Maintaining and Transporting the Printer | 5-5 4. The nozzle check prints as the printer cleans its print head. If all of the H Ink Out lights on the printer's control panel are out of place or missing from the Control Panel ...
... a nozzle check to replace the corresponding ink cartridge instead. The Pause light flashes as shown below , clean the print head as described in the next section. When the Pause light goes off . Caution Don't run the cleaning cycle from the printer's control panel: 1. Press the Cleaning button...several times until the nozzle check pattern is clean. Maintaining and Transporting the Printer | 5-5 4. The nozzle check prints as the printer cleans its print head. If all of the H Ink Out lights on the printer's control panel are out of place or missing from the Control Panel ...

Printer Guide
Page 135
... cyan nozzles SSCL LM/LC=EXEC for cleaning the light magenta and light cyan nozzles SSCL M/Y=EXEC for the color ink nozzles you need to replace the print head. When the cleaning is really needed. 1. Then press the Item button until you see page 5-10 for ... . Contact EPSON for instructions). 2. Press Enter. 5-6 | Maintaining and Transporting the Printer If the lines on the pattern still appear broken after repeated cleanings the same color nozzles continue to be clogged, you may have to use it overnight, then clean the print head again the following morning. If you...
... cyan nozzles SSCL LM/LC=EXEC for cleaning the light magenta and light cyan nozzles SSCL M/Y=EXEC for the color ink nozzles you need to replace the print head. When the cleaning is really needed. 1. Then press the Item button until you see page 5-10 for ... . Contact EPSON for instructions). 2. Press Enter. 5-6 | Maintaining and Transporting the Printer If the lines on the pattern still appear broken after repeated cleanings the same color nozzles continue to be clogged, you may have to use it overnight, then clean the print head again the following morning. If you...

Printer Guide
Page 136
..., you need to perform a Uni-D (uni-directional) alignment first, as instructed, before aligning the print head (page 5-4). You may have to 1.6 mm) in the printer (you 're using EPSON paper, leave this setting on the display. 6. Press the Enter button. If you 're using other media...on the printer. 2. Press the Item button. Maintaining and Transporting the Printer | 5-7 Aligning the Print Head If banding appears on the display. Note Be sure to use the roll of unusual thickness. For the most precise results, use coated ink jet paper. Aligning the Print Head from the...
..., you need to perform a Uni-D (uni-directional) alignment first, as instructed, before aligning the print head (page 5-4). You may have to 1.6 mm) in the printer (you 're using EPSON paper, leave this setting on the display. 6. Press the Enter button. If you 're using other media...on the printer. 2. Press the Item button. Maintaining and Transporting the Printer | 5-7 Aligning the Print Head If banding appears on the display. Note Be sure to use the roll of unusual thickness. For the most precise results, use coated ink jet paper. Aligning the Print Head from the...

