
Datasheet
Page 1
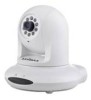
... network camera. Users can create high quality videos with a single camera. Its features night vision for crisp and clear videos images in low light situations, and PT-31E its PoE Ethernet port allows power and network data to create high quality videos with a free 64‐channel viewer software for an endless variety of network surveillance applications. 3 Megapixel Video The Edimax PT-31E is the world's first 3 megapixel pan & tilt network camera. With Edimax's superior H.264 video compression technology, the PT-31E can set the camera to record...
... network camera. Users can create high quality videos with a single camera. Its features night vision for crisp and clear videos images in low light situations, and PT-31E its PoE Ethernet port allows power and network data to create high quality videos with a free 64‐channel viewer software for an endless variety of network surveillance applications. 3 Megapixel Video The Edimax PT-31E is the world's first 3 megapixel pan & tilt network camera. With Edimax's superior H.264 video compression technology, the PT-31E can set the camera to record...

Datasheet
Page 2
....4° IR 10 Meters 1 Lux at real-time 30fps • H.264, MPEG-4 & M-JPEG multi-stream output • Simultaneous live monitoring and high resolution recording • Multi-area motion detection • Support IEEE802.3af Power-over-Ethernet (PoE) standard • SD/SDHC memory card slot for local storage • 2-way audio support Specifications Flash RAM Image Sensor S/N Type Lens Focal Length / F-Number DC-Iris View Angle Day Night Operation / IR Distance Min. All rights reserved...
....4° IR 10 Meters 1 Lux at real-time 30fps • H.264, MPEG-4 & M-JPEG multi-stream output • Simultaneous live monitoring and high resolution recording • Multi-area motion detection • Support IEEE802.3af Power-over-Ethernet (PoE) standard • SD/SDHC memory card slot for local storage • 2-way audio support Specifications Flash RAM Image Sensor S/N Type Lens Focal Length / F-Number DC-Iris View Angle Day Night Operation / IR Distance Min. All rights reserved...

Quick Install Guide
Page 5
Step 6: When mounted on the wall, the cables can be powered via the Ethernet cable when connected to the network camera via the hole indicated by the arrow. It can pass through mounting plate A as shown in the diagram. Note: PT-31E (PoE model) supports the IEEE 802.3af PoE standard. Step 7: Connect an Ethernet cable to a PoE switch. 4 Step 5: Screw mounting plate A and B together via the Ethernet port.
Step 6: When mounted on the wall, the cables can be powered via the Ethernet cable when connected to the network camera via the hole indicated by the arrow. It can pass through mounting plate A as shown in the diagram. Note: PT-31E (PoE model) supports the IEEE 802.3af PoE standard. Step 7: Connect an Ethernet cable to a PoE switch. 4 Step 5: Screw mounting plate A and B together via the Ethernet port.
Quick Install Guide
Page 7
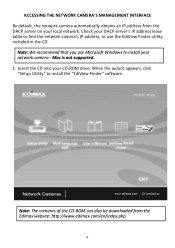
..." software. When the wizard appears, click "Setup Utility" to install your local network. Check your CD-ROM drive. Mac is not supported. 1. Note: We recommend that you use the EdiView Finder utility included in the CD. Note: The contents of the CD-ROM can also be downloaded from the DHCP server on your network camera - ACCESSING THE NETWORK CAMERA'S MANAGEMENT INTERFACE By default, the network camera automatically obtains an IP address from the Edimax website: http...
..." software. When the wizard appears, click "Setup Utility" to install your local network. Check your CD-ROM drive. Mac is not supported. 1. Note: We recommend that you use the EdiView Finder utility included in the CD. Note: The contents of the CD-ROM can also be downloaded from the DHCP server on your network camera - ACCESSING THE NETWORK CAMERA'S MANAGEMENT INTERFACE By default, the network camera automatically obtains an IP address from the Edimax website: http...
Quick Install Guide
Page 8
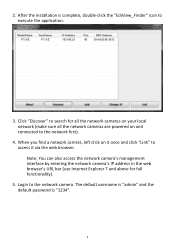
... "admin" and the default password is complete, double-click the "EdiView_Finder" icon to the network first). 4. Note: You can also access the network camera's management interface by entering the network camera's IP address in the web browser's URL bar (use Internet Explorer 7 and above for all the network cameras on your local network (make sure all the network cameras are powered on it once and click "Link" to the network camera. After the installation is "1234". 7 Login...
... "admin" and the default password is complete, double-click the "EdiView_Finder" icon to the network first). 4. Note: You can also access the network camera's management interface by entering the network camera's IP address in the web browser's URL bar (use Internet Explorer 7 and above for all the network cameras on your local network (make sure all the network cameras are powered on it once and click "Link" to the network camera. After the installation is "1234". 7 Login...

Quick Install Guide
Page 12
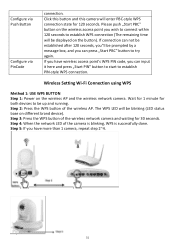
... 2: Open a web browser and login to be up and running. Step 4: Please enter the corresponding pin code of the camera is blinking, a WPS connection has been successfully established Step 6: If you have more than 1 camera, repeat steps 2 - 5 for 30 seconds. as shown below. Step 3: Open web browser and login to the wireless network camera. Method 2: PIN CODE SETTING Step 1: Power on both devices to the wireless server. Then push the "Start PIN" button.
... 2: Open a web browser and login to be up and running. Step 4: Please enter the corresponding pin code of the camera is blinking, a WPS connection has been successfully established Step 6: If you have more than 1 camera, repeat steps 2 - 5 for 30 seconds. as shown below. Step 3: Open web browser and login to the wireless network camera. Method 2: PIN CODE SETTING Step 1: Power on both devices to the wireless server. Then push the "Start PIN" button.
Manual
Page 3
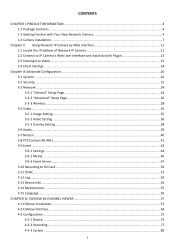
... of Network IP Camera 11 2.2 Connect to IP Camera's Web User Interface and Install ActiveX Plugin 13 2.3 Viewing Live Video ...15 2.4 Client Settings ...18 Chapter III Advanced Configuration...20 3-1 System...20 3-2 Security ...22 3-3 Network ...24 3-3-1 "General" Setup Page...24 3-3-2 "Advanced" Setup Page...26 3-3-3 Wireless ...28 3-5 Video ...35 3-5-1 Image Setting...35 3-5-2 Video Setting ...36 3-5-3 Overlay Setting ...38 3-6 Audio...39 3-7 Motion ...40 3-8 PTZ Control (RS-485)...41 3-9 Event ...43 3-9-1 Settings ...44 3-9-2 Media...46 3-9-3 Event Server...47 3-10 Recording to SD Card...
... of Network IP Camera 11 2.2 Connect to IP Camera's Web User Interface and Install ActiveX Plugin 13 2.3 Viewing Live Video ...15 2.4 Client Settings ...18 Chapter III Advanced Configuration...20 3-1 System...20 3-2 Security ...22 3-3 Network ...24 3-3-1 "General" Setup Page...24 3-3-2 "Advanced" Setup Page...26 3-3-3 Wireless ...28 3-5 Video ...35 3-5-1 Image Setting...35 3-5-2 Video Setting ...36 3-5-3 Overlay Setting ...38 3-6 Audio...39 3-7 Motion ...40 3-8 PTZ Control (RS-485)...41 3-9 Event ...43 3-9-1 Settings ...44 3-9-2 Media...46 3-9-3 Event Server...47 3-10 Recording to SD Card...

Manual
Page 6
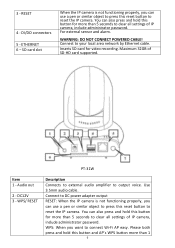
... IP camera: Left: Network activity LED On: Ethernet cable connected Off: Ethernet cable disconnected Flash: Transferring data Right: Power LED On: IP camera is switched on Off: IP camera is switched off Please note: These LEDs can be helpful if you don't want other people to indicate the operation of IP camera in IP camera's configuration menu. DC12V 6 PT-31E Description Connects to external audio amplifier to DC power adapter output 5 Use 3.5mm audio cable. Audio out 2 - Connect...
... IP camera: Left: Network activity LED On: Ethernet cable connected Off: Ethernet cable disconnected Flash: Transferring data Right: Power LED On: IP camera is switched on Off: IP camera is switched off Please note: These LEDs can be helpful if you don't want other people to indicate the operation of IP camera in IP camera's configuration menu. DC12V 6 PT-31E Description Connects to external audio amplifier to DC power adapter output 5 Use 3.5mm audio cable. Audio out 2 - Connect...
Manual
Page 7
.... Audio out 2 - WPS/ RESET Description Connects to external audio amplifier to your local area network by Ethernet cable. WPS: When you can use a pen or similar object to press this reset button to reset the IP camera. ETHERNET 6 - WARNING: DO NOT CONNECT POWERED CABLE! PT-31W Item 1 - Please both press and hold this reset button to clear all settings of IP camera, include administrator password. Use 3.5mm audio cable. DC12V 3 - Connect to DC power adapter output RESET...
.... Audio out 2 - WPS/ RESET Description Connects to external audio amplifier to your local area network by Ethernet cable. WPS: When you can use a pen or similar object to press this reset button to reset the IP camera. ETHERNET 6 - WARNING: DO NOT CONNECT POWERED CABLE! PT-31W Item 1 - Please both press and hold this reset button to clear all settings of IP camera, include administrator password. Use 3.5mm audio cable. DC12V 3 - Connect to DC power adapter output RESET...
Manual
Page 8
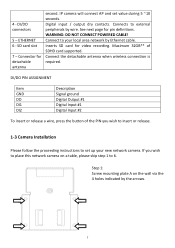
... or release a wire, press the button of SDHD card supported. Digital input / output dry contacts. Connect to 6. DI/DO connectors 5 - Maximum 32GB** of the PIN you wish to place this network camera on the wall via the 4 holes indicated by Ethernet cable. If you wish to insert or release. 1-3 Camera Installation Please follow the proceeding instructions to external peripherals by wire...
... or release a wire, press the button of SDHD card supported. Digital input / output dry contacts. Connect to 6. DI/DO connectors 5 - Maximum 32GB** of the PIN you wish to place this network camera on the wall via the 4 holes indicated by Ethernet cable. If you wish to insert or release. 1-3 Camera Installation Please follow the proceeding instructions to external peripherals by wire...

Manual
Page 10
Step 5: Screw mounting plate A and B together via the Ethernet cable when connected to the network camera via the Ethernet port. Note: PT-31E (PoE model) supports the IEEE 802.3af PoE standard. Step 6: When mounted on the wall, the cables can be powered via the hole indicated by the arrow. It can pass through mounting plate A as in the picture. Step 7: Connect an Ethernet cable to a PoE switch. 9
Step 5: Screw mounting plate A and B together via the Ethernet cable when connected to the network camera via the Ethernet port. Note: PT-31E (PoE model) supports the IEEE 802.3af PoE standard. Step 6: When mounted on the wall, the cables can be powered via the hole indicated by the arrow. It can pass through mounting plate A as in the picture. Step 7: Connect an Ethernet cable to a PoE switch. 9
Manual
Page 12
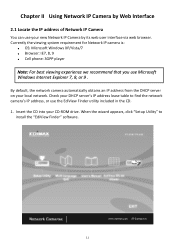
... Network IP camera is: ■ OS: Microsoft Windows XP/Vista/7 ■ Browser: IE7, 8, 9 ■ Cell phone: 3GPP player Note: For best viewing experience we recommend that you use Microsoft Windows Internet Explorer 7, 8, or 9 . Chapter II Using Network IP Camera by Web Interface 2.1 Locate the IP address of Network IP Camera You can use your DHCP server's IP address lease table to install the "EdiView Finder" software. 11 Check your new Network IP Camera by its web user interface via web browser...
... Network IP camera is: ■ OS: Microsoft Windows XP/Vista/7 ■ Browser: IE7, 8, 9 ■ Cell phone: 3GPP player Note: For best viewing experience we recommend that you use Microsoft Windows Internet Explorer 7, 8, or 9 . Chapter II Using Network IP Camera by Web Interface 2.1 Locate the IP address of Network IP Camera You can use your DHCP server's IP address lease table to install the "EdiView Finder" software. 11 Check your new Network IP Camera by its web user interface via web browser...
Manual
Page 29
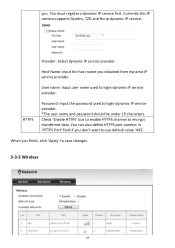
... a dynamic IP service first. Currently this IP camera supports Dyndns, TZO and No-ip dynamic IP service.. Check 'Enable HTTPS' box to enable HTTPS channel to save changes. 3-3-3 Wireless 28 When you . User name: Input user name used to login dynamic IP service provider. HTTPS Password: Input the password used to login dynamic IP service provider. *The user name and password should be under 16 characters. You can also define HTTPS port number in 'HTTPS Port' field if you...
... a dynamic IP service first. Currently this IP camera supports Dyndns, TZO and No-ip dynamic IP service.. Check 'Enable HTTPS' box to enable HTTPS channel to save changes. 3-3-3 Wireless 28 When you . User name: Input user name used to login dynamic IP service provider. HTTPS Password: Input the password used to login dynamic IP service provider. *The user name and password should be under 16 characters. You can also define HTTPS port number in 'HTTPS Port' field if you...
Manual
Page 32
... WPS connection. Configure via Push Button Configure via PinCode connection. If you have more than 1 camera, repeat step 2~4. 31 Wireless Setting Wi-Fi Connection using WPS Method 1: USE WPS BUTTON Step 1: Power on the wireless AP and the wireless network camera. Step 5: If you can input it here and press „Start PIN‟ button to start to establish WPS connection (The remaining time will be blinking (LED status base on the button). If connection can...
... WPS connection. Configure via Push Button Configure via PinCode connection. If you have more than 1 camera, repeat step 2~4. 31 Wireless Setting Wi-Fi Connection using WPS Method 1: USE WPS BUTTON Step 1: Power on the wireless AP and the wireless network camera. Step 5: If you can input it here and press „Start PIN‟ button to start to establish WPS connection (The remaining time will be blinking (LED status base on the button). If connection can...

Manual
Page 58
Locate EdiView setup file, and double-click on Windows Vista / 7 operating system. CHAPTER IV: EDIVIEW 64-CHANNEL VIEWER 4-1 EdiView Installation Please follow the following instructions to setup EdiView on it to start EdiView software installation. 57 Please note: You must login as system administrator when you're installing EdiView . 1.
Locate EdiView setup file, and double-click on Windows Vista / 7 operating system. CHAPTER IV: EDIVIEW 64-CHANNEL VIEWER 4-1 EdiView Installation Please follow the following instructions to setup EdiView on it to start EdiView software installation. 57 Please note: You must login as system administrator when you're installing EdiView . 1.

Manual
Page 77
... video stream type you have to use : Check 'Enable Camera' to enable this camera is found an IP camera of add it in EdiView and ready to input the details of IP camera manually: 1. You can also select it manually, click 'Add to list' button and the IP camera will be listed in the list and: View Image: View the live image from selected IP camera. Input the network settings of IP camera, including IP address, HTTP port number, user...
... video stream type you have to use : Check 'Enable Camera' to enable this camera is found an IP camera of add it in EdiView and ready to input the details of IP camera manually: 1. You can also select it manually, click 'Add to list' button and the IP camera will be listed in the list and: View Image: View the live image from selected IP camera. Input the network settings of IP camera, including IP address, HTTP port number, user...
Manual
Page 80
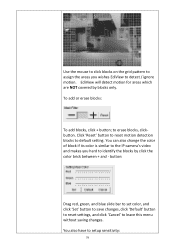
..., and click 'Set' button to save changes, click 'Default' button to reset settings, and click 'Cancel' to default setting. You also have to erase blocks, clickbutton. to setup sensitivity: 79 To add or erase blocks: To add blocks, click + button; You can also change the color of block if its color is similar to the IP camera's video and makes you wishes EdiView to detect / ignore motion. Use the mouse...
..., and click 'Set' button to save changes, click 'Default' button to reset settings, and click 'Cancel' to default setting. You also have to erase blocks, clickbutton. to setup sensitivity: 79 To add or erase blocks: To add blocks, click + button; You can also change the color of block if its color is similar to the IP camera's video and makes you wishes EdiView to detect / ignore motion. Use the mouse...

Manual
Page 82
... size 81 No: Do not display caption on your computer. Data Storage Setting Setup hard disk data storage: Enable Recycle: Check this button to remove it from running out of storage space you specified above to storage space list, or select an existing storage space in the list to change its parameter. You can click this button to add...
... size 81 No: Do not display caption on your computer. Data Storage Setting Setup hard disk data storage: Enable Recycle: Check this button to remove it from running out of storage space you specified above to storage space list, or select an existing storage space in the list to change its parameter. You can click this button to add...
Manual
Page 83
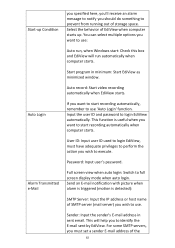
... use 'Auto Login' function. Auto Login If you want to login EdiView automatically. This will run automatically when computer starts. Start-up . Password: Input user's password. Alarm Transmitted e-Mail Full screen view when auto login: Switch to execute. For some SMTP servers, you want to start recording automatically, remember to use . Start program in sent email. Select the behavior of SMTP server (mail server) you wish to full screen display mode when auto login. User ID: Input user ID used to login EdiView, must set...
... use 'Auto Login' function. Auto Login If you want to login EdiView automatically. This will run automatically when computer starts. Start-up . Password: Input user's password. Alarm Transmitted e-Mail Full screen view when auto login: Switch to execute. For some SMTP servers, you want to start recording automatically, remember to use . Start program in sent email. Select the behavior of SMTP server (mail server) you wish to full screen display mode when auto login. User ID: Input user ID used to login EdiView, must set...
Manual
Page 104
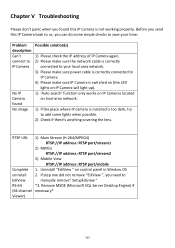
... LED lights on IP Camera will light up). 1) 'Auto search' function only works on IP Cameras located on control panel in Window OS 2. RTSP URL Complete uninstall EdiView RS-64 (64 channel Viewer) 1) Main Stream (H.264/MPEG4) RTSP://IP address :RTSP port/stream1 2) MJPEG RTSP://IP address :RTSP port/stream2 3) Mobile View RTSP://IP address :RTSP port/mobile 1. Before you send this IP Camera is too dark, try to add some simple checks to save your local area network. 3) Please make sure power...
... LED lights on IP Camera will light up). 1) 'Auto search' function only works on IP Cameras located on control panel in Window OS 2. RTSP URL Complete uninstall EdiView RS-64 (64 channel Viewer) 1) Main Stream (H.264/MPEG4) RTSP://IP address :RTSP port/stream1 2) MJPEG RTSP://IP address :RTSP port/stream2 3) Mobile View RTSP://IP address :RTSP port/mobile 1. Before you send this IP Camera is too dark, try to add some simple checks to save your local area network. 3) Please make sure power...

