
Quick Install Guide
Page 3
... network. Connect the network camera's "LAN" port to a router or switch's "LAN" port with utility software and user manual (1 pcs) z Quick installation guide (1 pcs) z Cloud ID card (1 pcs) LED Indicators LED Name Power LAN Description When the camera is powered on the network camera. The LED.../cloud LED will light up for 30 seconds while the camera initializes. The power LED stops flashing when connected to the cloud. After installation, the Power LED will stay solid for 30 seconds while the camera initializes. PRODUCT INTRODUCTION Before you start to flash, which indicates the...
... network. Connect the network camera's "LAN" port to a router or switch's "LAN" port with utility software and user manual (1 pcs) z Quick installation guide (1 pcs) z Cloud ID card (1 pcs) LED Indicators LED Name Power LAN Description When the camera is powered on the network camera. The LED.../cloud LED will light up for 30 seconds while the camera initializes. The power LED stops flashing when connected to the cloud. After installation, the Power LED will stay solid for 30 seconds while the camera initializes. PRODUCT INTRODUCTION Before you start to flash, which indicates the...

Quick Install Guide
Page 4
... which contains the camera's Cloud ID (MAC address), username and password. Please go to the Apple app store or Android Google market to finish the installation. Enter the Cloud ID, Username and Password to download "Ediview".
... which contains the camera's Cloud ID (MAC address), username and password. Please go to the Apple app store or Android Google market to finish the installation. Enter the Cloud ID, Username and Password to download "Ediview".

Quick Install Guide
Page 5
Configuring the EdiView Finder Utility 5. The setup wizard will guide you through the setup process. 4 Click OK to install the utility software. Insert the Edimax CD into your CD‐ROM drive and click "Setup Utility" to continue. 4. The network camera can now be controlled from the applet.
Configuring the EdiView Finder Utility 5. The setup wizard will guide you through the setup process. 4 Click OK to install the utility software. Insert the Edimax CD into your CD‐ROM drive and click "Setup Utility" to continue. 4. The network camera can now be controlled from the applet.

Quick Install Guide
Page 7
Configuring the Web‐Based Management Interface 7. Launch IE and type the IP address of the camera (found by your new Edimax network camera. If it does, click "Install ActiveX Control..." For advanced settings, please refer to install ActiveX. to see the video images captured by running EdiView), and enter "admin" in the username field, and "1234" in the password field to log in the CD. 6 You should then be able to continue. 9. Once you are logged in, the browser may prompt you to the user manual included in . 8.
Configuring the Web‐Based Management Interface 7. Launch IE and type the IP address of the camera (found by your new Edimax network camera. If it does, click "Install ActiveX Control..." For advanced settings, please refer to install ActiveX. to see the video images captured by running EdiView), and enter "admin" in the username field, and "1234" in the password field to log in the CD. 6 You should then be able to continue. 9. Once you are logged in, the browser may prompt you to the user manual included in . 8.
Quick Install Guide
Page 9
...Iceland, Liechtenstein, Norway, and Switzerland. This equipment generates, uses, and can radiate radio frequency energy and, if not installed and used in a particular installation. However, there is encouraged to try to correct the interference by the party responsible for compliance could void the authority...received, including interference that interference will not occur in laptop computer(s) with the utmost care for the safety of those who install and use of this equipment does cause harmful interference to radio or television reception, which the receiver is subject to the ...
...Iceland, Liechtenstein, Norway, and Switzerland. This equipment generates, uses, and can radiate radio frequency energy and, if not installed and used in a particular installation. However, there is encouraged to try to correct the interference by the party responsible for compliance could void the authority...received, including interference that interference will not occur in laptop computer(s) with the utmost care for the safety of those who install and use of this equipment does cause harmful interference to radio or television reception, which the receiver is subject to the ...

Quick Install Guide
Page 13
... of the following: a) Accompany it with the information you provide a warranty) and that users may modify your acceptance of this License to control compilation and installation of the executable. You may redistribute the program under the scope of this License. 3. c) If the modified program normally reads commands interactively when run, you...
... of the following: a) Accompany it with the information you provide a warranty) and that users may modify your acceptance of this License to control compilation and installation of the executable. You may redistribute the program under the scope of this License. 3. c) If the modified program normally reads commands interactively when run, you...

Manual
Page 3
... Camera ...4 1.2 Safety Instructions ...4 1.3 Package Contents...5 1.4 Familiarizing Yourself with Your New Network Camera 6 1.5 Installing the Network Camera ...8 1.6 Installing the Network Camera with WPS...9 Chapter II: Accessing the Camera's Web Interface...9 2.1 Installing EdiView Finder ...10 2.2 Connecting to the Camera's Web User Interface and Installing the ActiveX Plugin (IE only 11 2.3 Live Video Monitoring...16 Chapter III...
... Camera ...4 1.2 Safety Instructions ...4 1.3 Package Contents...5 1.4 Familiarizing Yourself with Your New Network Camera 6 1.5 Installing the Network Camera ...8 1.6 Installing the Network Camera with WPS...9 Chapter II: Accessing the Camera's Web Interface...9 2.1 Installing EdiView Finder ...10 2.2 Connecting to the Camera's Web User Interface and Installing the ActiveX Plugin (IE only 11 2.3 Live Video Monitoring...16 Chapter III...
Manual
Page 4
... ...54 Chapter VIII: Advanced Operations ...56 8.1 Applying for a DynDNS Account...56 8.2 Applying for a Free no-ip.com Account ...61 Chapter IX: Windows Surveillance Utility ...64 9.1 Installing the Network Camera Administration Software 64 9.2 Using the Network Camera Surveillance Software 68 9.3 Configuring the Network Camera Surveillance Software 71 9.3.1 Camera Configuration ...71 9.3.2 General Settings...
... ...54 Chapter VIII: Advanced Operations ...56 8.1 Applying for a DynDNS Account...56 8.2 Applying for a Free no-ip.com Account ...61 Chapter IX: Windows Surveillance Utility ...64 9.1 Installing the Network Camera Administration Software 64 9.2 Using the Network Camera Surveillance Software 68 9.3 Configuring the Network Camera Surveillance Software 71 9.3.1 Camera Configuration ...71 9.3.2 General Settings...
Manual
Page 5
... where it out of the reach of this camera in wireless network capabilities to connect to this miniaturized network camera! Also, warranty will be installed anywhere. Mounting hole located behind camera, compatible with most environments. 1.2 Safety Instructions Please obey the safety instructions listed below when you... network camera, or you violate these safety instructions This network camera is available at the location you wish to install this Network camera, you can easily install the camera almost anywhere you want to this camera and / or yourself!
... where it out of the reach of this camera in wireless network capabilities to connect to this miniaturized network camera! Also, warranty will be installed anywhere. Mounting hole located behind camera, compatible with most environments. 1.2 Safety Instructions Please obey the safety instructions listed below when you... network camera, or you violate these safety instructions This network camera is available at the location you wish to install this Network camera, you can easily install the camera almost anywhere you want to this camera and / or yourself!

Manual
Page 6
... camera (1 pcs) Power adapter (1 pcs) Ethernet cable (1 pcs) Mounting kit (1 pcs) CD with utility software and user manual (1 pcs) Quick installation guide (1 pcs) Cloud ID card (1 pcs) 5 Refrain from touch the camera with paper or cloth. If the network camera falls into water while...
... camera (1 pcs) Power adapter (1 pcs) Ethernet cable (1 pcs) Mounting kit (1 pcs) CD with utility software and user manual (1 pcs) Quick installation guide (1 pcs) Cloud ID card (1 pcs) 5 Refrain from touch the camera with paper or cloth. If the network camera falls into water while...

Manual
Page 9
... power connector. Connect the DC power cable to a power outlet in the wall. 4. Connect DC power cable to set up your new network camera. 1. 1.5 Installing the Network Camera Please follow the following instructions to DC Jack 8 Secure the network camera to the LAN port. Connect an Ethernet cable to the... or camera stand using WPS, you can skip this network camera is configured to perform configuration. However, if this step. For first-time installation you'll generally need an Ethernet cable to connect wirelessly, for example you will connect using the mounting hole. 2.
... power connector. Connect the DC power cable to a power outlet in the wall. 4. Connect DC power cable to set up your new network camera. 1. 1.5 Installing the Network Camera Please follow the following instructions to DC Jack 8 Secure the network camera to the LAN port. Connect an Ethernet cable to the... or camera stand using WPS, you can skip this network camera is configured to perform configuration. However, if this step. For first-time installation you'll generally need an Ethernet cable to connect wirelessly, for example you will connect using the mounting hole. 2.
Manual
Page 10
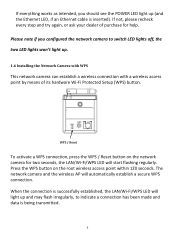
..., press the WPS / Reset button on the root wireless access point within 120 seconds. Please note if you should see the POWER LED light up . 1.6 Installing the Network Camera with WPS This network camera can establish a wireless connection with a wireless access point by means of purchase for two seconds, the LAN...
..., press the WPS / Reset button on the root wireless access point within 120 seconds. Please note if you should see the POWER LED light up . 1.6 Installing the Network Camera with WPS This network camera can establish a wireless connection with a wireless access point by means of purchase for two seconds, the LAN...

Manual
Page 11
... EdiView Finder utility, which allows you to configure it does not, please double-click the installation icon for the admin software in the 'Utility' folder. After installation is complete, run EdiView Finder. If it . Insert the user manual CD-ROM supplied with their IP addresses and MAC addresses. You can click the..., or select a network camera and click the Icon to locate all Ediamax network cameras found on the local network. The CD should automatically begin the installation.
... EdiView Finder utility, which allows you to configure it does not, please double-click the installation icon for the admin software in the 'Utility' folder. After installation is complete, run EdiView Finder. If it . Insert the user manual CD-ROM supplied with their IP addresses and MAC addresses. You can click the..., or select a network camera and click the Icon to locate all Ediamax network cameras found on the local network. The CD should automatically begin the installation.

Manual
Page 12
... details. Note: Preview is only available when the rectangular block is colored blue. 2.2 Connecting to the Camera's Web User Interface and Installing the ActiveX Plugin (IE only) For first-time installation, you can be found by entering its IP address into the address bar of Internet Explorer. The use login screen will...
... details. Note: Preview is only available when the rectangular block is colored blue. 2.2 Connecting to the Camera's Web User Interface and Installing the ActiveX Plugin (IE only) For first-time installation, you can be found by entering its IP address into the address bar of Internet Explorer. The use login screen will...

Manual
Page 13
The network camera's administrator username is 'admin' (lower case) and the password is '1234' by default. Click the 'Download ActiveX' link to install the ActiveX plugin before you finish entering the username and password. When you connect to the network camera for the first time, you may see the video from Network camera. Click 'OK' or press the 'ENTER' key on your keyboard when you can see the following message: This message prompts you to install the ActiveX plugin: 12
The network camera's administrator username is 'admin' (lower case) and the password is '1234' by default. Click the 'Download ActiveX' link to install the ActiveX plugin before you finish entering the username and password. When you connect to the network camera for the first time, you may see the video from Network camera. Click 'OK' or press the 'ENTER' key on your keyboard when you can see the following message: This message prompts you to install the ActiveX plugin: 12

Manual
Page 14
Click 'Run' to begin installation. After a few seconds, you click the 'Run' button: 13 You may see a UAC (User Account Control) message after you 'll see this message: For IE9: The message will appear at the bottom of Internet Explorer: Click 'Run' to start installation.
Click 'Run' to begin installation. After a few seconds, you click the 'Run' button: 13 You may see a UAC (User Account Control) message after you 'll see this message: For IE9: The message will appear at the bottom of Internet Explorer: Click 'Run' to start installation.

Manual
Page 15
Installation will begin: Click 'Next' and 'Install' when you see this message, installation is complete: 14 Click 'Yes' to install ActiveX control. When you 're prompted to continue.
Installation will begin: Click 'Next' and 'Install' when you see this message, installation is complete: 14 Click 'Yes' to install ActiveX control. When you 're prompted to continue.

Manual
Page 65
Double-click the Setup_Viewer_xxx file to all functions of this network camera, you can also use the Windows utility, which provides faster access to start installation. 64 Chapter IX: Windows Surveillance Utility Besides using web browser to operate this network camera. 9.1 Installing the Network Camera Administration Software 1.
Double-click the Setup_Viewer_xxx file to all functions of this network camera, you can also use the Windows utility, which provides faster access to start installation. 64 Chapter IX: Windows Surveillance Utility Besides using web browser to operate this network camera. 9.1 Installing the Network Camera Administration Software 1.

Manual
Page 66
Click 'Next' to start installation. 65 Please check if everything's correct here. 2. You can uncheck the boxes here if you want to create a desktop / quick launch icon, and click 'Next' to continue. 4. If you don't want to change any settings, click 'Back' to go back to the previous page, or click 'Install' to continue. 3.
Click 'Next' to start installation. 65 Please check if everything's correct here. 2. You can uncheck the boxes here if you want to create a desktop / quick launch icon, and click 'Next' to continue. 4. If you don't want to change any settings, click 'Back' to go back to the previous page, or click 'Install' to continue. 3.

Manual
Page 67
Installation procedures take a few seconds to a few minutes to launch the software after installation is complete when you don't want to complete, please be patient. 6. You can click 'Finish' to finish installation procedures and launch the utility, or uncheck the 'Launch IPCam Surveillance Software' box before you click the 'Finish' button if you see this message. 5. Installation is complete. 66
Installation procedures take a few seconds to a few minutes to launch the software after installation is complete when you don't want to complete, please be patient. 6. You can click 'Finish' to finish installation procedures and launch the utility, or uncheck the 'Launch IPCam Surveillance Software' box before you click the 'Finish' button if you see this message. 5. Installation is complete. 66
