
Installation Guide
Page 2
... Information 1 I ‐2. Mac ...4 III‐1. Using The Adapter ...8 III‐3‐1. Statistics ...15 III‐3‐2‐5. Using The Adapter ...25 System Requirements...1 II. Driver Installation ...4 III‐2. WPS ...16 III‐3‐2‐6. Driver Uninstallation...7 III‐3. Windows 20 IV‐1. Driver Uninstallation...24 IV‐2‐1. About...19 IV. Windows 8 ...24 IV‐3. Wireless Utility...11 III‐3‐2‐1. LED Status ...1 I . Link Status ...13 III...
... Information 1 I ‐2. Mac ...4 III‐1. Using The Adapter ...8 III‐3‐1. Statistics ...15 III‐3‐2‐5. Using The Adapter ...25 System Requirements...1 II. Driver Installation ...4 III‐2. WPS ...16 III‐3‐2‐6. Driver Uninstallation...7 III‐3. Windows 20 IV‐1. Driver Uninstallation...24 IV‐2‐1. About...19 IV. Windows 8 ...24 IV‐3. Wireless Utility...11 III‐3‐2‐1. LED Status ...1 I . Link Status ...13 III...
Installation Guide
Page 4
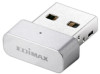
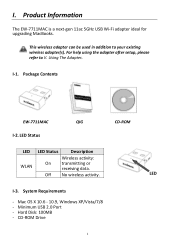
For help using the adapter after setup, please refer to your existing wireless adapter(s). I ‐3. LED Status CD‐ROM LED LED Status Description Wireless activity: WLAN On transmitting or receiving data. LED I ‐1. Using The Adapter. System Requirements ‐ Mac OS X 10.6 ‐ 10.9, Windows XP/Vista/7/8 ‐ Minimum USB 2.0 Port ‐ Hard Disk: 100MB ‐ CD‐ROM Drive 1 Product Information The EW‐7711MAC is a next‐gen 11ac 5GHz USB Wi...
For help using the adapter after setup, please refer to your existing wireless adapter(s). I ‐3. LED Status CD‐ROM LED LED Status Description Wireless activity: WLAN On transmitting or receiving data. LED I ‐1. Using The Adapter. System Requirements ‐ Mac OS X 10.6 ‐ 10.9, Windows XP/Vista/7/8 ‐ Minimum USB 2.0 Port ‐ Hard Disk: 100MB ‐ CD‐ROM Drive 1 Product Information The EW‐7711MAC is a next‐gen 11ac 5GHz USB Wi...

Installation Guide
Page 5
Never use force to insert the USB adapter. 2. Insert the included CD‐ROM into an available USB port of your computer. The setup wizard is also available for download from the Edimax website. 3. Mac users double click "Edimax.dmg" and Windows users click the EW‐7711MAC adapter. 2 Switch on your computer and insert the USB adapter into the CD drive of your computer. The setup wizard will open. Installation 1. II.
Never use force to insert the USB adapter. 2. Insert the included CD‐ROM into an available USB port of your computer. The setup wizard is also available for download from the Edimax website. 3. Mac users double click "Edimax.dmg" and Windows users click the EW‐7711MAC adapter. 2 Switch on your computer and insert the USB adapter into the CD drive of your computer. The setup wizard will open. Installation 1. II.

Installation Guide
Page 10
III‐2. You can use the wireless utility to connect to III‐3. 8. Using The Adapter. After your new adapter. 9.Select a Wi‐Fi network from the list and click "Connect". Driver Uninstallation 1.Double click the "Edimax.dmg" on the included CD wizard. 7 For more guidance, please refer to a Wi‐Fi network with your system has restarted, the wireless utility will open automatically as shown below.
III‐2. You can use the wireless utility to connect to III‐3. 8. Using The Adapter. After your new adapter. 9.Select a Wi‐Fi network from the list and click "Connect". Driver Uninstallation 1.Double click the "Edimax.dmg" on the included CD wizard. 7 For more guidance, please refer to a Wi‐Fi network with your system has restarted, the wireless utility will open automatically as shown below.

Installation Guide
Page 11
III‐3‐1. Using The Adapter Mac users need to connect to a Wi‐Fi network 1. Connect to a Wi‐Fi network using the included utility software. 2.Double click the "AC450_USB‐Uninstall.pkg" file to open , please click the "E" icon in the top right of the screen and select "Open Wireless Utility". 8 III‐3. If the wireless utility software window shown below is not already open the driver un‐ installation wizard and follow the instructions on‐screen.
III‐3‐1. Using The Adapter Mac users need to connect to a Wi‐Fi network 1. Connect to a Wi‐Fi network using the included utility software. 2.Double click the "AC450_USB‐Uninstall.pkg" file to open , please click the "E" icon in the top right of the screen and select "Open Wireless Utility". 8 III‐3. If the wireless utility software window shown below is not already open the driver un‐ installation wizard and follow the instructions on‐screen.

Installation Guide
Page 12
Enter your network, you set a password for your password and click "OK". 9 Select "Site Survey" from the menu across the top of the window, and then select a 5GHz Wi‐Fi network from the list and click "Connect". 3. If you will then be prompted to enter it. 2.
Enter your network, you set a password for your password and click "OK". 9 Select "Site Survey" from the menu across the top of the window, and then select a 5GHz Wi‐Fi network from the list and click "Connect". 3. If you will then be prompted to enter it. 2.

Installation Guide
Page 14
... the "Authentication & Security" tab and enter the Wi‐Fi network's security key/password under "WPA Pre‐Shared Key". Profile The "Profile" screen allows you select "ADD", a new window will open. ADD When you to ) an existing profile. Select an SSID from the "Site Survey" screen. 11 Wireless Utility The wireless utility offers features to add a new profile. III‐3‐2‐1. ADD EDIT DELETE ACTIVATE Opens a new window to monitor and configure your connection. Edit...
... the "Authentication & Security" tab and enter the Wi‐Fi network's security key/password under "WPA Pre‐Shared Key". Profile The "Profile" screen allows you select "ADD", a new window will open. ADD When you to ) an existing profile. Select an SSID from the "Site Survey" screen. 11 Wireless Utility The wireless utility offers features to add a new profile. III‐3‐2‐1. ADD EDIT DELETE ACTIVATE Opens a new window to monitor and configure your connection. Edit...

Installation Guide
Page 15
Advanced users can make adjustments if necessary. 12 This adjusts the transmit power of the wireless adapter. Power Saving Mode Tx Power RTS Threshold Fragment Threshold Select "CAM (Constantly Awake Mode)" or "Power Saving Mode" depending on this page. In "Power Saving Mode" the device will automatically reduce its power consumption when not being used. A lower level reduces performance but decreases interference in the local network environment. Adjust the...
Advanced users can make adjustments if necessary. 12 This adjusts the transmit power of the wireless adapter. Power Saving Mode Tx Power RTS Threshold Fragment Threshold Select "CAM (Constantly Awake Mode)" or "Power Saving Mode" depending on this page. In "Power Saving Mode" the device will automatically reduce its power consumption when not being used. A lower level reduces performance but decreases interference in the local network environment. Adjust the...

Installation Guide
Page 16
Turn Radio OFF Switch off the adapter's wireless radio. 13 Link Status The "Link Status" page displays information about the current wireless connection. III‐3‐2‐2.
Turn Radio OFF Switch off the adapter's wireless radio. 13 Link Status The "Link Status" page displays information about the current wireless connection. III‐3‐2‐2.
Installation Guide
Page 19
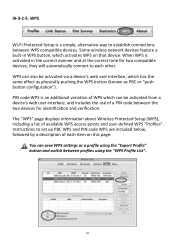
... connect to set up PBC WPS and PIN code WPS are included below, followed by a description of available WPS access points and user‐defined WPS "Profiles". PIN code WPS is activated in WPS button, which has the same effect as physically pushing the WPS button (known as a profile using the "WPS Profile List". 16 The "WPS" page displays information about Wireless Protected Setup (WPS), including a list of each other. Instructions to each item on that device. Some wireless network devices...
... connect to set up PBC WPS and PIN code WPS are included below, followed by a description of available WPS access points and user‐defined WPS "Profiles". PIN code WPS is activated in WPS button, which has the same effect as physically pushing the WPS button (known as a profile using the "WPS Profile List". 16 The "WPS" page displays information about Wireless Protected Setup (WPS), including a list of each other. Instructions to each item on that device. Some wireless network devices...

Installation Guide
Page 20
... check the instructions for how to access the web user interface and where to your wireless router/access point's web user interface and input the wireless adapter's PIN code in the bottom left of a PIN code between devices. Within two minutes, click the "PBC" button in the correct location, and activate PIN code WPS for your wireless router/access point for your wireless router/adapter. Go to input the PIN code. 17 The wireless adapter will establish a connection with multiple routers/access points/wireless devices. 1. PBC: Push Button Configuration The EW‐7711MAC does...
... check the instructions for how to access the web user interface and where to your wireless router/access point's web user interface and input the wireless adapter's PIN code in the bottom left of a PIN code between devices. Within two minutes, click the "PBC" button in the correct location, and activate PIN code WPS for your wireless router/access point for your wireless router/adapter. Go to input the PIN code. 17 The wireless adapter will establish a connection with multiple routers/access points/wireless devices. 1. PBC: Push Button Configuration The EW‐7711MAC does...

Installation Guide
Page 21
... the default setting. Rotate WPS profile. Display more information about the selected wireless network. Config Mode Enrollee Registrar "Enrollee" means the device acts a wireless client and will establish a connection with your wireless/router/access point from selected WPS profile. 18 This is recommended. Connect to selected WPS profile. 2. Below is a description of all the items on the "WPS" page: Rescan Information Refresh the list of selected WPS profile. Pin Code Renew Generate a new PIN code for WPS PIN code setup.
... the default setting. Rotate WPS profile. Display more information about the selected wireless network. Config Mode Enrollee Registrar "Enrollee" means the device acts a wireless client and will establish a connection with your wireless/router/access point from selected WPS profile. 18 This is recommended. Connect to selected WPS profile. 2. Below is a description of all the items on the "WPS" page: Rescan Information Refresh the list of selected WPS profile. Pin Code Renew Generate a new PIN code for WPS PIN code setup.

Installation Guide
Page 22
Begin PIN code WPS with selected access point. About The "About" screen displays various information such as a profile. Delete selected WPS profile. III‐3‐2‐6. Begin Push Button Configuration WPS. Export Profile Delete PIN PBC Save current WPS settings as wireless utility version and driver version. 19
Begin PIN code WPS with selected access point. About The "About" screen displays various information such as a profile. Delete selected WPS profile. III‐3‐2‐6. Begin Push Button Configuration WPS. Export Profile Delete PIN PBC Save current WPS settings as wireless utility version and driver version. 19

Installation Guide
Page 23
Driver Installation 1. IV. Click the EW‐7711MAC wireless USB adapter to install the drivers for your EW‐ 7711MAC. 20 Click "Install Driver" to continue to continue. 2. Windows IV‐1.
Driver Installation 1. IV. Click the EW‐7711MAC wireless USB adapter to install the drivers for your EW‐ 7711MAC. 20 Click "Install Driver" to continue to continue. 2. Windows IV‐1.

Installation Guide
Page 24
Click "Install" to continue. 5. Click "Next" to install the driver. 21 3.Please wait while the setup wizard prepares to install the drivers. 4.
Click "Install" to continue. 5. Click "Next" to install the driver. 21 3.Please wait while the setup wizard prepares to install the drivers. 4.
Installation Guide
Page 26
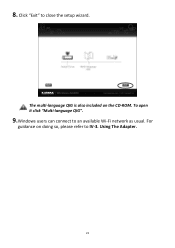
Click "Exit" to IV‐3. For guidance on the CD‐ROM. Using The Adapter. 23 The multi‐language QIG is also included on doing so, please refer to close the setup wizard. To open it click "Multi‐language QIG". 9.Windows users can connect to an available Wi‐Fi network as usual. 8.
Click "Exit" to IV‐3. For guidance on the CD‐ROM. Using The Adapter. 23 The multi‐language QIG is also included on doing so, please refer to close the setup wizard. To open it click "Multi‐language QIG". 9.Windows users can connect to an available Wi‐Fi network as usual. 8.

Installation Guide
Page 28
... set a password for the SSID of Windows. 1. In the example below ) in addition to your network, you have installed the driver, Windows users can connect to enter it is an example of how to a network". 2. Click the network icon (examples below , it . 25 Using The Adapter After you will be prompted to a Wi‐Fi network as usual. Search for your existing wireless adapter. Your new wireless adapter will then be listed...
... set a password for the SSID of Windows. 1. In the example below ) in addition to your network, you have installed the driver, Windows users can connect to enter it is an example of how to a network". 2. Click the network icon (examples below , it . 25 Using The Adapter After you will be prompted to a Wi‐Fi network as usual. Search for your existing wireless adapter. Your new wireless adapter will then be listed...

Installation Guide
Page 30
all necessary servicing, repair, and any defect in this QIG. Edimax Technology Co., Ltd. Edimax Technology Co., Ltd. The software and specifications are trademarks and/or registered trademarks of such revision or changes. All brand and product names mentioned in any form or by any means, electronic, mechanical, magnetic, optical, chemical, manual or otherwise, without the prior written permission...
all necessary servicing, repair, and any defect in this QIG. Edimax Technology Co., Ltd. Edimax Technology Co., Ltd. The software and specifications are trademarks and/or registered trademarks of such revision or changes. All brand and product names mentioned in any form or by any means, electronic, mechanical, magnetic, optical, chemical, manual or otherwise, without the prior written permission...

Installation Guide
Page 31
... which can radiate radio frequency energy and, if not installed and used in conjunction with electrical equipment. FCC Caution This device and its antenna must therefore be co‐located or operating in accordance with the instructions, may cause undesired operation. This device complies with Part 15 of FCC Rules. The R&TTE Directive repeals and replaces in OET Bulletin...
... which can radiate radio frequency energy and, if not installed and used in conjunction with electrical equipment. FCC Caution This device and its antenna must therefore be co‐located or operating in accordance with the instructions, may cause undesired operation. This device complies with Part 15 of FCC Rules. The R&TTE Directive repeals and replaces in OET Bulletin...

Installation Guide
Page 33
... that the equipment described below complies with the requirements of Signature: March 4th, 2014 Signature: Printed Name: Title: Albert Chang Director Edimax Technology Co., Ltd. Am 1:2009; EN 60950-1:2006+A11:2009+A1:2010+A12:2011 Recommendation 99/519/EC EMF :...Edition); No. 3, Wu Chuan 3rd Road, Wu‐Ku Industrial Park, New Taipei City, Taiwan Date of the European R&TTE directives. Equipment: AC450 Wi‐Fi USB Adapter - 11ac upgrade for MacBook Model No.: EW‐7711MAC The following European standards for essential requirements have been followed: Directives 1999/5/EC...
... that the equipment described below complies with the requirements of Signature: March 4th, 2014 Signature: Printed Name: Title: Albert Chang Director Edimax Technology Co., Ltd. Am 1:2009; EN 60950-1:2006+A11:2009+A1:2010+A12:2011 Recommendation 99/519/EC EMF :...Edition); No. 3, Wu Chuan 3rd Road, Wu‐Ku Industrial Park, New Taipei City, Taiwan Date of the European R&TTE directives. Equipment: AC450 Wi‐Fi USB Adapter - 11ac upgrade for MacBook Model No.: EW‐7711MAC The following European standards for essential requirements have been followed: Directives 1999/5/EC...


