Datasheet
Page 1
... experience clear Internet phone calls through your connection. The AR-7211A/B V2 also incorporates a firewall to ensure network security or moderate user's access to change without notice. Product specifications and design are subject to specific services. The router complies with IEEE802.3/802.3u standards and once connected via an Ethernet port access point, communicating with each other network devices. Features Supports ADSL 2/2+ standards for a wired connection with other to share files and resources. Ltd. www.edimax.com AR-7211A V2 / AR-7211B V2...
... experience clear Internet phone calls through your connection. The AR-7211A/B V2 also incorporates a firewall to ensure network security or moderate user's access to change without notice. Product specifications and design are subject to specific services. The router complies with IEEE802.3/802.3u standards and once connected via an Ethernet port access point, communicating with each other network devices. Features Supports ADSL 2/2+ standards for a wired connection with other to share files and resources. Ltd. www.edimax.com AR-7211A V2 / AR-7211B V2...

Datasheet
Page 2
...8226; Supports Telnet CLI command line • Bridge filtering • Reset function: via RJ-11. • Connect a computer to change without notice. Product specifications and design are subject to the LAN port and set up: • Connect the router's ADSL port to the Internet service provider via hardware reset or web • RFC 1483 Router interface reset • RIP 1 & 2 supported • Supports configuration file backup and • DHCP (RFC1541) Server, Relay restoration • Network Address Translation (NAT)/ Network • Supports LAN port IP address amend...
...8226; Supports Telnet CLI command line • Bridge filtering • Reset function: via RJ-11. • Connect a computer to change without notice. Product specifications and design are subject to the LAN port and set up: • Connect the router's ADSL port to the Internet service provider via hardware reset or web • RFC 1483 Router interface reset • RIP 1 & 2 supported • Supports configuration file backup and • DHCP (RFC1541) Server, Relay restoration • Network Address Translation (NAT)/ Network • Supports LAN port IP address amend...
Quick Install Guide
Page 3
...+ router (AR-7211A V2 or AR-7211B V2) Power adapter 1 meter RJ-45 Ethernet cable 1.8M RJ-11 telephone line x 2 Quick installation guide CD containing setup wizard, user manual & multi-language QIG System Requirements Recommended system requirements are as follows. A 10/100 base-T Ethernet card installed in your PC A hub or Switch (connected to several PCs through one of the Ethernet interfaces on the device) Operating system: Windows...
...+ router (AR-7211A V2 or AR-7211B V2) Power adapter 1 meter RJ-45 Ethernet cable 1.8M RJ-11 telephone line x 2 Quick installation guide CD containing setup wizard, user manual & multi-language QIG System Requirements Recommended system requirements are as follows. A 10/100 base-T Ethernet card installed in your PC A hub or Switch (connected to several PCs through one of the Ethernet interfaces on the device) Operating system: Windows...
Quick Install Guide
Page 4
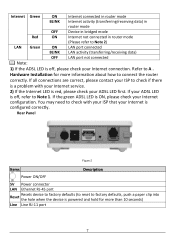
.... LEDs Color Status Description Green ON Powered on OFF Powered off Red ON ADSL broadband initial self-test failed or upgrading firmware ADSL Green ON ADSL line is synchronized and ready to use SLOW ADSL synchronization failed ( Please refer to Note BLINK 1) FAST BLINK ADSL negotiation is ON, please check your Internet configuration. Hardware Installation for more information about how to A . If the green ADSL LED is in router mode (Please refer to Note 1. If your ADSL LED is off , refer to Note 2) LAN Green ON LAN port connected BLINK LAN activity...
.... LEDs Color Status Description Green ON Powered on OFF Powered off Red ON ADSL broadband initial self-test failed or upgrading firmware ADSL Green ON ADSL line is synchronized and ready to use SLOW ADSL synchronization failed ( Please refer to Note BLINK 1) FAST BLINK ADSL negotiation is ON, please check your Internet configuration. Hardware Installation for more information about how to A . If the green ADSL LED is in router mode (Please refer to Note 1. If your ADSL LED is off , refer to Note 2) LAN Green ON LAN port connected BLINK LAN activity...
Quick Install Guide
Page 5
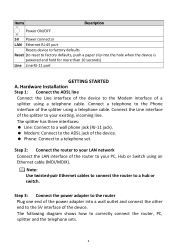
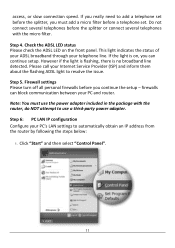
... router, PC, splitter and the telephone sets. 4 The splitter has three interfaces: Line: Connect to a wall phone jack (RJ-11 jack). Modem: Connect to the ADSL jack of the splitter using a telephone cable. Hardware Installation Step 1: Connect the ADSL line Connect the Line interface of the device to the Modem interface of a splitter using a telephone cable. The following diagram shows how to a hub or switch. Items Description Power ON/OFF 5V Power connector LAN Ethernet RJ-45 port Resets device to factory defaults Reset...
... router, PC, splitter and the telephone sets. 4 The splitter has three interfaces: Line: Connect to a wall phone jack (RJ-11 jack). Modem: Connect to the ADSL jack of the splitter using a telephone cable. Hardware Installation Step 1: Connect the ADSL line Connect the Line interface of the device to the Modem interface of a splitter using a telephone cable. The following diagram shows how to a hub or switch. Items Description Power ON/OFF 5V Power connector LAN Ethernet RJ-45 port Resets device to factory defaults Reset...
Quick Install Guide
Page 6
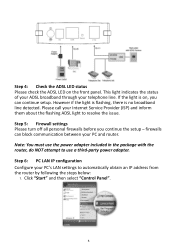
... PC's LAN settings to automatically obtain an IP address from the router by following the steps below: 1. Step 4: Check the ADSL LED status Please check the ADSL LED on , you continue the setup - firewalls can continue setup. Step 6: PC LAN IP configuration Configure your Internet Service Provider (ISP) and inform them about the flashing ADSL light to use a third-party power adapter. This light indicates the status of your ADSL broadband through your PC and router. Step 5: Firewall settings Please turn off...
... PC's LAN settings to automatically obtain an IP address from the router by following the steps below: 1. Step 4: Check the ADSL LED status Please check the ADSL LED on , you continue the setup - firewalls can continue setup. Step 6: PC LAN IP configuration Configure your Internet Service Provider (ISP) and inform them about the flashing ADSL light to use a third-party power adapter. This light indicates the status of your ADSL broadband through your PC and router. Step 5: Firewall settings Please turn off...

Quick Install Guide
Page 9
Please follow the instructions below will appear. The login screen below : . 1. Enter the default username "admin" and default password "1234" and click "OK". 8 Enter the router's default IP address: "192.168.2.1" into your PC's web browser and press "Enter". 2. Alternatively, if you lose the CD-ROM or prefer a web based setup, you can login to the ADSL router using Internet Explorer, and configure the router from there using the web-based interface.
Please follow the instructions below will appear. The login screen below : . 1. Enter the default username "admin" and default password "1234" and click "OK". 8 Enter the router's default IP address: "192.168.2.1" into your PC's web browser and press "Enter". 2. Alternatively, if you lose the CD-ROM or prefer a web based setup, you can login to the ADSL router using Internet Explorer, and configure the router from there using the web-based interface.
Manual
Page 3
...LED & BUTTON DEFINITIONS...6 1.5. WINDOWS 7...15 3.2. EZMAX SETUP WIZARD ...19 4.1. INTERNET CONNECTION TYPE ...25 4.3. FIRMWARE UPGRADE ...31 5. INTERNET CONNECTION...33 5.3. TR-069 ...62 5.5.6. FEATURES...8 2. WINDOWS VISTA ...16 3.3. WAN ...48 5.5. UPNP ...61 5.5.4. ACL ...64 3 Device Info ...39 5.3.2. WAN ...40 5.3.4. Statistics...41 5.3.5. NETWORK ...42 5.4.1. Firewall...58 5.5.3. IP ADDRESS SETTING ...15 3.1. WEB CONFIGURATION ...32 5.1. ACCESSING THE ROUTER...32 5.2. LAN...40 5.3.3. ARP...42 5.4. DNS ...56 5.5.2. WINDOWS XP...17 4. SETUP...
...LED & BUTTON DEFINITIONS...6 1.5. WINDOWS 7...15 3.2. EZMAX SETUP WIZARD ...19 4.1. INTERNET CONNECTION TYPE ...25 4.3. FIRMWARE UPGRADE ...31 5. INTERNET CONNECTION...33 5.3. TR-069 ...62 5.5.6. FEATURES...8 2. WINDOWS VISTA ...16 3.3. WAN ...48 5.5. UPNP ...61 5.5.4. ACL ...64 3 Device Info ...39 5.3.2. WAN ...40 5.3.4. Statistics...41 5.3.5. NETWORK ...42 5.4.1. Firewall...58 5.5.3. IP ADDRESS SETTING ...15 3.1. WEB CONFIGURATION ...32 5.1. ACCESSING THE ROUTER...32 5.2. LAN...40 5.3.3. ARP...42 5.4. DNS ...56 5.5.2. WINDOWS XP...17 4. SETUP...
Manual
Page 5
... A hub or Switch (connected to the device. 1. Package Contents Before you find any damage, replace it at once. Proper space left for heat dissipation to claim the missing item(s): ADSL2+ router (AR-7211A V2 or AR-7211B V2) Power adapter 1 meter RJ-45 Ethernet cable 1.8M RJ-11 telephone line x 2 Quick installation guide CD containing setup wizard, user manual & multi-language QIG 1.2. Safety...
... A hub or Switch (connected to the device. 1. Package Contents Before you find any damage, replace it at once. Proper space left for heat dissipation to claim the missing item(s): ADSL2+ router (AR-7211A V2 or AR-7211B V2) Power adapter 1 meter RJ-45 Ethernet cable 1.8M RJ-11 telephone line x 2 Quick installation guide CD containing setup wizard, user manual & multi-language QIG 1.2. Safety...
Manual
Page 7
... 5V Power connector LAN Ethernet RJ-45 port Reset Resets device to factory defaults (to reset to factory defaults, push a paper clip into the hole when the device is off , please check your Internet service. 2) If the Internet LED is configured correctly. If your Internet configuration. Internet Green ON Internet connected in router mode BLINK Internet activity (transferring/receiving data) in router mode OFF Device in bridged mode Red ON Internet not connected in router mode (Please refer to connect the router correctly. If the green ADSL LED is off , refer...
... 5V Power connector LAN Ethernet RJ-45 port Reset Resets device to factory defaults (to reset to factory defaults, push a paper clip into the hole when the device is off , please check your Internet service. 2) If the Internet LED is configured correctly. If your Internet configuration. Internet Green ON Internet connected in router mode BLINK Internet activity (transferring/receiving data) in router mode OFF Device in bridged mode Red ON Internet not connected in router mode (Please refer to connect the router correctly. If the green ADSL LED is off , refer...

Manual
Page 8
... route Firmware upgrading through Web, TFTP, or FTP Reset to factory defaults with reset button or web-based interface. DNS Virtual server DMZ Two-level passwords and usernames Web interface Telnet CLI System status display PPP session PAP/CHAP IP filter IP quality of service (QoS) Remote access control Line connection status test Remote managing through Telnet or HTTP Backup and restoration of configuration file Ethernet interface supporting...
... route Firmware upgrading through Web, TFTP, or FTP Reset to factory defaults with reset button or web-based interface. DNS Virtual server DMZ Two-level passwords and usernames Web interface Telnet CLI System status display PPP session PAP/CHAP IP filter IP quality of service (QoS) Remote access control Line connection status test Remote managing through Telnet or HTTP Backup and restoration of configuration file Ethernet interface supporting...
Manual
Page 11
... connection speed. Do not connect several telephones before you must use a third-party power adapter. firewalls can continue setup. Step 4. Firewall settings Please turn off all personal firewalls before the splitter or connect several telephones with the router, do NOT attempt to resolve the issue. If you can block communication between your PC's LAN settings to add a telephone set before a telephone set. Step 5. Click "Start" and then select "Control Panel". 11 Check the ADSL LED status Please check...
... connection speed. Do not connect several telephones before you must use a third-party power adapter. firewalls can continue setup. Step 4. Firewall settings Please turn off all personal firewalls before the splitter or connect several telephones with the router, do NOT attempt to resolve the issue. If you can block communication between your PC's LAN settings to add a telephone set before a telephone set. Step 5. Click "Start" and then select "Control Panel". 11 Check the ADSL LED status Please check...

Manual
Page 15
... button. 15 Windows 7 1. Click the Start button and select Control Panel. IP Address Setting To use the router to configure your list. It is a step-by-step illustration of the router or a fixed IP Address in order to be connected to set in the same subnet as the router. Click Change adapter settings and right click on your PC to obtain an IP address automatically for either directly or through the DHCP Server...
... button. 15 Windows 7 1. Click the Start button and select Control Panel. IP Address Setting To use the router to configure your list. It is a step-by-step illustration of the router or a fixed IP Address in order to be connected to set in the same subnet as the router. Click Change adapter settings and right click on your PC to obtain an IP address automatically for either directly or through the DHCP Server...
Manual
Page 32
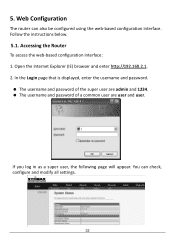
... access the web-based configuration interface: 1. Open the Internet Explorer (IE) browser and enter http://192.168.2.1. 2. You can also be configured using the web-based configuration interface. In the Login page that is displayed, enter the username and password. The username and password of the super user are admin and 1234. The username and password of a common user are user and user. Web Configuration The router can check, configure and modify all settings. 32 Follow the instructions...
... access the web-based configuration interface: 1. Open the Internet Explorer (IE) browser and enter http://192.168.2.1. 2. You can also be configured using the web-based configuration interface. In the Login page that is displayed, enter the username and password. The username and password of the super user are admin and 1234. The username and password of a common user are user and user. Web Configuration The router can check, configure and modify all settings. 32 Follow the instructions...
Manual
Page 64
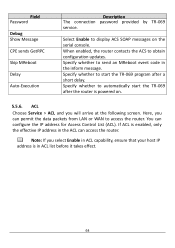
... Auto-Execution Description The connection password provided by TR-069 service. Specify whether to automatically start the TR-069 program after the router is powered on the serial console. If ACL is in the inform message. Here, you select Enable in ACL capability, ensure that your host IP address is enabled, only the effective IP address in the ACL can configure the IP address for Access Control List...
... Auto-Execution Description The connection password provided by TR-069 service. Specify whether to automatically start the TR-069 program after the router is powered on the serial console. If ACL is in the inform message. Here, you select Enable in ACL capability, ensure that your host IP address is enabled, only the effective IP address in the ACL can configure the IP address for Access Control List...
Manual
Page 67
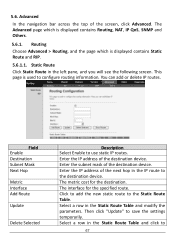
... the page which is displayed contains Routing, NAT, IP QoS, SNMP and Others. 5.6.1. Static Route Click Static Route in the IP route to 67 Field Enable Destination Subnet Mask Next Hop Metric Interface Add Route Update Delete Selected Description Select Enable to the Static Route Table. The interface for the destination. Click to add the new static route to use static IP routes. Enter the IP address of the destination device. Advanced In the navigation bar across...
... the page which is displayed contains Routing, NAT, IP QoS, SNMP and Others. 5.6.1. Static Route Click Static Route in the IP route to 67 Field Enable Destination Subnet Mask Next Hop Metric Interface Add Route Update Delete Selected Description Select Enable to the Static Route Table. The interface for the destination. Click to add the new static route to use static IP routes. Enter the IP address of the destination device. Advanced In the navigation bar across...
Manual
Page 78
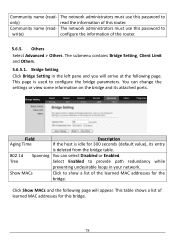
.... Tree Select Enabled to show a list of learned MAC addresses for this router. This table shows a list of the learned MAC addresses for 300 seconds (default value), its entry is used to only) read the information of the router. 5.6.5. The network administrators must use this password to write) configure the information of this bridge. 78 The submenu contains Bridge Setting, Client Limit and Others. 5.6.5.1. Field Description Aging Time If the host...
.... Tree Select Enabled to show a list of learned MAC addresses for this router. This table shows a list of the learned MAC addresses for 300 seconds (default value), its entry is used to only) read the information of the router. 5.6.5. The network administrators must use this password to write) configure the information of this bridge. 78 The submenu contains Bridge Setting, Client Limit and Others. 5.6.5.1. Field Description Aging Time If the host...
Manual
Page 80
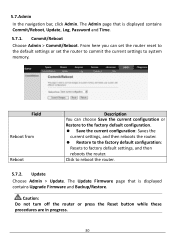
... Admin > Commit/Reboot. Caution: Do not turn off the router or press the Reset button while these procedures are in progress. 80 Field Reboot from Reboot Description You can set the router reset to the default settings or set the router to commit the current settings to factory default settings, and then reboots the router. Update Choose Admin > Update. The Update Firmware page that is displayed contains Upgrade Firmware and Backup/Restore. The Admin page that is displayed contains Commit/Reboot, Update, Log, Password and Time. 5.7.1. Admin...
... Admin > Commit/Reboot. Caution: Do not turn off the router or press the Reset button while these procedures are in progress. 80 Field Reboot from Reboot Description You can set the router reset to the default settings or set the router to commit the current settings to factory default settings, and then reboots the router. Update Choose Admin > Update. The Update Firmware page that is displayed contains Upgrade Firmware and Backup/Restore. The Admin page that is displayed contains Commit/Reboot, Update, Log, Password and Time. 5.7.1. Admin...
Manual
Page 81
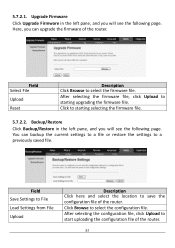
... saved file. Backup/Restore Click Backup/Restore in the left pane, and you will see the following page. Field Save Settings to File Load Settings from File Upload Description Click here and select the location to starting selecting the firmware file. 5.7.2.2. After selecting the configuration file, click Upload to select the firmware file. After selecting the firmware file, click Upload to save the configuration file of the router. Field Select File Upload Reset Description...
... saved file. Backup/Restore Click Backup/Restore in the left pane, and you will see the following page. Field Save Settings to File Load Settings from File Upload Description Click here and select the location to starting selecting the firmware file. 5.7.2.2. After selecting the configuration file, click Upload to select the firmware file. After selecting the firmware file, click Upload to save the configuration file of the router. Field Select File Upload Reset Description...
Manual
Page 87
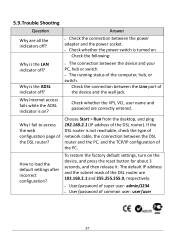
... Internet access fails while the ADSL indicator is the LAN indicator off ? The connection between the Line port of the DSL router). How to access the web configuration page of the PC. To restore the factory default settings, turn on ? Check the connection between the device and your PC, hub or switch. The running status of the DSL router are correctly entered. Choose Start > Run from the desktop, and ping 192.168.2.1 (IP address of the device...
... Internet access fails while the ADSL indicator is the LAN indicator off ? The connection between the Line port of the DSL router). How to access the web configuration page of the PC. To restore the factory default settings, turn on ? Check the connection between the device and your PC, hub or switch. The running status of the DSL router are correctly entered. Choose Start > Run from the desktop, and ping 192.168.2.1 (IP address of the device...


