Datasheet
Page 1
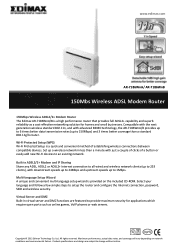
... coverage will vary depending on the included CD-ROM. Wi-Fi Protected Setup (WPS) Wi-Fi Protected Setup is provided on network conditions and environmental factors. www.edimax.com AR-7186WnA/ AR-7186WnB 150Mbs Wireless ADSL Modem Router 150Mbps Wireless ADSL2/2+ Modem Router The Edimax AR-7186WnA/B is a high performance router that provides full ADSL2+ capability and superb reliability...
... coverage will vary depending on the included CD-ROM. Wi-Fi Protected Setup (WPS) Wi-Fi Protected Setup is provided on network conditions and environmental factors. www.edimax.com AR-7186WnA/ AR-7186WnB 150Mbs Wireless ADSL Modem Router 150Mbps Wireless ADSL2/2+ Modem Router The Edimax AR-7186WnA/B is a high performance router that provides full ADSL2+ capability and superb reliability...
Datasheet
Page 2
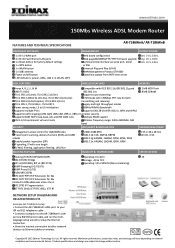
...Product specifications and design are subject to change without notice. www.edimax.com 150Mbs Wireless ADSL Modem Router FEATURES AND TECHNICAL SPECIFICATIONS AR-7186WnA/ AR-7186WnB HARDWARE INTERFACE 1 x RJ-11 WAN-port 4 x ...AR-7186WnA's ADSL port to your ISP via RJ11 telephone cable . • Connect a computer to the AR-7186WnA's LAN port via RJ45 Ethernet cable, and run the multilanguage setup wizard to setup the Internet connection. • Share the Internet connection to other network devices via Ethernet cables or wireless. All rights reserved. Copyright © 2012 Edimax...
...Product specifications and design are subject to change without notice. www.edimax.com 150Mbs Wireless ADSL Modem Router FEATURES AND TECHNICAL SPECIFICATIONS AR-7186WnA/ AR-7186WnB HARDWARE INTERFACE 1 x RJ-11 WAN-port 4 x ...AR-7186WnA's ADSL port to your ISP via RJ11 telephone cable . • Connect a computer to the AR-7186WnA's LAN port via RJ45 Ethernet cable, and run the multilanguage setup wizard to setup the Internet connection. • Share the Internet connection to other network devices via Ethernet cables or wireless. All rights reserved. Copyright © 2012 Edimax...
Quick Install Guide
Page 2
... any defect in the software. Should the programs prove defective following their respective holders. The product you have purchased and the setup screen may be reproduced, transmitted, transcribed, stored in a retrieval system, or translated into any language or computer language, in... this product, please refer to the contents hereof and specifically disclaims any warranties, merchantability, or fitness for updates. Edimax Technology Co., Ltd. Edimax Technology Co., Ltd. For more information about this QIG. makes no representations or warranties, either expressed or implied, ...
... any defect in the software. Should the programs prove defective following their respective holders. The product you have purchased and the setup screen may be reproduced, transmitted, transcribed, stored in a retrieval system, or translated into any language or computer language, in... this product, please refer to the contents hereof and specifically disclaims any warranties, merchantability, or fitness for updates. Edimax Technology Co., Ltd. Edimax Technology Co., Ltd. For more information about this QIG. makes no representations or warranties, either expressed or implied, ...
Quick Install Guide
Page 4
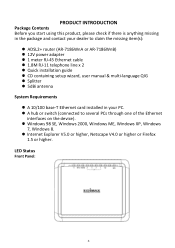
... package and contact your dealer to claim the missing item(s): ADSL2+ router (AR-7186WnA or AR-7186WnB) 12V power adapter 1 meter RJ-45 Ethernet cable 1.8M RJ-11 telephone line x 2 Quick installation guide CD containing setup wizard, user manual & multi-language QIG Splitter 5dBi antenna System...
... package and contact your dealer to claim the missing item(s): ADSL2+ router (AR-7186WnA or AR-7186WnB) 12V power adapter 1 meter RJ-45 Ethernet cable 1.8M RJ-11 telephone line x 2 Quick installation guide CD containing setup wizard, user manual & multi-language QIG Splitter 5dBi antenna System...
Quick Install Guide
Page 7
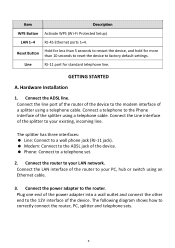
... correctly connect the router, PC, splitter and telephone sets. 6 Connect the router to your LAN network. Item Description WPS Button Activate WPS (Wi-Fi Protected Setup) LAN 1-4 RJ-45 Ethernet ports 1-4. Connect the line port of the router of the device to the Phone interface of a splitter using a telephone cable. Connect...
... correctly connect the router, PC, splitter and telephone sets. 6 Connect the router to your LAN network. Item Description WPS Button Activate WPS (Wi-Fi Protected Setup) LAN 1-4 RJ-45 Ethernet ports 1-4. Connect the line port of the router of the device to the Phone interface of a splitter using a telephone cable. Connect...
Quick Install Guide
Page 8
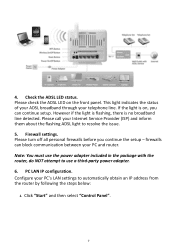
However if the light is flashing, there is on the front panel. firewalls can continue setup. This light indicates the status of your ADSL broadband through your PC and router. Please call your PC's LAN settings to resolve the issue. 5. Configure ... ADSL light to automatically obtain an IP address from the router by following the steps below: 1. Please check the ADSL LED on , you continue the setup - Click "Start" and then select "Control Panel". 7 4. If the light is no broadband line detected. Note: You must use the power adapter included in the...
However if the light is flashing, there is on the front panel. firewalls can continue setup. This light indicates the status of your ADSL broadband through your PC and router. Please call your PC's LAN settings to resolve the issue. 5. Configure ... ADSL light to automatically obtain an IP address from the router by following the steps below: 1. Please check the ADSL LED on , you continue the setup - Click "Start" and then select "Control Panel". 7 4. If the light is no broadband line detected. Note: You must use the power adapter included in the...
Quick Install Guide
Page 11
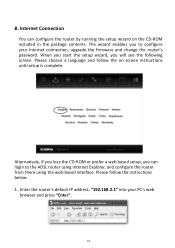
... to configure your PC's web browser and press "Enter". 10 B. Alternatively, if you lose the CD-ROM or prefer a web based setup, you to the ADSL router using Internet Explorer, and configure the router from there using the web-based interface. The wizard enables you can configure... the router by running the setup wizard on screen instructions until setup is complete. Please follow the on the CD-ROM included in the package contents. Please choose a language and follow the...
... to configure your PC's web browser and press "Enter". 10 B. Alternatively, if you lose the CD-ROM or prefer a web based setup, you to the ADSL router using Internet Explorer, and configure the router from there using the web-based interface. The wizard enables you can configure... the router by running the setup wizard on screen instructions until setup is complete. Please follow the on the CD-ROM included in the package contents. Please choose a language and follow the...
Manual
Page 2
... the setup screen may be reproduced, transmitted, transcribed, stored in a retrieval system, or translated into any warranties, merchantability, or fitness for updates. Add: No. 3, Wu-Chuan 3rd Rd., Wu-Ku Industrial Park, New Taipei City, Taiwan Tel: +886-2-77396888 Email: sales@edimax.com...cost of such revision or changes. Edimax Technology Co., Ltd. Should the programs prove defective following their respective holders. Edimax Technology Co., Ltd. Please visit our website www.edimax.com for any person of all rights reserved. Edimax Technology Co., Ltd. Any software ...
... the setup screen may be reproduced, transmitted, transcribed, stored in a retrieval system, or translated into any warranties, merchantability, or fitness for updates. Add: No. 3, Wu-Chuan 3rd Rd., Wu-Ku Industrial Park, New Taipei City, Taiwan Tel: +886-2-77396888 Email: sales@edimax.com...cost of such revision or changes. Edimax Technology Co., Ltd. Should the programs prove defective following their respective holders. Edimax Technology Co., Ltd. Please visit our website www.edimax.com for any person of all rights reserved. Edimax Technology Co., Ltd. Any software ...
Manual
Page 4
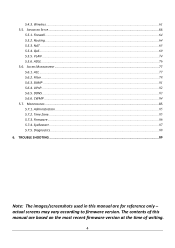
... based on the most recent firmware version at the time of writing. 4 SNMP ...81 5.6.4. actual screens may vary according to firmware version. 5.4.3. Wireless...61 5.5. ADVANCED SETUP...64 5.5.1. ADSL ...76 5.6. Time Zone...85 5.7.3.
... based on the most recent firmware version at the time of writing. 4 SNMP ...81 5.6.4. actual screens may vary according to firmware version. 5.4.3. Wireless...61 5.5. ADVANCED SETUP...64 5.5.1. ADSL ...76 5.6. Time Zone...85 5.7.3.
Manual
Page 5
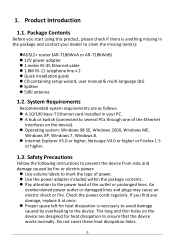
... package contents. Pay attention to claim the missing item(s): ADSL2+ router (AR-7186WnA or AR-7186WnB) 12V power adapter 1 meter RJ-45 Ethernet cable 1.8M RJ-11 telephone line x 2 Quick installation guide CD containing setup wizard, user manual & multi-language QIG Splitter 5dBi antenna 1.2. Do...
... package contents. Pay attention to claim the missing item(s): ADSL2+ router (AR-7186WnA or AR-7186WnB) 12V power adapter 1 meter RJ-45 Ethernet cable 1.8M RJ-11 telephone line x 2 Quick installation guide CD containing setup wizard, user manual & multi-language QIG Splitter 5dBi antenna 1.2. Do...
Manual
Page 8
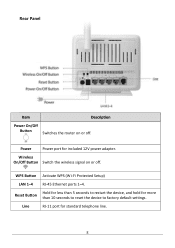
Reset Button Hold for less than 5 seconds to restart the device, and hold for standard telephone line. 8 Line RJ-11 port for more than 10 seconds to reset the device to factory default settings. Power Power port for included 12V power adapter. Rear Panel Item Description Power On/Off Button Switches the router on or off . WPS Button Activate WPS (Wi-Fi Protected Setup) LAN 1-4 RJ-45 Ethernet ports 1-4. Wireless On/Off Button Switch the wireless signal on or off .
Reset Button Hold for less than 5 seconds to restart the device, and hold for standard telephone line. 8 Line RJ-11 port for more than 10 seconds to reset the device to factory default settings. Power Power port for included 12V power adapter. Rear Panel Item Description Power On/Off Button Switches the router on or off . WPS Button Activate WPS (Wi-Fi Protected Setup) LAN 1-4 RJ-45 Ethernet ports 1-4. Wireless On/Off Button Switch the wireless signal on or off .
Manual
Page 12
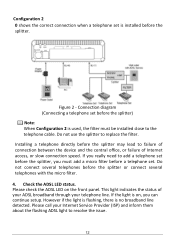
... the ADSL LED status. Please check the ADSL LED on , you must be installed close to add a telephone set before the splitter, you can continue setup. Please call your telephone line. Connection diagram (Connecting a telephone set before the splitter) Note: When Configuration 2 is on the front panel. This light indicates the...
... the ADSL LED status. Please check the ADSL LED on , you must be installed close to add a telephone set before the splitter, you can continue setup. Please call your telephone line. Connection diagram (Connecting a telephone set before the splitter) Note: When Configuration 2 is on the front panel. This light indicates the...
Manual
Page 13
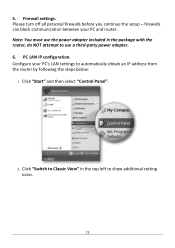
PC LAN IP configuration. Firewall settings. Click "Switch to Classic View" in the package with the router, do NOT attempt to use the power adapter included in the top left to automatically obtain an IP address from the router by following the steps below: 1. 5. firewalls can block communication between your PC's LAN settings to show additional setting icons. 13 Please turn off all personal firewalls before you continue the setup - Configure your PC and router. Click "Start" and then select "Control Panel". 2. Note: You must use a third-party power adapter. 6.
PC LAN IP configuration. Firewall settings. Click "Switch to Classic View" in the package with the router, do NOT attempt to use the power adapter included in the top left to automatically obtain an IP address from the router by following the steps below: 1. 5. firewalls can block communication between your PC's LAN settings to show additional setting icons. 13 Please turn off all personal firewalls before you continue the setup - Configure your PC and router. Click "Start" and then select "Control Panel". 2. Note: You must use a third-party power adapter. 6.
Manual
Page 24
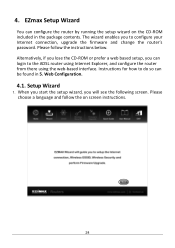
...configure the router from there using the web-based interface. Please choose a language and follow the instructions below. When you start the setup wizard, you to configure your Internet connection, upgrade the firmware and change the router's password. Web Configuration. 4.1. Alternatively, if you ...lose the CD-ROM or prefer a web based setup, you can login to do so can configure the router by running the setup wizard on screen instructions. 24 Setup Wizard 1. 4. EZmax Setup Wizard You can be found in the package contents. The wizard enables ...
...configure the router from there using the web-based interface. Please choose a language and follow the instructions below. When you start the setup wizard, you to configure your Internet connection, upgrade the firmware and change the router's password. Web Configuration. 4.1. Alternatively, if you ...lose the CD-ROM or prefer a web based setup, you can login to do so can configure the router by running the setup wizard on screen instructions. 24 Setup Wizard 1. 4. EZmax Setup Wizard You can be found in the package contents. The wizard enables ...

Manual
Page 43
...in an ATM network. Bridge Mode Select Bridge Mode, click NEXT, and the page shown in the following figure appears. Auto setup by ISP list Select Auto setup by your Internet Service Provider (ISP). Its valid value is between 0 and 255. The following figure will appear. 43 ...Address, PPPoE/PPPoA or Bridge Mode. 5.3.1. Virtual channel identifier (VCI) is the virtual path between VCI two points in . You may select Auto setup by your ISP. Virtual path identifier (VPI) is the virtual channel between two VPI points in an ATM network. You may select PPPoE/ PPPoA...
...in an ATM network. Bridge Mode Select Bridge Mode, click NEXT, and the page shown in the following figure appears. Auto setup by ISP list Select Auto setup by your Internet Service Provider (ISP). Its valid value is between 0 and 255. The following figure will appear. 43 ...Address, PPPoE/PPPoA or Bridge Mode. 5.3.1. Virtual channel identifier (VCI) is the virtual path between VCI two points in . You may select Auto setup by your ISP. Virtual path identifier (VPI) is the virtual channel between two VPI points in an ATM network. You may select PPPoE/ PPPoA...

Manual
Page 44
The following figure appears. 44 Dynamic IP Address For configuration method, please refer to that of Auto setup by ISP list Select Auto setup by ISP list, click NEXT, and the page as shown in the following table describes the parameters in this example, the Type encapsulation mode is ...
The following figure appears. 44 Dynamic IP Address For configuration method, please refer to that of Auto setup by ISP list Select Auto setup by ISP list, click NEXT, and the page as shown in the following table describes the parameters in this example, the Type encapsulation mode is ...
Manual
Page 47
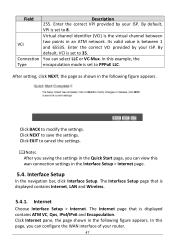
...VCI) is set to 35. In this wan connection settings in an ATM network. Click NEXT to modify the settings. The Interface Setup page that is displayed contains Internet, LAN and Wireless. 5.4.1. In this page, you can view this example, the Type encapsulation ...mode is set to cancel the settings. Interface Setup In the navigation bar, click Interface Setup. Internet Choose Interface Setup > Internet. Enter the correct VCI provided by your ISP. Enter the correct VPI provided by your ISP...
...VCI) is set to 35. In this wan connection settings in an ATM network. Click NEXT to modify the settings. The Interface Setup page that is displayed contains Internet, LAN and Wireless. 5.4.1. In this page, you can view this example, the Type encapsulation ...mode is set to cancel the settings. Interface Setup In the navigation bar, click Interface Setup. Internet Choose Interface Setup > Internet. Enter the correct VCI provided by your ISP. Enter the correct VPI provided by your ISP...

Manual
Page 57
It is displayed contains Router Local IP, DHCP Server, DNS, Radvd and DHCPv6. The default IP address is 192.168.2.1, which is the private IP address of this PVC. 5.4.2. Field Encapsulation Description You can change the IP address of the router. LAN Choose Interface Setup > LAN. After finishing, click SAVE to apply the settings of this page: Field Description Main IP Enter the IP address of LAN interface. The LAN page that is 57 In this page, you can choose 1483 Bridged IP LLC or 1483 Bridged IP VC-Mux. The following table describes the parameters of the router.
It is displayed contains Router Local IP, DHCP Server, DNS, Radvd and DHCPv6. The default IP address is 192.168.2.1, which is the private IP address of this PVC. 5.4.2. Field Encapsulation Description You can change the IP address of the router. LAN Choose Interface Setup > LAN. After finishing, click SAVE to apply the settings of this page: Field Description Main IP Enter the IP address of LAN interface. The LAN page that is 57 In this page, you can choose 1483 Bridged IP LLC or 1483 Bridged IP VC-Mux. The following table describes the parameters of the router.
Manual
Page 61
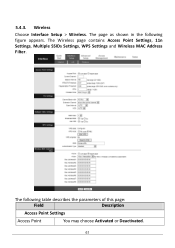
The following figure appears. 5.4.3. Wireless Choose Interface Setup > Wireless. The Wireless page contains Access Point Settings, 11n Settings, Multiple SSIDs Settings, WPS Settings and Wireless MAC Address Filter. The page as shown in the following table describes the parameters of this page: Field Description Access Point Settings Access Point You may choose Activated or Deactivated. 61
The following figure appears. 5.4.3. Wireless Choose Interface Setup > Wireless. The Wireless page contains Access Point Settings, 11n Settings, Multiple SSIDs Settings, WPS Settings and Wireless MAC Address Filter. The page as shown in the following table describes the parameters of this page: Field Description Access Point Settings Access Point You may choose Activated or Deactivated. 61

Manual
Page 64
... table information. Click ADD ROUTE, the page shown in the following figure appears. Advanced Setup In the navigation bar, click Advanced Setup. Routing Click Advanced Setup > Routing, the page shown in the following figure appears. In the Advanced Setup page that is used to automatically detect and block Denial of Service (DoS) attacks such.... 5.5.2. You can select this option to configure the routing information. This page is displayed contains Firewall, Routing, NAT, QoS, VLAN and ADSL. 5.5.1. Firewall Choose Advanced Setup > Firewall. 5.5.
... table information. Click ADD ROUTE, the page shown in the following figure appears. Advanced Setup In the navigation bar, click Advanced Setup. Routing Click Advanced Setup > Routing, the page shown in the following figure appears. In the Advanced Setup page that is used to automatically detect and block Denial of Service (DoS) attacks such.... 5.5.2. You can select this option to configure the routing information. This page is displayed contains Firewall, Routing, NAT, QoS, VLAN and ADSL. 5.5.1. Firewall Choose Advanced Setup > Firewall. 5.5.

