Datasheet
Page 1
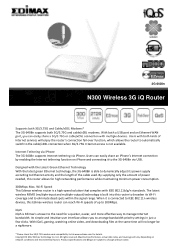
... this router to broaden its power supply according to the 3G‐6408n via iPhone. With iQoS, gaming, watching online video, and downloading files at www.edimax.com for high networking performance while maintaining minimum power consumption. 300Mbps Max. Ltd. 3G-6408n N300 Wireless 3G iQ Router Supports both 3G/3.75G and Cable/xDSL Modems* The 3G‐6408n supports both 3G/3.75G and cable/xDSL modems. With both kinds of Internet services will enjoy the router's connection fail‐...
... this router to broaden its power supply according to the 3G‐6408n via iPhone. With iQoS, gaming, watching online video, and downloading files at www.edimax.com for high networking performance while maintaining minimum power consumption. 300Mbps Max. Ltd. 3G-6408n N300 Wireless 3G iQ Router Supports both 3G/3.75G and Cable/xDSL Modems* The 3G‐6408n supports both 3G/3.75G and cable/xDSL modems. With both kinds of Internet services will enjoy the router's connection fail‐...

Datasheet
Page 2
... energy efficiency Functions Supports 3G/3.75G and cable/xDSL connection fail‐over iQoS bandwidth management system Port triggering for special applications Supports iPhone Internet tethering Green Ethernet technology DDNS, WMM, QoS, virtual server, DMZ & UPnP VPN pass‐through (IPSec/PPTP) WAN Supports UMTS, HSDPA, HSUPA & CDMA Supports cable/xDSL modems WAN protocols: PPPoE, static IP, PPTP, dynamic IP & L2TP Memory 8MB NOR flash 32MB SDRAM Power DC 5V, 2A Hardware Management 1 x 10/100Mbps WAN port 4 x 10/100Mbps LAN port 1 x USB 2.0 port 1 x WPS/Reset button 1 x Wi‐...
... energy efficiency Functions Supports 3G/3.75G and cable/xDSL connection fail‐over iQoS bandwidth management system Port triggering for special applications Supports iPhone Internet tethering Green Ethernet technology DDNS, WMM, QoS, virtual server, DMZ & UPnP VPN pass‐through (IPSec/PPTP) WAN Supports UMTS, HSDPA, HSUPA & CDMA Supports cable/xDSL modems WAN protocols: PPPoE, static IP, PPTP, dynamic IP & L2TP Memory 8MB NOR flash 32MB SDRAM Power DC 5V, 2A Hardware Management 1 x 10/100Mbps WAN port 4 x 10/100Mbps LAN port 1 x USB 2.0 port 1 x WPS/Reset button 1 x Wi‐...

Quick Install Guide
Page 3
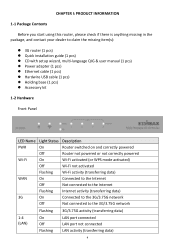
... Edimax 3G‐6408n! PRODUCT INTRODUCTION Thank you start using this router, all your dealer to claim the missing item(s): z 3G router (1 pcs) z Quick installation guide (1 pcs) z CD with setup wizard, multi‐language QIG & user manual (1 pcs) z Power adapter (1 pcs) z Ethernet cable (1 pcs) z Holding base (1 Pcs) z Accessory kit Front Panel LED Name PWR Wi‐Fi WAN Light Status On Off On Off Flashing On Off Flashing Description Router switched on and correctly powered Router not powered or not correctly powered...
... Edimax 3G‐6408n! PRODUCT INTRODUCTION Thank you start using this router, all your dealer to claim the missing item(s): z 3G router (1 pcs) z Quick installation guide (1 pcs) z CD with setup wizard, multi‐language QIG & user manual (1 pcs) z Power adapter (1 pcs) z Ethernet cable (1 pcs) z Holding base (1 Pcs) z Accessory kit Front Panel LED Name PWR Wi‐Fi WAN Light Status On Off On Off Flashing On Off Flashing Description Router switched on and correctly powered Router not powered or not correctly powered...

Quick Install Guide
Page 4
... Off Flashing On Off Flashing Connected to the 3G network Not connected to the 3G network 3G activity (transferring data) LAN port connected LAN port not connected LAN activity (transferring data) Back Panel Item Name Description USB Port Connects to 3G/3.75G USB Modem Cards Power Connector Connects to the supplied power adapter WAN Port Connects to cable/xDSL modems 1‐4 (LAN Ports) Connects to computer or other web devices WPS/Reset Button Resets the router to factory default settings or starts WPS function (press this button and hold for 20 seconds to clear all settings or...
... Off Flashing On Off Flashing Connected to the 3G network Not connected to the 3G network 3G activity (transferring data) LAN port connected LAN port not connected LAN activity (transferring data) Back Panel Item Name Description USB Port Connects to 3G/3.75G USB Modem Cards Power Connector Connects to the supplied power adapter WAN Port Connects to cable/xDSL modems 1‐4 (LAN Ports) Connects to computer or other web devices WPS/Reset Button Resets the router to factory default settings or starts WPS function (press this button and hold for 20 seconds to clear all settings or...
Quick Install Guide
Page 5
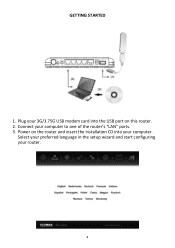
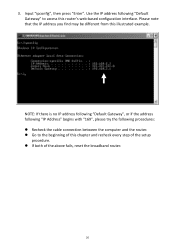
Select your preferred language in the setup wizard and start configuring your 3G/3.75G USB modem card into the USB port on the router and insert the installation CD into your computer to one of the router's "LAN" ports. 3. Plug your router. 4 Power on this router. 2. GETTING STARTED 1. Connect your computer.
Select your preferred language in the setup wizard and start configuring your 3G/3.75G USB modem card into the USB port on the router and insert the installation CD into your computer to one of the router's "LAN" ports. 3. Plug your router. 4 Power on this router. 2. GETTING STARTED 1. Connect your computer.
Quick Install Guide
Page 6
... be determined by turning the equipment off and on the side near the center, as PDAs or lap pads is restricted for use with the specific antenna tested in a particular installation. Federal Communications Commission (FCC) RF Exposure Requirements SAR compliance has been established in the laptop computer(s) configurations with PCMCIA slot on , the user is encouraged to...
... be determined by turning the equipment off and on the side near the center, as PDAs or lap pads is restricted for use with the specific antenna tested in a particular installation. Federal Communications Commission (FCC) RF Exposure Requirements SAR compliance has been established in the laptop computer(s) configurations with PCMCIA slot on , the user is encouraged to...
Manual
Page 3
...connection type 27 2-4-5 Using "PPTP" as broadband connection type 29 2-4-6 Using "L2TP" as broadband connection type 32 2-4-7 Using "WISP" as broadband connection type 35 2-5 Using "iQoS" ...37 CHAPTER III: GENERAL SETUP ...40 3-1 System...41 3-1-1 Time Zone ...42 3-1-2 Password Settings...43 3-1-3 Remote Management...44 3-2 WAN...45 3-2-1 3G/3.75G ...46 3-2-2 Dynamic IP ...48 3-2-3 Static IP ...49 3-2-4 PPPoE...50 3-2-5 PPTP...52 3-2-6 L2TP ...55 3-2-7 WISP...58 3-3 LAN...60 3-3-1 LAN IP...60 3-3-2 DHCP Server...62 3-3-3 Static DHCP Leases ...63 3-4 Wireless ...65 3-4-1 Wireless Settings...
...connection type 27 2-4-5 Using "PPTP" as broadband connection type 29 2-4-6 Using "L2TP" as broadband connection type 32 2-4-7 Using "WISP" as broadband connection type 35 2-5 Using "iQoS" ...37 CHAPTER III: GENERAL SETUP ...40 3-1 System...41 3-1-1 Time Zone ...42 3-1-2 Password Settings...43 3-1-3 Remote Management...44 3-2 WAN...45 3-2-1 3G/3.75G ...46 3-2-2 Dynamic IP ...48 3-2-3 Static IP ...49 3-2-4 PPPoE...50 3-2-5 PPTP...52 3-2-6 L2TP ...55 3-2-7 WISP...58 3-3 LAN...60 3-3-1 LAN IP...60 3-3-2 DHCP Server...62 3-3-3 Static DHCP Leases ...63 3-4 Wireless ...65 3-4-1 Wireless Settings...
Manual
Page 4
... MAC Address Filtering ...71 3-4-4 WPS (Wi-Fi Protected Setup) Settings 73 3-5 Advance Settings...74 3-5-1 QoS ...75 3-5-1-1 Basic QoS Settings ...75 3-5-2 DDNS...78 3-5-3 Port Forwarding...81 3-5-4 DMZ ...83 3-5-5 Fail Over...84 3-5-6 3G Limit Control...85 3-6 NAT ...87 3-6-1 Virtual Server...87 3-6-2 Special Applications...89 3-6-3 UPnP Settings ...91 3-6-4 ALG Settings...92 3-6-5 Static Routing...93 3-7 Firewall...95 3-7-1 Access Control ...95 3-7-2 URL Blocking ...99 3-7-3 DoS...101 CHAPTER IV: STATUS, TOOLS & LANGUAGE 104 4-1 Status ...104 4-1-1 Internet Connection ...104 4-1-2 Device...
... MAC Address Filtering ...71 3-4-4 WPS (Wi-Fi Protected Setup) Settings 73 3-5 Advance Settings...74 3-5-1 QoS ...75 3-5-1-1 Basic QoS Settings ...75 3-5-2 DDNS...78 3-5-3 Port Forwarding...81 3-5-4 DMZ ...83 3-5-5 Fail Over...84 3-5-6 3G Limit Control...85 3-6 NAT ...87 3-6-1 Virtual Server...87 3-6-2 Special Applications...89 3-6-3 UPnP Settings ...91 3-6-4 ALG Settings...92 3-6-5 Static Routing...93 3-7 Firewall...95 3-7-1 Access Control ...95 3-7-2 URL Blocking ...99 3-7-3 DoS...101 CHAPTER IV: STATUS, TOOLS & LANGUAGE 104 4-1 Status ...104 4-1-1 Internet Connection ...104 4-1-2 Device...
Manual
Page 5
... start using this router, please check if there is anything missing in the package, and contact your dealer to claim the missing item(s): 3G router (1 pcs) Quick installation guide (1 pcs) CD with setup wizard, multi-language QIG & user manual (1 pcs) Power adapter (1 pcs) Ethernet cable (1 pcs) Hardwire USB cable (1 pcs) Holding base (1 pcs) Accessory kit 1-2 Hardware Front Panel LED Name PWR Wi-Fi WAN 3G Light Status...
... start using this router, please check if there is anything missing in the package, and contact your dealer to claim the missing item(s): 3G router (1 pcs) Quick installation guide (1 pcs) CD with setup wizard, multi-language QIG & user manual (1 pcs) Power adapter (1 pcs) Ethernet cable (1 pcs) Hardwire USB cable (1 pcs) Holding base (1 pcs) Accessory kit 1-2 Hardware Front Panel LED Name PWR Wi-Fi WAN 3G Light Status...
Manual
Page 6
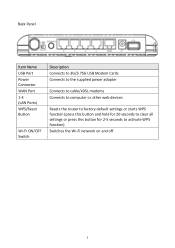
Back Panel Item Name USB Port Power Connector WAN Port 1-4 (LAN Ports) WPS/Reset Button Wi-Fi ON/OFF Switch Description Connects to 3G/3.75G USB Modem Cards Connects to the supplied power adapter Connects to cable/xDSL modems Connects to computer or other web devices Resets the router to factory default settings or starts WPS function (press this button and hold for 20 seconds to clear all settings or press this button for 2-5 seconds to activate WPS function) Switches the Wi-Fi network on and off 5
Back Panel Item Name USB Port Power Connector WAN Port 1-4 (LAN Ports) WPS/Reset Button Wi-Fi ON/OFF Switch Description Connects to 3G/3.75G USB Modem Cards Connects to the supplied power adapter Connects to cable/xDSL modems Connects to computer or other web devices Resets the router to factory default settings or starts WPS function (press this button and hold for 20 seconds to clear all settings or press this button for 2-5 seconds to activate WPS function) Switches the Wi-Fi network on and off 5
Manual
Page 7
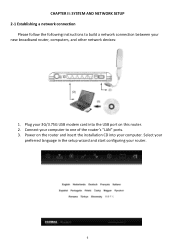
Power on the router and insert the installation CD into the USB port on this router. 2. CHAPTER II: SYSTEM AND NETWORK SETUP 2-1 Establishing a network connection Please follow the following instructions to one of the router's "LAN" ports. 3. Plug your computer to build a network connection between your computer. Connect your 3G/3.75G USB modem card into your new broadband router, computers, and other network devices: 1. Select your preferred language in the setup wizard and start configuring your router. 6
Power on the router and insert the installation CD into the USB port on this router. 2. CHAPTER II: SYSTEM AND NETWORK SETUP 2-1 Establishing a network connection Please follow the following instructions to one of the router's "LAN" ports. 3. Plug your computer to build a network connection between your computer. Connect your 3G/3.75G USB modem card into your new broadband router, computers, and other network devices: 1. Select your preferred language in the setup wizard and start configuring your router. 6

Manual
Page 18
... address of the WAN port Displays the IP address of the first DNS server Displays the IP address of time this router has been switched on Hardware Version Displays this broadband router's hardware version (useful when you need technical service) Boot Code Displays this broadband router's boot code version (useful Version when you need technical service) Internet Connection IP Address Mode IP Address Subnet Mask Default Gateway MAC Address Primary DNS Secondary DNS Displays how this broadband router's runtime code version (useful Version when you see all the current settings...
... address of the WAN port Displays the IP address of the first DNS server Displays the IP address of time this router has been switched on Hardware Version Displays this broadband router's hardware version (useful when you need technical service) Boot Code Displays this broadband router's boot code version (useful Version when you need technical service) Internet Connection IP Address Mode IP Address Subnet Mask Default Gateway MAC Address Primary DNS Secondary DNS Displays how this broadband router's runtime code version (useful Version when you see all the current settings...

Manual
Page 19
... the 3G/3.75G connection's default gateway Wireless Configuration Mode ESSID Channel Number Security Displays the operation mode of the wireless access point Displays the name of the access point Displays the channel number of the wireless network Displays the security authentication mode of the access point LAN Connection IP Address Subnet Mask DHCP Server MAC Address Displays the IP address of the LAN connection Displays the subnet mask of the LAN connection Displays the status of the internal DHCP server Displays the physical address of the LAN port The SSID, the up time...
... the 3G/3.75G connection's default gateway Wireless Configuration Mode ESSID Channel Number Security Displays the operation mode of the wireless access point Displays the name of the access point Displays the channel number of the wireless network Displays the security authentication mode of the access point LAN Connection IP Address Subnet Mask DHCP Server MAC Address Displays the IP address of the LAN connection Displays the subnet mask of the LAN connection Displays the status of the internal DHCP server Displays the physical address of the LAN port The SSID, the up time...
Manual
Page 21
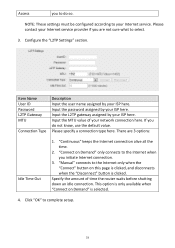
Use the IP address following procedures: Recheck the cable connection between the computer and the router. Go to access this illustrated example. Please note that the IP address you find may be different from this router's web-based configuration interface. 3. Input "ipconfig", then press "Enter". NOTE: If there is no IP address following "Default Gateway", or if the address following "IP Address" begins with "169", please...
Use the IP address following procedures: Recheck the cable connection between the computer and the router. Go to access this illustrated example. Please note that the IP address you find may be different from this router's web-based configuration interface. 3. Input "ipconfig", then press "Enter". NOTE: If there is no IP address following "Default Gateway", or if the address following "IP Address" begins with "169", please...

Manual
Page 31
... your Internet service. Configure the "PPTP Settings" section. "Continuous" keeps the Internet connection alive all the time. 2. Select "Use the following IP address" if your ISP requires you do so. Check the "Enable Dual-WAN Access" box if your ISP requires that you to select. 3. There are in Israel and using BEZEQ network services. "Manual" connects to the Internet when you do not know, use the default value. Input the MTU value...
... your Internet service. Configure the "PPTP Settings" section. "Continuous" keeps the Internet connection alive all the time. 2. Select "Use the following IP address" if your ISP requires you do so. Check the "Enable Dual-WAN Access" box if your ISP requires that you to select. 3. There are in Israel and using BEZEQ network services. "Manual" connects to the Internet when you do not know, use the default value. Input the MTU value...
Manual
Page 34
..." button is selected. 4. Access you are 3 options: Idle Time Out 1. "Manual" connects to do not know, use the default value. Specify the amount of your Internet service provider if you to the Internet only when the "Connect" button on Demand" is clicked. Please contact your network connection here. Configure the "L2TP Settings" section. Please specify a connection type here. There are not sure what to complete setup. 33 Input the password...
..." button is selected. 4. Access you are 3 options: Idle Time Out 1. "Manual" connects to do not know, use the default value. Specify the amount of your Internet service provider if you to the Internet only when the "Connect" button on Demand" is clicked. Please contact your network connection here. Configure the "L2TP Settings" section. Please specify a connection type here. There are not sure what to complete setup. 33 Input the password...
Manual
Page 44
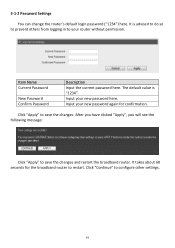
.... Click "Continue" to save the changes. It is "1234". It takes about 60 seconds for confirmation. Input your new password again for the broadband router to save the changes and restart the broadband router. After you have clicked "Apply", you will see the following message: Click "Apply" to configure other settings. 43 3-1-2 Password Settings You can change the router's default login password ("1234") here.
.... Click "Continue" to save the changes. It is "1234". It takes about 60 seconds for confirmation. Input your new password again for the broadband router to save the changes and restart the broadband router. After you have clicked "Apply", you will see the following message: Click "Apply" to configure other settings. 43 3-1-2 Password Settings You can change the router's default login password ("1234") here.

Manual
Page 54
..." button is clicked. 53 Please specify a connection type here. "Connect on this connection a name (optional). NOTE: These settings must be configured according to the Internet when you to select. There are not sure what to do not know, use the default value. DNS Address DNS Address 1 and 2 Enable Dual-WAN Access Select "Use the following IP address" if your ISP requires that you are in Israel and using BEZEQ network services. Check the "Enable...
..." button is clicked. 53 Please specify a connection type here. "Connect on this connection a name (optional). NOTE: These settings must be configured according to the Internet when you to select. There are not sure what to do not know, use the default value. DNS Address DNS Address 1 and 2 Enable Dual-WAN Access Select "Use the following IP address" if your ISP requires that you are in Israel and using BEZEQ network services. Check the "Enable...
Manual
Page 57
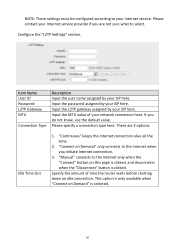
.... "Manual" connects to the Internet only when the "Connect" button on this page is clicked, and disconnects when the "Disconnect" button is selected. 56 Specify the amount of your ISP here. Please specify a connection type here. Input the L2TP gateway assigned by your Internet service. There are not sure what to select. Input the password assigned by your network connection here. Configure the "L2TP Settings" section...
.... "Manual" connects to the Internet only when the "Connect" button on this page is clicked, and disconnects when the "Disconnect" button is selected. 56 Specify the amount of your ISP here. Please specify a connection type here. Input the L2TP gateway assigned by your Internet service. There are not sure what to select. Input the password assigned by your network connection here. Configure the "L2TP Settings" section...
Manual
Page 94
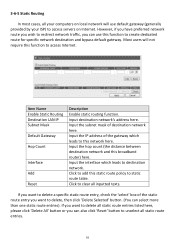
... static route entries). Click to add this static route policy to access Internet. Input the interface which leads to destination network. Item Name Enable Static Routing Destination LAN IP Subnet Mask Default Gateway Hop Count Interface Add Reset Description Enable static routing function. Input the IP address of the gateway which leads to this function to static route table. Input the hop count (the distance between destination network and this function to access servers on Internet. Most users will use this broadband router...
... static route entries). Click to add this static route policy to access Internet. Input the interface which leads to destination network. Item Name Enable Static Routing Destination LAN IP Subnet Mask Default Gateway Hop Count Interface Add Reset Description Enable static routing function. Input the IP address of the gateway which leads to this function to static route table. Input the hop count (the distance between destination network and this function to access servers on Internet. Most users will use this broadband router...


