User Manual (English)
Page 2
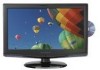
ii Dynex DX-LDVD22-10A 22" LCD TV/DVD Combo Contents CHILD SAFETY 1 Important safety instructions 2 Warnings 2 Cautions 2 Installing the stand 3 Removing the stand 3 Removing the stand 4 Installing a wall-mount bracket 4 TV components 4 Front and side panels 4 Back 5 Remote control 5 Using the remote control 6 Installing...settings 12 Displaying additional information 12 Adjusting the picture 12 Adjusting the TV picture 12 Adjusting the computer image 13 Adjusting the sound 13 Adjusting the sound 13 Changing channel settings 14 Automatically scanning for channels 14 Adding ...
ii Dynex DX-LDVD22-10A 22" LCD TV/DVD Combo Contents CHILD SAFETY 1 Important safety instructions 2 Warnings 2 Cautions 2 Installing the stand 3 Removing the stand 3 Removing the stand 4 Installing a wall-mount bracket 4 TV components 4 Front and side panels 4 Back 5 Remote control 5 Using the remote control 6 Installing...settings 12 Displaying additional information 12 Adjusting the picture 12 Adjusting the TV picture 12 Adjusting the computer image 13 Adjusting the sound 13 Adjusting the sound 13 Changing channel settings 14 Automatically scanning for channels 14 Adding ...
User Manual (English)
Page 7
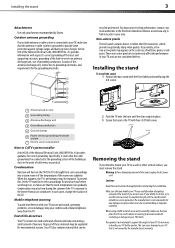
... for the grounding electrode. 1 2 3 4 5 7 6 recycled and reused. Non-active pixels The LCD panel contains almost 3 million thin film transistors, which provide exceptionally sharp video quality. These non-active pixels... be 2 Push the TV onto the base until the clips snap into a warm room or if the temperature of your TV by Dynex. End of life directives Your TV contains tin-lead solder and... Installing the stand To install the stand: 1 Position the base stand with your TV picture and sound, operating problems, or even damage, keep your ability to mishandling or improper assembly...
... for the grounding electrode. 1 2 3 4 5 7 6 recycled and reused. Non-active pixels The LCD panel contains almost 3 million thin film transistors, which provide exceptionally sharp video quality. These non-active pixels... be 2 Push the TV onto the base until the clips snap into a warm room or if the temperature of your TV by Dynex. End of life directives Your TV contains tin-lead solder and... Installing the stand To install the stand: 1 Position the base stand with your TV picture and sound, operating problems, or even damage, keep your ability to mishandling or improper assembly...

User Manual (English)
Page 9
...so you will need to connect audio cables from the device to the AUDIO IN jacks. 8 COMPONENT IN Connect a component video device to put your TV. For more information, see "Connecting a VCR" on page 8. 7 S-VIDEO jack Connect an S-Video device to enter channel numbers or the parental ...789 RECALL CH+ MUTE VOL - Press to the last viewed channel. For more information, see "Adjusting the sound" on page 13. Press to go to select the input source. MENU ENTER CH- TV components 5 ## Component Description 6 AUDIO IN jacks Connect the audio output (L and R) from an AV ...
...so you will need to connect audio cables from the device to the AUDIO IN jacks. 8 COMPONENT IN Connect a component video device to put your TV. For more information, see "Connecting a VCR" on page 8. 7 S-VIDEO jack Connect an S-Video device to enter channel numbers or the parental ...789 RECALL CH+ MUTE VOL - Press to the last viewed channel. For more information, see "Adjusting the sound" on page 13. Press to go to select the input source. MENU ENTER CH- TV components 5 ## Component Description 6 AUDIO IN jacks Connect the audio output (L and R) from an AV ...
User Manual (English)
Page 10
...16 MENU 17 PLAY/ENTER 18 , , , and Arrow keys 19 ANGLE 20 AUDIO 21 PROGRAM 22 OPEN/CLOSE 23 DVD 24 PICTURE 25 SLEEP 26 • (Dot) 27 GUIDE 28 MUTE ...For more information, see "Displaying additional information" on page 11. For more information, see "Adjusting the TV picture" on the DVD picture. Press to increase or decrease the volume. Press to zoom in slow...Press to play a DVD. Remove batteries when they no longer have a charge. Press to turn on the sound. For more information, see "Setting the sleep timer" on a DVD. Press to program DVD playback. ...
...16 MENU 17 PLAY/ENTER 18 , , , and Arrow keys 19 ANGLE 20 AUDIO 21 PROGRAM 22 OPEN/CLOSE 23 DVD 24 PICTURE 25 SLEEP 26 • (Dot) 27 GUIDE 28 MUTE ...For more information, see "Displaying additional information" on page 11. For more information, see "Adjusting the TV picture" on the DVD picture. Press to increase or decrease the volume. Press to zoom in slow...Press to play a DVD. Remove batteries when they no longer have a charge. Press to turn on the sound. For more information, see "Setting the sleep timer" on a DVD. Press to program DVD playback. ...

User Manual (English)
Page 16
...Input Labels Computer Settings PICTURE AUDIO CHANNELS SETTINGS CH+ VOL VOL - + CH- Also lets you set closed captioning on or off all sound (except the headphones). The information banner shows current program information such as channel number, video input source, and resolution. • Digital...the TV picture To adjust the picture: 1 Press MENU. Picture Mode Brightness Contrast Color Tint Sharpness CH+ VOL VOL - + CH- to highlight an option, then press ENTER/VOL+ to adjust the picture's reproduction rate when receiving DVI signals in data provides a better picture and sound ...
...Input Labels Computer Settings PICTURE AUDIO CHANNELS SETTINGS CH+ VOL VOL - + CH- Also lets you set closed captioning on or off all sound (except the headphones). The information banner shows current program information such as channel number, video input source, and resolution. • Digital...the TV picture To adjust the picture: 1 Press MENU. Picture Mode Brightness Contrast Color Tint Sharpness CH+ VOL VOL - + CH- to highlight an option, then press ENTER/VOL+ to adjust the picture's reproduction rate when receiving DVI signals in data provides a better picture and sound ...
User Manual (English)
Page 17
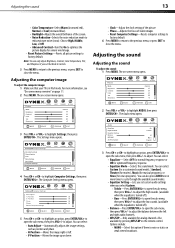
... to adjust. The on -screen menu opens. Adjusting the computer image To adjust the computer image: 1 Make sure that your TV is noise or static on weak stereo broadcasts. MOVE PICTURE AUDIO CHANNELS SETTINGS Custom 40 60 45 R5 +5 ENTER SELECT MENU PREVIOUS ...Reduction-Selects the noise reduction mode to highlight AUDIO, then press ENTER/CH-. to highlight Computer Settings, then press ENTER/VOL+. Adjusting the sound 13 • Color Temperature-Select Warm (increased red), Normal, or Cool (increased blue). • Backlight-Adjusts the overall brilliance of ...
... to adjust. The on -screen menu opens. Adjusting the computer image To adjust the computer image: 1 Make sure that your TV is noise or static on weak stereo broadcasts. MOVE PICTURE AUDIO CHANNELS SETTINGS Custom 40 60 45 R5 +5 ENTER SELECT MENU PREVIOUS ...Reduction-Selects the noise reduction mode to highlight AUDIO, then press ENTER/CH-. to highlight Computer Settings, then press ENTER/VOL+. Adjusting the sound 13 • Color Temperature-Select Warm (increased red), Normal, or Cool (increased blue). • Backlight-Adjusts the overall brilliance of ...

User Manual (English)
Page 26
... stop playback. If you press within two seconds of symbol you can add a label to an input source to make it easier to stop completely. 22 DVD Playback 3 Press CH+ or CH- to highlight Input Labels, then press ENTER/VOL+. Options include: • Transparency-Press VOL+ or VOL- MOVE ENTER ... MENU to return to the previous menu, or press EXIT to enter DVD mode. 2 When the TV displays "OPEN," place a DVD in the DVD slot, "OPEN" will move between fields and press CH+ or CH- The sound is reached. • Press NEXT to skip the current chapter and play a DVD: 1 Press DVD...
... stop playback. If you press within two seconds of symbol you can add a label to an input source to make it easier to stop completely. 22 DVD Playback 3 Press CH+ or CH- to highlight Input Labels, then press ENTER/VOL+. Options include: • Transparency-Press VOL+ or VOL- MOVE ENTER ... MENU to return to the previous menu, or press EXIT to enter DVD mode. 2 When the TV displays "OPEN," place a DVD in the DVD slot, "OPEN" will move between fields and press CH+ or CH- The sound is reached. • Press NEXT to skip the current chapter and play a DVD: 1 Press DVD...
User Manual (English)
Page 29
... Try another channel. The problem could be with the cloth. • Do not spray insecticide liquid near your TV yourself. For more information, see "Setting parental controls" on an LCD screen is normal. For more information, see "Adjusting the picture" on page 6. • Make sure that...it is not a malfunction. If surfaces are inserted correctly. Troubleshooting 25 This Region number of this TV. • Increase the volume. • Press MUTE to make sure that the sound is not muted. • Make sure that fingerprints do not work Solution • Replace the ...
... Try another channel. The problem could be with the cloth. • Do not spray insecticide liquid near your TV yourself. For more information, see "Setting parental controls" on an LCD screen is normal. For more information, see "Adjusting the picture" on page 6. • Make sure that...it is not a malfunction. If surfaces are inserted correctly. Troubleshooting 25 This Region number of this TV. • Increase the volume. • Press MUTE to make sure that the sound is not muted. • Make sure that fingerprints do not work Solution • Replace the ...
User Manual (English)
Page 30
...to try to operate this device may cause harmful interference to change without notice. Model Picture/sound system Audio output External input ports Power requirements Power consumption Temperature Humidity Dimensions Weight Accessories 22" NTSC, ATSC, Clear QAM ≥ 3W+3W AV input, PC input, S-VIDEO ...233;vision ordinaire, Canada BETS-7 / NTMR-7 Notices Specifications and features are subject to correct the interference by turning the equipment off your TV/DVD combo yourself. For service and support call (800) 305-2204. Do not expose the disc to radio or television reception, ...
...to try to operate this device may cause harmful interference to change without notice. Model Picture/sound system Audio output External input ports Power requirements Power consumption Temperature Humidity Dimensions Weight Accessories 22" NTSC, ATSC, Clear QAM ≥ 3W+3W AV input, PC input, S-VIDEO ...233;vision ordinaire, Canada BETS-7 / NTMR-7 Notices Specifications and features are subject to correct the interference by turning the equipment off your TV/DVD combo yourself. For service and support call (800) 305-2204. Do not expose the disc to radio or television reception, ...


