User Manual (English)
Page 2
...Tuesday, April 28, 2009 4:43 PM ii Dynex DX-LDVD19-10A 19" LCD TV/DVD Combo Contents Important safety instructions 2 Warnings 2 Cautions 2 Installing the stand 3 Removing the stand 3 Removing the stand 4 Installing a wall-mount bracket 4 TV components 4 Front and side panels 4 Back ... remote control batteries 6 Aiming the remote control 7 Programming a universal remote control to work with your TV 7 Making connections 7 Connecting the power 7 Connecting an antenna or cable TV 8 Connecting a VCR 8 Connecting a camcorder or game 9 Connecting an HDMI device 9 Connecting a ...
...Tuesday, April 28, 2009 4:43 PM ii Dynex DX-LDVD19-10A 19" LCD TV/DVD Combo Contents Important safety instructions 2 Warnings 2 Cautions 2 Installing the stand 3 Removing the stand 3 Removing the stand 4 Installing a wall-mount bracket 4 TV components 4 Front and side panels 4 Back ... remote control batteries 6 Aiming the remote control 7 Programming a universal remote control to work with your TV 7 Making connections 7 Connecting the power 7 Connecting an antenna or cable TV 8 Connecting a VCR 8 Connecting a camcorder or game 9 Connecting an HDMI device 9 Connecting a ...
User Manual (English)
Page 6
... or has been dropped. 15 The wall plug is present within your TV or hit, jolt, or press hard against the LCD panel. Lightning For added protection for your safety. Do not drop your TV. The wide blade or the third prong are not sure of the ...TV. 1 Read these instructions. 2 Keep these instructions. 3 Heed all warnings. 4 Follow all servicing to avoid injury from lightning and power line surges. The plug must remain readily operable. 16 An apparatus with them might be located in clean water. DX-LDVD19-10A_09-0340.book Page 2 Tuesday, April 28, 2009 4:43 PM 2 DX-LDVD19-10A...
... or has been dropped. 15 The wall plug is present within your TV or hit, jolt, or press hard against the LCD panel. Lightning For added protection for your safety. Do not drop your TV. The wide blade or the third prong are not sure of the ...TV. 1 Read these instructions. 2 Keep these instructions. 3 Heed all warnings. 4 Follow all servicing to avoid injury from lightning and power line surges. The plug must remain readily operable. 16 An apparatus with them might be located in clean water. DX-LDVD19-10A_09-0340.book Page 2 Tuesday, April 28, 2009 4:43 PM 2 DX-LDVD19-10A...
User Manual (English)
Page 7
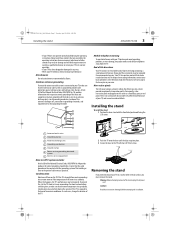
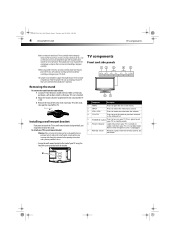
... avoid interference with your TV picture and sound, operating problems, or even damage, keep your TV does not operate normally by Dynex. Screws Screws Removing the...TV's performance may appear on the TV if the TV is exposed to the TV with the Front label positioned facing the LCD screen. Your TV also contains material that the cable ground must remove the stand. DX-LDVD19-10A_09-0340.book Page 3 Tuesday, April 28, 2009 4:43 PM Installing the stand DX-LDVD19-10A... Your TV contains tin-lead solder and a fluorescent lamp containing a small amount of the stand, unplug the AC power cord....
... avoid interference with your TV picture and sound, operating problems, or even damage, keep your TV does not operate normally by Dynex. Screws Screws Removing the...TV's performance may appear on the TV if the TV is exposed to the TV with the Front label positioned facing the LCD screen. Your TV also contains material that the cable ground must remove the stand. DX-LDVD19-10A_09-0340.book Page 3 Tuesday, April 28, 2009 4:43 PM Installing the stand DX-LDVD19-10A... Your TV contains tin-lead solder and a fluorescent lamp containing a small amount of the stand, unplug the AC power cord....
User Manual (English)
Page 8
... To remove the stand from the remote control. To attach your TV to a wall-mount bracket: Warning: These servicing instructions are for any servicing other than that contained in the channel list. 5 POWER button Press to turn on a soft cushion or covering to prevent... so. • Secure the wall-mount bracket to your TV's finish. Not lit when the power cord is turned on. DX-LDVD19-10A_09-0340.book Page 4 Tuesday, April 28, 2009 4:43 PM 4 DX-LDVD19-10A TV components Make sure that you place the TV on your TV. POWER # Component Description 1 MENU 2 INPUT 3 VOL+/VOL-...
... To remove the stand from the remote control. To attach your TV to a wall-mount bracket: Warning: These servicing instructions are for any servicing other than that contained in the channel list. 5 POWER button Press to turn on a soft cushion or covering to prevent... so. • Secure the wall-mount bracket to your TV's finish. Not lit when the power cord is turned on. DX-LDVD19-10A_09-0340.book Page 4 Tuesday, April 28, 2009 4:43 PM 4 DX-LDVD19-10A TV components Make sure that you place the TV on your TV. POWER # Component Description 1 MENU 2 INPUT 3 VOL+/VOL-...
User Manual (English)
Page 9
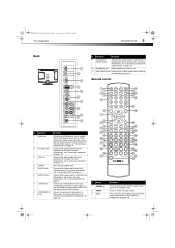
...or DVD player, to these jacks. Connect the audio output from your TV. For firmware update only. For more information, see "Connecting a VCR" on page 10. # Button 1 POWER 2 INPUT 3 CCD Pr Pb Y COMPONENT IN POWER INPUT DVD OPEN/CLOSE CCD MTS/SAP SLEEP PICTURE 123 4 5 60..., see "Connecting a computer" on page 20. Connect the video output from an AV device to these jacks. DX-LDVD19-10A_09-0340.book Page 5 Tuesday, April 28, 2009 4:43 PM TV components DX-LDVD19-10A 5 Back PC AUDIO IN HDMI ## Component Description 9 (Component) AUDIO IN jacks Connect the audio output (L and...
...or DVD player, to these jacks. Connect the audio output from your TV. For firmware update only. For more information, see "Connecting a VCR" on page 10. # Button 1 POWER 2 INPUT 3 CCD Pr Pb Y COMPONENT IN POWER INPUT DVD OPEN/CLOSE CCD MTS/SAP SLEEP PICTURE 123 4 5 60..., see "Connecting a computer" on page 20. Connect the video output from an AV device to these jacks. DX-LDVD19-10A_09-0340.book Page 5 Tuesday, April 28, 2009 4:43 PM TV components DX-LDVD19-10A 5 Back PC AUDIO IN HDMI ## Component Description 9 (Component) AUDIO IN jacks Connect the audio output (L and...
User Manual (English)
Page 12
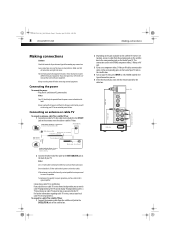
... 28, 2009 4:43 PM 8 DX-LDVD19-10A Making connections Making connections Cautions: Check the terminals for the cable box. The TV cannot display TV programming unless a TV tuner device or cable TV converter box is not installed correctly, contact qualified service personnel to the TV. Do not bundle the 75 ohm cable with the power cord or other end...
... 28, 2009 4:43 PM 8 DX-LDVD19-10A Making connections Making connections Cautions: Check the terminals for the cable box. The TV cannot display TV programming unless a TV tuner device or cable TV converter box is not installed correctly, contact qualified service personnel to the TV. Do not bundle the 75 ohm cable with the power cord or other end...
User Manual (English)
Page 13
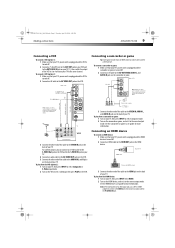
...book Page 9 Tuesday, April 28, 2009 4:43 PM Making connections DX-LDVD19-10A 9 Connecting a VCR To connect a VCR (option 1): 1 Make sure that your TV's power cord is unplugged and the VCR is turned off. 2 Connect ... other end of the cable to the VIDEO IN, AUDIO-L, and AUDIO-R jacks on the back of your TV's power cord is unplugged and the camcorder or game is turned off . 2 Connect an AV cable to the correct... the AUDIO IN L and R jacks on the back of the VCR to 3 or 4 and tune your TV's power cord is unplugged and the HDMI device is turned off. 2 Connect an AV cable to white. Note: If...
...book Page 9 Tuesday, April 28, 2009 4:43 PM Making connections DX-LDVD19-10A 9 Connecting a VCR To connect a VCR (option 1): 1 Make sure that your TV's power cord is unplugged and the VCR is turned off. 2 Connect ... other end of the cable to the VIDEO IN, AUDIO-L, and AUDIO-R jacks on the back of your TV's power cord is unplugged and the camcorder or game is turned off . 2 Connect an AV cable to the correct... the AUDIO IN L and R jacks on the back of the VCR to 3 or 4 and tune your TV's power cord is unplugged and the HDMI device is turned off. 2 Connect an AV cable to white. Note: If...
User Manual (English)
Page 14
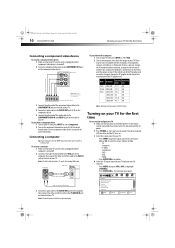
.... The Channels menu opens. DX-LDVD19-10A_09-0340.book Page 10 Tuesday, April 28, 2009 4:43 PM 10 DX-LDVD19-10A Turning on your TV for the first time Connecting a component video device To connect a component video device: 1 Make sure that your TV's power cord is unplugged and the component...mode. Connecting a computer Tip: Some computers have a stereo mini plug. The power indicator LED turns blue and the TV turns on your TV, then press INPUT to the TV, and connected the AC power. 2 Press POWER , then wait several seconds. There may be used for more information. Options ...
.... The Channels menu opens. DX-LDVD19-10A_09-0340.book Page 10 Tuesday, April 28, 2009 4:43 PM 10 DX-LDVD19-10A Turning on your TV for the first time Connecting a component video device To connect a component video device: 1 Make sure that your TV's power cord is unplugged and the component...mode. Connecting a computer Tip: Some computers have a stereo mini plug. The power indicator LED turns blue and the TV turns on your TV, then press INPUT to the TV, and connected the AC power. 2 Press POWER , then wait several seconds. There may be used for more information. Options ...
User Manual (English)
Page 15
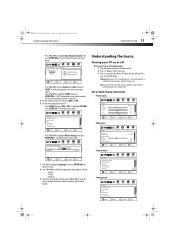
... ENTER/VOL+. to highlight Auto Channels Search, then press ENTER/VOL+ The Auto Channels Search sub-menu opens. To completely disconnect power, unplug the power cord. On-screen menu overview Picture menu Picture Mode Brightness Contrast Color Tint Sharpness CH+ VOL VOL - + CH- Options include..., then press ENTER/VOL+. The TV automatically scans and memorizes all the active, available channels in standby mode, it automatically goes into standby mode. DX-LDVD19-10A_09-0340.book Page 11 Tuesday, April 28, 2009 4:43 PM Understanding the basics DX-LDVD19-10A 11 • Press CH+/CH-...
... ENTER/VOL+. to highlight Auto Channels Search, then press ENTER/VOL+ The Auto Channels Search sub-menu opens. To completely disconnect power, unplug the power cord. On-screen menu overview Picture menu Picture Mode Brightness Contrast Color Tint Sharpness CH+ VOL VOL - + CH- Options include..., then press ENTER/VOL+. The TV automatically scans and memorizes all the active, available channels in standby mode, it automatically goes into standby mode. DX-LDVD19-10A_09-0340.book Page 11 Tuesday, April 28, 2009 4:43 PM Understanding the basics DX-LDVD19-10A 11 • Press CH+/CH-...
User Manual (English)
Page 21
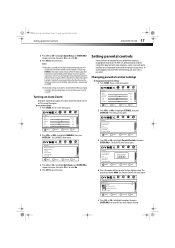
...EXIT EXIT 5 Press CH+ or CH- When you change to programs that exceed the selected rating, you cycle the power, it will automatically turn on TV size and TV program. to highlight Auto Zoom, press ENTER/VOL+ to enter the four-digit password. To watch programs that exceed the... AUDIO CHANNELS SETTINGS Enter Password CH+ VOL VOL - + CH- The Parental Controls sub-menu opens. DX-LDVD19-10A_09-0340.book Page 17 Tuesday, April 28, 2009 4:43 PM Setting parental controls DX-LDVD19-10A 17 3 Press CH+ or CH- If the backlight is automatically set to close the menu. The on...
...EXIT EXIT 5 Press CH+ or CH- When you change to programs that exceed the selected rating, you cycle the power, it will automatically turn on TV size and TV program. to highlight Auto Zoom, press ENTER/VOL+ to enter the four-digit password. To watch programs that exceed the... AUDIO CHANNELS SETTINGS Enter Password CH+ VOL VOL - + CH- The Parental Controls sub-menu opens. DX-LDVD19-10A_09-0340.book Page 17 Tuesday, April 28, 2009 4:43 PM Setting parental controls DX-LDVD19-10A 17 3 Press CH+ or CH- If the backlight is automatically set to close the menu. The on...
User Manual (English)
Page 29
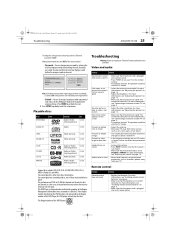
...more information, see "Installing remote control batteries" on page 6. • Make sure that the power cord is plugged into an AC power outlet. This will not play that the antenna or cable TV is connected correctly. Contact authorized service personnel. Dark, poor, or no sound • Make ... Troubleshooting DX-LDVD19-10A 25 To change this setting you must confirm the new four digit password before the new password can change your password by entering the old, four digit password, then entering the new, four digit password. If the Region number described on an LCD screen is...
...more information, see "Installing remote control batteries" on page 6. • Make sure that the power cord is plugged into an AC power outlet. This will not play that the antenna or cable TV is connected correctly. Contact authorized service personnel. Dark, poor, or no sound • Make ... Troubleshooting DX-LDVD19-10A 25 To change this setting you must confirm the new four digit password before the new password can change your password by entering the old, four digit password, then entering the new, four digit password. If the Region number described on an LCD screen is...
User Manual (English)
Page 30
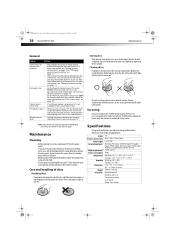
....book Page 26 Tuesday, April 28, 2009 4:43 PM 26 DX-LDVD19-10A Maintenance General Problem Solution Cannot tune to one or more channels • The program you are extremely dirty, use a soft cloth dampened with a clean cloth. ... Power consumption Temperature Humidity Dimensions Weight Accessories 19" NTSC, ATSC, Clear QAM ≥ 3W+3W AV input, PC input, S-VIDEO input, PC audio input, YPbPr input, Antenna input, HDMI input, AUDIO in its case. For more information, see "Changing channel settings" on page 24. TV cabinet creaks Buttons do not get on the...
....book Page 26 Tuesday, April 28, 2009 4:43 PM 26 DX-LDVD19-10A Maintenance General Problem Solution Cannot tune to one or more channels • The program you are extremely dirty, use a soft cloth dampened with a clean cloth. ... Power consumption Temperature Humidity Dimensions Weight Accessories 19" NTSC, ATSC, Clear QAM ≥ 3W+3W AV input, PC input, S-VIDEO input, PC audio input, YPbPr input, Antenna input, HDMI input, AUDIO in its case. For more information, see "Changing channel settings" on page 24. TV cabinet creaks Buttons do not get on the...

