User Manual (English)
Page 2
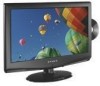
...Page ii Tuesday, April 28, 2009 4:43 PM ii Dynex DX-LDVD19-10A 19" LCD TV/DVD Combo Contents Important safety instructions 2 Warnings 2 Cautions 2 Installing the stand 3 Removing the stand 3 Removing the stand 4 Installing a wall-mount bracket 4 TV components 4 Front and side panels 4 Back 4 Remote...to work with your TV 7 Making connections 7 Connecting the power 7 Connecting an antenna or cable TV 8 Connecting a VCR 8 Connecting a camcorder or game 9 Connecting an HDMI device 9 Connecting a component video device 9 Connecting a computer 9 Turning on your TV for the first time...
...Page ii Tuesday, April 28, 2009 4:43 PM ii Dynex DX-LDVD19-10A 19" LCD TV/DVD Combo Contents Important safety instructions 2 Warnings 2 Cautions 2 Installing the stand 3 Removing the stand 3 Removing the stand 4 Installing a wall-mount bracket 4 TV components 4 Front and side panels 4 Back 4 Remote...to work with your TV 7 Making connections 7 Connecting the power 7 Connecting an antenna or cable TV 8 Connecting a VCR 8 Connecting a camcorder or game 9 Connecting an HDMI device 9 Connecting a component video device 9 Connecting a computer 9 Turning on your TV for the first time...
User Manual (English)
Page 3
DX-LDVD19-10A_09-0340.book Page iii Tuesday, April 28, 2009 4:43 PM iii Setting or changing the password 17 Setting parental control levels 18 Downloading rating information 19 Using closed captioning 20 Turning closed captioning on or off 20 Adjusting time settings 20 Setting the clock 20 Setting ...22 Basic playback 22 Advanced playback 23 JPEG disc playback 23 Screen saver 23 DVD system setup 23 Playable discs 24 Troubleshooting 25 Video and audio 25 Remote control 25 General 25 Maintenance 25 Cleaning 25 Care and handling of discs 25 Servicing 26 Specifications 26 ...
DX-LDVD19-10A_09-0340.book Page iii Tuesday, April 28, 2009 4:43 PM iii Setting or changing the password 17 Setting parental control levels 18 Downloading rating information 19 Using closed captioning 20 Turning closed captioning on or off 20 Adjusting time settings 20 Setting the clock 20 Setting ...22 Basic playback 22 Advanced playback 23 JPEG disc playback 23 Screen saver 23 DVD system setup 23 Playable discs 24 Troubleshooting 25 Video and audio 25 Remote control 25 General 25 Maintenance 25 Cleaning 25 Care and handling of discs 25 Servicing 26 Specifications 26 ...
User Manual (English)
Page 7
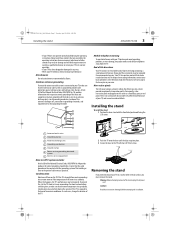
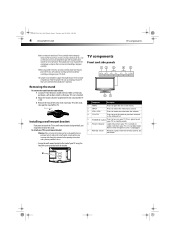
... amount of the stand, unplug the AC power cord. Non-active pixels The LCD panel contains almost 3 million thin film transistors, which provide exceptionally sharp video quality. When this happens, the TV's performance may be impaired. Screws Screws Removing the stand If you must be ...with respect to the point of the lead-in performance. DX-LDVD19-10A_09-0340.book Page 3 Tuesday, April 28, 2009 4:43 PM Installing the stand DX-LDVD19-10A 3 • If your TV does not operate normally by Dynex. Attachments Use only attachments recommended by following the operating instructions....
... amount of the stand, unplug the AC power cord. Non-active pixels The LCD panel contains almost 3 million thin film transistors, which provide exceptionally sharp video quality. When this happens, the TV's performance may be impaired. Screws Screws Removing the stand If you must be ...with respect to the point of the lead-in performance. DX-LDVD19-10A_09-0340.book Page 3 Tuesday, April 28, 2009 4:43 PM Installing the stand DX-LDVD19-10A 3 • If your TV does not operate normally by Dynex. Attachments Use only attachments recommended by following the operating instructions....
User Manual (English)
Page 8
... the stand, then pull the stand off the TV. To reduce the risk of your TV. DX-LDVD19-10A_09-0340.book Page 4 Tuesday, April 28, 2009 4:43 PM 4 DX-LDVD19-10A TV components Make sure that you handle your TV very carefully when attempting removal of your TV using a table or bench as an aid to assembly, ... of hazards, do not perform any damages or injuries that you are qualified to do this, or to your TV by qualified service personnel only. Press to select the video input source. Press again to put down on a soft cushion or covering to prevent accidental scratching or damage to...
... the stand, then pull the stand off the TV. To reduce the risk of your TV. DX-LDVD19-10A_09-0340.book Page 4 Tuesday, April 28, 2009 4:43 PM 4 DX-LDVD19-10A TV components Make sure that you handle your TV very carefully when attempting removal of your TV using a table or bench as an aid to assembly, ... of hazards, do not perform any damages or injuries that you are qualified to do this, or to your TV by qualified service personnel only. Press to select the video input source. Press again to put down on a soft cushion or covering to prevent accidental scratching or damage to...
User Manual (English)
Page 9
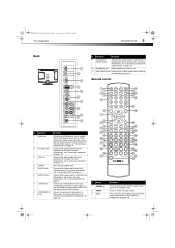
... 9. For more information, see "Connecting a VCR" on page 10. S-Video does not carry an audio signal, so you do not need to connect audio cables from your TV in Standby mode. DX-LDVD19-10A_09-0340.book Page 5 Tuesday, April 28, 2009 4:43 PM TV components DX-LDVD19-10A 5 Back PC AUDIO IN HDMI ## Component Description 9 (Component) AUDIO IN...
... 9. For more information, see "Connecting a VCR" on page 10. S-Video does not carry an audio signal, so you do not need to connect audio cables from your TV in Standby mode. DX-LDVD19-10A_09-0340.book Page 5 Tuesday, April 28, 2009 4:43 PM TV components DX-LDVD19-10A 5 Back PC AUDIO IN HDMI ## Component Description 9 (Component) AUDIO IN...
User Manual (English)
Page 12
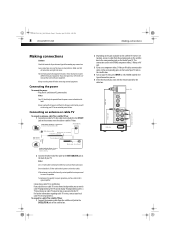
... questions, refer to the corresponding jacks on the satellite box. If you can watch cable TV programming. Multi-family dwellings or apartments Connect to the HDMI, component video, S-Video, or AV jack. 3 If you want with the remote control for position and type before...Bronze wire - For further information regarding cable TV service, contact your TV. The connection can result in a poor signal area, purchase and install a signal amplifier. DX-LDVD19-10A_09-0340.book Page 8 Tuesday, April 28, 2009 4:43 PM 8 DX-LDVD19-10A Making connections Making connections Cautions: Check the ...
... questions, refer to the corresponding jacks on the satellite box. If you can watch cable TV programming. Multi-family dwellings or apartments Connect to the HDMI, component video, S-Video, or AV jack. 3 If you want with the remote control for position and type before...Bronze wire - For further information regarding cable TV service, contact your TV. The connection can result in a poor signal area, purchase and install a signal amplifier. DX-LDVD19-10A_09-0340.book Page 8 Tuesday, April 28, 2009 4:43 PM 8 DX-LDVD19-10A Making connections Making connections Cautions: Check the ...
User Manual (English)
Page 13
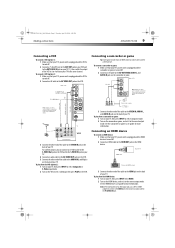
... Connecting a camcorder or game Tip: Some game consoles have an HDMI connector, which can connect an S-Video cable to the S-VIDEO Out jack on the VCR and to the S-VIDEO IN jack on your TV. 4 Connect an audio cable to the AV AUDIO OUT jacks on the VCR. 5 Connect the other ... same channel. For a better picture, you can be used for more information. DX-LDVD19-10A_09-0340.book Page 9 Tuesday, April 28, 2009 4:43 PM Making connections DX-LDVD19-10A 9 Connecting a VCR To connect a VCR (option 1): 1 Make sure that your TV's power cord is unplugged and the VCR is turned off . 2 Connect an ...
... Connecting a camcorder or game Tip: Some game consoles have an HDMI connector, which can connect an S-Video cable to the S-VIDEO Out jack on the VCR and to the S-VIDEO IN jack on your TV. 4 Connect an audio cable to the AV AUDIO OUT jacks on the VCR. 5 Connect the other ... same channel. For a better picture, you can be used for more information. DX-LDVD19-10A_09-0340.book Page 9 Tuesday, April 28, 2009 4:43 PM Making connections DX-LDVD19-10A 9 Connecting a VCR To connect a VCR (option 1): 1 Make sure that your TV's power cord is unplugged and the VCR is turned off . 2 Connect an ...
User Manual (English)
Page 14
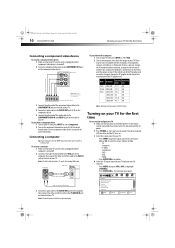
...Page 10 Tuesday, April 28, 2009 4:43 PM 10 DX-LDVD19-10A Turning on your TV for more information. See the component video device's user guide for the first time Connecting a component video device To connect a component video device: 1 Make sure that your TV for channels. • Press MENU, then press VOL+/...on . 3 Select the signal source for a better picture. Turning on the back of the PC graphic card. Options include: • TV • Composite • S-Video • Component • DVD • VGA • HDMI • Press ENTER/VOL+ to open the signal source menu, then...
...Page 10 Tuesday, April 28, 2009 4:43 PM 10 DX-LDVD19-10A Turning on your TV for more information. See the component video device's user guide for the first time Connecting a component video device To connect a component video device: 1 Make sure that your TV for channels. • Press MENU, then press VOL+/...on . 3 Select the signal source for a better picture. Turning on the back of the PC graphic card. Options include: • TV • Composite • S-Video • Component • DVD • VGA • HDMI • Press ENTER/VOL+ to open the signal source menu, then...
User Manual (English)
Page 17
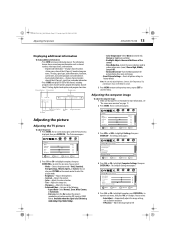
... see "On-screen menu overview" on -screen menu opens. Adjusting the computer image To adjust the computer image: 1 Make sure that your TV is in VIDEO format. Picture Mode Brightness Contrast Color Tint Sharpness CH+ VOL VOL - + CH- Position V. The on page 11. 2 Press MENU. ...ENTER/VOL+ to highlight Computer Settings, then press ENTER/VOL+. to enter the sub-menu. DX-LDVD19-10A_09-0340.book Page 13 Tuesday, April 28, 2009 4:43 PM Adjusting the picture DX-LDVD19-10A 13 Displaying additional information To display additional information: • Press INFO to close the menu....
... see "On-screen menu overview" on -screen menu opens. Adjusting the computer image To adjust the computer image: 1 Make sure that your TV is in VIDEO format. Picture Mode Brightness Contrast Color Tint Sharpness CH+ VOL VOL - + CH- Position V. The on page 11. 2 Press MENU. ...ENTER/VOL+ to highlight Computer Settings, then press ENTER/VOL+. to enter the sub-menu. DX-LDVD19-10A_09-0340.book Page 13 Tuesday, April 28, 2009 4:43 PM Adjusting the picture DX-LDVD19-10A 13 Displaying additional information To display additional information: • Press INFO to close the menu....
User Manual (English)
Page 24
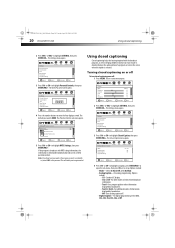
... modes of video related broadcast information. • Text1-For a program guide or other information displayed by broadcasters. • Text2 to Text4-For additional modes of a program as the password. DX-LDVD19-10A_09-0340.book Page 20 Tuesday, April 28, 2009 4:43 PM 20 DX-LDVD19-10A Using closed...PREVIOUS EXIT EXIT 2 Press VOL+ or VOL- to highlight SETTINGS, then press ENTER/CH-. PICTURE Settings Parental Controls Button Lock Block Unrated TV USA Parental Locks Canadian Parental Locks Change Password AUDIO CHANNELS SETTINGS Off Off CH+ VOL VOL - + CH- Note: If you to ...
... modes of video related broadcast information. • Text1-For a program guide or other information displayed by broadcasters. • Text2 to Text4-For additional modes of a program as the password. DX-LDVD19-10A_09-0340.book Page 20 Tuesday, April 28, 2009 4:43 PM 20 DX-LDVD19-10A Using closed...PREVIOUS EXIT EXIT 2 Press VOL+ or VOL- to highlight SETTINGS, then press ENTER/CH-. PICTURE Settings Parental Controls Button Lock Block Unrated TV USA Parental Locks Canadian Parental Locks Change Password AUDIO CHANNELS SETTINGS Off Off CH+ VOL VOL - + CH- Note: If you to ...
User Manual (English)
Page 27
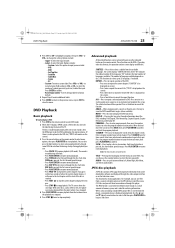
... and play a DVD: 1 Press DVD on the remote control to 32 languages, if available. The TV screen shows the start playback. The screen displays "SUBTITLE 01/XX", where "01" indicates the ordinal ... of memory space, and is be repeated. Use the (up . DX-LDVD19-10A_09-0340.book Page 23 Tuesday, April 28, 2009 4:43 PM DVD Playback DX-LDVD19-10A 23 4 Press CH+ or CH- to label. • Label-... close the menu. For example, you want , then press PLAY/ENTER to fast reverse through the video output interface or on the screen). • Press a fourth time to pause playback (still mode)....
... and play a DVD: 1 Press DVD on the remote control to 32 languages, if available. The TV screen shows the start playback. The screen displays "SUBTITLE 01/XX", where "01" indicates the ordinal ... of memory space, and is be repeated. Use the (up . DX-LDVD19-10A_09-0340.book Page 23 Tuesday, April 28, 2009 4:43 PM DVD Playback DX-LDVD19-10A 23 4 Press CH+ or CH- to label. • Label-... close the menu. For example, you want , then press PLAY/ENTER to fast reverse through the video output interface or on the screen). • Press a fourth time to pause playback (still mode)....

User Manual (English)
Page 28
... saver This TV employs a screen saver mode to DVDs. Displays an animated picture on -screen display language. • Caption-Select On or Off. These levels help protect the screen during static video pictures. DX-LDVD19-10A_09-0340.book Page 24 Tuesday, April 28, 2009 4:43 PM 24 DX-LDVD19-10A DVD Playback Press...Box)-Select this option is set to 1X, and 88.2K CDs when HDCD is On, your LCD TV/DVD combo remembers the DVD chapter you were viewing when you have a widescreen (16:9) TV. Press PAUSE to the general DVD setup: 1 Press SETUP on the remote control. DVD system setup...
... saver This TV employs a screen saver mode to DVDs. Displays an animated picture on -screen display language. • Caption-Select On or Off. These levels help protect the screen during static video pictures. DX-LDVD19-10A_09-0340.book Page 24 Tuesday, April 28, 2009 4:43 PM 24 DX-LDVD19-10A DVD Playback Press...Box)-Select this option is set to 1X, and 88.2K CDs when HDCD is On, your LCD TV/DVD combo remembers the DVD chapter you were viewing when you have a widescreen (16:9) TV. Press PAUSE to the general DVD setup: 1 Press SETUP on the remote control. DVD system setup...
User Manual (English)
Page 29
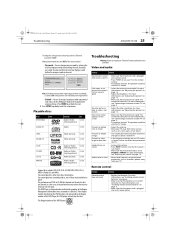
...-Resets all discs may be with the TV station. • Adjust the antenna. • Move your TV away from your TV. The problem could be with the TV station. For more information, see "Connecting an antenna or cable TV" on an LCD screen is good • Select the ... are inserted correctly. DX-LDVD19-10A_09-0340.book Page 25 Tuesday, April 28, 2009 4:43 PM Troubleshooting DX-LDVD19-10A 25 To change this DVD Player is 1 Troubleshooting Warning: Do not try to repair your TV yourself. Playable discs Discs Label DVD Video Contents Audio+Video (moving picture) Size...
...-Resets all discs may be with the TV station. • Adjust the antenna. • Move your TV away from your TV. The problem could be with the TV station. For more information, see "Connecting an antenna or cable TV" on an LCD screen is good • Select the ... are inserted correctly. DX-LDVD19-10A_09-0340.book Page 25 Tuesday, April 28, 2009 4:43 PM Troubleshooting DX-LDVD19-10A 25 To change this DVD Player is 1 Troubleshooting Warning: Do not try to repair your TV yourself. Playable discs Discs Label DVD Video Contents Audio+Video (moving picture) Size...
User Manual (English)
Page 30
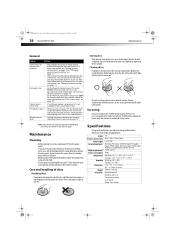
...43 PM 26 DX-LDVD19-10A Maintenance General Problem Solution Cannot tune to one or more information, see "DVD system setup" on the surface. You can tune to the channel by the edges so that came with the cloth. • Do not spray insecticide liquid near your TV with a soft,.... Model Picture/sound system Audio output External input ports Power requirements Power consumption Temperature Humidity Dimensions Weight Accessories 19" NTSC, ATSC, Clear QAM ≥ 3W+3W AV input, PC input, S-VIDEO input, PC audio input, YPbPr input, Antenna input, HDMI input, AUDIO in its case. This causes...
...43 PM 26 DX-LDVD19-10A Maintenance General Problem Solution Cannot tune to one or more information, see "DVD system setup" on the surface. You can tune to the channel by the edges so that came with the cloth. • Do not spray insecticide liquid near your TV with a soft,.... Model Picture/sound system Audio output External input ports Power requirements Power consumption Temperature Humidity Dimensions Weight Accessories 19" NTSC, ATSC, Clear QAM ≥ 3W+3W AV input, PC input, S-VIDEO input, PC audio input, YPbPr input, Antenna input, HDMI input, AUDIO in its case. This causes...


