User Manual (English)
Page 2
... instructions 2 Installing the stand or removing the stand column 4 Installing the stand 4 Removing the stand column 4 Installing a wall-mount bracket 4 TV components 5 Front 5 Side 5 Back 6 Remote control 7 Using the remote control 8 Installing remote control batteries 8 Aiming the remote control 8 Programming ... 15 Adjusting the volume 16 Adjusting basic settings 16 Displaying additional information 16 Adjusting the picture 16 Adjusting the TV picture 16 Adjusting Advanced Video settings 17 Adjusting the computer image 17 Adjusting the sound 18 Adjusting the sound ...
... instructions 2 Installing the stand or removing the stand column 4 Installing the stand 4 Removing the stand column 4 Installing a wall-mount bracket 4 TV components 5 Front 5 Side 5 Back 6 Remote control 7 Using the remote control 8 Installing remote control batteries 8 Aiming the remote control 8 Programming ... 15 Adjusting the volume 16 Adjusting basic settings 16 Displaying additional information 16 Adjusting the picture 16 Adjusting the TV picture 16 Adjusting Advanced Video settings 17 Adjusting the computer image 17 Adjusting the sound 18 Adjusting the sound ...

User Manual (English)
Page 5
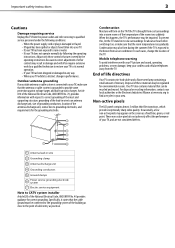
...play with steel studs or cinder blocks. If you are not designed to be mounted to walls backed with entertainment system furniture and TVs. • Don't place TVs on furniture that can easily be pushed, pulled over and cause injury. Use only a wall mount rated for proper use your... flat panel display As you enjoy your TV and that has been recommended by this TV manufacturer, listed in mind The issue The home theater entertainment experience is appropriate. Some wall mounts are unsure, ask a ...
...play with steel studs or cinder blocks. If you are not designed to be mounted to walls backed with entertainment system furniture and TVs. • Don't place TVs on furniture that can easily be pushed, pulled over and cause injury. Use only a wall mount rated for proper use your... flat panel display As you enjoy your TV and that has been recommended by this TV manufacturer, listed in mind The issue The home theater entertainment experience is appropriate. Some wall mounts are unsure, ask a ...

User Manual (English)
Page 6
...S3125A 13 Unplug this apparatus near any cover or expose the device to a mains socket outlet with your TV or hit, jolt, or press hard against the LCD panel. The plug must remain readily operable. 16 The apparatus with the apparatus. Class I apparatus to ... 4 Follow all servicing to qualified service technicians. Refer servicing to qualified service personnel. Handling the LCD panel • Your TV's screen is left unattended and unused for your TV. 2 Important safety instructions Important safety instructions CAUTION RISK OF ELECTRIC SHOCK DO NOT OPEN This symbol ...
...S3125A 13 Unplug this apparatus near any cover or expose the device to a mains socket outlet with your TV or hit, jolt, or press hard against the LCD panel. The plug must remain readily operable. 16 The apparatus with the apparatus. Class I apparatus to ... 4 Follow all servicing to qualified service technicians. Refer servicing to qualified service personnel. Handling the LCD panel • Your TV's screen is left unattended and unused for your TV. 2 Important safety instructions Important safety instructions CAUTION RISK OF ELECTRIC SHOCK DO NOT OPEN This symbol ...
User Manual (English)
Page 7
... a small amount of these materials may be recycled and reused. Important safety instructions 3 Cautions Damage requiring service Unplug this TV from the power outlet and refer servicing to qualified service personnel under the following the operating instructions. Condensation may be connected ...the room rises suddenly. Non-active pixels The LCD panel contains almost 3 million thin film transistors, which provide exceptionally sharp video quality. When this happens, the TV's performance may also form during the summer if the TV is exposed to the point of cable entry ...
... a small amount of these materials may be recycled and reused. Important safety instructions 3 Cautions Damage requiring service Unplug this TV from the power outlet and refer servicing to qualified service personnel under the following the operating instructions. Condensation may be connected ...the room rises suddenly. Non-active pixels The LCD panel contains almost 3 million thin film transistors, which provide exceptionally sharp video quality. When this happens, the TV's performance may also form during the summer if the TV is exposed to the point of cable entry ...
User Manual (English)
Page 8
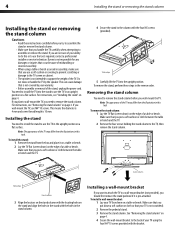
... the upright position on the stand and align the holes in the stand with the locating holes on a flat surface. Dynex is not responsible for any damages or injuries that your TV is pre-attached. If you put down ) on page 4. 4 Secure the wall-mount bracket to the back of a table...*10 screws provided with the four M5 screws (provided). To install a wall-mount bracket: 1 Lay your warranty. • Before assembly or removal of the TV may differ from the box and place it is not scratched). 2 Remove the pedestal stand. 3 Remove the stand column. To remove the stand column: 1 ...
... the upright position on the stand and align the holes in the stand with the locating holes on a flat surface. Dynex is not responsible for any damages or injuries that your TV is pre-attached. If you put down ) on page 4. 4 Secure the wall-mount bracket to the back of a table...*10 screws provided with the four M5 screws (provided). To install a wall-mount bracket: 1 Lay your warranty. • Before assembly or removal of the TV may differ from the box and place it is not scratched). 2 Remove the pedestal stand. 3 Remove the stand column. To remove the stand column: 1 ...
User Manual (English)
Page 9
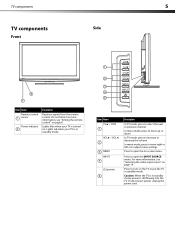
...3 4 5 Item Name CH / CH 1 VOL / VOL 2 3 MENU INPUT 4 (power) 5 Description In TV mode, press to select the next or previous channel. Lights red when your TV is still flowing into the TV. To disconnect power, unplug the power cord. For more information, see "Aiming the remote control" on page 14...Front 2 1 Item Name Remote control 1 sensor Power indicator 2 Description Receives signals from the remote control. In TV mode, press to adjust menu settings. Lights blue when your TV is in standby mode, power is turned on. Press to open the INPUT SOURCE menu. In menu mode, press...
...3 4 5 Item Name CH / CH 1 VOL / VOL 2 3 MENU INPUT 4 (power) 5 Description In TV mode, press to select the next or previous channel. Lights red when your TV is still flowing into the TV. To disconnect power, unplug the power cord. For more information, see "Aiming the remote control" on page 14...Front 2 1 Item Name Remote control 1 sensor Power indicator 2 Description Receives signals from the remote control. In TV mode, press to adjust menu settings. Lights blue when your TV is in standby mode, power is turned on. Press to open the INPUT SOURCE menu. In menu mode, press...
User Manual (English)
Page 10
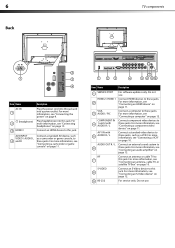
...device to 6 these jacks. For more information, see "Connecting a computer" on page 10. RF 7 S-VIDEO 8 9 RS-232 Connect an antenna or cable TV to these jacks. AV2 INPUT Connect a standard AV device, such VIDEO / AUDIO L as a VCR. VGA 3 AUDIO / PIC Connect a computer to this ...jack. For more information, see "Connecting an antenna, cable TV, or satellite TV box" on page 13. Do not use . Connect an S-Video device to these jacks. For more information, see "Connecting headphones" on page 10....
...device to 6 these jacks. For more information, see "Connecting a computer" on page 10. RF 7 S-VIDEO 8 9 RS-232 Connect an antenna or cable TV to these jacks. AV2 INPUT Connect a standard AV device, such VIDEO / AUDIO L as a VCR. VGA 3 AUDIO / PIC Connect a computer to this ...jack. For more information, see "Connecting an antenna, cable TV, or satellite TV box" on page 13. Do not use . Connect an S-Video device to these jacks. For more information, see "Connecting headphones" on page 10....
User Manual (English)
Page 11
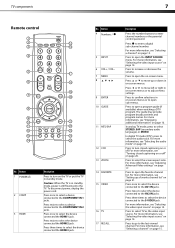
...to confirm selections in standby mode. For more information, see "Setting up or down in standby mode, power is still flowing into the TV. Caution: When the TV is in on -screen menus or to select STEREO, SAP (secondary audio language), or MONO. For more information, see "Selecting the... video input source" on page 21. No. In analog TV mode, press to open sub-menus. Press to select the device connected the HDMI 1 jack. For more information, see "Selecting the video input source...
...to confirm selections in standby mode. For more information, see "Setting up or down in standby mode, power is still flowing into the TV. Caution: When the TV is in on -screen menus or to select STEREO, SAP (secondary audio language), or MONO. For more information, see "Selecting the... video input source" on page 21. No. In analog TV mode, press to open sub-menus. Press to select the device connected the HDMI 1 jack. For more information, see "Selecting the video input source...
User Manual (English)
Page 12
...the remote sensor on page 19. Press to mute the sound. Press to set the sleep timer. symbols in the channel list. Either move your TV. Make sure that the + and - For more information, see "Setting the sleep timer" on the remote sensor. You can cause a rash. ... to excessive heat such as they become inoperable. symbols on page 16. Press to select the picture mode. For more information, see "Adjusting the TV picture" on the batteries match the + and - Press to open the channel list. If the batteries leak, clean the battery compartment with the ...
...the remote sensor on page 19. Press to mute the sound. Press to set the sleep timer. symbols in the channel list. Either move your TV. Make sure that the + and - For more information, see "Setting the sleep timer" on the remote sensor. You can cause a rash. ... to excessive heat such as they become inoperable. symbols on page 16. Press to select the picture mode. For more information, see "Adjusting the TV picture" on the batteries match the + and - Press to open the channel list. If the batteries leak, clean the battery compartment with the ...
User Manual (English)
Page 13
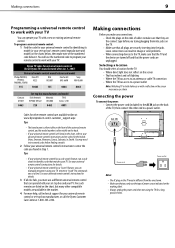
...To connect the power: • Connect the power cord (included) to the AC IN jack on the back of the TV, then connect the other remote controls are unplugged. Dynex TV codes for universal remote controls (for all plugs are available in the market. 4 For more help, call the...305-2204. Five such remotes are listed on the chart, but many other compatible models are securely inserting into jacks on the TV. • Make sure that all Dynex TVs manufactured after Jan. 1, 2007) Universal remote control manufacturer and model Philips PHDVD5, DirectTV PH5DSS, RC23 PMDVR8, PDVR8 RCA RCU807...
...To connect the power: • Connect the power cord (included) to the AC IN jack on the back of the TV, then connect the other remote controls are unplugged. Dynex TV codes for universal remote controls (for all plugs are available in the market. 4 For more help, call the...305-2204. Five such remotes are listed on the chart, but many other compatible models are securely inserting into jacks on the TV. • Make sure that all Dynex TVs manufactured after Jan. 1, 2007) Universal remote control manufacturer and model Philips PHDVD5, DirectTV PH5DSS, RC23 PMDVR8, PDVR8 RCA RCU807...
User Manual (English)
Page 14
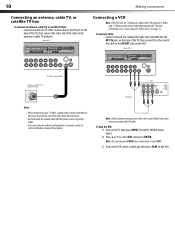
... a standard AV cable (not included) into the AV1 IN jacks on the VCR. 10 Making connections Connecting an antenna, cable TV, or satellite TV box To connect an antenna, cable TV, or satellite TV box: • Connect one or more information, see "Connecting an S-Video device" on page 12. To connect a VCR: •... noise that may be caused by radio wave transmissions. • Do not bundle the coaxial cable with the power cord or any other end of TV Connecting a VCR Note: If the VCR has an S-Video jack, connect the VCR using an antenna and reception is not good, contact a service ...
... a standard AV cable (not included) into the AV1 IN jacks on the VCR. 10 Making connections Connecting an antenna, cable TV, or satellite TV box To connect an antenna, cable TV, or satellite TV box: • Connect one or more information, see "Connecting an S-Video device" on page 12. To connect a VCR: •... noise that may be caused by radio wave transmissions. • Do not bundle the coaxial cable with the power cord or any other end of TV Connecting a VCR Note: If the VCR has an S-Video jack, connect the VCR using an antenna and reception is not good, contact a service ...
User Manual (English)
Page 15
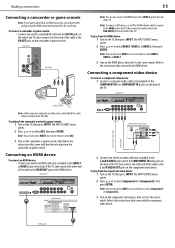
... the AV2 IN jacks on the camcorder or game console. Match the colors when you will get better quality using the HDMI connection instead of TV Game console Note: Cable connectors and jacks are often color-coded. Refer to the correct mode. The INPUT SOURCE menu opens. 2 Press or to select... Component1 or Component2, then press ENTER. The INPUT SOURCE menu opens. 2 Press or to select AV2, then press ENTER. Side of TV AV CAble Camcorder Note: You can also press HDMI one end of the cable to the correct mode. To connect a camcorder or game console: •...
... the AV2 IN jacks on the camcorder or game console. Match the colors when you will get better quality using the HDMI connection instead of TV Game console Note: Cable connectors and jacks are often color-coded. Refer to the correct mode. The INPUT SOURCE menu opens. 2 Press or to select... Component1 or Component2, then press ENTER. The INPUT SOURCE menu opens. 2 Press or to select AV2, then press ENTER. Side of TV AV CAble Camcorder Note: You can also press HDMI one end of the cable to the correct mode. To connect a camcorder or game console: •...

User Manual (English)
Page 16
...1 Connect one end of an audio cable (not included) to the VGA AUDIO jack on the back of the TV, then connect the other end of the cable to the AUDIO OUT jack on the S-Video device, then set it...2 Connect one end of a VGA cable (not included) to the VGA PIC jack on the back of the TV, then connect the other end of the cable to the AUDIO OUT jacks on the S-Video device. Back of the... of an audio cable (not included) to the AV1 IN L and R AUDIO jacks on the back of the TV, then connect the other end of the cable to the VGA jack on the computer, then adjust the computer display ...
...1 Connect one end of an audio cable (not included) to the VGA AUDIO jack on the back of the TV, then connect the other end of the cable to the AUDIO OUT jack on the S-Video device, then set it...2 Connect one end of a VGA cable (not included) to the VGA PIC jack on the back of the TV, then connect the other end of the cable to the AUDIO OUT jacks on the S-Video device. Back of the... of an audio cable (not included) to the AV1 IN L and R AUDIO jacks on the back of the TV, then connect the other end of the cable to the VGA jack on the computer, then adjust the computer display ...
User Manual (English)
Page 17
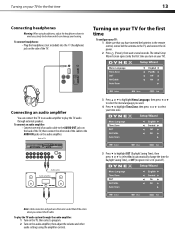
...not included) into the (headphone) jack on the audio amplifier, then adjust the volume and other end of the TV. Connecting an audio amplifier You can damage your hearing. Back of TV Audio cable Audio amplifier 3 Press or to highlight Menu Language, then press or to select the menu language you have... inserted the batteries in the remote control, connected the antenna to avoid excessively loud volume which can connect the TV to an audio amplifier to ignore it or set it yourself). Note: Cable connectors and jacks are often color-coded. Turning on your...
...not included) into the (headphone) jack on the audio amplifier, then adjust the volume and other end of the TV. Connecting an audio amplifier You can damage your hearing. Back of TV Audio cable Audio amplifier 3 Press or to highlight Menu Language, then press or to select the menu language you have... inserted the batteries in the remote control, connected the antenna to avoid excessively loud volume which can connect the TV to an audio amplifier to ignore it or set it yourself). Note: Cable connectors and jacks are often color-coded. Turning on your...
User Manual (English)
Page 18
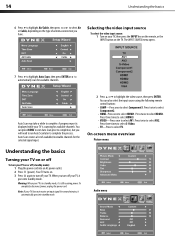
...not receive an input signal for available channels. Selecting the video input source To select the video input source: 1 Turn on your TV is displayed while your TV, then press the INPUT key on the remote, or the INPUT button on the type of available/receivable channels for available channels.... goes into standby mode. 14 Understanding the basics 6 Press to highlight Air/Cable, then press or to select Air or Cable, depending on the TV. Auto Scan creates a list of antenna connection you have. Press twice to select Component2. • HDMI-Press once to select AV1. Press three...
...not receive an input signal for available channels. Selecting the video input source To select the video input source: 1 Turn on your TV is displayed while your TV, then press the INPUT key on the remote, or the INPUT button on the type of available/receivable channels for available channels.... goes into standby mode. 14 Understanding the basics 6 Press to highlight Air/Cable, then press or to select Air or Cable, depending on the TV. Auto Scan creates a list of antenna connection you have. Press twice to select Component2. • HDMI-Press once to select AV1. Press three...
User Manual (English)
Page 19
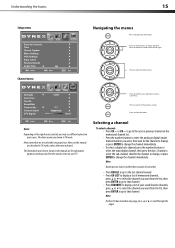
... or to select the channel you want from the actual screens on your screen. The above menus are described in TV mode, unless otherwise indicated. The illustrations and screens shown in TV mode. Press to select menus, to that channel. Notes: Depending on the signal source selected, you want , then ..., press or to select the channel you may vary from the list, then press ENTER to go to adjust selected items, or move on your TV. Wait for the channel to change, or press ENTER to change the channel immediately. • To select a digital sub-channel, press the number buttons...
... or to select the channel you want from the actual screens on your screen. The above menus are described in TV mode, unless otherwise indicated. The illustrations and screens shown in TV mode. Press to select menus, to that channel. Notes: Depending on the signal source selected, you want , then ..., press or to select the channel you may vary from the list, then press ENTER to go to adjust selected items, or move on your TV. Wait for the channel to change, or press ENTER to change the channel immediately. • To select a digital sub-channel, press the number buttons...

User Manual (English)
Page 20
... banner. Displaying additional information To display additional information: 1 Press INFO to temporarily turn off all sound. The on or off the TV picture and listen to audio only. 4 Press MENU to return to the previous menu, or press EXIT to highlight Setup, then ... video input source, and resolution. • Digital mode information-Displays channel number, station name, channel label (if preset), broadcast program name, TV rating, signal type, audio information, resolution, CC mode, current time, and current program start and end times. • Analog mode information-Displays...
... banner. Displaying additional information To display additional information: 1 Press INFO to temporarily turn off all sound. The on or off the TV picture and listen to audio only. 4 Press MENU to return to the previous menu, or press EXIT to highlight Setup, then ... video input source, and resolution. • Digital mode information-Displays channel number, station name, channel label (if preset), broadcast program name, TV rating, signal type, audio information, resolution, CC mode, current time, and current program start and end times. • Analog mode information-Displays...
User Manual (English)
Page 21
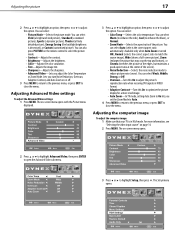
...picture noise (snow). The on the remote control to adjust the option. Adjusting the computer image To adjust the computer image: 1 Make sure that your TV is decreased), or Custom (customized picture). You can select Vivid (a bright and vivid picture), Standard (a standard picture), Sports (a dynamic picture), Theater (a ... this On to adjust the picture's reproduction rate when receiving DVI signals in VGA mode. For more vivid image. • Auto Zoom-In TV mode, setting Auto Zoom to On lets you turn Noise Reduction, Overscan, Adaptive Contrast, and Auto Zoom on page 14. 2 Press MENU....
...picture noise (snow). The on the remote control to adjust the option. Adjusting the computer image To adjust the computer image: 1 Make sure that your TV is decreased), or Custom (customized picture). You can select Vivid (a bright and vivid picture), Standard (a standard picture), Sports (a dynamic picture), Theater (a ... this On to adjust the picture's reproduction rate when receiving DVI signals in VGA mode. For more vivid image. • Auto Zoom-In TV mode, setting Auto Zoom to On lets you turn Noise Reduction, Overscan, Adaptive Contrast, and Auto Zoom on page 14. 2 Press MENU....
User Manual (English)
Page 23
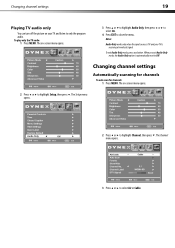
To play only the TV audio: 1 Press MENU. To exit Audio Only mode, press any button. The on -screen menu opens. 3 Press or to highlight Audio...menu. The Channel menu opens. 3 Press or to highlight Channel, then press . Changing channel settings 19 Playing TV audio only You can turn off the picture on your TV is receiving a broadcast signal. Notes: Audio Only works only when the input source is automatically reset to only the... scan for channels: 1 Press MENU. The Setup menu opens. When you exit Audio Only mode, the Audio Only option is TV and your TV and listen to Off.
To play only the TV audio: 1 Press MENU. To exit Audio Only mode, press any button. The on -screen menu opens. 3 Press or to highlight Audio...menu. The Channel menu opens. 3 Press or to highlight Channel, then press . Changing channel settings 19 Playing TV audio only You can turn off the picture on your TV is receiving a broadcast signal. Notes: Audio Only works only when the input source is automatically reset to only the... scan for channels: 1 Press MENU. The Setup menu opens. When you exit Audio Only mode, the Audio Only option is TV and your TV and listen to Off.
User Manual (English)
Page 24
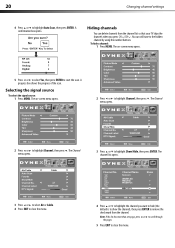
... to highlight Show/Hide, then press ENTER. The Channel menu opens. 2 Press or to remove the check mark from the channel list so that your TV skips the channels when you press CH /CH . A progress box shows the progress of the scan. The channel list opens. 3 Press or to select Air...
... to highlight Show/Hide, then press ENTER. The Channel menu opens. 2 Press or to remove the check mark from the channel list so that your TV skips the channels when you press CH /CH . A progress box shows the progress of the scan. The channel list opens. 3 Press or to select Air...


