
User Manual (English)
Page 6
...during a lightning storm, or when it is left unattended and unused for replacement of broken glass. • If the LCD panel is broken, make sure that the service technician uses replacement parts specified by the manufacturer, or sold with the ...TV. 1 Read these instructions. 2 Keep these instructions. 3 Heed all warnings. 4 Follow all servicing to qualified service technicians. Safety check After completing any service or repair to this apparatus near any heat sources such as contact with them might be careful of the obsolete outlet. 10 Protect the power cord...
...during a lightning storm, or when it is left unattended and unused for replacement of broken glass. • If the LCD panel is broken, make sure that the service technician uses replacement parts specified by the manufacturer, or sold with the ...TV. 1 Read these instructions. 2 Keep these instructions. 3 Heed all warnings. 4 Follow all servicing to qualified service technicians. Safety check After completing any service or repair to this apparatus near any heat sources such as contact with them might be careful of the obsolete outlet. 10 Protect the power cord...
User Manual (English)
Page 7
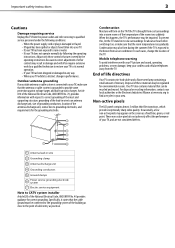
... cord or plug is brought from the power outlet and refer servicing to its new surroundings for about an hour before switching it states that the room temperature rises gradually. Occasionally, a few non-active pixels may also form during the summer if the TV is grounded to CATV...damaged in any way. • When your TV exhibits a distinct change the location of the TV. For disposal or recycling information, contact your local authorities or the Electronic Industries Alliance at www.eia.org to your area. Non-active pixels The LCD panel contains almost 3 million thin film transistors...
... cord or plug is brought from the power outlet and refer servicing to its new surroundings for about an hour before switching it states that the room temperature rises gradually. Occasionally, a few non-active pixels may also form during the summer if the TV is grounded to CATV...damaged in any way. • When your TV exhibits a distinct change the location of the TV. For disposal or recycling information, contact your local authorities or the Electronic Industries Alliance at www.eia.org to your area. Non-active pixels The LCD panel contains almost 3 million thin film transistors...
User Manual (English)
Page 8
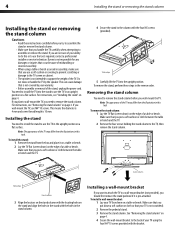
...• Before assembly or removal of the TV. For instructions, see "Removing the stand column" on page 4. If you wall-mount the TV. Do not move or handle the TV by your TV is not intended to support the weight of the stand, unplug the power cord. For instructions, see "Installing the stand"...or to use a soft cushion or covering to prevent scratching or damage to the TV screen or cabinet. • The speaker is not scratched). 2 Remove the pedestal stand. 3 Remove the stand column. Dynex is not covered by the speaker. This can cause damage that is not responsible for...
...• Before assembly or removal of the TV. For instructions, see "Removing the stand column" on page 4. If you wall-mount the TV. Do not move or handle the TV by your TV is not intended to support the weight of the stand, unplug the power cord. For instructions, see "Installing the stand"...or to use a soft cushion or covering to prevent scratching or damage to the TV screen or cabinet. • The speaker is not scratched). 2 Remove the pedestal stand. 3 Remove the stand column. Dynex is not covered by the speaker. This can cause damage that is not responsible for...
User Manual (English)
Page 9
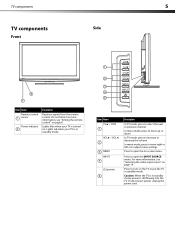
...or previous channel. Press to open the on page 14. Press to open the INPUT SOURCE menu. TV components 5 TV components Side Front 2 1 Item Name Remote control 1 sensor Power indicator 2 Description Receives signals from the remote control. In menu mode, press to move right or left... when your TV is turned on. Caution: When the TV is still flowing into the TV. Press to turn on page 8. For more information, see "Aiming the remote control" on the TV or put the TV in standby mode, power is in standby mode. To disconnect power, unplug the power cord. Do not...
...or previous channel. Press to open the on page 14. Press to open the INPUT SOURCE menu. TV components 5 TV components Side Front 2 1 Item Name Remote control 1 sensor Power indicator 2 Description Receives signals from the remote control. In menu mode, press to move right or left... when your TV is turned on. Caution: When the TV is still flowing into the TV. Press to turn on page 8. For more information, see "Aiming the remote control" on the TV or put the TV in standby mode, power is in standby mode. To disconnect power, unplug the power cord. Do not...
User Manual (English)
Page 10
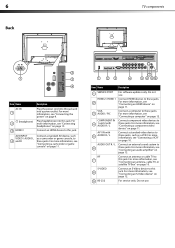
...these jacks. COMPONENT IN 4 1 and 2 with 5 AUDIO R / L Connect a standard video device to this jack and into a power outlet. For more information, see "Connecting an audio amplifier" on page 12. For more information, see "Connecting an S-Video device" on...more information, see "Connecting the power" on page 11. For service only. 6 Back TV components 2 1 3 4 Item Name Description AC IN 1 2 (headphone) 3 HDMI 3 Plug the power cord into this jack. For more information, see "Connecting an antenna, cable TV, or satellite TV box" on page 13. AUDIO ...
...these jacks. COMPONENT IN 4 1 and 2 with 5 AUDIO R / L Connect a standard video device to this jack and into a power outlet. For more information, see "Connecting an audio amplifier" on page 12. For more information, see "Connecting an S-Video device" on...more information, see "Connecting the power" on page 11. For service only. 6 Back TV components 2 1 3 4 Item Name Description AC IN 1 2 (headphone) 3 HDMI 3 Plug the power cord into this jack. For more information, see "Connecting an antenna, cable TV, or satellite TV box" on page 13. AUDIO ...
User Manual (English)
Page 11
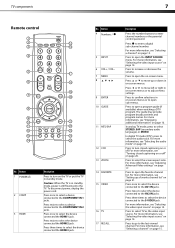
...21 11 22 12 23 13 24 14 25 No. To disconnect power, unplug the power cord. Button 4 Numbers / 5 INPUT 6 VOL+ / VOL- 7 MENU 8 9 ENTER 10 GUIDE 11 MTS/SAP 12 CCD 13 ZOOM 14 FAVORITE 15 VIDEO 16 TV 17 RECALL Description Press the number buttons to move left or right...jack. For more information, see "Selecting a channel" on page 14. For more information, see "Adjusting Advanced Video settings" on page 26. Button 1 POWER 2 COMP 3 HDMI Description Press to open the INPUT SOURCE menu. No. Press to turn closed captioning on or off . For more information, see "...
...21 11 22 12 23 13 24 14 25 No. To disconnect power, unplug the power cord. Button 4 Numbers / 5 INPUT 6 VOL+ / VOL- 7 MENU 8 9 ENTER 10 GUIDE 11 MTS/SAP 12 CCD 13 ZOOM 14 FAVORITE 15 VIDEO 16 TV 17 RECALL Description Press the number buttons to move left or right...jack. For more information, see "Selecting a channel" on page 14. For more information, see "Adjusting Advanced Video settings" on page 26. Button 1 POWER 2 COMP 3 HDMI Description Press to open the INPUT SOURCE menu. No. Press to turn closed captioning on or off . For more information, see "...
User Manual (English)
Page 13
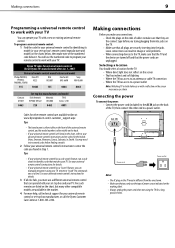
You may cause eye strain. Dynex TV codes for universal remote controls (for all Dynex TVs manufactured after Jan. 1, 2007) Universal remote control manufacturer and model Philips PHDVD5, DirectTV PH5DSS, RC23 PMDVR8, PDVR8 RCA RCU807 One for All URC-6690 Sony ... may need to try codes for your universal remote control by identifying its model (or your set -top box and your TV. Power cord Power outlet Notes: • The AC plug on the TV may be different from the one at : www.dynexproducts.com\t-customer_support.aspx Tips: • The brand name is often visible on...
You may cause eye strain. Dynex TV codes for universal remote controls (for all Dynex TVs manufactured after Jan. 1, 2007) Universal remote control manufacturer and model Philips PHDVD5, DirectTV PH5DSS, RC23 PMDVR8, PDVR8 RCA RCU807 One for All URC-6690 Sony ... may need to try codes for your universal remote control by identifying its model (or your set -top box and your TV. Power cord Power outlet Notes: • The AC plug on the TV may be different from the one at : www.dynexproducts.com\t-customer_support.aspx Tips: • The brand name is often visible on...
User Manual (English)
Page 14
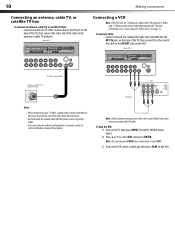
...-Ohm coaxial cable VCR Antenna, cable TV, or satellite RF jack AV cable Notes: • We recommend using a 75-Ohm, coaxial cable to reduce interference and noise that may be caused by radio wave transmissions. • Do not bundle the coaxial cable with the power cord or any other end of the cable... to select AV1, then press ENTER. The INPUT SOURCE menu opens. 2 Press or to the antenna or cable TV wall jack.
...-Ohm coaxial cable VCR Antenna, cable TV, or satellite RF jack AV cable Notes: • We recommend using a 75-Ohm, coaxial cable to reduce interference and noise that may be caused by radio wave transmissions. • Do not bundle the coaxial cable with the power cord or any other end of the cable... to select AV1, then press ENTER. The INPUT SOURCE menu opens. 2 Press or to the antenna or cable TV wall jack.
User Manual (English)
Page 18
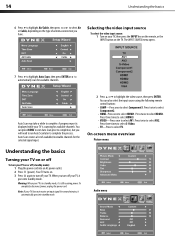
...on or off To turn off (standby mode): 1 Plug the power cord into standby mode. Press three times to select S-Video. • TV-Press to select Component1. Warning: When your TV, it goes into an AC power outlet. 2 Press (power). Auto Scan may take a while to select HDMI2. On-...screen menu overview Picture menu Understanding the basics Turning your TV on the TV. When you will need to run Auto Scan later to select HDMI1. To completely disconnect power, unplug the power cord. Auto Scan creates a list of antenna connection you have. Press twice to ...
...on or off To turn off (standby mode): 1 Plug the power cord into standby mode. Press three times to select S-Video. • TV-Press to select Component1. Warning: When your TV, it goes into an AC power outlet. 2 Press (power). Auto Scan may take a while to select HDMI2. On-...screen menu overview Picture menu Understanding the basics Turning your TV on the TV. When you will need to run Auto Scan later to select HDMI1. To completely disconnect power, unplug the power cord. Auto Scan creates a list of antenna connection you have. Press twice to ...
User Manual (English)
Page 35
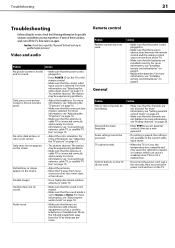
... a cordless telephone or headphones. For more information, see "Selecting the audio mode" on again. Refer all servicing to repair the TV yourself. If none of the TV. • Make sure that the power cord is selected. Double images. • Adjust the brightness. For more channels do not work . General Problem Solution One or more...
... a cordless telephone or headphones. For more information, see "Selecting the audio mode" on again. Refer all servicing to repair the TV yourself. If none of the TV. • Make sure that the power cord is selected. Double images. • Adjust the brightness. For more channels do not work . General Problem Solution One or more...


