User Manual (English)
Page 2
...11 Connecting an S-Video device 12 Connecting a computer 12 Connecting headphones 13 Connecting an audio amplifier 13 Turning on your TV for the first time 13 Understanding the basics 14 Turning your TV on or off 14 Selecting the video input source 14 On-screen menu overview 14 ...16 Adjusting Advanced Video settings 17 Adjusting the computer image 17 Adjusting the sound 18 Adjusting the sound 18 Selecting the audio mode 18 Playing TV audio only 19 Changing channel settings 19 Automatically scanning for channels 19 Selecting the signal source 20 Hiding channels 20 Setting up ...
...11 Connecting an S-Video device 12 Connecting a computer 12 Connecting headphones 13 Connecting an audio amplifier 13 Turning on your TV for the first time 13 Understanding the basics 14 Turning your TV on or off 14 Selecting the video input source 14 On-screen menu overview 14 ...16 Adjusting Advanced Video settings 17 Adjusting the computer image 17 Adjusting the sound 18 Adjusting the sound 18 Selecting the audio mode 18 Playing TV audio only 19 Changing channel settings 19 Automatically scanning for channels 19 Selecting the signal source 20 Hiding channels 20 Setting up ...
User Manual (English)
Page 3
iii Using closed captioning 26 Turning closed captioning on or off 26 Selecting the closed captioning mode 26 Customizing DTV closed captioning styles 27 Adjusting time settings 28 Setting the clock 28 Setting the sleep timer 28 Adjusting menu settings 29 Selecting the menu language and transparency 29 Labeling an input source 30 Restoring default settings 30 Troubleshooting 31 Video and audio 31 Remote control 31 General 31 Maintenance 32 Cleaning 32 Specifications 32 Legal notices 32 One-year limited warranty 33
iii Using closed captioning 26 Turning closed captioning on or off 26 Selecting the closed captioning mode 26 Customizing DTV closed captioning styles 27 Adjusting time settings 28 Setting the clock 28 Setting the sleep timer 28 Adjusting menu settings 29 Selecting the menu language and transparency 29 Labeling an input source 30 Restoring default settings 30 Troubleshooting 31 Video and audio 31 Remote control 31 General 31 Maintenance 32 Cleaning 32 Specifications 32 Legal notices 32 One-year limited warranty 33
User Manual (English)
Page 10
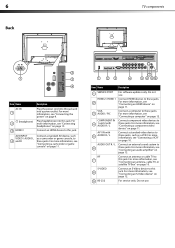
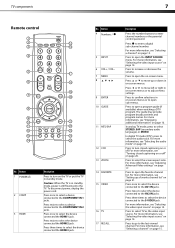
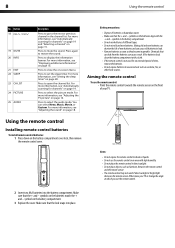
... page 11. 1 23 7 4 5 6 89 Item Name Description 1 SERVICE PORT For software updates only. Do not use . COMPONENT IN 4 1 and 2 with 5 AUDIO R / L Connect a standard video device to these jacks, such as a camcorder or game console, to these jacks. RF 7 S-VIDEO 8 9 RS-232 Connect an..., see "Connecting a VCR" on page 13. Connect an HDMI device to this jack. For more information, see "Connecting an audio amplifier" on page 10. 6 Back TV components 2 1 3 4 Item Name Description AC IN 1 2 (headphone) 3 HDMI 3 Plug the power cord into this jack and into...
... page 11. 1 23 7 4 5 6 89 Item Name Description 1 SERVICE PORT For software updates only. Do not use . COMPONENT IN 4 1 and 2 with 5 AUDIO R / L Connect a standard video device to these jacks, such as a camcorder or game console, to these jacks. RF 7 S-VIDEO 8 9 RS-232 Connect an..., see "Connecting a VCR" on page 13. Connect an HDMI device to this jack. For more information, see "Connecting an audio amplifier" on page 10. 6 Back TV components 2 1 3 4 Item Name Description AC IN 1 2 (headphone) 3 HDMI 3 Plug the power cord into this jack and into...
User Manual (English)
Page 11
...open a program guide (if available) when watching a DTV program. In digital TV mode (DTV), press to select the screen aspect ratio. Press to select the audio track. Press once to select the device connected to select TV as the video input source. Press to the AV1 IN jacks. No. Press... move left or right in on -screen menus or to open the on -screen menus. In analog TV mode, press to enter a digital sub-channel number. Press to select STEREO, SAP (secondary audio language), or MONO. Press to turn closed captioning on or off . For more information, see "Turning...
...open a program guide (if available) when watching a DTV program. In digital TV mode (DTV), press to select the screen aspect ratio. Press to select the audio track. Press once to select the device connected to select TV as the video input source. Press to the AV1 IN jacks. No. Press... move left or right in on -screen menus or to open the on -screen menus. In analog TV mode, press to enter a digital sub-channel number. Press to select STEREO, SAP (secondary audio language), or MONO. Press to turn closed captioning on or off . For more information, see "Turning...
User Manual (English)
Page 12
... heat sources. For more information, see "Displaying additional information" on the remote sensor. Press to select the audio mode. symbols in the battery compartment. • Do not mix batteries of your TV or change the angle at which you use the remote control in the channel list. If the batteries leak...towards the remote sensor on page 15. Button 18 CH / CH 19 MUTE 20 INFO 21 EXIT 22 SLEEP 23 CH-LIST 24 PICTURE 25 AUDIO Description Press to go to set the sleep timer. For more information, see "Automatically scanning for an extended period of new batteries and can ...
... heat sources. For more information, see "Displaying additional information" on the remote sensor. Press to select the audio mode. symbols in the battery compartment. • Do not mix batteries of your TV or change the angle at which you use the remote control in the channel list. If the batteries leak...towards the remote sensor on page 15. Button 18 CH / CH 19 MUTE 20 INFO 21 EXIT 22 SLEEP 23 CH-LIST 24 PICTURE 25 AUDIO Description Press to go to set the sleep timer. For more information, see "Automatically scanning for an extended period of new batteries and can ...
User Manual (English)
Page 15
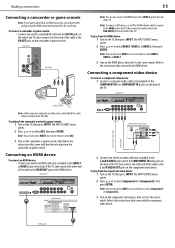
To connect a camcorder or game console: • Connect one end of an audio cable (not included) to the L and R AUDIO jacks next to the COMPONENT IN video jacks on the back of the TV, then connect the other end of the TV. Note: To connect a DVI device, use a DVI to HDMI adapter cable to connect... to the HDMI jack on the TV, then connect an audio cable to play from the HDMI device: 1 Turn on the TV, then press INPUT. Refer to the instructions that came with the device to the VGA AUDIO jack on the camcorder or game console. To playback the camcorder...
To connect a camcorder or game console: • Connect one end of an audio cable (not included) to the L and R AUDIO jacks next to the COMPONENT IN video jacks on the back of the TV, then connect the other end of the TV. Note: To connect a DVI device, use a DVI to HDMI adapter cable to connect... to the HDMI jack on the TV, then connect an audio cable to play from the HDMI device: 1 Turn on the TV, then press INPUT. Refer to the instructions that came with the device to the VGA AUDIO jack on the camcorder or game console. To playback the camcorder...

User Manual (English)
Page 16
...Video, then press ENTER. The INPUT SOURCE menu opens. 2 Press or to the VGA jack on the back of the TV, then connect the other end of the cable to the AUDIO OUT jack on the computer. The INPUT SOURCE menu opens. 2 Press or to the correct mode. Note: You can also...and S-VIDEO jacks share the same L and R AUDIO jacks. Back of TV Audio cable S-Video device Audio cable VGA cable Computer S-Video cable 2 Connect one end of an audio cable (not included) to the VGA AUDIO jack on the back of the TV, then connect the other end of TV Connecting a computer Note: If your computer has ...
...Video, then press ENTER. The INPUT SOURCE menu opens. 2 Press or to the VGA jack on the back of the TV, then connect the other end of the cable to the AUDIO OUT jack on the computer. The INPUT SOURCE menu opens. 2 Press or to the correct mode. Note: You can also...and S-VIDEO jacks share the same L and R AUDIO jacks. Back of TV Audio cable S-Video device Audio cable VGA cable Computer S-Video cable 2 Connect one end of an audio cable (not included) to the VGA AUDIO jack on the back of the TV, then connect the other end of TV Connecting a computer Note: If your computer has ...
User Manual (English)
Page 17
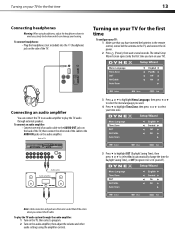
... the headphone volume to avoid excessively loud volume which can connect the TV to an audio amplifier to play the TV audio system through external speakers. To connect an audio amplifier: • Connect one end of an audio cable to the TV, and connect the AC power. 2 Press (Power), then wait several... seconds. Note: Cable connectors and jacks are often color-coded. Turning on the side of TV Audio cable Audio amplifier 3 Press or to highlight Menu Language, then press or to select the menu language you want. 4 Press to highlight Time Zone,...
... the headphone volume to avoid excessively loud volume which can connect the TV to an audio amplifier to play the TV audio system through external speakers. To connect an audio amplifier: • Connect one end of an audio cable to the TV, and connect the AC power. 2 Press (Power), then wait several... seconds. Note: Cable connectors and jacks are often color-coded. Turning on the side of TV Audio cable Audio amplifier 3 Press or to highlight Menu Language, then press or to select the menu language you want. 4 Press to highlight Time Zone,...
User Manual (English)
Page 18
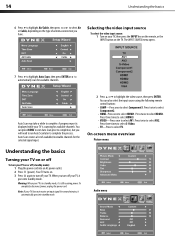
... channels for available channels. Note: If your TV is still receiving power. Press three times to select S-Video. • TV-Press to select Air or Cable, depending on or off (standby mode): 1 Plug the power cord into standby mode. Audio menu 14 Understanding the basics 6 Press to ...highlight Air/Cable, then press or to select TV. Selecting the video input source To select the video input source: 1 Turn on the TV. A progress report is displayed while your TV does not receive an input signal...
... channels for available channels. Note: If your TV is still receiving power. Press three times to select S-Video. • TV-Press to select Air or Cable, depending on or off (standby mode): 1 Plug the power cord into standby mode. Audio menu 14 Understanding the basics 6 Press to ...highlight Air/Cable, then press or to select TV. Selecting the video input source To select the video input source: 1 Turn on the TV. A progress report is displayed while your TV does not receive an input signal...

User Manual (English)
Page 20
... sub-channel is indicated by the main channel number, followed by the broadcaster. You can watch, based on or off the TV picture and listen to audio only. 4 Press MENU to return to the previous menu, or press EXIT to transmit a variety of main channel 5. The...input source, and resolution. • Digital mode information-Displays channel number, station name, channel label (if preset), broadcast program name, TV rating, signal type, audio information, resolution, CC mode, current time, and current program start and end times. • Analog mode information-Displays channel number, channel...
... sub-channel is indicated by the main channel number, followed by the broadcaster. You can watch, based on or off the TV picture and listen to audio only. 4 Press MENU to return to the previous menu, or press EXIT to transmit a variety of main channel 5. The...input source, and resolution. • Digital mode information-Displays channel number, station name, channel label (if preset), broadcast program name, TV rating, signal type, audio information, resolution, CC mode, current time, and current program start and end times. • Analog mode information-Displays channel number, channel...

User Manual (English)
Page 22
... the image settings such as position and phase 6 Press MENU to return to the previous menu, or press EXIT to a secondary audio program, if available. Selecting the audio mode You can select Standard (for normal programs), News (for news programs), Music (for musical programs), Movie (for movies) or... Custom (for a digital channel: • Press MTS/SAP. You can select: • Sound Mode-Selects the sound mode. The Audio menu opens. You can select: • MONO-Select this option if there is noise or static on -screen menu opens. 3 Press or to highlight an...
... the image settings such as position and phase 6 Press MENU to return to the previous menu, or press EXIT to a secondary audio program, if available. Selecting the audio mode You can select Standard (for normal programs), News (for news programs), Music (for musical programs), Movie (for movies) or... Custom (for a digital channel: • Press MTS/SAP. You can select: • Sound Mode-Selects the sound mode. The Audio menu opens. You can select: • MONO-Select this option if there is noise or static on -screen menu opens. 3 Press or to highlight an...
User Manual (English)
Page 23
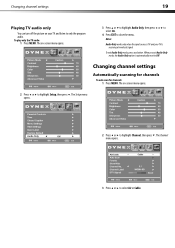
.... The Setup menu opens. Changing channel settings 19 Playing TV audio only You can turn off the picture on your TV is automatically reset to Off. Notes: Audio Only works only when the input source is TV and your TV and listen to only the program audio. Changing channel settings Automatically scanning for channels To auto scan...
.... The Setup menu opens. Changing channel settings 19 Playing TV audio only You can turn off the picture on your TV is automatically reset to Off. Notes: Audio Only works only when the input source is TV and your TV and listen to only the program audio. Changing channel settings Automatically scanning for channels To auto scan...

User Manual (English)
Page 31
... opens. 6 Press or to highlight Closed Caption, then press or ENTER. Text1 through CC4-Closed captioning appears in a small banner across the bottom of the audio. Customizing DTV closed captioning styles You can select Service1 -
... opens. 6 Press or to highlight Closed Caption, then press or ENTER. Text1 through CC4-Closed captioning appears in a small banner across the bottom of the audio. Customizing DTV closed captioning styles You can select Service1 -
User Manual (English)
Page 35
... video input mode. • When the TV is lit), but no interference with infrared equipment such as cars, neon signs, or hair dryers. • Use a highly directional outdoor antenna or cable TV. For more information, see "Selecting the audio mode" on page 16. • Try... another channel. Double images. • Adjust the brightness. For more information, see "Adjusting the TV picture" on page 18. For more information, see "Installing...
... video input mode. • When the TV is lit), but no interference with infrared equipment such as cars, neon signs, or hair dryers. • Use a highly directional outdoor antenna or cable TV. For more information, see "Selecting the audio mode" on page 16. • Try... another channel. Double images. • Adjust the brightness. For more information, see "Adjusting the TV picture" on page 18. For more information, see "Installing...
User Manual (English)
Page 36
.... Standard Television Receiving Apparatus - For service and support call (800) 305-2204. Type Panel TV system Receiving channels Audio multiples Audio out Power requirement Power consumption Dimensions (W × H × D with stand) Weight Input ports Output ports Control ports LCD TV 32-inch TFT LCD NTSC-M, ATSC VHF: 2 - 13 UHF: 14 - 69 CATV: 1 - 125 CADTV: 1 - 135 DTV: 2 - 69...
.... Standard Television Receiving Apparatus - For service and support call (800) 305-2204. Type Panel TV system Receiving channels Audio multiples Audio out Power requirement Power consumption Dimensions (W × H × D with stand) Weight Input ports Output ports Control ports LCD TV 32-inch TFT LCD NTSC-M, ATSC VHF: 2 - 13 UHF: 14 - 69 CATV: 1 - 125 CADTV: 1 - 135 DTV: 2 - 69...


