User Manual (English)
Page 2
...10 Connecting the power 10 Connecting an antenna, cable TV, or satellite TV box 11 Connecting a VCR 11 Connecting a camcorder or game console 11 Connecting an HDMI device 12 Connecting a component video device 12 Connecting an S-Video device 12 Connecting a computer 13 Connecting headphones 13 ...15 Adjusting the volume 16 Adjusting basic settings 16 Displaying additional information 16 Adjusting the picture 16 Adjusting the TV picture 16 Adjusting Advanced Video settings 17 Adjusting the computer image 17 Adjusting the sound 18 Adjusting the sound 18 Selecting the audio mode...
...10 Connecting the power 10 Connecting an antenna, cable TV, or satellite TV box 11 Connecting a VCR 11 Connecting a camcorder or game console 11 Connecting an HDMI device 12 Connecting a component video device 12 Connecting an S-Video device 12 Connecting a computer 13 Connecting headphones 13 ...15 Adjusting the volume 16 Adjusting basic settings 16 Displaying additional information 16 Adjusting the picture 16 Adjusting the TV picture 16 Adjusting Advanced Video settings 17 Adjusting the computer image 17 Adjusting the sound 18 Adjusting the sound 18 Selecting the audio mode...
User Manual (English)
Page 3
...control levels 23 Downloading rating information 25 Using closed captioning 25 Turning closed captioning on or off 25 Selecting the closed captioning mode 26 Customizing DTV closed captioning styles 27 Adjusting time settings 28 Setting the clock 28 Setting the sleep timer 28 Adjusting menu settings ...29 Selecting the menu language and transparency 29 Labeling an input source 29 Restoring default settings 30 Troubleshooting 30 Video and audio 30 Remote control 31 General 31 Maintenance 31 Cleaning 31 Specifications 31 Legal notices 32 One-year limited warranty 33
...control levels 23 Downloading rating information 25 Using closed captioning 25 Turning closed captioning on or off 25 Selecting the closed captioning mode 26 Customizing DTV closed captioning styles 27 Adjusting time settings 28 Setting the clock 28 Setting the sleep timer 28 Adjusting menu settings ...29 Selecting the menu language and transparency 29 Labeling an input source 29 Restoring default settings 30 Troubleshooting 30 Video and audio 30 Remote control 31 General 31 Maintenance 31 Cleaning 31 Specifications 31 Legal notices 32 One-year limited warranty 33
User Manual (English)
Page 7
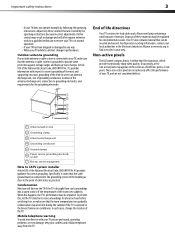
...exposed to provide some protection against voltage surges and built-up static charges. Disposal of these materials may appear on the TV if the TV is grounded to the breeze from cool surroundings into a warm room or if the temperature of the National Electrical Code...do not adversely affect the performance of your TV, and are covered by the operating instructions because incorrect adjustment of the TV. Non-active pixels The LCD panel contains almost 3 million thin film transistors, which provide exceptionally sharp video quality. Condensation Moisture will often require extensive work...
...exposed to provide some protection against voltage surges and built-up static charges. Disposal of these materials may appear on the TV if the TV is grounded to the breeze from cool surroundings into a warm room or if the temperature of the National Electrical Code...do not adversely affect the performance of your TV, and are covered by the operating instructions because incorrect adjustment of the TV. Non-active pixels The LCD panel contains almost 3 million thin film transistors, which provide exceptionally sharp video quality. Condensation Moisture will often require extensive work...
User Manual (English)
Page 10
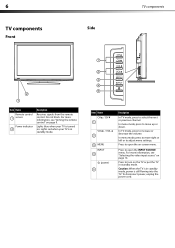
... or left or to turn on -screen menu. Lights red when your TV is turned on page 9. For more information, see "Selecting the video input source" on page 14. Caution: When the TV is still flowing into the TV. 6 TV components Side Front TV components 2 1 Item Name Remote control 1 sensor Power indicator 2 Description Receives signals from...
... or left or to turn on -screen menu. Lights red when your TV is turned on page 9. For more information, see "Selecting the video input source" on page 14. Caution: When the TV is still flowing into the TV. 6 TV components Side Front TV components 2 1 Item Name Remote control 1 sensor Power indicator 2 Description Receives signals from...
User Manual (English)
Page 11
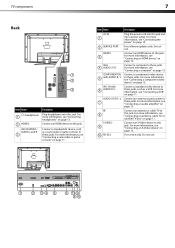
...page 11. For more information, see "Connecting an antenna, cable TV, or satellite TV box" on page 12. For software updates only. Connect an S-Video device to this jack. TV components 7 Back 1 2 3 Item Name (headphone) 1 2 HDMI 2 AV2 IN VIDEO / AUDIO L and R 3 Description Plug headphones into this jack...." on page 13. Connect an antenna or cable TV to these jacks. Item Name Description AC IN 1 2 SERVICE PORT HDMI 1 3 VGA 4 AUDIO / PIC COMPONENT IN 5 with AUDIO R / L AV1 IN with 6 AUDIO R / L AUDIO OUT R / L 7 RF 8 S-VIDEO 9 10 RS-232 Plug the power cord into ...
...page 11. For more information, see "Connecting an antenna, cable TV, or satellite TV box" on page 12. For software updates only. Connect an S-Video device to this jack. TV components 7 Back 1 2 3 Item Name (headphone) 1 2 HDMI 2 AV2 IN VIDEO / AUDIO L and R 3 Description Plug headphones into this jack...." on page 13. Connect an antenna or cable TV to these jacks. Item Name Description AC IN 1 2 SERVICE PORT HDMI 1 3 VGA 4 AUDIO / PIC COMPONENT IN 5 with AUDIO R / L AV1 IN with 6 AUDIO R / L AUDIO OUT R / L 7 RF 8 S-VIDEO 9 10 RS-232 Plug the power cord into ...
User Manual (English)
Page 12
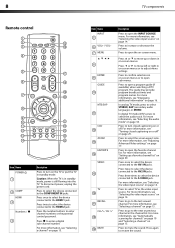
...list. Press to open the favorite channel list. Press to the HDMI 2 jack. Press to select TV as the video input source. Press to open the INPUT SOURCE menu. For more information, see "Selecting the video input source" on page 14. Press to increase or decrease the volume. Press the number buttons ... SAP (secondary audio language), or MONO. Item Name INPUT 5 6 VOL+ / VOL- 7 MENU 8 ENTER 9 GUIDE 10 MTS/SAP 11 CCD 12 ZOOM 13 FAVORITE 14 VIDEO 15 TV 16 RECALL 17 CH / CH 18 19 MUTE Description Press to open the on-screen menu. Press or to move up a favorite channel list" on...
...list. Press to open the favorite channel list. Press to the HDMI 2 jack. Press to select TV as the video input source. Press to open the INPUT SOURCE menu. For more information, see "Selecting the video input source" on page 14. Press to increase or decrease the volume. Press the number buttons ... SAP (secondary audio language), or MONO. Item Name INPUT 5 6 VOL+ / VOL- 7 MENU 8 ENTER 9 GUIDE 10 MTS/SAP 11 CCD 12 ZOOM 13 FAVORITE 14 VIDEO 15 TV 16 RECALL 17 CH / CH 18 19 MUTE Description Press to open the on-screen menu. Press or to move up a favorite channel list" on...
User Manual (English)
Page 15
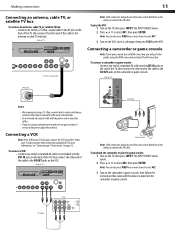
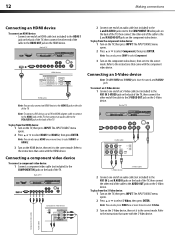
...: Cable connectors and jacks are often color-coded. Note: You can also press VIDEO one or more information, see "Connecting an S-Video device" on page 12. S-Video provides better video than standard AV. Back of TV AV CAble Camcorder Game console Note: Cable connectors and jacks are often color-coded....console Note: If your game console has an HDMI connection, you are using the S-Video jack. Making connections 11 Connecting an antenna, cable TV, or satellite TV box To connect an antenna, cable TV, or satellite TV box: • Connect one end of a standard AV cable into the AV1 IN...
...: Cable connectors and jacks are often color-coded. Note: You can also press VIDEO one or more information, see "Connecting an S-Video device" on page 12. S-Video provides better video than standard AV. Back of TV AV CAble Camcorder Game console Note: Cable connectors and jacks are often color-coded....console Note: If your game console has an HDMI connection, you are using the S-Video jack. Making connections 11 Connecting an antenna, cable TV, or satellite TV box To connect an antenna, cable TV, or satellite TV box: • Connect one end of a standard AV cable into the AV1 IN...
User Manual (English)
Page 16
...HDMI cable Note: You can also press VIDEO one or more times to select HDMI 1 or HDMI 2. 3 Turn on the TV, then press INPUT. To play from the HDMI device: 1 Turn on the S-Video device. Connecting an S-Video device Note: The AV1 VIDEO and S-VIDEO jacks share the same L and R.... Connecting a component video device To connect a component video device: 1 Connect a component video cable (not included) to the instructions that came with the S-Video device. To play from the component video device: 1 Turn on the back of the TV. Refer to the COMPONENT IN jacks on the TV, then press INPUT....
...HDMI cable Note: You can also press VIDEO one or more times to select HDMI 1 or HDMI 2. 3 Turn on the TV, then press INPUT. To play from the HDMI device: 1 Turn on the S-Video device. Connecting an S-Video device Note: The AV1 VIDEO and S-VIDEO jacks share the same L and R.... Connecting a component video device To connect a component video device: 1 Connect a component video cable (not included) to the instructions that came with the S-Video device. To play from the component video device: 1 Turn on the back of the TV. Refer to the COMPONENT IN jacks on the TV, then press INPUT....
User Manual (English)
Page 17
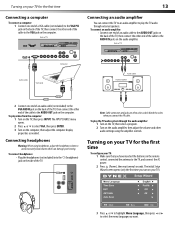
.... Turning on your TV for the first time To configure your TV: 1 Make sure that you have inserted the batteries in the remote control, connected the antenna to select the menu language you want. Connecting headphones Warning: When using the amplifier controls. To play video from the computer: ...1 Turn on the back of the cable to the AUDIO OUT jacks on the TV, then press INPUT. Back of TV Audio cable VGA cable Computer Audio cable Audio amplifier 2 Connect one end ...
.... Turning on your TV for the first time To configure your TV: 1 Make sure that you have inserted the batteries in the remote control, connected the antenna to select the menu language you want. Connecting headphones Warning: When using the amplifier controls. To play video from the computer: ...1 Turn on the back of the cable to the AUDIO OUT jacks on the TV, then press INPUT. Back of TV Audio cable VGA cable Computer Audio cable Audio amplifier 2 Connect one end ...
User Manual (English)
Page 18
... disconnect power, unplug the power cord. 14 Understanding the basics 4 Press to highlight Time Zone, then press or to select TV. Press three times to select S-Video. • TV-Press to select your TV, it yourself). 6 Press to highlight Air/Cable, then press or to complete the process. You can press MENU to exit...
... disconnect power, unplug the power cord. 14 Understanding the basics 4 Press to highlight Time Zone, then press or to select TV. Press three times to select S-Video. • TV-Press to select your TV, it yourself). 6 Press to highlight Air/Cable, then press or to complete the process. You can press MENU to exit...
User Manual (English)
Page 20
... the picture mode. Broadcasters may show an information banner. The information banner shows current program information such as channel number, video input source, and resolution. • Digital mode information-Displays channel number, station name, channel label (if preset), broadcast program name...Parental Controls-Lets you control which may use these sub-channels to adjust the option. 16 Adjusting the picture Digital sub-channels A digital TV signal transmits more data than an analog signal. to increase or decrease the volume. • Press MUTE to temporarily turn off all sound...
... the picture mode. Broadcasters may show an information banner. The information banner shows current program information such as channel number, video input source, and resolution. • Digital mode information-Displays channel number, station name, channel label (if preset), broadcast program name...Parental Controls-Lets you control which may use these sub-channels to adjust the option. 16 Adjusting the picture Digital sub-channels A digital TV signal transmits more data than an analog signal. to increase or decrease the volume. • Press MUTE to temporarily turn off all sound...
User Manual (English)
Page 21
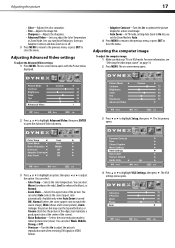
...You can select: • Color Temp-Selects the color temperature. Adjusting the computer image To adjust the computer image: 1 Make sure that your TV is turned ON), Normal (selects the correct aspect ratio to match the source image), Wide (shows a full-screen picture), Zoom (enlarges the picture... Weak, Middle, Strong, or Off. • Overscan-Turn this On to optimize the picture display for a more information, see "Selecting the video input source" on -screen menu opens with the Picture menu displayed. • Adaptive Contrast-Turn this On to adjust the picture's reproduction rate when...
...You can select: • Color Temp-Selects the color temperature. Adjusting the computer image To adjust the computer image: 1 Make sure that your TV is turned ON), Normal (selects the correct aspect ratio to match the source image), Wide (shows a full-screen picture), Zoom (enlarges the picture... Weak, Middle, Strong, or Off. • Overscan-Turn this On to optimize the picture display for a more information, see "Selecting the video input source" on -screen menu opens with the Picture menu displayed. • Adaptive Contrast-Turn this On to adjust the picture's reproduction rate when...
User Manual (English)
Page 34
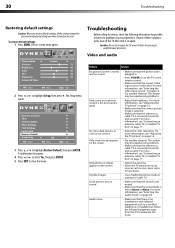
...lit) and no sound. • Make sure that the power cord is plugged in. • Press POWER on the TV or the remote control. • Make sure that the correct video input source is no sound. • Make sure that the sound is not muted. • Make sure that the ..., see "Selecting the audio mode" on page 11. • Adjust the antenna. • Move the TV away from the TV to highlight Restore Default, then press ENTER. Video and audio 2 Press or to repair the TV yourself. Parental Controls 3 Press or to eliminate the noise. Audio noise. • Make sure that the ...
...lit) and no sound. • Make sure that the power cord is plugged in. • Press POWER on the TV or the remote control. • Make sure that the correct video input source is no sound. • Make sure that the sound is not muted. • Make sure that the ..., see "Selecting the audio mode" on page 11. • Adjust the antenna. • Move the TV away from the TV to highlight Restore Default, then press ENTER. Video and audio 2 Press or to repair the TV yourself. Parental Controls 3 Press or to eliminate the noise. Audio noise. • Make sure that the ...
User Manual (English)
Page 35
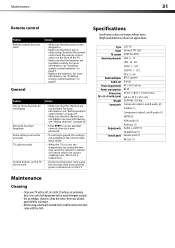
... Problem Remote control does not work . • If a setting is grayed, the setting is not available in the current video input mode. • When the TV is in . • Make sure that there are no obstructions between the remote control and the remote control sensor on the... Receiving channels Audio multiples Audio out Power requirement Power consumption Dimensions (W × H × D with stand) Weight Input ports Output ports Control ports LCD TV 26-inch TFT LCD NTSC-M, ATSC VHF: 2 - 13 UHF: 14 - 69 CATV: 1 - 125 CADTV: 1 - 135 DTV: 2 - 69 BTSC system 5 W (2) AC 120 V, 60 Hz 85 W 25.43 ...
... Problem Remote control does not work . • If a setting is grayed, the setting is not available in the current video input mode. • When the TV is in . • Make sure that there are no obstructions between the remote control and the remote control sensor on the... Receiving channels Audio multiples Audio out Power requirement Power consumption Dimensions (W × H × D with stand) Weight Input ports Output ports Control ports LCD TV 26-inch TFT LCD NTSC-M, ATSC VHF: 2 - 13 UHF: 14 - 69 CATV: 1 - 125 CADTV: 1 - 135 DTV: 2 - 69 BTSC system 5 W (2) AC 120 V, 60 Hz 85 W 25.43 ...


