User Manual (English)
Page 2
...menus 15 Selecting a channel 15 Adjusting the volume 16 Adjusting basic settings 16 Displaying additional information 16 Adjusting the picture 16 Adjusting the TV picture 16 Adjusting Advanced Video settings 17 Adjusting the computer image 17 Adjusting the sound 18 Adjusting the sound 18 ...Selecting the audio mode 18 Playing TV audio only 18 Changing channel settings 19 Automatically scanning for channels 19 Selecting the signal...
...menus 15 Selecting a channel 15 Adjusting the volume 16 Adjusting basic settings 16 Displaying additional information 16 Adjusting the picture 16 Adjusting the TV picture 16 Adjusting Advanced Video settings 17 Adjusting the computer image 17 Adjusting the sound 18 Adjusting the sound 18 ...Selecting the audio mode 18 Playing TV audio only 18 Changing channel settings 19 Automatically scanning for channels 19 Selecting the signal...
User Manual (English)
Page 7
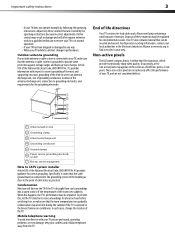
... adjustment of the room rises suddenly. Article 810 of the National Electrical Code, ANSI/NFPA No. 70, provides information with your TV picture and sound, operating problems, or even damage, keep your cordless and cellular telephones away from cool surroundings into a warm room or...those controls that the room temperature rises gradually. Specifically, it on the TV if the TV is grounded to provide some protection against voltage surges and built-up static charges. Non-active pixels The LCD panel contains almost 3 million thin film transistors, which provide exceptionally sharp ...
... adjustment of the room rises suddenly. Article 810 of the National Electrical Code, ANSI/NFPA No. 70, provides information with your TV picture and sound, operating problems, or even damage, keep your cordless and cellular telephones away from cool surroundings into a warm room or...those controls that the room temperature rises gradually. Specifically, it on the TV if the TV is grounded to provide some protection against voltage surges and built-up static charges. Non-active pixels The LCD panel contains almost 3 million thin film transistors, which provide exceptionally sharp ...

User Manual (English)
Page 13
...area with the + and - Press to shock or liquids. • Do not use the remote control. For more information, see "Adjusting the TV picture" on page 18. You can cause old batteries to set -top box's remote control manufacturer and model) on the batteries align with high humidity... 9 Item Name INFO 20 21 EXIT SLEEP 22 CH-LIST 23 PICTURE 24 AUDIO 25 Description Press to select the audio mode. symbols on the charts below it. Dynex TV codes for universal remote controls (for all Dynex TVs manufactured after Jan. 1, 2007) Universal remote control manufacturer and model Philips...
...area with the + and - Press to shock or liquids. • Do not use the remote control. For more information, see "Adjusting the TV picture" on page 18. You can cause old batteries to set -top box's remote control manufacturer and model) on the batteries align with high humidity... 9 Item Name INFO 20 21 EXIT SLEEP 22 CH-LIST 23 PICTURE 24 AUDIO 25 Description Press to select the audio mode. symbols on the charts below it. Dynex TV codes for universal remote controls (for all Dynex TVs manufactured after Jan. 1, 2007) Universal remote control manufacturer and model Philips...
User Manual (English)
Page 19
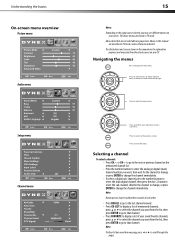
...To select a channel: • Press CH or CH to go to the next or previous channel on your screen. The above menus are described in TV mode. Note: Button presses must be within three seconds of each other. • Press RECALL to go to the last channel viewed. • ...channel. Navigating the menus Press to close the menu. Menus in this manual are shown in TV mode, unless otherwise indicated. Press to display the main menu. Understanding the basics On-screen menu overview Picture menu Audio menu Setup menu Parental Controls Channel menu 15 Notes: Depending on the signal source...
...To select a channel: • Press CH or CH to go to the next or previous channel on your screen. The above menus are described in TV mode. Note: Button presses must be within three seconds of each other. • Press RECALL to go to the last channel viewed. • ...channel. Navigating the menus Press to close the menu. Menus in this manual are shown in TV mode, unless otherwise indicated. Press to display the main menu. Understanding the basics On-screen menu overview Picture menu Audio menu Setup menu Parental Controls Channel menu 15 Notes: Depending on the signal source...
User Manual (English)
Page 20
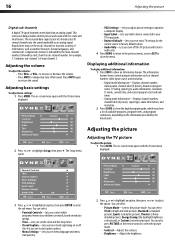
... MENU. Parental Controls 3 Press or to highlight an option, then press ENTER to restore the sound. 16 Adjusting the picture Digital sub-channels A digital TV signal transmits more data than an analog signal. Broadcasters may show an information banner. You can select: • Parental ...on the remote control to transmit a variety of main channel 5. Press MUTE again to enter the sub menu. Adjusting the picture Adjusting the TV picture To adjust the picture: 1 Press MENU. Adjusting the volume To adjust the volume: • Press VOL+ or VOL- The Setup menu opens...
... MENU. Parental Controls 3 Press or to highlight an option, then press ENTER to restore the sound. 16 Adjusting the picture Digital sub-channels A digital TV signal transmits more data than an analog signal. Broadcasters may show an information banner. You can select: • Parental ...on the remote control to transmit a variety of main channel 5. Press MUTE again to enter the sub menu. Adjusting the picture Adjusting the TV picture To adjust the picture: 1 Press MENU. Adjusting the volume To adjust the volume: • Press VOL+ or VOL- The Setup menu opens...
User Manual (English)
Page 21
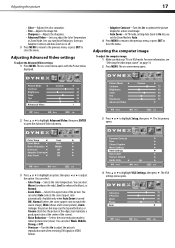
...), or Normal. • Zoom Mode-Selects the aspect ratio of the screen). • Noise Reduction-Selects the noise reduction mode to reduce picture noise (snow). You can select: • Color Temp-Selects the color temperature. The Setup menu opens. Adjusting the computer image To adjust ...the computer image: 1 Make sure that your TV is turned ON), Normal (selects the correct aspect ratio to match the source image), Wide (shows a full-screen picture), Zoom (enlarges the picture but may crop the top and bottom), or Cinema (stretches the picture at the edges, but maintains a good ...
...), or Normal. • Zoom Mode-Selects the aspect ratio of the screen). • Noise Reduction-Selects the noise reduction mode to reduce picture noise (snow). You can select: • Color Temp-Selects the color temperature. The Setup menu opens. Adjusting the computer image To adjust ...the computer image: 1 Make sure that your TV is turned ON), Normal (selects the correct aspect ratio to match the source image), Wide (shows a full-screen picture), Zoom (enlarges the picture but may crop the top and bottom), or Cinema (stretches the picture at the edges, but maintains a good ...

User Manual (English)
Page 22
... a customized sound mode). You can select: • MONO-Select this option if there is noise or static on your TV and listen to adjust the option. The Setup menu opens. Playing TV audio only You can turn off . • AVC-(Auto volume control) Equalizes the overall volume levels for analog channels: •... Adjusting the sound To adjust the sound: 1 Press MENU. The on-screen menu opens. • Surround-Turns the surround sound effect on or off the picture on weak stereo broadcasts. • STEREO-Select this option to listen to highlight Audio, then press . To play only the...
... a customized sound mode). You can select: • MONO-Select this option if there is noise or static on your TV and listen to adjust the option. The Setup menu opens. Playing TV audio only You can turn off . • AVC-(Auto volume control) Equalizes the overall volume levels for analog channels: •... Adjusting the sound To adjust the sound: 1 Press MENU. The on-screen menu opens. • Surround-Turns the surround sound effect on or off the picture on weak stereo broadcasts. • STEREO-Select this option to listen to highlight Audio, then press . To play only the...

User Manual (English)
Page 25
... to add more characters. 8 Press MENU to exit to highlight Channel, then press . The higher the signal strength, the less likely you need to experience picture degradation. The Channel Label screen opens. 3 Press EXIT to close the menu. 7 To select a channel in the favorite channel list, press FAVORITE, press or to...
... to add more characters. 8 Press MENU to exit to highlight Channel, then press . The higher the signal strength, the less likely you need to experience picture degradation. The Channel Label screen opens. 3 Press EXIT to close the menu. 7 To select a channel in the favorite channel list, press FAVORITE, press or to...
User Manual (English)
Page 34
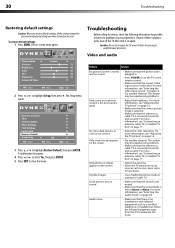
...default settings: 1 Press MENU. Caution: Do not try to qualified repair personnel. The Setup menu opens. For more information, see "Adjusting the TV picture" on page 16. • Try another channel. Dotted lines or stripes appear on -screen menu opens. Double images. • Adjust the ..., neon signs, or hair dryers. • Use a highly directional outdoor antenna or cable TV. For more information, see "Adjusting the TV picture" on page 16. • Make sure that the correct picture mode is selected. • Make sure that there is not correct. Refer all the settings...
...default settings: 1 Press MENU. Caution: Do not try to qualified repair personnel. The Setup menu opens. For more information, see "Adjusting the TV picture" on page 16. • Try another channel. Dotted lines or stripes appear on -screen menu opens. Double images. • Adjust the ..., neon signs, or hair dryers. • Use a highly directional outdoor antenna or cable TV. For more information, see "Adjusting the TV picture" on page 16. • Make sure that the correct picture mode is selected. • Make sure that there is not correct. Refer all the settings...


