User Manual (English)
Page 2
...Warnings 2 Cautions 2 Installing the stand or removing the stand column 4 Installing the stand 4 Removing the stand column 5 Installing a wall-mount bracket 5 TV components 6 Front 6 Side 6 Back 7 Remote control 8 Using the remote control 9 Installing remote control batteries 9 Aiming the remote control 9 Programming a... 15 Adjusting the volume 16 Adjusting basic settings 16 Displaying additional information 16 Adjusting the picture 16 Adjusting the TV picture 16 Adjusting Advanced Video settings 17 Adjusting the computer image 17 Adjusting the sound 18 Adjusting the sound...
...Warnings 2 Cautions 2 Installing the stand or removing the stand column 4 Installing the stand 4 Removing the stand column 5 Installing a wall-mount bracket 5 TV components 6 Front 6 Side 6 Back 7 Remote control 8 Using the remote control 9 Installing remote control batteries 9 Aiming the remote control 9 Programming a... 15 Adjusting the volume 16 Adjusting basic settings 16 Displaying additional information 16 Adjusting the picture 16 Adjusting the TV picture 16 Adjusting Advanced Video settings 17 Adjusting the computer image 17 Adjusting the sound 18 Adjusting the sound...
User Manual (English)
Page 5
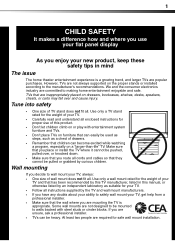
...drawers. • Remember that children can become excited while watching a program, especially on furniture that can be mounted to wall mount your TV, always: • One size of wall mount does not fit all . Wall mounting If you decide to walls backed with entertainment system furniture... and TVs. • Don't place TVs on a "larger-than-life" TV. We and the consumer electronics industry are inappropriately placed on the proper stands or installed according to safely wall ...
...drawers. • Remember that children can become excited while watching a program, especially on furniture that can be mounted to wall mount your TV, always: • One size of wall mount does not fit all . Wall mounting If you decide to walls backed with entertainment system furniture... and TVs. • Don't place TVs on a "larger-than-life" TV. We and the consumer electronics industry are inappropriately placed on the proper stands or installed according to safely wall ...
User Manual (English)
Page 6
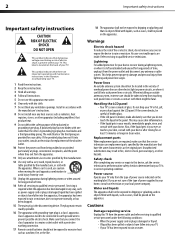
...such power lines or circuits as the original part. This symbol indicates that you connect the class I apparatus. Handling the LCD panel • Your TV's screen is broken, make sure that the service technician uses replacement parts specified by the manufacturer, or sold with them might...to avoid injury from the type of broken glass. • If the LCD panel is made of your TV. Cautions Damage requiring service Unplug this apparatus during a lightning storm, or when it can fall into your TV. • If your TV or hit, jolt, or press hard against the...
...such power lines or circuits as the original part. This symbol indicates that you connect the class I apparatus. Handling the LCD panel • Your TV's screen is broken, make sure that the service technician uses replacement parts specified by the manufacturer, or sold with them might...to avoid injury from the type of broken glass. • If the LCD panel is made of your TV. Cautions Damage requiring service Unplug this apparatus during a lightning storm, or when it can fall into your TV. • If your TV or hit, jolt, or press hard against the...
User Manual (English)
Page 7
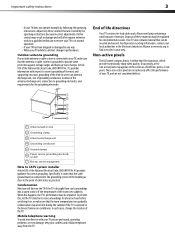
...temperature of cable entry as a fixed blue, green, or red point. In such cases, change in performance. Non-active pixels The LCD panel contains almost 3 million thin film transistors, which provide exceptionally sharp video quality. Mobile telephone warning To avoid interference with respect to ...for correct grounding. Specifically, it on, or make sure that the antenna or cable system is exposed to the breeze from an air conditioner. Your TV also contains material that are not considered defects. 1 2 3 4 5 7 6 1 Antenna lead-in damage and will form on the screen as...
...temperature of cable entry as a fixed blue, green, or red point. In such cases, change in performance. Non-active pixels The LCD panel contains almost 3 million thin film transistors, which provide exceptionally sharp video quality. Mobile telephone warning To avoid interference with respect to ...for correct grounding. Specifically, it on, or make sure that the antenna or cable system is exposed to the breeze from an air conditioner. Your TV also contains material that are not considered defects. 1 2 3 4 5 7 6 1 Antenna lead-in damage and will form on the screen as...
User Manual (English)
Page 8
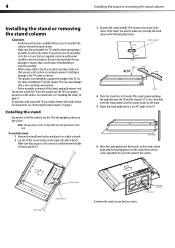
... in the upright position on the stand, then use the tools required, contact a professional installer or service technician. Note: The appearance of the TV may differ from the box and place it is not responsible for any damages or injuries that occur because of mishandling or incorrect assembly. •... Stand Short Long Stand 4 Place the stand close to remove the stand column. Installing the stand You need to the end of the stand. Dynex is at 30° or less, then fully insert the stand column into the stand to use a soft cushion or covering to prevent scratching ...
... in the upright position on the stand, then use the tools required, contact a professional installer or service technician. Note: The appearance of the TV may differ from the box and place it is not responsible for any damages or injuries that occur because of mishandling or incorrect assembly. •... Stand Short Long Stand 4 Place the stand close to remove the stand column. Installing the stand You need to the end of the stand. Dynex is at 30° or less, then fully insert the stand column into the stand to use a soft cushion or covering to prevent scratching ...
User Manual (English)
Page 9
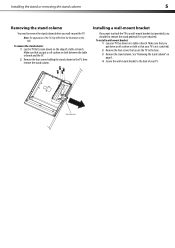
...the stand column. Installing a wall-mount bracket If you want to attach the TV to a wall-mount bracket (not provided), you wall-mount the TV. To install a wall-mount bracket: 1 Lay your TV face down ) on the edge of the TV may differ from the illustration in this task. Installing the stand or removing... before you should first remove the stand pedestal if it is not scratched). 2 Remove the four screws that secure the TV to the base. 3 Remove the stand column. To remove the stand column: 1 Lay the TV flat (screen down on page 5. 4 Secure the wall-mount bracket to the back of your...
...the stand column. Installing a wall-mount bracket If you want to attach the TV to a wall-mount bracket (not provided), you wall-mount the TV. To install a wall-mount bracket: 1 Lay your TV face down ) on the edge of the TV may differ from the illustration in this task. Installing the stand or removing... before you should first remove the stand pedestal if it is not scratched). 2 Remove the four screws that secure the TV to the base. 3 Remove the stand column. To remove the stand column: 1 Lay the TV flat (screen down on page 5. 4 Secure the wall-mount bracket to the back of your...
User Manual (English)
Page 10
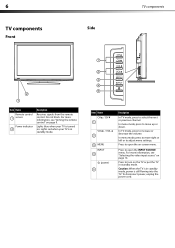
...For more information, see "Selecting the video input source" on -screen menu. Lights blue when your TV is in standby mode. Lights red when your TV is still flowing into the TV. To disconnect power, unplug the power cord. Do not block. Press to open the INPUT SOURCE menu.... In TV mode, press to adjust menu settings. 6 TV components Side Front TV components 2 1 Item Name Remote control 1 sensor Power indicator 2 Description Receives signals from the remote control. In menu mode, ...
...For more information, see "Selecting the video input source" on -screen menu. Lights blue when your TV is in standby mode. Lights red when your TV is still flowing into the TV. To disconnect power, unplug the power cord. Do not block. Press to open the INPUT SOURCE menu.... In TV mode, press to adjust menu settings. 6 TV components Side Front TV components 2 1 Item Name Remote control 1 sensor Power indicator 2 Description Receives signals from the remote control. In menu mode, ...
User Manual (English)
Page 11
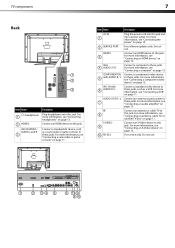
...For more information, see "Connecting a component video device" on page 11. For more information, see "Connecting an antenna, cable TV, or satellite TV box" on page 12. For service only. For software updates only. Connect a standard video device to these jacks. For ...more information, see "Connecting a VCR" on page 13. For more information, see "Connecting an audio amplifier" on page 11. TV components 7 Back 1 2 3 Item Name (headphone) 1 2 HDMI 2 AV2 IN VIDEO / AUDIO L and R 3 Description Plug headphones into this jack...
...For more information, see "Connecting a component video device" on page 11. For more information, see "Connecting an antenna, cable TV, or satellite TV box" on page 12. For service only. For software updates only. Connect a standard video device to these jacks. For ...more information, see "Connecting a VCR" on page 13. For more information, see "Connecting an audio amplifier" on page 11. TV components 7 Back 1 2 3 Item Name (headphone) 1 2 HDMI 2 AV2 IN VIDEO / AUDIO L and R 3 Description Plug headphones into this jack...
User Manual (English)
Page 12
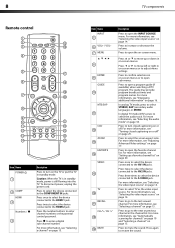
... information, see "Selecting a channel" on -screen menus or to restore the sound. Press to go to the next or previous channel in on -screen menus. 8 TV components Remote control 1 2 15 3 16 4 5 17 6 18 19 7 20 8 9 10 21 11 22 12 23 13 24 14 25 Item Name POWER 1 2...enter a digital sub-channel number. Press to turn closed captioning on page 15. The guide may provide program broadcast times and program names. In digital TV mode (DTV), press to the AV2 IN jacks. For more information, see "Selecting a channel" on or off . For more information, see "...
... information, see "Selecting a channel" on -screen menus or to restore the sound. Press to go to the next or previous channel in on -screen menus. 8 TV components Remote control 1 2 15 3 16 4 5 17 6 18 19 7 20 8 9 10 21 11 22 12 23 13 24 14 25 Item Name POWER 1 2...enter a digital sub-channel number. Press to turn closed captioning on page 15. The guide may provide program broadcast times and program names. In digital TV mode (DTV), press to the AV2 IN jacks. For more information, see "Selecting a channel" on or off . For more information, see "...

User Manual (English)
Page 13
... "Displaying additional information" on the front of different types. • Do not mix old and new batteries. You can operate your TV. Aiming the remote control To aim the remote control: • Point the remote control towards the remote sensor on page 16. Using... two AAA batteries into place. Mixing old and new batteries can cause old batteries to work with your TV with the + and - Dynex TV codes for universal remote controls (for all Dynex TVs manufactured after Jan. 1, 2007) Universal remote control manufacturer and model Philips PHDVD5, DirectTV PH5DSS, RC23 PMDVR8...
... "Displaying additional information" on the front of different types. • Do not mix old and new batteries. You can operate your TV. Aiming the remote control To aim the remote control: • Point the remote control towards the remote sensor on page 16. Using... two AAA batteries into place. Mixing old and new batteries can cause old batteries to work with your TV with the + and - Dynex TV codes for universal remote controls (for all Dynex TVs manufactured after Jan. 1, 2007) Universal remote control manufacturer and model Philips PHDVD5, DirectTV PH5DSS, RC23 PMDVR8...
User Manual (English)
Page 14
... you make any connections: • Check the plugs on the ends of cables to make sure that the TV and the device are available in the market. 4 For more help, call the Dynex Customer Care Center at a time. Tips: • If your universal remote control has a code search feature..., run a code search to identify a code that you only use a different universal remote control that can manually program it using the TV for the brands Orion, Emerson, ...
... you make any connections: • Check the plugs on the ends of cables to make sure that the TV and the device are available in the market. 4 For more help, call the Dynex Customer Care Center at a time. Tips: • If your universal remote control has a code search feature..., run a code search to identify a code that you only use a different universal remote control that can manually program it using the TV for the brands Orion, Emerson, ...
User Manual (English)
Page 15
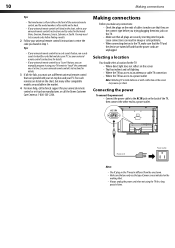
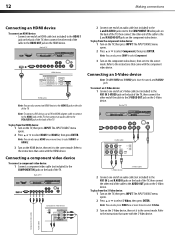
...you connect the AV cable. Note: You can also press VIDEO one or more information, see "Connecting an S-Video device" on page 12. Back of TV AV CAble Camcorder Game console Note: Cable connectors and jacks are often color-coded. Connecting a VCR Note: If the VCR has an S-Video jack, connect... AV2, then press ENTER. Match the colors when you are using the S-Video jack. Making connections 11 Connecting an antenna, cable TV, or satellite TV box To connect an antenna, cable TV, or satellite TV box: • Connect one end of a 75-Ohm, coaxial cable to the RF jack on the back of the...
...you connect the AV cable. Note: You can also press VIDEO one or more information, see "Connecting an S-Video device" on page 12. Back of TV AV CAble Camcorder Game console Note: Cable connectors and jacks are often color-coded. Connecting a VCR Note: If the VCR has an S-Video jack, connect... AV2, then press ENTER. Match the colors when you are using the S-Video jack. Making connections 11 Connecting an antenna, cable TV, or satellite TV box To connect an antenna, cable TV, or satellite TV box: • Connect one end of a 75-Ohm, coaxial cable to the RF jack on the back of the...
User Manual (English)
Page 16
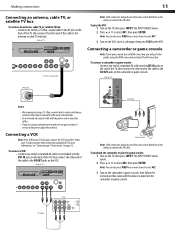
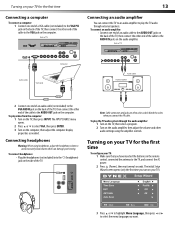
...menu opens. 2 Press or to select HDMI 1 or HDMI 2, then press ENTER. To play from the S-Video device: 1 Turn on the back of the TV. Connecting an S-Video device Note: The AV1 VIDEO and S-VIDEO jacks share the same L and R AUDIO jacks. Note: You can also press COMP to select... Component. 3 Turn on the HDMI device. Component video cable Audio cable To play from the component video device: 1 Turn on the TV, then press INPUT. 12 Making connections Connecting an HDMI device To connect an HDMI device: • Connect one end of an audio cable (not included...
...menu opens. 2 Press or to select HDMI 1 or HDMI 2, then press ENTER. To play from the S-Video device: 1 Turn on the back of the TV. Connecting an S-Video device Note: The AV1 VIDEO and S-VIDEO jacks share the same L and R AUDIO jacks. Note: You can also press COMP to select... Component. 3 Turn on the HDMI device. Component video cable Audio cable To play from the component video device: 1 Turn on the TV, then press INPUT. 12 Making connections Connecting an HDMI device To connect an HDMI device: • Connect one end of an audio cable (not included...
User Manual (English)
Page 17
...select the menu language you have inserted the batteries in the remote control, connected the antenna to avoid excessively loud volume which can connect the TV to an audio amplifier to select VGA, then press ENTER. 3 Turn on the computer, then adjust the computer display properties as needed. Match... an audio amplifier: • Connect one end of an audio cable (not included) to the VGA AUDIO jack on the computer. To play the TV audio system through external speakers. To connect headphones: • Plug the headphones (not included) into the (headphone) jack on the side of the ...
...select the menu language you have inserted the batteries in the remote control, connected the antenna to avoid excessively loud volume which can connect the TV to an audio amplifier to select VGA, then press ENTER. 3 Turn on the computer, then adjust the computer display properties as needed. Match... an audio amplifier: • Connect one end of an audio cable (not included) to the VGA AUDIO jack on the computer. To play the TV audio system through external speakers. To connect headphones: • Plug the headphones (not included) into the (headphone) jack on the side of the ...
User Manual (English)
Page 18
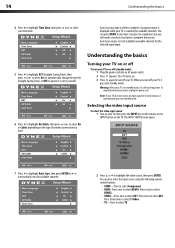
... to highlight Auto Scan, then press ENTER or to automatically scan for available channels. Note: If your TV on the TV. Press twice to select AV1. Understanding the basics Turning your TV does not receive an input signal for Daylight Saving Time), or Off (to ignore it or set it...(power). To completely disconnect power, unplug the power cord. 14 Understanding the basics 4 Press to highlight Time Zone, then press or to select your TV, it is scanning for available channels. 2 Press or to highlight the video source, then press ENTER. Auto Scan creates a list of antenna connection you...
... to highlight Auto Scan, then press ENTER or to automatically scan for available channels. Note: If your TV on the TV. Press twice to select AV1. Understanding the basics Turning your TV does not receive an input signal for Daylight Saving Time), or Off (to ignore it or set it...(power). To completely disconnect power, unplug the power cord. 14 Understanding the basics 4 Press to highlight Time Zone, then press or to select your TV, it is scanning for available channels. 2 Press or to highlight the video source, then press ENTER. Auto Scan creates a list of antenna connection you...
User Manual (English)
Page 19
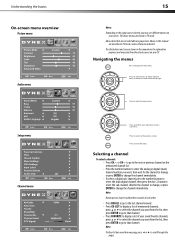
... actual screens on your selection or enter a sub-menu. Wait for the channel to change the channel immediately. Menus in this manual are shown in TV mode, unless otherwise indicated. Note: If either list has more than one page, press or to the previous screen. Understanding the basics On-screen menu...-channel. Menu items that channel. Press to return to scroll through the pages. Press to display the main menu. The above menus are described in TV mode. Navigating the menus Press to close the menu. Press to select the menu items. Press to confirm your...
... actual screens on your selection or enter a sub-menu. Wait for the channel to change the channel immediately. Menus in this manual are shown in TV mode, unless otherwise indicated. Note: If either list has more than one page, press or to the previous screen. Understanding the basics On-screen menu...-channel. Menu items that channel. Press to return to scroll through the pages. Press to display the main menu. The above menus are described in TV mode. Navigating the menus Press to close the menu. Press to select the menu items. Press to confirm your...
User Manual (English)
Page 20
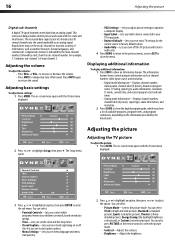
..., video input source, and resolution. • Digital mode information-Displays channel number, station name, channel label (if preset), broadcast program name, TV rating, signal type, audio information, resolution, CC mode, current time, and current program start and end times. • Analog mode information-Displays...and menu transparency. 2 Press or to highlight an option, then press or to highlight Setup, then press . Adjusting the picture Adjusting the TV picture To adjust the picture: 1 Press MENU. You can also press PICTURE on -screen menu opens with less static and interference. You...
..., video input source, and resolution. • Digital mode information-Displays channel number, station name, channel label (if preset), broadcast program name, TV rating, signal type, audio information, resolution, CC mode, current time, and current program start and end times. • Analog mode information-Displays...and menu transparency. 2 Press or to highlight an option, then press or to highlight Setup, then press . Adjusting the picture Adjusting the TV picture To adjust the picture: 1 Press MENU. You can also press PICTURE on -screen menu opens with less static and interference. You...
User Manual (English)
Page 21
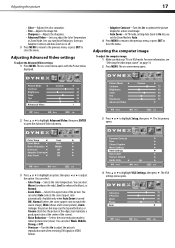
... Contrast-Turn this On to adjust the picture's reproduction rate when receiving DVI signals in VGA mode. For more vivid image. • Auto Zoom-In TV mode, setting Auto Zoom to On lets you set the Zoom Mode to Auto. 4 Press MENU to return to the previous menu, or press EXIT... 14. 2 Press MENU. Lets you adjust the Color Temperature or Zoom Mode. Adjusting the computer image To adjust the computer image: 1 Make sure that your TV is turned ON), Normal (selects the correct aspect ratio to reduce picture noise (snow). You can select: • Color Temp-Selects the color temperature.
... Contrast-Turn this On to adjust the picture's reproduction rate when receiving DVI signals in VGA mode. For more vivid image. • Auto Zoom-In TV mode, setting Auto Zoom to On lets you set the Zoom Mode to Auto. 4 Press MENU to return to the previous menu, or press EXIT... 14. 2 Press MENU. Lets you adjust the Color Temperature or Zoom Mode. Adjusting the computer image To adjust the computer image: 1 Make sure that your TV is turned ON), Normal (selects the correct aspect ratio to reduce picture noise (snow). You can select: • Color Temp-Selects the color temperature.

User Manual (English)
Page 22
... mode You can select: • Sound Mode-Selects the sound mode. To select an audio track for a customized sound mode). To play only the TV audio: 1 Press MENU. You can select the audio mode for analog channels. The on-screen menu opens. • Surround-Turns the surround sound effect.... Note: Mono is automatically selected if the program is broadcast in stereo. • SAP-Select this option if there is available, it plays. Playing TV audio only You can select: • MONO-Select this option to listen to adjust the option. You can turn off . • AVC-(Auto volume...
... mode You can select: • Sound Mode-Selects the sound mode. To select an audio track for a customized sound mode). To play only the TV audio: 1 Press MENU. You can select the audio mode for analog channels. The on-screen menu opens. • Surround-Turns the surround sound effect.... Note: Mono is automatically selected if the program is broadcast in stereo. • SAP-Select this option if there is available, it plays. Playing TV audio only You can select: • MONO-Select this option to listen to adjust the option. You can turn off . • AVC-(Auto volume...
User Manual (English)
Page 23
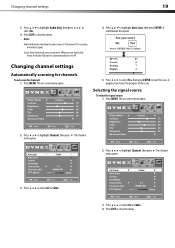
... MENU. The Channel menu opens. 2 Press or to highlight Auto Scan, then press ENTER. Notes: Audio Only works only when the input source is TV and your TV is automatically reset to Off . 4 Press or to highlight Channel, then press . The on -screen menu opens. 5 Press or to select Yes, then press...
... MENU. The Channel menu opens. 2 Press or to highlight Auto Scan, then press ENTER. Notes: Audio Only works only when the input source is TV and your TV is automatically reset to Off . 4 Press or to highlight Channel, then press . The on -screen menu opens. 5 Press or to select Yes, then press...


