
User Manual (English)
Page 2
ii Dynex DX-L24-10A 24" LCD TV Contents Important safety instructions 2 Warnings 2 Cautions 2 Installing and removing the stand 3 Installing the stand 3 Adjusting the viewing angle of the TV 4 Removing the stand 4 Installing a wall-mount bracket 5 TV components 5 Front 5 Side 6 Back and side 6 Remote control 7 Using the remote...13 Selecting a channel 13 Adjusting the volume 14 Displaying additional information 14 Adjusting the picture 14 Adjusting the TV picture 14 Adjusting the computer image 14 Changing channel settings 15 Selecting the signal source 15 Hiding channels 15...
ii Dynex DX-L24-10A 24" LCD TV Contents Important safety instructions 2 Warnings 2 Cautions 2 Installing and removing the stand 3 Installing the stand 3 Adjusting the viewing angle of the TV 4 Removing the stand 4 Installing a wall-mount bracket 5 TV components 5 Front 5 Side 6 Back and side 6 Remote control 7 Using the remote...13 Selecting a channel 13 Adjusting the volume 14 Displaying additional information 14 Adjusting the picture 14 Adjusting the TV picture 14 Adjusting the computer image 14 Changing channel settings 15 Selecting the signal source 15 Hiding channels 15...

User Manual (English)
Page 3
iii Using closed captioning 18 Selecting the closed captioning mode 18 Selecting the closed captioning type 19 Adjusting the sound 19 Adjusting the sound 19 Adjusting TV settings 20 Setting the time zone 20 Selecting the menu language 20 Turning the side panel lock on or off 21 Setting the auto shut-off function 21 Setting the optical audio output format 22 Playing TV audio only 22 Turning overscan on or off 23 Troubleshooting 23 Video and audio 23 Remote control 23 General 24 Maintenance 24 Cleaning 24 Specifications 24 Legal notices 24 One-year limited warranty 25
iii Using closed captioning 18 Selecting the closed captioning mode 18 Selecting the closed captioning type 19 Adjusting the sound 19 Adjusting the sound 19 Adjusting TV settings 20 Setting the time zone 20 Selecting the menu language 20 Turning the side panel lock on or off 21 Setting the auto shut-off function 21 Setting the optical audio output format 22 Playing TV audio only 22 Turning overscan on or off 23 Troubleshooting 23 Video and audio 23 Remote control 23 General 24 Maintenance 24 Cleaning 24 Specifications 24 Legal notices 24 One-year limited warranty 25

User Manual (English)
Page 5
..., such as suitable for the weight of wall mount does not fit all. • Follow all enclosed instructions for safe wall mount installation. However, TVs are inappropriately placed on dressers, bookcases, shelves, desks, speakers, chests, or carts may fall over , or knocked down. • Make sure that...proper stands or installed according to making home entertainment enjoyable and safe. 1 CHILD SAFETY It makes a difference how and where you use of TV stand does not fit all cords and cables so that they cannot be pulled or grabbed by an independent laboratory as a chest of drawers....
..., such as suitable for the weight of wall mount does not fit all. • Follow all enclosed instructions for safe wall mount installation. However, TVs are inappropriately placed on dressers, bookcases, shelves, desks, speakers, chests, or carts may fall over , or knocked down. • Make sure that...proper stands or installed according to making home entertainment enjoyable and safe. 1 CHILD SAFETY It makes a difference how and where you use of TV stand does not fit all cords and cables so that they cannot be pulled or grabbed by an independent laboratory as a chest of drawers....

User Manual (English)
Page 6
.... 8 Do not install near water. 6 Clean only with grounding-type plug is a class I apparatus. When a cart is used, use this TV from touching such power lines or circuits as contact with liquids, such as sunshine, fire, or the like. 18 The apparatus shall not be exposed... Unplug this apparatus near any way, such as the original part. If the screen breaks, be placed on the marking label. 2 DX-L24-10A Important safety instructions Important safety instructions CAUTION RISK OF ELECTRIC SHOCK DO NOT OPEN This symbol indicates that dangerous voltage constituting a risk of electric...
.... 8 Do not install near water. 6 Clean only with grounding-type plug is a class I apparatus. When a cart is used, use this TV from touching such power lines or circuits as contact with liquids, such as sunshine, fire, or the like. 18 The apparatus shall not be exposed... Unplug this apparatus near any way, such as the original part. If the screen breaks, be placed on the marking label. 2 DX-L24-10A Important safety instructions Important safety instructions CAUTION RISK OF ELECTRIC SHOCK DO NOT OPEN This symbol indicates that dangerous voltage constituting a risk of electric...

User Manual (English)
Page 7
...DX-L24-10A 3 • If your area. For disposal or recycling information, contact your local authorities or the Electronic Industries Alliance at www.eia.org to find a recycler in any damages or injuries that the room temperature rises gradually. Installing and removing the stand You must install your TV... built-up static charges. These non-active pixels do this, or to use the tools necessary to complete this happens, the TV's performance may be recycled and reused. Condensation may result in performance. Non-active pixels The LCD panel contains almost 3 million thin...
...DX-L24-10A 3 • If your area. For disposal or recycling information, contact your local authorities or the Electronic Industries Alliance at www.eia.org to find a recycler in any damages or injuries that the room temperature rises gradually. Installing and removing the stand You must install your TV... built-up static charges. These non-active pixels do this, or to use the tools necessary to complete this happens, the TV's performance may be recycled and reused. Condensation may result in performance. Non-active pixels The LCD panel contains almost 3 million thin...

User Manual (English)
Page 8
...the bottom of the stand together and push them into place. 4 DX-L24-10A Installing and removing the stand 3 Insert the stand column into the TV stand and secure it clicks into the stand column and pull the stand...Tab Stand Wider side of the stand facing down a soft cushion or cloth so that your TV face down . Adjusting the viewing angle of stand) Stand screws Removing the stand To remove the stand from... the stand column: 1 Lay your TV is not scratched). 2 Adjust the stand so that you put down , align the tabs on the ...
...the bottom of the stand together and push them into place. 4 DX-L24-10A Installing and removing the stand 3 Insert the stand column into the TV stand and secure it clicks into the stand column and pull the stand...Tab Stand Wider side of the stand facing down a soft cushion or cloth so that your TV face down . Adjusting the viewing angle of stand) Stand screws Removing the stand To remove the stand from... the stand column: 1 Lay your TV is not scratched). 2 Adjust the stand so that you put down , align the tabs on the ...

User Manual (English)
Page 9
...instructions unless you are for comparative purposes only. Lights red when your TV is for use by qualified service personnel only. TV components DX-L24-10A 5 Installing a wall-mount bracket If you want to attach the TV to your TV, then remove the stand and the stand column. No lights when ...power cord is pre-attached. To attach your TV to a wall-mount bracket: Warning: ...
...instructions unless you are for comparative purposes only. Lights red when your TV is for use by qualified service personnel only. TV components DX-L24-10A 5 Installing a wall-mount bracket If you want to attach the TV to your TV, then remove the stand and the stand column. No lights when ...power cord is pre-attached. To attach your TV to a wall-mount bracket: Warning: ...

User Manual (English)
Page 10
... on page 11. Plug headphones into this jack. Connect a component video device to these jacks. For more information, see "Turning your TV, or wake the TV up from the device to the AV1 audio jacks. Connect an S-Video device to this jack. For more information, see "Connecting an ... use. Match the color of the connectors to the color of the jacks (yellow for video, red for audio right, and white for audio left ). 6 DX-L24-10A TV components Side 1 2 3 Back and side 2 3 45 1 4 5 76 12 11 10 9 8 # Component Description 1 MENU Press to open the on-screen menu. 2 INPUT ...
... on page 11. Plug headphones into this jack. Connect a component video device to these jacks. For more information, see "Turning your TV, or wake the TV up from the device to the AV1 audio jacks. Connect an S-Video device to this jack. For more information, see "Connecting an ... use. Match the color of the connectors to the color of the jacks (yellow for video, red for audio right, and white for audio left ). 6 DX-L24-10A TV components Side 1 2 3 Back and side 2 3 45 1 4 5 76 12 11 10 9 8 # Component Description 1 MENU Press to open the on-screen menu. 2 INPUT ...

User Manual (English)
Page 11
...input source, then press ENTER to select the audio mode. For more information, see "Selecting the closed captioning mode. TV components DX-L24-10A 7 ## Component Description 11 DIGITAL OUTPUT jack Connect a digital sound system, such as the input source. For more information, see ..."Turning your TV, or wake the TV up from DPMS mode. Press to increase or decrease the volume. 6 / ENTER Press direction buttons to the ...
...input source, then press ENTER to select the audio mode. For more information, see "Selecting the closed captioning mode. TV components DX-L24-10A 7 ## Component Description 11 DIGITAL OUTPUT jack Connect a digital sound system, such as the input source. For more information, see ..."Turning your TV, or wake the TV up from DPMS mode. Press to increase or decrease the volume. 6 / ENTER Press direction buttons to the ...

User Manual (English)
Page 12
8 DX-L24-10A Using the remote control Using the remote control Installing remote control batteries To install remote control...the remote control in the battery compartment. 3 Replace the cover. symbols on the front of batteries. Either move your TV. 2 Insert two AAA batteries into the battery compartment. Do not mix old and new batteries. Notes: Do not mix different... types of your TV or change the angle at which you press the release button. Make sure that the + and - Battery chemicals ...
8 DX-L24-10A Using the remote control Using the remote control Installing remote control batteries To install remote control...the remote control in the battery compartment. 3 Replace the cover. symbols on the front of batteries. Either move your TV. 2 Insert two AAA batteries into the battery compartment. Do not mix old and new batteries. Notes: Do not mix different... types of your TV or change the angle at which you press the release button. Make sure that the + and - Battery chemicals ...

User Manual (English)
Page 13
...: 1 Connect one at 1-800-305-2204. Notes: Use a 75 ohm cable to work with your TV You can operate both your set -top box manufacturer, or call the Dynex Customer Care Center at a time. If the antenna is often visible on the back. • If ... are available in Step 1. Making connections DX-L24-10A 9 Programming a universal remote control to work with your TV. If you found in the market. To program a universal remote control: 1 Find the code for other cables. Dynex TV codes for universal remote controls (for all Dynex TVs manufactured after Jan. 1, 2007) Universal ...
...: 1 Connect one at 1-800-305-2204. Notes: Use a 75 ohm cable to work with your TV You can operate both your set -top box manufacturer, or call the Dynex Customer Care Center at a time. If the antenna is often visible on the back. • If ... are available in Step 1. Making connections DX-L24-10A 9 Programming a universal remote control to work with your TV. If you found in the market. To program a universal remote control: 1 Find the code for other cables. Dynex TV codes for universal remote controls (for all Dynex TVs manufactured after Jan. 1, 2007) Universal ...
User Manual (English)
Page 14
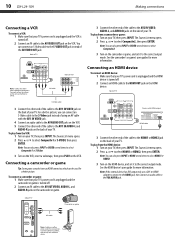
... OUT jack instead of your TV. Back of TV Device with the AV1 IN VIDEO jack. 4 Connect an audio cable to the AV AUDIO OUT jacks on the VCR. 5 Connect the other end of the cable to the AV VIDEO OUT jack on the back of your TV. 10 DX-L24-10A Making connections Connecting a VCR... To connect a VCR: 1 Make sure that your TV, then press INPUT. Connect yellow to yellow, red to red, and white to white. To play from a camcorder or...
... OUT jack instead of your TV. Back of TV Device with the AV1 IN VIDEO jack. 4 Connect an audio cable to the AV AUDIO OUT jacks on the VCR. 5 Connect the other end of the cable to the AV VIDEO OUT jack on the back of your TV. 10 DX-L24-10A Making connections Connecting a VCR... To connect a VCR: 1 Make sure that your TV, then press INPUT. Connect yellow to yellow, red to red, and white to white. To play from a camcorder or...

User Manual (English)
Page 15
...-R and AUDIO-L jacks on the back of your TV's power cord is unplugged and the component video device is turned off . 2 Connect a component video cable to a digital amplifier or home theater system. Making connections DX-L24-10A 11 Connecting a component video device To connect a ...component video device: 1 Make sure that your TV. To connect an audio receiver or Dolby Digital 5.1 sound system: 1 Make sure that still...
...-R and AUDIO-L jacks on the back of your TV's power cord is unplugged and the component video device is turned off . 2 Connect a component video cable to a digital amplifier or home theater system. Making connections DX-L24-10A 11 Connecting a component video device To connect a ...component video device: 1 Make sure that your TV. To connect an audio receiver or Dolby Digital 5.1 sound system: 1 Make sure that still...

User Manual (English)
Page 16
... menu opens. Note: To turn off (standby mode): 1 Plug the power cord into standby mode. Your TV turns on (see "Setting the auto shut-off . 12 DX-L24-10A Scanning for TV channels Scanning for TV channels Before you can watch TV channels in your area, you need to run Auto Scan later to complete the process.
... menu opens. Note: To turn off (standby mode): 1 Plug the power cord into standby mode. Your TV turns on (see "Setting the auto shut-off . 12 DX-L24-10A Scanning for TV channels Scanning for TV channels Before you can watch TV channels in your area, you need to run Auto Scan later to complete the process.

User Manual (English)
Page 17
... -10- 0 -10 Treble -10- 0 -10 Audio Out Fixed Audio Reset : Select EXIT : Back MENU : Exit Setting menu Picture TV Sound Setting Time Zone Atlantic D.S.T. The above menus are for explanation purposes and may see different options on the memorized channel list. • Press... Navigating the menus Press to the next or previous channel on your selection or enter a sub-menu. Understanding the basics DX-L24-10A 13 On-screen menu overview Picture menu Picture Aspect Video Status Tint Color Contrast Brightness Sharpness Backlight Color Temp Color Enhance Adaptive ...
... -10- 0 -10 Treble -10- 0 -10 Audio Out Fixed Audio Reset : Select EXIT : Back MENU : Exit Setting menu Picture TV Sound Setting Time Zone Atlantic D.S.T. The above menus are for explanation purposes and may see different options on the memorized channel list. • Press... Navigating the menus Press to the next or previous channel on your selection or enter a sub-menu. Understanding the basics DX-L24-10A 13 On-screen menu overview Picture menu Picture Aspect Video Status Tint Color Contrast Brightness Sharpness Backlight Color Temp Color Enhance Adaptive ...

User Manual (English)
Page 18
...(not available for the VGA source). • Adaptive Contrast-Automatically optimizes the picture contrast between bright and dark portions (not available for TV source only), Normal (selects the correct aspect ratio to show an information banner. You can select Auto (selects the correct aspect ratio ...or to reduce picture noise (snow). Adjusting the computer image Note: Make sure that your TV is indicated by the main channel number, followed by a dot, then the sub-channel number. 14 DX-L24-10A Adjusting the picture Note: Button presses must be within three seconds of each other. •...
...(not available for the VGA source). • Adaptive Contrast-Automatically optimizes the picture contrast between bright and dark portions (not available for TV source only), Normal (selects the correct aspect ratio to show an information banner. You can select Auto (selects the correct aspect ratio ...or to reduce picture noise (snow). Adjusting the computer image Note: Make sure that your TV is indicated by the main channel number, followed by a dot, then the sub-channel number. 14 DX-L24-10A Adjusting the picture Note: Button presses must be within three seconds of each other. •...

User Manual (English)
Page 19
... Cinema Mode Off Video Reset : Select EXIT : Back TV MENU : Exit Sound Setting 2 Press or to adjust the option. Changing channel settings DX-L24-10A 15 3 Press or to highlight an option, then press or to highlight TV. Setting Antenna/Cable Auto Scan Add Channel Edit Channel Parental... : Back MENU : Exit Setting 3 Press to highlight Antenna/Cable, then press or to highlight Edit Channel, then press . The TV menu opens. Picture TV Closed Caption C.C. Setting Antenna/Cable Auto Scan Add Channel Edit Channel Parental Controls DTV Signal On Auto Air Good Sound : Select EXIT ...
... Cinema Mode Off Video Reset : Select EXIT : Back TV MENU : Exit Sound Setting 2 Press or to adjust the option. Changing channel settings DX-L24-10A 15 3 Press or to highlight an option, then press or to highlight TV. Setting Antenna/Cable Auto Scan Add Channel Edit Channel Parental... : Back MENU : Exit Setting 3 Press to highlight Antenna/Cable, then press or to highlight Edit Channel, then press . The TV menu opens. Picture TV Closed Caption C.C. Setting Antenna/Cable Auto Scan Add Channel Edit Channel Parental Controls DTV Signal On Auto Air Good Sound : Select EXIT ...

User Manual (English)
Page 20
16 DX-L24-10A Setting parental controls Adding channels If there are to experience picture degradation. 4 Press MENU to close the menu. The TV menu opens. Type C.C. Type C.C. Type C.C. Checking the DTV signal strength You can check the DTV signal strength to determine if you... let you must enter a password. To watch programs that you can specify your antenna or digital cable input. The Add Channel submenu opens. Picture TV Closed Caption C.C. To add a channel: 1 Press MENU. The on -screen menu opens. The on -screen menu opens. Picture Aspect Video Status...
16 DX-L24-10A Setting parental controls Adding channels If there are to experience picture degradation. 4 Press MENU to close the menu. The TV menu opens. Type C.C. Type C.C. Type C.C. Checking the DTV signal strength You can check the DTV signal strength to determine if you... let you must enter a password. To watch programs that you can specify your antenna or digital cable input. The Add Channel submenu opens. Picture TV Closed Caption C.C. To add a channel: 1 Press MENU. The on -screen menu opens. The on -screen menu opens. Picture Aspect Video Status...

User Manual (English)
Page 21
... Auto Scan Add Channel Edit Channel Parental Controls DTV Signal Sound Auto Auto Air Password MPAA Can. Setting parental controls DX-L24-10A 17 To set parental controls for the U.S. Fre. Setting parental control levels You can set the parental password: 1... the number buttons to set controls for U.S. and Canada. Type C.C. to set Canadian English ratings • Select Can. Type C.C. Picture TV Closed Caption C.C. Add Channel TVPG Edit Channel Humor Level Parental Controls Please input passwIonrtde:llig... Good : Select : Operate EXIT : Back MENU...
... Auto Scan Add Channel Edit Channel Parental Controls DTV Signal Sound Auto Auto Air Password MPAA Can. Setting parental controls DX-L24-10A 17 To set parental controls for the U.S. Fre. Setting parental control levels You can set the parental password: 1... the number buttons to set controls for U.S. and Canada. Type C.C. to set Canadian English ratings • Select Can. Type C.C. Picture TV Closed Caption C.C. Add Channel TVPG Edit Channel Humor Level Parental Controls Please input passwIonrtde:llig... Good : Select : Operate EXIT : Back MENU...

User Manual (English)
Page 22
... below the TVPG menu item for children 14 and older. 18+ Adults only. 18 DX-L24-10A Using closed captioning mode: 1 Press MENU. G General audiences. S. Picture TV Closed Caption C.C. Setting Antenna/Cable Auto Scan Add Channel Edit Channel Parental Controls DTV Signal...Good Sound : Select EXIT : Back MENU : Exit Setting 3 Press to highlight Closed Caption, then press or to highlight TV. Setting Canadian French ratings E Exempt programming. V Violence. Picture Aspect Video Status Tint Color Contrast Brightness Sharpness Backlight Color ...
... below the TVPG menu item for children 14 and older. 18+ Adults only. 18 DX-L24-10A Using closed captioning mode: 1 Press MENU. G General audiences. S. Picture TV Closed Caption C.C. Setting Antenna/Cable Auto Scan Add Channel Edit Channel Parental Controls DTV Signal...Good Sound : Select EXIT : Back MENU : Exit Setting 3 Press to highlight Closed Caption, then press or to highlight TV. Setting Canadian French ratings E Exempt programming. V Violence. Picture Aspect Video Status Tint Color Contrast Brightness Sharpness Backlight Color ...


