
User Manual (English)
Page 2
ii Dynex DX-L15-L19-L22-10A 15", 19", and 22" LCD TVs Contents Child Safety 1 Important safety instructions 2 Warnings 2 Cautions 2 Installing and removing the stand 3 Installing the stand 3 Adjusting the viewing angle of the TV 4 Removing the stand 4 Installing a wall-mount bracket 4 TV components 5 Front 5 Side 5 Back ... channel 12 Adjusting the volume 12 Adjusting basic settings 12 Displaying additional information 13 Adjusting the picture 13 Adjusting the TV picture 13 Adjusting Advanced Video settings 13 Adjusting the computer image 14 Adjusting the sound 14 Adjusting ...
ii Dynex DX-L15-L19-L22-10A 15", 19", and 22" LCD TVs Contents Child Safety 1 Important safety instructions 2 Warnings 2 Cautions 2 Installing and removing the stand 3 Installing the stand 3 Adjusting the viewing angle of the TV 4 Removing the stand 4 Installing a wall-mount bracket 4 TV components 5 Front 5 Side 5 Back ... channel 12 Adjusting the volume 12 Adjusting basic settings 12 Displaying additional information 13 Adjusting the picture 13 Adjusting the TV picture 13 Adjusting Advanced Video settings 13 Adjusting the computer image 14 Adjusting the sound 14 Adjusting ...
User Manual (English)
Page 6
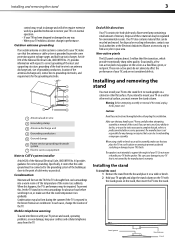
...sure that you intend to mishandling or improper assembly. When this installation. Non-active pixels The LCD panel contains almost 3 million thin film transistors, which provide exceptionally sharp video quality. If you handle your TV into the stand. This can be regulated for the grounding electrode. 1 2 3 4 ... Mobile telephone warning To avoid interference with your TV picture and sound, operating problems, or even damage, keep your TV, and are not sure of the room rises suddenly. The speaker is connected to your TV on a soft cushion or covering to prevent ...
...sure that you intend to mishandling or improper assembly. When this installation. Non-active pixels The LCD panel contains almost 3 million thin film transistors, which provide exceptionally sharp video quality. If you handle your TV into the stand. This can be regulated for the grounding electrode. 1 2 3 4 ... Mobile telephone warning To avoid interference with your TV picture and sound, operating problems, or even damage, keep your TV, and are not sure of the room rises suddenly. The speaker is connected to your TV on a soft cushion or covering to prevent ...
User Manual (English)
Page 9
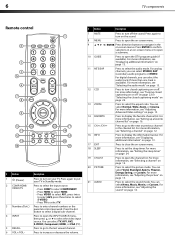
... "Turning closed captioning on or off" on page 22 or "Selecting the closed captioning on or off the sound. For more information, see "Adjusting the picture" on -screen menus. Press again to confirm selections in the on page 13. Press ENTER to put your TV. For more information, see "Adjusting the sound" on...
... "Turning closed captioning on or off" on page 22 or "Selecting the closed captioning on or off the sound. For more information, see "Adjusting the picture" on -screen menus. Press again to confirm selections in the on page 13. Press ENTER to put your TV. For more information, see "Adjusting the sound" on...

User Manual (English)
Page 11
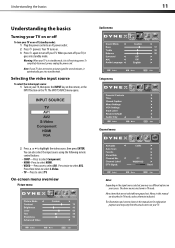
... of the cable to the AV AUDIO OUT jacks on the VCR. 5 Connect the other end of your TV. Back of VCR AV cable S-Video cable 3 Connect the other end of your TV. For a better picture, you can connect an S-Video cable to the AV OUT VIDEO, AUDIO-L, and AUDIO-R jacks on the... type before making any connections. Connecting a VCR To connect a VCR: 1 Make sure that came with your TV for a better picture. Back of time. The INPUT SOURCE menu opens. 2 Press or to the user manual that your TV, then press INPUT. Note: You can be using an AV cable with the power cord or...
... of the cable to the AV AUDIO OUT jacks on the VCR. 5 Connect the other end of your TV. Back of VCR AV cable S-Video cable 3 Connect the other end of your TV. For a better picture, you can connect an S-Video cable to the AV OUT VIDEO, AUDIO-L, and AUDIO-R jacks on the... type before making any connections. Connecting a VCR To connect a VCR: 1 Make sure that came with your TV for a better picture. Back of time. The INPUT SOURCE menu opens. 2 Press or to the user manual that your TV, then press INPUT. Note: You can be using an AV cable with the power cord or...
User Manual (English)
Page 12
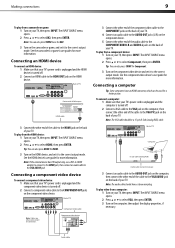
... the display properties, if necessary. Connecting a computer Tip: Some computers have a stereo mini plug. To connect a computer: 1 Make sure that your TV's power cord is unplugged and the computer is turned off . 2 Connect a component video cable to select Component, then press ENTER. The INPUT SOURCE ...menu opens. 2 Press or to the COMPONENT OUT jacks on the component video device. Tip: You can also press HDMI for a better picture. See the camcorder's or game's user guides for more information. See the HDMI device's user guide for more information. Note: The VGA ...
... the display properties, if necessary. Connecting a computer Tip: Some computers have a stereo mini plug. To connect a computer: 1 Make sure that your TV's power cord is unplugged and the computer is turned off . 2 Connect a component video cable to select Component, then press ENTER. The INPUT SOURCE ...menu opens. 2 Press or to the COMPONENT OUT jacks on the component video device. Tip: You can also press HDMI for a better picture. See the camcorder's or game's user guides for more information. See the HDMI device's user guide for more information. Note: The VGA ...
User Manual (English)
Page 14
... not selectable are for several minutes, it goes into standby mode. Warning: When your TV. On-screen menu overview Picture menu Notes: Depending on the signal source selected, you turn off your TV does not receive an input signal for explanation purposes and may see different options on .... 3 Press again to turn your TV on the TV. The illustrations and screens shown in TV mode. The...
... not selectable are for several minutes, it goes into standby mode. Warning: When your TV. On-screen menu overview Picture menu Notes: Depending on the signal source selected, you turn off your TV does not receive an input signal for explanation purposes and may see different options on .... 3 Press again to turn your TV on the TV. The illustrations and screens shown in TV mode. The...
User Manual (English)
Page 15
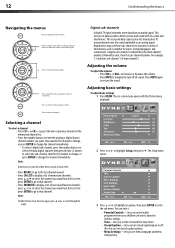
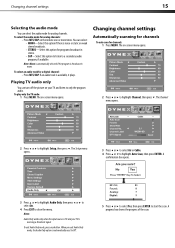
Press to select the menu items. Press to confirm your saved favorite channels, press or to select the sub-channel. Digital sub-channels A digital TV signal transmits more than an analog signal. Adjusting the volume To adjust the volume: • Press VOL+ or VOL- You can select: ...8226; Press CH-LIST to enter the analog or digital (main) channel number you turn off . This increase in data provides a better picture and sound with the Picture menu displayed. Wait for the channel to change, or press ENTER to transmit a variety of main channel 5. Parental Controls 3 Press or ...
Press to select the menu items. Press to confirm your saved favorite channels, press or to select the sub-channel. Digital sub-channels A digital TV signal transmits more than an analog signal. Adjusting the volume To adjust the volume: • Press VOL+ or VOL- You can select: ...8226; Press CH-LIST to enter the analog or digital (main) channel number you turn off . This increase in data provides a better picture and sound with the Picture menu displayed. Wait for the channel to change, or press ENTER to transmit a variety of main channel 5. Parental Controls 3 Press or ...
User Manual (English)
Page 16
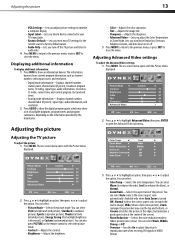
... then press or to adjust the option. You can select: • Picture Mode-Selects the picture mode. Adjusting the TV picture To adjust the picture: 1 Press MENU. Available only when Auto Zoom is decreased), or Custom (customized picture). Displaying additional information To display additional information: 1 Press INFO to show ...to factory default values. • Audio Only-Lets you turn Noise Reduction, Overscan, Adaptive Contrast, and Auto Zoom on or off the TV picture and listen to audio only. 4 Press MENU to return to the previous menu, or press EXIT to close the menu. You can ...
... then press or to adjust the option. You can select: • Picture Mode-Selects the picture mode. Adjusting the TV picture To adjust the picture: 1 Press MENU. Available only when Auto Zoom is decreased), or Custom (customized picture). Displaying additional information To display additional information: 1 Press INFO to show ...to factory default values. • Audio Only-Lets you turn Noise Reduction, Overscan, Adaptive Contrast, and Auto Zoom on or off the TV picture and listen to audio only. 4 Press MENU to return to the previous menu, or press EXIT to close the menu. You can ...
User Manual (English)
Page 17
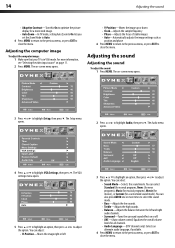
14 Adjusting the sound • Adaptive Contrast-Turn this On to optimize the picture display for all channels. • Audio Language-(DTV channels only) Selects an alternate...or to close the menu. You can also press AUDIO one or more vivid image. • Auto Zoom-In TV mode, setting Auto Zoom to On lets you set the Zoom Mode to Auto. 4 Press MENU to return to...2 Press or to adjust the option. Adjusting the computer image To adjust the computer image: 1 Make sure that your TV is in VGA mode. The on or off. • AVC-(Auto volume control) Equalizes the overall volume levels for ...
14 Adjusting the sound • Adaptive Contrast-Turn this On to optimize the picture display for all channels. • Audio Language-(DTV channels only) Selects an alternate...or to close the menu. You can also press AUDIO one or more vivid image. • Auto Zoom-In TV mode, setting Auto Zoom to On lets you set the Zoom Mode to Auto. 4 Press MENU to return to...2 Press or to adjust the option. Adjusting the computer image To adjust the computer image: 1 Make sure that your TV is in VGA mode. The on or off. • AVC-(Auto volume control) Equalizes the overall volume levels for ...
User Manual (English)
Page 18
...audio track is receiving a broadcast signal. Notes: Audio Only works only when the input source is TV and your TV and listen to only the program audio. Playing TV audio only You can turn off the picture on your TV is available, it plays. The on -screen menu opens. 2 Press or to a secondary ...select: • MONO-Select this option to listen to highlight Channel, then press . To exit Audio Only mode, press any button. To play only the TV audio: 1 Press MENU. When you exit Audio Only mode, the Audio Only option is automatically reset to Off . 5 Press or to select Yes, ...
...audio track is receiving a broadcast signal. Notes: Audio Only works only when the input source is TV and your TV and listen to only the program audio. Playing TV audio only You can turn off the picture on your TV is available, it plays. The on -screen menu opens. 2 Press or to a secondary ...select: • MONO-Select this option to listen to highlight Channel, then press . To exit Audio Only mode, press any button. To play only the TV audio: 1 Press MENU. When you exit Audio Only mode, the Audio Only option is automatically reset to Off . 5 Press or to select Yes, ...

User Manual (English)
Page 21
... controls let you need to adjust your children from watching inappropriate material on -screen menu opens. 2 Press or to highlight Channel, then press . The on TV. The Channel menu opens. The Setup menu opens with some exceptions, such as news and sports) and deny access to programs that exceed the selected... digital cable input. The higher the signal strength, the less likely you select. To watch programs that exceed the ratings level you are to experience picture degradation.
... controls let you need to adjust your children from watching inappropriate material on -screen menu opens. 2 Press or to highlight Channel, then press . The on TV. The Channel menu opens. The Setup menu opens with some exceptions, such as news and sports) and deny access to programs that exceed the selected... digital cable input. The higher the signal strength, the less likely you select. To watch programs that exceed the ratings level you are to experience picture degradation.
User Manual (English)
Page 30
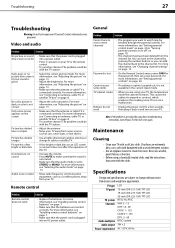
..., or hair dryers. Note: If the problem is set a new password. Contact authorized service personnel. Video and audio Problem Solution No picture or sound (the screen is not lit) Dark, poor, or no sound • Increase the volume. • Press MUTE to make... cord for the password, then set to change to the channel list. Specifications Design and specifications are approximate. TV type LCD TV panel 15-inch (DX-L15-10A) TFT LCD 19-inch (DX-L19-10A) TFT LCD TV system Channels 22-inch (DX-L22-10A) TFT LCD NTSC-M, ATSC VHF: 2 - 13 UHF: 14 - 69 CATV: 1 - 125 CADTV: 1-135 DTV:...
..., or hair dryers. Note: If the problem is set a new password. Contact authorized service personnel. Video and audio Problem Solution No picture or sound (the screen is not lit) Dark, poor, or no sound • Increase the volume. • Press MUTE to make... cord for the password, then set to change to the channel list. Specifications Design and specifications are approximate. TV type LCD TV panel 15-inch (DX-L15-10A) TFT LCD 19-inch (DX-L19-10A) TFT LCD TV system Channels 22-inch (DX-L22-10A) TFT LCD NTSC-M, ATSC VHF: 2 - 13 UHF: 14 - 69 CATV: 1 - 125 CADTV: 1-135 DTV:...


