Warranty (English)
Page 1
...by this warranty that requires service, terms of this warranty apply. This warranty does not cover: • Customer instruction • Installation • Set up adjustments • Cosmetic damage • Damage due to acts of God, such as you place the product in its sole option): (1) repair... the product with new or rebuilt comparable products or parts. 1 Year Limited Warranty Dynex Products ("Dynex") warrants to you, the original purchaser of this new product, that the product shall be free of defects in the original manufacture of...
...by this warranty that requires service, terms of this warranty apply. This warranty does not cover: • Customer instruction • Installation • Set up adjustments • Cosmetic damage • Damage due to acts of God, such as you place the product in its sole option): (1) repair... the product with new or rebuilt comparable products or parts. 1 Year Limited Warranty Dynex Products ("Dynex") warrants to you, the original purchaser of this new product, that the product shall be free of defects in the original manufacture of...
Warranty (English)
Page 2
... OF AND CONDITIONS OF MERCHANTABILITY AND FITNESS FOR A PARTICULAR PURPOSE, ARE LIMITED IN DURATION TO THE WARRANTY PERIOD SET FORTH ABOVE AND NO WARRANTIES, WHETHER EXPRESS OR IMPLIED, WILL APPLY AFTER THE WARRANTY PERIOD. Dynex, 7601 Penn Avenue South, Richfield, Minnesota, U.S.A. 2 www.dynexproducts.com SOME STATES, PROVINCES AND JURISDICTIONS DO NOT ALLOW...
... OF AND CONDITIONS OF MERCHANTABILITY AND FITNESS FOR A PARTICULAR PURPOSE, ARE LIMITED IN DURATION TO THE WARRANTY PERIOD SET FORTH ABOVE AND NO WARRANTIES, WHETHER EXPRESS OR IMPLIED, WILL APPLY AFTER THE WARRANTY PERIOD. Dynex, 7601 Penn Avenue South, Richfield, Minnesota, U.S.A. 2 www.dynexproducts.com SOME STATES, PROVINCES AND JURISDICTIONS DO NOT ALLOW...

User Manual (English)
Page 2
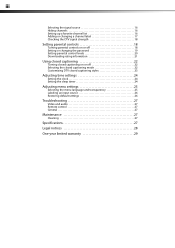
ii Dynex DX-L15-L19-L22-10A 15", 19", and 22" LCD TVs Contents Child Safety 1 Important safety instructions 2 Warnings 2 Cautions 2 Installing and removing the stand 3 Installing the stand 3 Adjusting the viewing angle of the TV 4 Removing the stand 4 Installing a wall-mount bracket 4 TV components 5 Front 5 Side 5 Back ...Selecting a channel 12 Adjusting the volume 12 Adjusting basic settings 12 Displaying additional information 13 Adjusting the picture 13 Adjusting the TV picture 13 Adjusting Advanced Video settings 13 Adjusting the computer image 14 Adjusting the sound 14...
ii Dynex DX-L15-L19-L22-10A 15", 19", and 22" LCD TVs Contents Child Safety 1 Important safety instructions 2 Warnings 2 Cautions 2 Installing and removing the stand 3 Installing the stand 3 Adjusting the viewing angle of the TV 4 Removing the stand 4 Installing a wall-mount bracket 4 TV components 5 Front 5 Side 5 Back ...Selecting a channel 12 Adjusting the volume 12 Adjusting basic settings 12 Displaying additional information 13 Adjusting the picture 13 Adjusting the TV picture 13 Adjusting Advanced Video settings 13 Adjusting the computer image 14 Adjusting the sound 14...
User Manual (English)
Page 3
... control levels 20 Downloading rating information 21 Using closed captioning 22 Turning closed captioning on or off 22 Selecting the closed captioning mode 22 Customizing DTV closed captioning styles 23 Adjusting time settings 24 Setting the clock 24 Setting the sleep timer 24 Adjusting menu settings 25 Selecting the menu language and transparency 25 Labeling an input...
... control levels 20 Downloading rating information 21 Using closed captioning 22 Turning closed captioning on or off 22 Selecting the closed captioning mode 22 Customizing DTV closed captioning styles 23 Adjusting time settings 24 Setting the clock 24 Setting the sleep timer 24 Adjusting menu settings 25 Selecting the menu language and transparency 25 Labeling an input...
User Manual (English)
Page 9
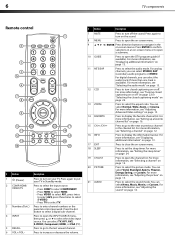
... decrease the volume. # Button Description 7 MUTE Press to turn off " on page 22 or "Selecting the closed captioning mode" on page 24. For more information, see "Setting the sleep timer" on page 22. 13 ZOOM Press to select the aspect ratio. For more information, see "Selecting a...screen menu or to open a submenu. 10 GUIDE Press to open the channel list. For more information, see "Setting up a favorite channel list" on or off the sound. 6 TV components Remote control INFO # Button Description 1 (Power) Press to turn on -screen menus. Press the dot button...
... decrease the volume. # Button Description 7 MUTE Press to turn off " on page 22 or "Selecting the closed captioning mode" on page 24. For more information, see "Setting the sleep timer" on page 22. 13 ZOOM Press to select the aspect ratio. For more information, see "Selecting a...screen menu or to open a submenu. 10 GUIDE Press to open the channel list. For more information, see "Setting up a favorite channel list" on or off the sound. 6 TV components Remote control INFO # Button Description 1 (Power) Press to turn on -screen menus. Press the dot button...
User Manual (English)
Page 10
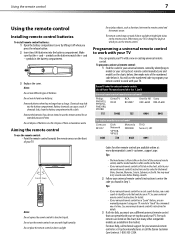
... work with your TV You can operate both your set-top box and your TV with your universal remote control or set -top box's remote control manufacturer and model) on the chart, but many other remote controls are available online at 1-800-305-2204. Dynex TV codes for universal remote controls (for all Dynex TVs manufactured after Jan...
... work with your TV You can operate both your set-top box and your TV with your universal remote control or set -top box's remote control manufacturer and model) on the chart, but many other remote controls are available online at 1-800-305-2204. Dynex TV codes for universal remote controls (for all Dynex TVs manufactured after Jan...
User Manual (English)
Page 12
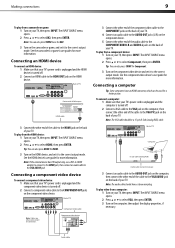
... component video device. See the component video device's user guide for HDMI. 3 Turn on the HDMI device, and set it to the COMPONENT AUDIO-R and AUDIO-L jacks on the back of your TV. Back of TV Computer D-Sub cable (analog RGB) Audio cable (stereo mini plugs) 3 Connect an audio cable to the AUDIO... You can also press HDMI for more information. See the camcorder's or game's user guides for Component. 3 Turn on the component video device and set it to the VGA PIC jack on the back of your TV. Audio cable To play from a camcorder or game: 1 Turn on the camcorder or game, and...
... component video device. See the component video device's user guide for HDMI. 3 Turn on the HDMI device, and set it to the COMPONENT AUDIO-R and AUDIO-L jacks on the back of your TV. Back of TV Computer D-Sub cable (analog RGB) Audio cable (stereo mini plugs) 3 Connect an audio cable to the AUDIO... You can also press HDMI for more information. See the camcorder's or game's user guides for Component. 3 Turn on the component video device and set it to the VGA PIC jack on the back of your TV. Audio cable To play from a camcorder or game: 1 Turn on the camcorder or game, and...
User Manual (English)
Page 13
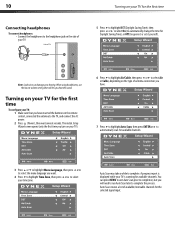
... (Power), then wait several seconds. The initial Setup Wizard screen opens (only the first time you hear the sound. Auto Scan creates a list of TV 5 Press to highlight DST (Daylight Saving Time), then press or to select On (to automatically change the time for the selected signal input. Side of... Time), or Off (to complete the process. Turning on the type of your TV. You can damage your TV is scanning for the first time To configure your time zone. When using headphones, use the lowest volume setting that you have . 7 Press to highlight Auto Scan, then press ENTER or ...
... (Power), then wait several seconds. The initial Setup Wizard screen opens (only the first time you hear the sound. Auto Scan creates a list of TV 5 Press to highlight DST (Daylight Saving Time), then press or to select On (to automatically change the time for the selected signal input. Side of... Time), or Off (to complete the process. Turning on the type of your TV. You can damage your TV is scanning for the first time To configure your time zone. When using headphones, use the lowest volume setting that you have . 7 Press to highlight Auto Scan, then press ENTER or ...
User Manual (English)
Page 15
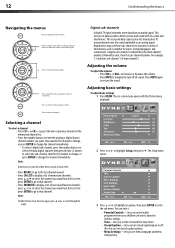
...to select the main digital channel, then press the dot (.) button to transmit a variety of main channel 5. Digital sub-channels A digital TV signal transmits more than an analog signal. Wait for the channel to change, or press ENTER to change , or press ENTER to adjust selected...increased data capacity also lets broadcasters fit several channels into the same bandwidth as weather forecasts, foreign languages, and commercials. Also lets you set menu language and menu transparency. Press to select the menu items. Press to close the menu. A digital sub-channel is indicated by ...
...to select the main digital channel, then press the dot (.) button to transmit a variety of main channel 5. Digital sub-channels A digital TV signal transmits more than an analog signal. Wait for the channel to change, or press ENTER to change , or press ENTER to adjust selected...increased data capacity also lets broadcasters fit several channels into the same bandwidth as weather forecasts, foreign languages, and commercials. Also lets you set menu language and menu transparency. Press to select the menu items. Press to close the menu. A digital sub-channel is indicated by ...
User Manual (English)
Page 16
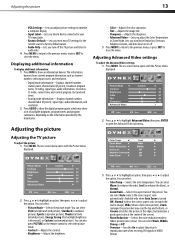
... optimize a computer display. • Input Label-Lets you label a device connected to your TV's input jacks. • Restore Default-Lets you reset most TV settings for the current source to factory default values. • Audio Only-Lets you adjust the Color Temperature or ... center of available programs, program times, and program summaries, depending on the information provided by the broadcaster. Adjusting Advanced Video settings To adjust the Advanced Video settings: 1 Press MENU. Color Temp Adaptive Contrast 2 Press or to highlight an option, then press or to enhance the blues...
... optimize a computer display. • Input Label-Lets you label a device connected to your TV's input jacks. • Restore Default-Lets you reset most TV settings for the current source to factory default values. • Audio Only-Lets you adjust the Color Temperature or ... center of available programs, program times, and program summaries, depending on the information provided by the broadcaster. Adjusting Advanced Video settings To adjust the Advanced Video settings: 1 Press MENU. Color Temp Adaptive Contrast 2 Press or to highlight an option, then press or to enhance the blues...
User Manual (English)
Page 17
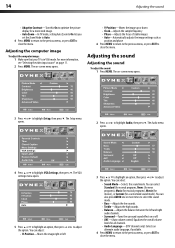
...), Music (for musical programs), Movie (for movies), or Custom (for a customized sound mode). The on -screen menu opens. 3 Press or to highlight VGA Settings, then press . Adjusting the sound Adjusting the sound To adjust the sound: 1 Press MENU. You can select: • Sound Mode-Selects the sound mode. ...sound • Adaptive Contrast-Turn this On to optimize the picture display for a more vivid image. • Auto Zoom-In TV mode, setting Auto Zoom to On lets you set the Zoom Mode to Auto. 4 Press MENU to return to the previous menu, or press EXIT to adjust the option. You...
...), Music (for musical programs), Movie (for movies), or Custom (for a customized sound mode). The on -screen menu opens. 3 Press or to highlight VGA Settings, then press . Adjusting the sound Adjusting the sound To adjust the sound: 1 Press MENU. You can select: • Sound Mode-Selects the sound mode. ...sound • Adaptive Contrast-Turn this On to optimize the picture display for a more vivid image. • Auto Zoom-In TV mode, setting Auto Zoom to On lets you set the Zoom Mode to Auto. 4 Press MENU to return to the previous menu, or press EXIT to adjust the option. You...
User Manual (English)
Page 18
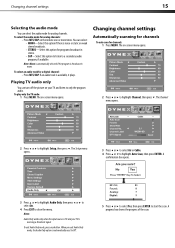
...Scan, then press ENTER. Parental Controls 3 Press or to select Air or Cable. 4 Press or to highlight Channel, then press . Changing channel settings 15 Selecting the audio mode You can select the audio mode for a digital channel: • Press MTS/SAP. The on the remote one ...broadcast in mono. Notes: Audio Only works only when the input source is TV and your TV and listen to a secondary audio program, if available. To select the audio mode for channels: 1 Press MENU. Changing channel settings Automatically scanning for channels To auto scan for analog channels: • Press...
...Scan, then press ENTER. Parental Controls 3 Press or to select Air or Cable. 4 Press or to highlight Channel, then press . Changing channel settings 15 Selecting the audio mode You can select the audio mode for a digital channel: • Press MTS/SAP. The on the remote one ...broadcast in mono. Notes: Audio Only works only when the input source is TV and your TV and listen to a secondary audio program, if available. To select the audio mode for channels: 1 Press MENU. Changing channel settings Automatically scanning for channels To auto scan for analog channels: • Press...
User Manual (English)
Page 19
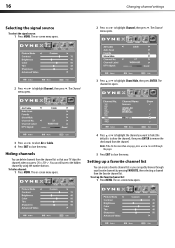
...using the number buttons. Note: If the list has more than one page, press or to scroll through your TV skips the channels when you can still tune to close the menu. To set up a favorite channel list You can create a favorite channel list so you press CH /CH . The ... opens. 2 Press or to highlight Show/Hide, then press ENTER. Hiding channels You can delete channels from the channel. Setting up the favorite channel list: 1 Press MENU. Changing channel settings 2 Press or to close the menu. The on -screen menu opens. 16 Selecting the signal source To select the signal...
...using the number buttons. Note: If the list has more than one page, press or to scroll through your TV skips the channels when you can still tune to close the menu. To set up a favorite channel list You can create a favorite channel list so you press CH /CH . The ... opens. 2 Press or to highlight Show/Hide, then press ENTER. Hiding channels You can delete channels from the channel. Setting up the favorite channel list: 1 Press MENU. Changing channel settings 2 Press or to close the menu. The on -screen menu opens. 16 Selecting the signal source To select the signal...

User Manual (English)
Page 20
Changing channel settings 17 2 Press or to the next position. The Channel menu opens. 5 Press or to highlight the channel you can also relabel a channel that is added ... screen opens. 7 Press or to select a character, then press or to move to highlight Channel, then press . The check mark disappears if you want to set up on -screen menu opens. 3 Select the signal source of the channel you want to label. 4 Highlight Channel No. , then press or to select the...
Changing channel settings 17 2 Press or to the next position. The Channel menu opens. 5 Press or to highlight the channel you can also relabel a channel that is added ... screen opens. 7 Press or to select a character, then press or to move to highlight Channel, then press . The check mark disappears if you want to set up on -screen menu opens. 3 Select the signal source of the channel you want to label. 4 Highlight Channel No. , then press or to select the...

User Manual (English)
Page 21
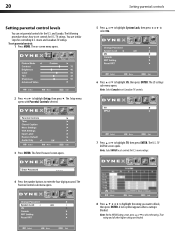
...such as news and sports) and deny access to adjust your children from watching inappropriate material on TV. The higher the signal strength, the less likely you are to highlight Channel, then press . Setting parental controls Parental controls let you must enter a password. The on-screen menu opens. 2 ... The on or off To turn parental controls on -screen menu opens. The Enter Password screen opens. The Channel menu opens. 18 Setting parental controls Checking the DTV signal strength You can check the DTV signal strength to determine if you need to programs that exceed the selected...
...such as news and sports) and deny access to adjust your children from watching inappropriate material on TV. The higher the signal strength, the less likely you are to highlight Channel, then press . Setting parental controls Parental controls let you must enter a password. The on-screen menu opens. 2 ... The on or off To turn parental controls on -screen menu opens. The Enter Password screen opens. The Channel menu opens. 18 Setting parental controls Checking the DTV signal strength You can check the DTV signal strength to determine if you need to programs that exceed the selected...

User Manual (English)
Page 22
...enter 9999. 7 Press EXIT to close the menu. The Setup menu opens with Parental Controls selected. Note: If you set up and to set up the blocking scheme (otherwise the rating setting can remember. The Parental Controls sub menu opens. 3 Press ENTER. The Parental Controls sub menu reopens... 2 Press or to highlight Change Password, then press ENTER. The default password is 0000. You should change the password to a number you set the parental password: 1 Press MENU. Parental Controls 6 Press the number buttons to disable the blocking scheme you can not be accessed) or Off...
...enter 9999. 7 Press EXIT to close the menu. The Setup menu opens with Parental Controls selected. Note: If you set up and to set up the blocking scheme (otherwise the rating setting can remember. The Parental Controls sub menu opens. 3 Press ENTER. The Parental Controls sub menu reopens... 2 Press or to highlight Change Password, then press ENTER. The default password is 0000. You should change the password to a number you set the parental password: 1 Press MENU. Parental Controls 6 Press the number buttons to disable the blocking scheme you can not be accessed) or Off...
User Manual (English)
Page 23
... number buttons to highlight Setup, then press . The US settings sub-menu opens. Note: Select Canada to select the rating. To set parental controls: 1 Press MENU. Note: Select MPAA to set controls for controlling U.S. Note: On the MPAA Rating screen, press or to set Canadian TV controls. The Setup menu opens with Parental Controls selected...
... number buttons to highlight Setup, then press . The US settings sub-menu opens. Note: Select Canada to select the rating. To set parental controls: 1 Press MENU. Note: Select MPAA to set controls for controlling U.S. Note: On the MPAA Rating screen, press or to set Canadian TV controls. The Setup menu opens with Parental Controls selected...

User Manual (English)
Page 24
... only. 3 Press ENTER. S. U.S. R Parental guidance suggested . N/A Movie is not rated. 2 Press or to use when setting parental controls. Setting parental controls 21 9 Press EXIT to enter the four-digit password. D Suggestive dialog. U. NC-17 Not suitable for children under 17. TV-G General audiences. To download rating information: 1 Press MENU. PG Parental guidance suggested...
... only. 3 Press ENTER. S. U.S. R Parental guidance suggested . N/A Movie is not rated. 2 Press or to use when setting parental controls. Setting parental controls 21 9 Press EXIT to enter the four-digit password. D Suggestive dialog. U. NC-17 Not suitable for children under 17. TV-G General audiences. To download rating information: 1 Press MENU. PG Parental guidance suggested...
User Manual (English)
Page 25
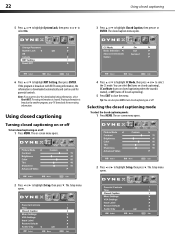
...1 Press MENU. The Setup menu opens. 2 Press or to highlight Closed Caption, then press or ENTER. 22 Using closed captioning 5 Press or to highlight System Lock, then press or to select On. 3 Press or... CC mode. The Setup menu opens. The rating information is broadcast by another program, your TV downloads the new rating information. Tip: You can be used for parental controls. If the... can also press CCD to turn closed captioning on closed captioning). 5 Press EXIT to highlight RRT Setting, then press ENTER. The on-screen menu opens. 2 Press or to clear the downloaded rating ...
...1 Press MENU. The Setup menu opens. 2 Press or to highlight Closed Caption, then press or ENTER. 22 Using closed captioning 5 Press or to highlight System Lock, then press or to select On. 3 Press or... CC mode. The Setup menu opens. The rating information is broadcast by another program, your TV downloads the new rating information. Tip: You can be used for parental controls. If the... can also press CCD to turn closed captioning on closed captioning). 5 Press EXIT to highlight RRT Setting, then press ENTER. The on-screen menu opens. 2 Press or to clear the downloaded rating ...
User Manual (English)
Page 27
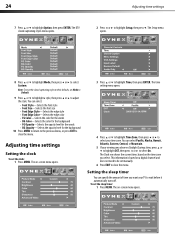
... a style, then press or to highlight Option, then press ENTER. This information is based on the time zone you want your TV to select On. The time setting menu opens. 4 Press or to highlight Time Zone, then press or to select your viewing area observes Daylight Savings time, press ...or to highlight DST, then press or to wait before it automatically turns off. Setting the sleep timer You can select Pacific, Alaska, Hawaii, Atlantic, Eastern, Central, or Mountain. 5 If your time zone. Parental Controls 8 Press or ...
... a style, then press or to highlight Option, then press ENTER. This information is based on the time zone you want your TV to select On. The time setting menu opens. 4 Press or to highlight Time Zone, then press or to select your viewing area observes Daylight Savings time, press ...or to highlight DST, then press or to wait before it automatically turns off. Setting the sleep timer You can select Pacific, Alaska, Hawaii, Atlantic, Eastern, Central, or Mountain. 5 If your time zone. Parental Controls 8 Press or ...


