Quick Setup Guide (English)
Page 1
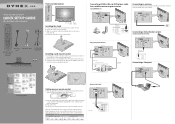
... PR 2 Insert two AAA batteries into the battery compartment. symbols in the battery compartment. 3 Replace the cover. Universal remote control TV codes (for all Dynex TVs manufactured after Jan. 1, 2007) Universal remote control makers and models Philips PHDVD5, PH5DSS, PMDVR8, PDVR8 RCA RCU807 One for the... on the back of the remote, lift the cover off the remote. 19"/22"LCD/DVD Combo TV QUICK SETUP GUIDE DX-19LD150A11/DX-22LD150A11 Front and side features Remote control Power sensor indicator Installing the stand 1 Remove the stand from damages and scratches. 2 Remove the two screws...
... PR 2 Insert two AAA batteries into the battery compartment. symbols in the battery compartment. 3 Replace the cover. Universal remote control TV codes (for all Dynex TVs manufactured after Jan. 1, 2007) Universal remote control makers and models Philips PHDVD5, PH5DSS, PMDVR8, PDVR8 RCA RCU807 One for the... on the back of the remote, lift the cover off the remote. 19"/22"LCD/DVD Combo TV QUICK SETUP GUIDE DX-19LD150A11/DX-22LD150A11 Front and side features Remote control Power sensor indicator Installing the stand 1 Remove the stand from damages and scratches. 2 Remove the two screws...
Quick Setup Guide (English)
Page 2
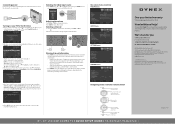
...2 2 " LC D / D V D CO M B O T V I Q U I C K S E T U P G U I D E I DX-19LD150A11/DX-22LD150A11 ENGLISH 09-1087 09-0xxx Press to a power outlet. Need additional help? We're here for you selected Antenna or Cable, your TV automatically scans for the first time 1 Plug in your TV and turn off the sound. Santa Fe 485, Segundo Piso...169; 2009 BBY Solutions, Inc. All rights reserved. DYNEX is a trademark of the video source buttons directly. Connecting power Connect the power cable to the AC IN jack on the back of the TV, then connect the other products and brand names are ...
...2 2 " LC D / D V D CO M B O T V I Q U I C K S E T U P G U I D E I DX-19LD150A11/DX-22LD150A11 ENGLISH 09-1087 09-0xxx Press to a power outlet. Need additional help? We're here for you selected Antenna or Cable, your TV automatically scans for the first time 1 Plug in your TV and turn off the sound. Santa Fe 485, Segundo Piso...169; 2009 BBY Solutions, Inc. All rights reserved. DYNEX is a trademark of the video source buttons directly. Connecting power Connect the power cable to the AC IN jack on the back of the TV, then connect the other products and brand names are ...
User Manual (English)
Page 2
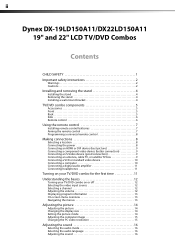
ii Dynex DX-19LD150A11/DX22LD150A11 19" and 22" LCD TV/DVD Combos Contents CHILD SAFETY 1 Important safety instructions 2 Warnings 2 Cautions 2 Installing and removing the stand 4 Installing the stand 4 Removing the stand 4 Installing a wall-mount bracket 4 TV/DVD combo components 5 Accessories 5 Front 5... Selecting a location 8 Connecting the power 8 Connecting an HDMI or DVI device (best picture 9 Connecting a component video device (better connection 9 Connecting an S-Video device (good connection 9 Connecting an antenna, cable TV, or satellite TV box 9 Connecting a VCR or ...
ii Dynex DX-19LD150A11/DX22LD150A11 19" and 22" LCD TV/DVD Combos Contents CHILD SAFETY 1 Important safety instructions 2 Warnings 2 Cautions 2 Installing and removing the stand 4 Installing the stand 4 Removing the stand 4 Installing a wall-mount bracket 4 TV/DVD combo components 5 Accessories 5 Front 5... Selecting a location 8 Connecting the power 8 Connecting an HDMI or DVI device (best picture 9 Connecting a component video device (better connection 9 Connecting an S-Video device (good connection 9 Connecting an antenna, cable TV, or satellite TV box 9 Connecting a VCR or ...
User Manual (English)
Page 6
.... 2 DX-19LD150A11/DX-22LD150A11 Important safety instructions Important safety instructions CAUTION RISK OF ELECTRIC SHOCK DO NOT OPEN This symbol indicates that dangerous voltage constituting a risk of electric shock is made of glass. Install in fire, electric shock, personal injury, or other electric light or power circuits, or where it can fall into your TV...
.... 2 DX-19LD150A11/DX-22LD150A11 Important safety instructions Important safety instructions CAUTION RISK OF ELECTRIC SHOCK DO NOT OPEN This symbol indicates that dangerous voltage constituting a risk of electric shock is made of glass. Install in fire, electric shock, personal injury, or other electric light or power circuits, or where it can fall into your TV...
User Manual (English)
Page 7
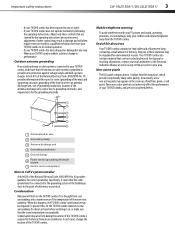
... combo stand in your area. Disposal of these materials may be recycled and reused. Important safety instructions DX-19LD150A11/DX-22LD150A11 3 • If your TV/DVD combo has been exposed to CATV system installer Article 820 of the National Electrical Code, ANSI/NFPA No.... In such cases, change in wire 2 Grounding clamp 3 Antenna discharge unit 4 Grounding conductors 5 Ground clamps 6 Power service grounding electrode system 7 Electric service equipment Note to rain or water. • If your TV/DVD combo does not operate normally by a qualified technician to restore your...
... combo stand in your area. Disposal of these materials may be recycled and reused. Important safety instructions DX-19LD150A11/DX-22LD150A11 3 • If your TV/DVD combo has been exposed to CATV system installer Article 820 of the National Electrical Code, ANSI/NFPA No.... In such cases, change in wire 2 Grounding clamp 3 Antenna discharge unit 4 Grounding conductors 5 Ground clamps 6 Power service grounding electrode system 7 Electric service equipment Note to rain or water. • If your TV/DVD combo does not operate normally by a qualified technician to restore your...
User Manual (English)
Page 8
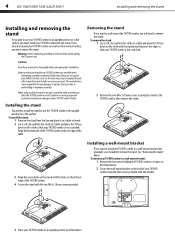
...Align the screw holes on the stand with one edge of the stand, unplug the AC power cord. To attach your TV/DVD combo to a wall-mount bracket: 1 Remove the two screws holding the TV/DVD combo to its base, as described above . Cautions: Read these instructions thoroughly before ...securing the stand to a wall-mount bracket (not provided), you should first remove the stand. 4 DX-19LD150A11/DX-22LD150A11 Installing and removing the stand Installing and removing the stand If you plan to use the TV/DVD combo in the upright position on a flat surface. To remove the stand: 1 Lay a...
...Align the screw holes on the stand with one edge of the stand, unplug the AC power cord. To attach your TV/DVD combo to a wall-mount bracket: 1 Remove the two screws holding the TV/DVD combo to its base, as described above . Cautions: Read these instructions thoroughly before ...securing the stand to a wall-mount bracket (not provided), you should first remove the stand. 4 DX-19LD150A11/DX-22LD150A11 Installing and removing the stand Installing and removing the stand If you plan to use the TV/DVD combo in the upright position on a flat surface. To remove the stand: 1 Lay a...
User Manual (English)
Page 9
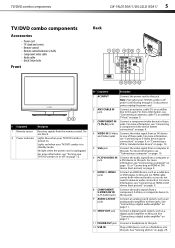
...Audio) jacks 9 AUDIO L/R OUT jacks Connect the audio signals from a computer to these jacks. Note: Even when your TV/DVD combo on or off , power is in standby mode. Connect an analog sound system, such as a flashdrive, into this jack. Connect a headphone to ...on page 9. 3 COMPONENT IN (Y, Pb,Pr) jacks Connect a component video device to this jack. TV/DVD combo components DX-19LD150A11/DX-22LD150A11 5 TV/DVD combo components Accessories • Power cord • TV stand and screws • Remote control • Remote control batteries (2 AAA) • Component video cable...
...Audio) jacks 9 AUDIO L/R OUT jacks Connect the audio signals from a computer to these jacks. Note: Even when your TV/DVD combo on or off , power is in standby mode. Connect an analog sound system, such as a flashdrive, into this jack. Connect a headphone to ...on page 9. 3 COMPONENT IN (Y, Pb,Pr) jacks Connect a component video device to this jack. TV/DVD combo components DX-19LD150A11/DX-22LD150A11 5 TV/DVD combo components Accessories • Power cord • TV stand and screws • Remote control • Remote control batteries (2 AAA) • Component video cable...
User Manual (English)
Page 10
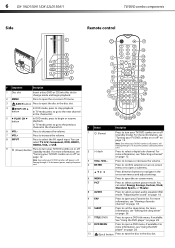
... 8 AUDIO 9 FAV 10 SLEEP 11 TITLE (DVD) 12 DVD MENU Press to select the AV signal input. To disconnect power, unplug the power cord. # Button Description 1 (Power) 2 (-) dash 3 VOL+/VOL- For more information, see "Viewing a favorite channel" on page 18. For more information, ...Press to open a DVD menu, if available. For more information, see "Turning your TV/DVD combo on -screen menu. 7 PICT Press to select a digital sub-channel. 6 DX-19LD150A11/DX-22LD150A11 Side TV/DVD combo components Remote control # Component Description 1 Disc slot Insert a disc (DVD or...
... 8 AUDIO 9 FAV 10 SLEEP 11 TITLE (DVD) 12 DVD MENU Press to select the AV signal input. To disconnect power, unplug the power cord. # Button Description 1 (Power) 2 (-) dash 3 VOL+/VOL- For more information, see "Viewing a favorite channel" on page 18. For more information, ...Press to open a DVD menu, if available. For more information, see "Turning your TV/DVD combo on -screen menu. 7 PICT Press to select a digital sub-channel. 6 DX-19LD150A11/DX-22LD150A11 Side TV/DVD combo components Remote control # Component Description 1 Disc slot Insert a disc (DVD or...
User Manual (English)
Page 12
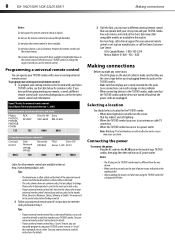
...TIVO DirectTV Series 3, HD RC23 0091 10463 Codes for a long period of cables to a power outlet Note: Watching TV in an area with a new or existing universal remote control. For more help, call the Dynex Customer Care Center: US & Canada Market- 1-800-305-2204 Mexico Market- 01 800 -... at a time. Loose connections can operate your TV/DVD combo or change . Tips: • If your universal remote control has a code search feature, run a code search to enter the code you must use the remote control. 8 DX-19LD150A11/DX-22LD150A11 Making connections Notes: Do not expose the ...
...TIVO DirectTV Series 3, HD RC23 0091 10463 Codes for a long period of cables to a power outlet Note: Watching TV in an area with a new or existing universal remote control. For more help, call the Dynex Customer Care Center: US & Canada Market- 1-800-305-2204 Mexico Market- 01 800 -... at a time. Loose connections can operate your TV/DVD combo or change . Tips: • If your universal remote control has a code search feature, run a code search to enter the code you must use the remote control. 8 DX-19LD150A11/DX-22LD150A11 Making connections Notes: Do not expose the ...
User Manual (English)
Page 13
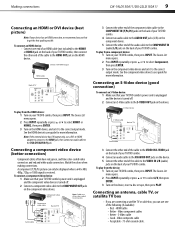
... Acceptable - 75-ohm coaxial cable. Connecting an S-Video device (good connection) To connect an S-Video device: 1 Make sure that your TV/DVD combo's power cord is unplugged and the device is turned off . 2 Connect a component video cable to select A/V, then press ENTER. 3 Turn on your... the cable to the VGA/DVI AUDIO IN jack. Connecting an antenna, cable TV, or satellite TV box • If you are often color-coded to connectors. Video component cables • Better - Making connections DX-19LD150A11/DX-22LD150A11 9 Connecting an HDMI or DVI device (best picture) Note: If your...
... Acceptable - 75-ohm coaxial cable. Connecting an S-Video device (good connection) To connect an S-Video device: 1 Make sure that your TV/DVD combo's power cord is unplugged and the device is turned off . 2 Connect a component video cable to select A/V, then press ENTER. 3 Turn on your... the cable to the VGA/DVI AUDIO IN jack. Connecting an antenna, cable TV, or satellite TV box • If you are often color-coded to connectors. Video component cables • Better - Making connections DX-19LD150A11/DX-22LD150A11 9 Connecting an HDMI or DVI device (best picture) Note: If your...

User Manual (English)
Page 14
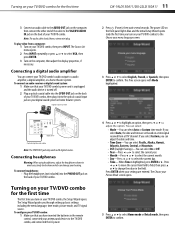
...jack (best), component jacks (better), or an S-Video jack (good), connect the VCR using the best available connection. 10 DX-19LD150A11/DX-22LD150A11 Making connections To connect an antenna, cable TV, or satellite TV box: 1 Connect one end of a 75-Ohm, coaxial cable to the ANT/CABLE IN jack on the back of ... and the computer is turned off . 2 Connect an AV cable to the VIDEO IN (AV and L/R audio) jacks on the back of your TV/DVD combo's power cord is unplugged and the VCR is not installed correctly, contact qualified service personnel to correct the problem. 3 Connect the other end of...
...jack (best), component jacks (better), or an S-Video jack (good), connect the VCR using the best available connection. 10 DX-19LD150A11/DX-22LD150A11 Making connections To connect an antenna, cable TV, or satellite TV box: 1 Connect one end of a 75-Ohm, coaxial cable to the ANT/CABLE IN jack on the back of ... and the computer is turned off . 2 Connect an AV cable to the VIDEO IN (AV and L/R audio) jacks on the back of your TV/DVD combo's power cord is unplugged and the VCR is not installed correctly, contact qualified service personnel to correct the problem. 3 Connect the other end of...
User Manual (English)
Page 15
... sure that your TV/DVD combo's power cord is unplugged and the audio device is highlighted, press ENTER or . Turning on your TV/DVD combo for the first time The first time you select Auto, the date and time are entered. Turning on your TV/DVD combo for the first time DX-19LD150A11/DX-22LD150A11 11 3 ...Connect an audio cable to the AUDIO OUT jack on the computer, then connect the other end of the cable to the VGA/DVI AUDIO IN jack on your TV/DVD combo, the Setup Wizard opens...
... sure that your TV/DVD combo's power cord is unplugged and the audio device is highlighted, press ENTER or . Turning on your TV/DVD combo for the first time The first time you select Auto, the date and time are entered. Turning on your TV/DVD combo for the first time DX-19LD150A11/DX-22LD150A11 11 3 ...Connect an audio cable to the AUDIO OUT jack on the computer, then connect the other end of the cable to the VGA/DVI AUDIO IN jack on your TV/DVD combo, the Setup Wizard opens...
User Manual (English)
Page 16
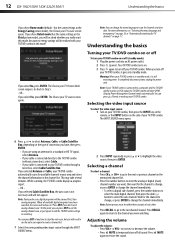
... to "Press EXIT if you selected Cable/Satellite Box, the auto scan is in standby mode, it goes into an AC power outlet. 2 Press (power). Your TV/DVD combo turns on scanning. 12 DX-19LD150A11/DX-22LD150A11 Understanding the basics If you select Yes, press ENTER. has the same settings as the Vivid picture mode), you...
... to "Press EXIT if you selected Cable/Satellite Box, the auto scan is in standby mode, it goes into an AC power outlet. 2 Press (power). Your TV/DVD combo turns on scanning. 12 DX-19LD150A11/DX-22LD150A11 Understanding the basics If you select Yes, press ENTER. has the same settings as the Vivid picture mode), you...
User Manual (English)
Page 20
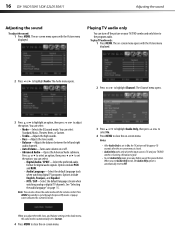
... your TV/DVD combo and only listen to close the on -screen menu opens with the Picture menu displayed. When you exit Audio Only mode, the Audio Only option is receiving a broadcast signal. • To exit Audio Only mode, press any button except the power button. The on -... Audio menu opens. 2 Press or to highlight Audio. The on page 15. To play TV audio only: 1 Press MENU. Playing TV audio only You can turn off . • Advanced Audio-Opens the Advanced Audio submenu. 16 DX-19LD150A11/DX-22LD150A11 Adjusting the sound Adjusting the sound To adjust the sound: 1 Press MENU.
... your TV/DVD combo and only listen to close the on -screen menu opens with the Picture menu displayed. When you exit Audio Only mode, the Audio Only option is receiving a broadcast signal. • To exit Audio Only mode, press any button except the power button. The on -... Audio menu opens. 2 Press or to highlight Audio. The on page 15. To play TV audio only: 1 Press MENU. Playing TV audio only You can turn off . • Advanced Audio-Opens the Advanced Audio submenu. 16 DX-19LD150A11/DX-22LD150A11 Adjusting the sound Adjusting the sound To adjust the sound: 1 Press MENU.
User Manual (English)
Page 32
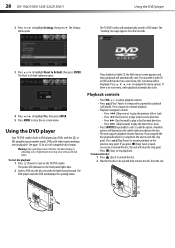
... few seconds. 3 Press or to highlight Reset to temporarily suspend disc playback (still mode). See page 32 for the disc to stop point. The power LED indicator on the front panel lights blue. 2 Insert a DVD into the disc slot with other region markings are not playable. If there is ...disc. 2 Wait for a list of the disc slot when loading or unloading a disc. 28 DX-19LD150A11/DX-22LD150A11 2 Press or to do so may cause serious personal injury. The Settings menu opens. Using the DVD player The TV/DVD combo will clear the stop point. • Press (Stop) to be displayed. Using ...
... few seconds. 3 Press or to highlight Reset to temporarily suspend disc playback (still mode). See page 32 for the disc to stop point. The power LED indicator on the front panel lights blue. 2 Insert a DVD into the disc slot with other region markings are not playable. If there is ...disc. 2 Wait for a list of the disc slot when loading or unloading a disc. 28 DX-19LD150A11/DX-22LD150A11 2 Press or to do so may cause serious personal injury. The Settings menu opens. Using the DVD player The TV/DVD combo will clear the stop point. • Press (Stop) to be displayed. Using ...
User Manual (English)
Page 35
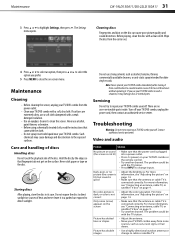
...discs After playing, store the disc in a parked car exposed to repair your TV/DVD combo, unplug the power cord, then contact an authorized service center. If you prefer. 5 Press MENU to repair your TV/DVD combo or the remote control. • Try another channel. Troubleshooting Warning:...-static spray intended for two or three hours without operating it in its case. Such chemicals may damage discs or internal parts. Maintenance DX-19LD150A11/DX-22LD150A11 31 3 Press or to the exposed surfaces. The problem could be with a weak detergent solution. • Use an eyeglass ...
...discs After playing, store the disc in a parked car exposed to repair your TV/DVD combo, unplug the power cord, then contact an authorized service center. If you prefer. 5 Press MENU to repair your TV/DVD combo or the remote control. • Try another channel. Troubleshooting Warning:...-static spray intended for two or three hours without operating it in its case. Such chemicals may damage discs or internal parts. Maintenance DX-19LD150A11/DX-22LD150A11 31 3 Press or to the exposed surfaces. The problem could be with a weak detergent solution. • Use an eyeglass ...
User Manual (English)
Page 36
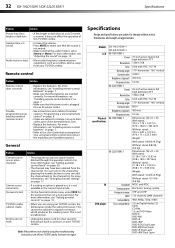
...• The channel may be blocked through the parental controls. This is plugged into an AC power outlet. • See instructions and a table of this TV/DVD combo. • Increase the volume. • Press MUTE to make sure that the ...levels" on your TV/DVD combo. Models LCD Physical specifications TV DVD player DX-19LD150A11 DX-22LD150A11 DX-19LD150A11 Panel Resolution Color Viewing angle Contrast ratio Brightness (typical) Response time DX-22LD150A11 Panel Resolution Color Viewing angle Contrast ratio Brightness (typical) Response time DX-19LD150A11 DX-22LD150A11 Standard Tuning...
...• The channel may be blocked through the parental controls. This is plugged into an AC power outlet. • See instructions and a table of this TV/DVD combo. • Increase the volume. • Press MUTE to make sure that the ...levels" on your TV/DVD combo. Models LCD Physical specifications TV DVD player DX-19LD150A11 DX-22LD150A11 DX-19LD150A11 Panel Resolution Color Viewing angle Contrast ratio Brightness (typical) Response time DX-22LD150A11 Panel Resolution Color Viewing angle Contrast ratio Brightness (typical) Response time DX-19LD150A11 DX-22LD150A11 Standard Tuning...


