Quick Setup Guide (English)
Page 1
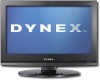
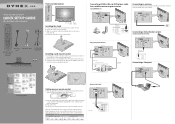
...To program your existing universal remote control to work with your TV/DVD combo using the four screws provided with the two screws provided. 19"/22"LCD/DVD Combo TV QUICK SETUP GUIDE DX-19LD150A11/DX-22LD150A11 Front and side features Remote control Power sensor indicator ...Installing the stand 1 Remove the stand from damages and scratches. 2 Remove the two screws holding the TV to its base, then remove the base. 3 Secure the wall-mount bracket to the back of your new Dynex TV...
...To program your existing universal remote control to work with your TV/DVD combo using the four screws provided with the two screws provided. 19"/22"LCD/DVD Combo TV QUICK SETUP GUIDE DX-19LD150A11/DX-22LD150A11 Front and side features Remote control Power sensor indicator ...Installing the stand 1 Remove the stand from damages and scratches. 2 Remove the two screws holding the TV to its base, then remove the base. 3 Secure the wall-mount bracket to the back of your new Dynex TV...
Quick Setup Guide (English)
Page 2
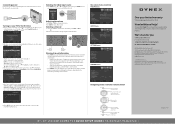
...2 2 " LC D / D V D CO M B O T V I Q U I C K S E T U P G U I D E I DX-19LD150A11/DX-22LD150A11 ENGLISH 09-1087 09-0xxx When you www.dynexproducts.com For customer service, call: 1-800-305-2204 (U.S./Canada markets) 01 800-926-3020 (Mexico... information-Displays the channel number, station name, channel label, broadcast program name, TV rating, signal type, audio information, resolution, CC mode, current time, and ...Adjusting the volume • Press VOL+ or VOL- See your menu language screen. DYNEX is a trademark of the video source buttons directly. Press or to the previous menu...
...2 2 " LC D / D V D CO M B O T V I Q U I C K S E T U P G U I D E I DX-19LD150A11/DX-22LD150A11 ENGLISH 09-1087 09-0xxx When you www.dynexproducts.com For customer service, call: 1-800-305-2204 (U.S./Canada markets) 01 800-926-3020 (Mexico... information-Displays the channel number, station name, channel label, broadcast program name, TV rating, signal type, audio information, resolution, CC mode, current time, and ...Adjusting the volume • Press VOL+ or VOL- See your menu language screen. DYNEX is a trademark of the video source buttons directly. Press or to the previous menu...
User Manual (English)
Page 1
19" and 22" LCD TV/DVD Combos DX-19LD150A11 DX-22LD150A11 USER GUIDE
19" and 22" LCD TV/DVD Combos DX-19LD150A11 DX-22LD150A11 USER GUIDE
User Manual (English)
Page 2
ii Dynex DX-19LD150A11/DX22LD150A11 19" and 22" LCD TV/DVD Combos Contents CHILD SAFETY 1 Important safety instructions 2 Warnings 2 Cautions 2 Installing and removing the stand 4 Installing the stand 4 Removing the stand 4 Installing a wall-mount bracket 4 TV/DVD combo components 5 Accessories 5 Front 5 Back 5 Side... a component video device (better connection 9 Connecting an S-Video device (good connection 9 Connecting an antenna, cable TV, or satellite TV box 9 Connecting a VCR or standard video device 10 Connecting a computer 10 Connecting a digital audio amplifier 11 Connecting ...
ii Dynex DX-19LD150A11/DX22LD150A11 19" and 22" LCD TV/DVD Combos Contents CHILD SAFETY 1 Important safety instructions 2 Warnings 2 Cautions 2 Installing and removing the stand 4 Installing the stand 4 Removing the stand 4 Installing a wall-mount bracket 4 TV/DVD combo components 5 Accessories 5 Front 5 Back 5 Side... a component video device (better connection 9 Connecting an S-Video device (good connection 9 Connecting an antenna, cable TV, or satellite TV box 9 Connecting a VCR or standard video device 10 Connecting a computer 10 Connecting a digital audio amplifier 11 Connecting ...
User Manual (English)
Page 3
... strength 19 Setting parental controls 19 Setting or changing the password 19 Setting parental control levels 20 Blocking unrated TV 21 Viewing blocked content 22 Downloading rating information 22 Locking control buttons 23 Using closed captioning 23 Turning closed captioning ...on or off 23 Selecting the closed captioning mode 24 Customizing digital TV closed captioning styles 25 Adjusting time settings 25 Setting the sleep timer 26 Adjusting menu settings 26 Selecting the menu language and ...
... strength 19 Setting parental controls 19 Setting or changing the password 19 Setting parental control levels 20 Blocking unrated TV 21 Viewing blocked content 22 Downloading rating information 22 Locking control buttons 23 Using closed captioning 23 Turning closed captioning ...on or off 23 Selecting the closed captioning mode 24 Customizing digital TV closed captioning styles 25 Adjusting time settings 25 Setting the sleep timer 26 Adjusting menu settings 26 Selecting the menu language and ...
User Manual (English)
Page 5
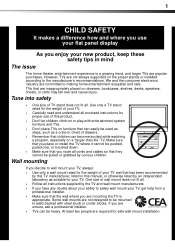
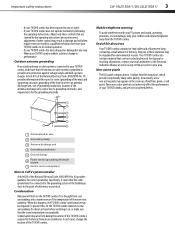
..., speakers, chests, or carts may fall over , or knocked down. • Make sure that you route all instructions supplied by this TV manufacturer, listed in mind The issue The home theater entertainment experience is appropriate. At least two people are committed to the manufacturer's recommendations. ...or installed according to making home entertainment enjoyable and safe. One size of TV stand does not fit all enclosed instructions for your TV. However, TVs are mounting the TV is a growing trend, and larger TVs are not designed to be used as steps, such as suitable for ...
..., speakers, chests, or carts may fall over , or knocked down. • Make sure that you route all instructions supplied by this TV manufacturer, listed in mind The issue The home theater entertainment experience is appropriate. At least two people are committed to the manufacturer's recommendations. ...or installed according to making home entertainment enjoyable and safe. One size of TV stand does not fit all enclosed instructions for your TV. However, TVs are mounting the TV is a growing trend, and larger TVs are not designed to be used as steps, such as suitable for ...
User Manual (English)
Page 6
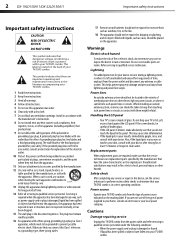
...have the same characteristics as vases, should not be placed on the back of power supplied to qualified service personnel. 2 DX-19LD150A11/DX-22LD150A11 Important safety instructions Important safety instructions CAUTION RISK OF ELECTRIC SHOCK DO NOT OPEN This symbol indicates that dangerous voltage ...to qualified service technicians. Unauthorized substitutions may cause skin inflammation. • If the liquid gets in the literature accompanying your TV/DVD combo. This symbol indicates that there are inside. This label is damaged or frayed. • If liquid has ...
...have the same characteristics as vases, should not be placed on the back of power supplied to qualified service personnel. 2 DX-19LD150A11/DX-22LD150A11 Important safety instructions Important safety instructions CAUTION RISK OF ELECTRIC SHOCK DO NOT OPEN This symbol indicates that dangerous voltage ...to qualified service technicians. Unauthorized substitutions may cause skin inflammation. • If the liquid gets in the literature accompanying your TV/DVD combo. This symbol indicates that there are inside. This label is damaged or frayed. • If liquid has ...
User Manual (English)
Page 7
...-up static charges. Condensation may result in damage and will form on the screen as practical. Important safety instructions DX-19LD150A11/DX-22LD150A11 3 • If your TV/DVD combo has been exposed to rain or water. • If your cordless and cellular telephones away from the..., which provide exceptionally sharp video quality. Occasionally, a few non-active pixels may be regulated for correct grounding. When this , let the TV/DVD combo stand in wire to an antenna discharge unit, size of grounding conductors, location of these materials may be impaired. In such cases...
...-up static charges. Condensation may result in damage and will form on the screen as practical. Important safety instructions DX-19LD150A11/DX-22LD150A11 3 • If your TV/DVD combo has been exposed to rain or water. • If your cordless and cellular telephones away from the..., which provide exceptionally sharp video quality. Occasionally, a few non-active pixels may be regulated for correct grounding. When this , let the TV/DVD combo stand in wire to an antenna discharge unit, size of grounding conductors, location of these materials may be impaired. In such cases...
User Manual (English)
Page 8
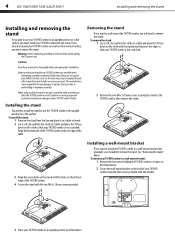
...should first remove the stand. To attach your TV/DVD combo to a wall-mount bracket: 1 Remove the two screws holding the TV/DVD combo to its base, as an aid to assembly, make sure that your TV/DVD combo into the stand. 4 DX-19LD150A11/DX-22LD150A11 Installing and removing the stand Installing and ...removing the stand If you plan to use your TV/DVD combo in an upright position on a flat surface, you must remove the...
...should first remove the stand. To attach your TV/DVD combo to a wall-mount bracket: 1 Remove the two screws holding the TV/DVD combo to its base, as an aid to assembly, make sure that your TV/DVD combo into the stand. 4 DX-19LD150A11/DX-22LD150A11 Installing and removing the stand Installing and ...removing the stand If you plan to use your TV/DVD combo in an upright position on a flat surface, you must remove the...
User Manual (English)
Page 9
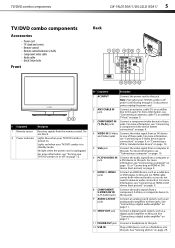
...L/R OUT jacks Connect the audio signals from a component, S-Video, or composite device to these jacks. TV/DVD combo components DX-19LD150A11/DX-22LD150A11 5 TV/DVD combo components Accessories • Power cord • TV stand and screws • Remote control • Remote control batteries (2 AAA) • Component video ... IN (Y, Pb,Pr) jacks Connect a component video device to these jacks. For more information, see "Connecting an antenna, cable TV, or satellite TV box" on page 10. 5 VGA jack Connect the video signal from a computer or jack a DVI device to this jack. ...
...L/R OUT jacks Connect the audio signals from a component, S-Video, or composite device to these jacks. TV/DVD combo components DX-19LD150A11/DX-22LD150A11 5 TV/DVD combo components Accessories • Power cord • TV stand and screws • Remote control • Remote control batteries (2 AAA) • Component video ... IN (Y, Pb,Pr) jacks Connect a component video device to these jacks. For more information, see "Connecting an antenna, cable TV, or satellite TV box" on page 10. 5 VGA jack Connect the video signal from a computer or jack a DVI device to this jack. ...
User Manual (English)
Page 10
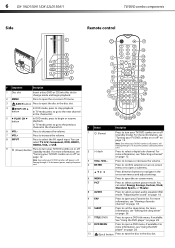
... cord. For more information, see "Setting the sleep timer" on page 26. See "Using the DVD player" on page 16. 6 DX-19LD150A11/DX-22LD150A11 Side TV/DVD combo components Remote control # Component Description 1 Disc slot Insert a disc (DVD or CD) into this slot to change mode and ...Adjusting the sound" on page 28. For more information, see "Viewing a favorite channel" on or off (standby mode). Press to open your TV/DVD combo on page 18. Press to select a preset picture mode. Press to turn your Favorite list. You can select Energy Savings, Custom,...
... cord. For more information, see "Setting the sleep timer" on page 26. See "Using the DVD player" on page 16. 6 DX-19LD150A11/DX-22LD150A11 Side TV/DVD combo components Remote control # Component Description 1 Disc slot Insert a disc (DVD or CD) into this slot to change mode and ...Adjusting the sound" on page 28. For more information, see "Viewing a favorite channel" on or off (standby mode). Press to open your TV/DVD combo on page 18. Press to select a preset picture mode. Press to turn your Favorite list. You can select Energy Savings, Custom,...
User Manual (English)
Page 11
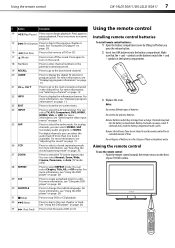
...change the subtitle language. If chemicals leak, clean the battery compartment with a cloth. For more information, see "Displaying program information" on the front of your TV/DVD combo. Remove the batteries if you can select Chapter, Title, All, or Off modes. For more information, see "Selecting a channel" on page 23... the audio track (if more information, see "Selecting the closed captioning mode. For more than one track is available). Using the remote control DX-19LD150A11/DX-22LD150A11 7 # Button Description 14 (Play/Pause) Press once to begin playback.
...change the subtitle language. If chemicals leak, clean the battery compartment with a cloth. For more information, see "Displaying program information" on the front of your TV/DVD combo. Remove the batteries if you can select Chapter, Title, All, or Off modes. For more information, see "Selecting a channel" on page 23... the audio track (if more information, see "Selecting the closed captioning mode. For more than one track is available). Using the remote control DX-19LD150A11/DX-22LD150A11 7 # Button Description 14 (Play/Pause) Press once to begin playback.
User Manual (English)
Page 12
...back of your universal remote control has a code search feature, run a code search to try several codes before you have problems programming your Dynex TV/DVD combo, see the table below for a long period of power source indicated on the chart, but are available in Step 1. Selecting a...outlet. Programming a universal remote control You can result in total darkness or with high humidity. 8 DX-19LD150A11/DX-22LD150A11 Making connections Notes: Do not expose the remote control to the TV/DVD combo, make sure that the TV/DVD combo and the device are turned off and that matches your...
...back of your universal remote control has a code search feature, run a code search to try several codes before you have problems programming your Dynex TV/DVD combo, see the table below for a long period of power source indicated on the chart, but are available in Step 1. Selecting a...outlet. Programming a universal remote control You can result in total darkness or with high humidity. 8 DX-19LD150A11/DX-22LD150A11 Making connections Notes: Do not expose the remote control to the TV/DVD combo, make sure that the TV/DVD combo and the device are turned off and that matches your...
User Manual (English)
Page 13
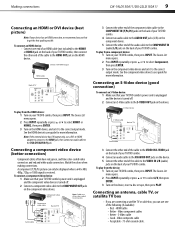
...output mode. Connecting an antenna, cable TV, or satellite TV box • If you are often color-coded to select A/V, then press ENTER. 3 Turn on the back of your TV/DVD combo. Video component cables • Better - Making connections DX-19LD150A11/DX-22LD150A11 9 Connecting an HDMI or DVI... device (best picture) Note: If your TV/DVD combo, then press INPUT. See the component video device's ...
...output mode. Connecting an antenna, cable TV, or satellite TV box • If you are often color-coded to select A/V, then press ENTER. 3 Turn on the back of your TV/DVD combo. Video component cables • Better - Making connections DX-19LD150A11/DX-22LD150A11 9 Connecting an HDMI or DVI... device (best picture) Note: If your TV/DVD combo, then press INPUT. See the component video device's ...

User Manual (English)
Page 14
... 1 Turn on your TV/DVD combo to display the input source menu. 4 Press INPUT repeatedly or press or to select TV, then press ENTER. Do not tighten this connector with the power cord or other end of the cable to the antenna or cable TV wall jack. 10 DX-19LD150A11/DX-22LD150A11 Making connections To... connect an antenna, cable TV, or satellite TV box: 1 Connect one end of a 75-Ohm, coaxial cable to the ANT/CABLE IN jack on ...
... 1 Turn on your TV/DVD combo to display the input source menu. 4 Press INPUT repeatedly or press or to select TV, then press ENTER. Do not tighten this connector with the power cord or other end of the cable to the antenna or cable TV wall jack. 10 DX-19LD150A11/DX-22LD150A11 Making connections To... connect an antenna, cable TV, or satellite TV box: 1 Connect one end of a 75-Ohm, coaxial cable to the ANT/CABLE IN jack on ...
User Manual (English)
Page 15
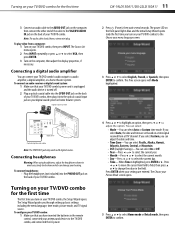
...2 Plug a optical coaxial cable into the optical coaxial input jack on your TV/DVD combo for the first time DX-19LD150A11/DX-22LD150A11 11 3 Connect an audio cable to the AUDIO OUT jack on the ...computer, then connect the other end of the cable to the VGA/DVI AUDIO IN jack on the back of TV... Warning: When using headphones, adjust the headphone volume to avoid excessively loud volume which can connect your TV/DVD combo's audio output to a audio amplifier, a digital amplifier, or a home theater system....
...2 Plug a optical coaxial cable into the optical coaxial input jack on your TV/DVD combo for the first time DX-19LD150A11/DX-22LD150A11 11 3 Connect an audio cable to the AUDIO OUT jack on the ...computer, then connect the other end of the cable to the VGA/DVI AUDIO IN jack on the back of TV... Warning: When using headphones, adjust the headphone volume to avoid excessively loud volume which can connect your TV/DVD combo's audio output to a audio amplifier, a digital amplifier, or a home theater system....
User Manual (English)
Page 16
... to run the auto scan again to select the sub-channel. While scanning, the TV/DVD combo displays a progress report. - 12 DX-19LD150A11/DX-22LD150A11 Understanding the basics If you select No, press ENTER. Go back to temporarily turn your TV/DVD combo. At this mode. You can press EXIT to change the channel immediately...
... to run the auto scan again to select the sub-channel. While scanning, the TV/DVD combo displays a progress report. - 12 DX-19LD150A11/DX-22LD150A11 Understanding the basics If you select No, press ENTER. Go back to temporarily turn your TV/DVD combo. At this mode. You can press EXIT to change the channel immediately...
User Manual (English)
Page 17
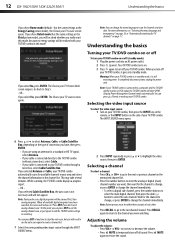
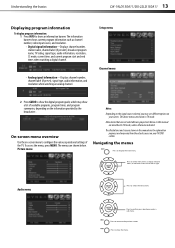
.... Navigating the menus Press to show a list of the TV. Press to select menu items, to show the digital program guide, which may show an information banner. To access the menu, press MENU. The menus are grayed out. Understanding the basics DX-19LD150A11/DX-22LD150A11 13 Displaying program information To display program information: 1 Press...
.... Navigating the menus Press to show a list of the TV. Press to select menu items, to show the digital program guide, which may show an information banner. To access the menu, press MENU. The menus are grayed out. Understanding the basics DX-19LD150A11/DX-22LD150A11 13 Displaying program information To display program information: 1 Press...
User Manual (English)
Page 18
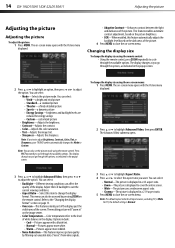
...finely detailed picture • Sports-a dynamic picture • Energy Savings-brightness and backlight levels are reduced for all input sources, excluding TV, is Wide. Adjust the LCD backlight to suit the current viewing conditions. • Aspect Ratio-Select this feature automatically adjusts the ...then press or to cycle through the options, as indicated in " on the remote control. For TV, the default setting is displayed in the display. 14 DX-19LD150A11/DX-22LD150A11 Adjusting the picture Adjusting the picture Adjusting the picture To adjust the picture: 1 Press MENU. ...
...finely detailed picture • Sports-a dynamic picture • Energy Savings-brightness and backlight levels are reduced for all input sources, excluding TV, is Wide. Adjust the LCD backlight to suit the current viewing conditions. • Aspect Ratio-Select this feature automatically adjusts the ...then press or to cycle through the options, as indicated in " on the remote control. For TV, the default setting is displayed in the display. 14 DX-19LD150A11/DX-22LD150A11 Adjusting the picture Adjusting the picture Adjusting the picture To adjust the picture: 1 Press MENU. ...

User Manual (English)
Page 19
... control: • Using the remote control, press SAP repeatedly to one of the settings in an alternative language. • In digital TV mode, select the preferred audio track language (when available). The on -screen menu. To choose an audio language with the Picture menu ...setting to correspond to cycle through the audio stream options. Adjusting the sound DX-19LD150A11/DX-22LD150A11 15 Adjusting the computer image To adjust the computer image: 1 Make sure that your TV provider. • In analog TV mode, select one of the four preset equalizer (EQ) modes. Format Resolution...
... control: • Using the remote control, press SAP repeatedly to one of the settings in an alternative language. • In digital TV mode, select the preferred audio track language (when available). The on -screen menu. To choose an audio language with the Picture menu ...setting to correspond to cycle through the audio stream options. Adjusting the sound DX-19LD150A11/DX-22LD150A11 15 Adjusting the computer image To adjust the computer image: 1 Make sure that your TV provider. • In analog TV mode, select one of the four preset equalizer (EQ) modes. Format Resolution...


