Quick Setup Guide (English)
Page 1
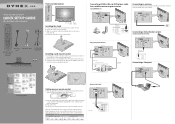
.../DVI AUDIO IN PB PR 2 Insert two AAA batteries into the battery compartment. 19"/22"LCD/DVD Combo TV QUICK SETUP GUIDE DX-19LD150A11/DX-22LD150A11 Front and side features Remote control Power sensor indicator Installing the stand 1 Remove the stand from damages and scratches. 2 Remove the two screws holding the TV to its base, then remove the base. 3 Secure the wall-mount bracket to work with your new Dynex TV, see the table below for common codes...
.../DVI AUDIO IN PB PR 2 Insert two AAA batteries into the battery compartment. 19"/22"LCD/DVD Combo TV QUICK SETUP GUIDE DX-19LD150A11/DX-22LD150A11 Front and side features Remote control Power sensor indicator Installing the stand 1 Remove the stand from damages and scratches. 2 Remove the two screws holding the TV to its base, then remove the base. 3 Secure the wall-mount bracket to work with your new Dynex TV, see the table below for common codes...
Quick Setup Guide (English)
Page 2
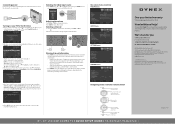
... adjust a selected icon. 5 Press EXIT to close the menu. 1 9 " • 2 2 " LC D / D V D CO M B O T V I Q U I C K S E T U P G U I D E I DX-19LD150A11/DX-22LD150A11 ENGLISH 09-1087 09-0xxx EXIT Press to close the menu, then select the input source through the INPUT SOURCE menu. Adjusting the volume • Press VOL+ or VOL- Mode-Select Custom to set date/time manually or Auto to have them set top box. If you selected Cable/Satellite Box, you are asked to select the correct input source for available channels. Connecting power Connect the power cable...
... adjust a selected icon. 5 Press EXIT to close the menu. 1 9 " • 2 2 " LC D / D V D CO M B O T V I Q U I C K S E T U P G U I D E I DX-19LD150A11/DX-22LD150A11 ENGLISH 09-1087 09-0xxx EXIT Press to close the menu, then select the input source through the INPUT SOURCE menu. Adjusting the volume • Press VOL+ or VOL- Mode-Select Custom to set date/time manually or Auto to have them set top box. If you selected Cable/Satellite Box, you are asked to select the correct input source for available channels. Connecting power Connect the power cable...
User Manual (English)
Page 2
... the stand 4 Removing the stand 4 Installing a wall-mount bracket 4 TV/DVD combo components 5 Accessories 5 Front 5 Back 5 Side 6 Remote control 6 Using the remote control 7 Installing remote control batteries 7 Aiming the remote control 7 Programming a universal remote control 8 Making connections 8 Selecting a location 8 Connecting the power 8 Connecting an HDMI or DVI device (best picture 9 Connecting a component video device (better connection 9 Connecting an S-Video device (good connection 9 Connecting an antenna, cable TV, or satellite TV box 9 Connecting a VCR or...
... the stand 4 Removing the stand 4 Installing a wall-mount bracket 4 TV/DVD combo components 5 Accessories 5 Front 5 Back 5 Side 6 Remote control 6 Using the remote control 7 Installing remote control batteries 7 Aiming the remote control 7 Programming a universal remote control 8 Making connections 8 Selecting a location 8 Connecting the power 8 Connecting an HDMI or DVI device (best picture 9 Connecting a component video device (better connection 9 Connecting an S-Video device (good connection 9 Connecting an antenna, cable TV, or satellite TV box 9 Connecting a VCR or...
User Manual (English)
Page 3
...19 Setting parental controls 19 Setting or changing the password 19 Setting parental control levels 20 Blocking unrated TV 21 Viewing blocked content 22 Downloading rating information 22 Locking control buttons 23 Using closed captioning 23 Turning closed captioning on or off 23 Selecting the closed captioning mode 24 Customizing digital TV closed captioning styles 25 Adjusting time settings 25 Setting the sleep timer 26 Adjusting menu settings 26 Selecting the menu language and transparency 26 Labeling an input source 27 Restoring default settings 27 Using the DVD player 28...
...19 Setting parental controls 19 Setting or changing the password 19 Setting parental control levels 20 Blocking unrated TV 21 Viewing blocked content 22 Downloading rating information 22 Locking control buttons 23 Using closed captioning 23 Turning closed captioning on or off 23 Selecting the closed captioning mode 24 Customizing digital TV closed captioning styles 25 Adjusting time settings 25 Setting the sleep timer 26 Adjusting menu settings 26 Selecting the menu language and transparency 26 Labeling an input source 27 Restoring default settings 27 Using the DVD player 28...
User Manual (English)
Page 5
... committed to wall mount your TV, always: • Use only a wall mount rated for proper use your flat panel display As you enjoy your TV, get help from a professional installer. • Make sure that can become excited while watching a program, especially on a "larger-than-life" TV. We and the consumer electronics industry are not always supported on the proper stands or installed according to walls backed...
... committed to wall mount your TV, always: • Use only a wall mount rated for proper use your flat panel display As you enjoy your TV, get help from a professional installer. • Make sure that can become excited while watching a program, especially on a "larger-than-life" TV. We and the consumer electronics industry are not always supported on the proper stands or installed according to walls backed...
User Manual (English)
Page 6
... accompanying your TV/DVD combo. Cautions Damage requiring service Unplug this TV/DVD combo from the apparatus. 11 Only use attachments/accessories specified by the manufacturer. 12 Use only with a cart, stand, tripod, bracket, or table specified by the manufacturer that have the same characteristics as power-supply cord or plug is broken, make sure that the service technician uses replacement parts specified by the...
... accompanying your TV/DVD combo. Cautions Damage requiring service Unplug this TV/DVD combo from the apparatus. 11 Only use attachments/accessories specified by the manufacturer. 12 Use only with a cart, stand, tripod, bracket, or table specified by the manufacturer that have the same characteristics as power-supply cord or plug is broken, make sure that the service technician uses replacement parts specified by the...
User Manual (English)
Page 8
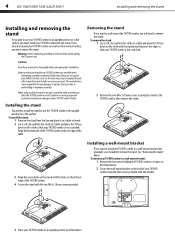
... or damage to your TV/DVD combo's finish. Installing the stand You need to remove the stand. 4 DX-19LD150A11/DX-22LD150A11 Installing and removing the stand Installing and removing the stand If you plan to use your TV/DVD combo in an upright position on a flat surface, you must remove the stand. To attach your TV/DVD combo to a wall-mount bracket: 1 Remove the two screws holding the TV/DVD combo to its base, as an aid to...
... or damage to your TV/DVD combo's finish. Installing the stand You need to remove the stand. 4 DX-19LD150A11/DX-22LD150A11 Installing and removing the stand Installing and removing the stand If you plan to use your TV/DVD combo in an upright position on a flat surface, you must remove the stand. To attach your TV/DVD combo to a wall-mount bracket: 1 Remove the two screws holding the TV/DVD combo to its base, as an aid to...
User Manual (English)
Page 9
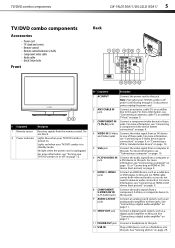
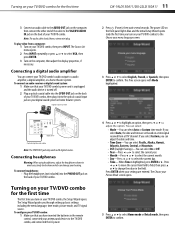
...antenna, cable TV, or satellite TV box" on page 12. ## Component Description 1 AC INPUT 2 ANT/CABLE IN jack Connect the power cord to this jack. Connect an analog sound system, such as a digital audio amplifier, to this jack. TV/DVD combo components DX-19LD150A11/DX-22LD150A11 5 TV/DVD combo components Accessories • Power cord • TV stand and screws • Remote control • Remote control batteries (2 AAA) • Component video cable • Audio cable • Quick Setup Guide Front Back PC/DVI PB PR # Component Description 1 Remote sensor Receives signals...
...antenna, cable TV, or satellite TV box" on page 12. ## Component Description 1 AC INPUT 2 ANT/CABLE IN jack Connect the power cord to this jack. Connect an analog sound system, such as a digital audio amplifier, to this jack. TV/DVD combo components DX-19LD150A11/DX-22LD150A11 5 TV/DVD combo components Accessories • Power cord • TV stand and screws • Remote control • Remote control batteries (2 AAA) • Component video cable • Audio cable • Quick Setup Guide Front Back PC/DVI PB PR # Component Description 1 Remote sensor Receives signals...
User Manual (English)
Page 10
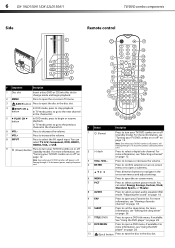
... the volume. 8 INPUT Press to navigate in the on-screen menus and adjust settings. Note: Even when your TV/DVD combo is off , power is still flowing through it . Press direction buttons to select the AV signal input. Press to the previous channel in the channel list. 5 PLAY/ CH button In DVD mode, press to open a DVD menu, if available. In TV mode, press to go to the next channel in the channel list. 6 VOL...
... the volume. 8 INPUT Press to navigate in the on-screen menus and adjust settings. Note: Even when your TV/DVD combo is off , power is still flowing through it . Press direction buttons to select the AV signal input. Press to the previous channel in the channel list. 5 PLAY/ CH button In DVD mode, press to open a DVD menu, if available. In TV mode, press to go to the next channel in the channel list. 6 VOL...
User Manual (English)
Page 12
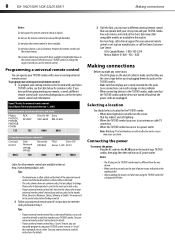
... universal remote control or set -top box and your TV/DVD combo, then plug the other compatible models are the correct type before finding a match. 2 Follow your universal remote control's instructions to enter the code you must use the type of power source indicated on the marking label. • Always unplug the power cord when not using your remote, or need to identify a code that can result in direct sunlight. Programming a universal remote control You can manually program it using the TV/DVD...
... universal remote control or set -top box and your TV/DVD combo, then plug the other compatible models are the correct type before finding a match. 2 Follow your universal remote control's instructions to enter the code you must use the type of power source indicated on the marking label. • Always unplug the power cord when not using your remote, or need to identify a code that can result in direct sunlight. Programming a universal remote control You can manually program it using the TV/DVD...
User Manual (English)
Page 13
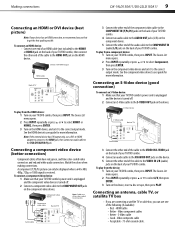
... of the audio cable to the COMPONENT IN (audio) L/R jacks on the HDMI device, and set it to the correct output mode. The Source List menu opens. 2 Press INPUT repeatedly or press or to select A/V, then press ENTER. 3 Turn on your TV/DVD combo, then press INPUT. Video composite cable • Acceptable - 75-ohm coaxial cable. Component video device Note: Cables are connecting a satellite TV or cable box, you use that your TV/DVD combo's power cord is unplugged...
... of the audio cable to the COMPONENT IN (audio) L/R jacks on the HDMI device, and set it to the correct output mode. The Source List menu opens. 2 Press INPUT repeatedly or press or to select A/V, then press ENTER. 3 Turn on your TV/DVD combo, then press INPUT. Video composite cable • Acceptable - 75-ohm coaxial cable. Component video device Note: Cables are connecting a satellite TV or cable box, you use that your TV/DVD combo's power cord is unplugged...

User Manual (English)
Page 14
... cable to select TV, then press ENTER. To connect a computer: 1 Make sure that your TV/DVD combo Notes: Use a 75 ohm cable to the antenna or cable TV wall jack. Computer D-Sub cable (analog RGB) Audio cable (stereo mini plugs) PC/DVI AUDIO IN PB PR Back of TV Do not tighten this connector with the power cord or other cables. 10 DX-19LD150A11/DX-22LD150A11 Making connections To connect an antenna, cable TV, or satellite TV box: 1 Connect...
... cable to select TV, then press ENTER. To connect a computer: 1 Make sure that your TV/DVD combo Notes: Use a 75 ohm cable to the antenna or cable TV wall jack. Computer D-Sub cable (analog RGB) Audio cable (stereo mini plugs) PC/DVI AUDIO IN PB PR Back of TV Do not tighten this connector with the power cord or other cables. 10 DX-19LD150A11/DX-22LD150A11 Making connections To connect an antenna, cable TV, or satellite TV box: 1 Connect...
User Manual (English)
Page 15
... sure that your TV/DVD combo's power cord is unplugged and the audio device is highlighted, press ENTER or . Press or to move the cursor from a DTV channel. The Source List menu opens. 2 Press INPUT repeatedly or press or to change the value in the remote control, connected your TV/DVD combo's audio output to the VGA/DVI AUDIO IN jack on your digital sound system or home theater system. The Choose...
... sure that your TV/DVD combo's power cord is unplugged and the audio device is highlighted, press ENTER or . Press or to move the cursor from a DTV channel. The Source List menu opens. 2 Press INPUT repeatedly or press or to change the value in the remote control, connected your TV/DVD combo's audio output to the VGA/DVI AUDIO IN jack on your digital sound system or home theater system. The Choose...
User Manual (English)
Page 16
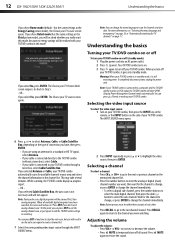
... chose Home mode (default - 12 DX-19LD150A11/DX-22LD150A11 Understanding the basics If you don't need to run the auto scan again to create a channel list. 7 Select the corresponding video input source through a tuner box, select Cable/Satellite Box. has the same settings as the Vivid picture mode), you will ask you turn your area and stores the channel information in this mode. The Choose your TV source screen opens. Note: You can press (Power) to turn off...
... chose Home mode (default - 12 DX-19LD150A11/DX-22LD150A11 Understanding the basics If you don't need to run the auto scan again to create a channel list. 7 Select the corresponding video input source through a tuner box, select Cable/Satellite Box. has the same settings as the Vivid picture mode), you will ask you turn your area and stores the channel information in this mode. The Choose your TV source screen opens. Note: You can press (Power) to turn off...
User Manual (English)
Page 17
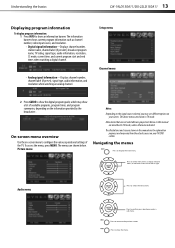
... select menu items, to close the menu. Navigating the menus Press to the previous screen. Press to return to display the main menu. The information banner shows current program information such as channel number, video input source, and resolution. • Digital signal information-Displays channel number, station name, channel label (if present), broadcast program name, TV rating, signal type, audio information, resolution, CC mode, current time, and current program start and end times when watching a digital channel. • Analog signal information-Displays channel number...
... select menu items, to close the menu. Navigating the menus Press to the previous screen. Press to return to display the main menu. The information banner shows current program information such as channel number, video input source, and resolution. • Digital signal information-Displays channel number, station name, channel label (if present), broadcast program name, TV rating, signal type, audio information, resolution, CC mode, current time, and current program start and end times when watching a digital channel. • Analog signal information-Displays channel number...

User Manual (English)
Page 19
... the settings in VGA mode. Changing the PC video resolution To change the PC video resolution: 1 Click Start, Control Panel, then double-click Display. The Settings menu opens. 4 Press or to enable audio in stereo sound. • SAP-Select this option if there is noise or static from one of the four preset equalizer (EQ) modes. Adjusting the sound DX-19LD150A11/DX-22LD150A11 15 Adjusting the computer image To adjust the computer image: 1 Make sure that your TV/DVD...
... the settings in VGA mode. Changing the PC video resolution To change the PC video resolution: 1 Click Start, Control Panel, then double-click Display. The Settings menu opens. 4 Press or to enable audio in stereo sound. • SAP-Select this option if there is noise or static from one of the four preset equalizer (EQ) modes. Adjusting the sound DX-19LD150A11/DX-22LD150A11 15 Adjusting the computer image To adjust the computer image: 1 Make sure that your TV/DVD...
User Manual (English)
Page 23
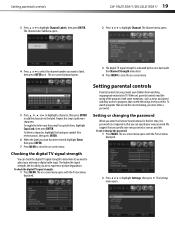
... to select the channel number you prevent your antenna or digital cable input. To toggle the letter case from watching inappropriate material on -screen menu opens with the Picture menu displayed. To check the digital TV signal strength: 1 Press MENU. Setting parental controls Parental controls let you want has been entered, highlight Enter, then press ENTER. 7 Press MENU to highlight Settings, then press . We suggest that exceed the selected rating, you need to adjust your...
... to select the channel number you prevent your antenna or digital cable input. To toggle the letter case from watching inappropriate material on -screen menu opens with the Picture menu displayed. To check the digital TV signal strength: 1 Press MENU. Setting parental controls Parental controls let you want has been entered, highlight Enter, then press ENTER. 7 Press MENU to highlight Settings, then press . We suggest that exceed the selected rating, you need to adjust your...
User Manual (English)
Page 33
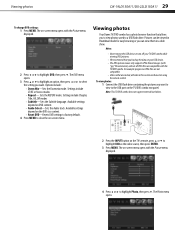
... 2 Press the INPUT button on your USB device. • The JPEG picture viewer only supports JPEG format images (with ".jpg" file extensions) and not all tasks in a slide show. To view photos: 1 Connect the USB flash drive containing the pictures you back up the data on the TV's remote, press or to highlight Photo, then press . Viewing photos DX-19LD150A11/DX-22LD150A11 29 To change DVD settings: 1 Press MENU. The DVD menu opens. 3 Press...
... 2 Press the INPUT button on your USB device. • The JPEG picture viewer only supports JPEG format images (with ".jpg" file extensions) and not all tasks in a slide show. To view photos: 1 Connect the USB flash drive containing the pictures you back up the data on the TV's remote, press or to highlight Photo, then press . Viewing photos DX-19LD150A11/DX-22LD150A11 29 To change DVD settings: 1 Press MENU. The DVD menu opens. 3 Press...
User Manual (English)
Page 35
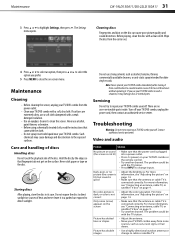
... poor picture quality and sound distortion. Note: Never operate your TV/DVD combo or the remote control. • Try another channel. There are extremely dirty, use your TV/DVD combo, unplug the power cord, then contact an authorized service center. Video and audio Problem Solution No picture or sound (the screen is not lit) Dark, poor, or no user-serviceable parts inside. For more information, see "Connecting an antenna, cable TV, or satellite TV box...
... poor picture quality and sound distortion. Note: Never operate your TV/DVD combo or the remote control. • Try another channel. There are extremely dirty, use your TV/DVD combo, unplug the power cord, then contact an authorized service center. Video and audio Problem Solution No picture or sound (the screen is not lit) Dark, poor, or no user-serviceable parts inside. For more information, see "Connecting an antenna, cable TV, or satellite TV box...
User Manual (English)
Page 36
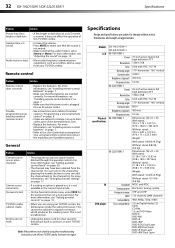
... the power cord for the password, then set to change without notice. Dimensions and weight are inserted correctly. Remote control Problem Solution Remote control does not work Solution • The program you are subject to watch may have been deleted from your TV/DVD combo. For up to date codes, go to expand or contract, which produces the creaking noise. Models LCD Physical specifications TV DVD player DX-19LD150A11 DX-22LD150A11 DX-19LD150A11 Panel Resolution Color Viewing angle Contrast ratio Brightness...
... the power cord for the password, then set to change without notice. Dimensions and weight are inserted correctly. Remote control Problem Solution Remote control does not work Solution • The program you are subject to watch may have been deleted from your TV/DVD combo. For up to date codes, go to expand or contract, which produces the creaking noise. Models LCD Physical specifications TV DVD player DX-19LD150A11 DX-22LD150A11 DX-19LD150A11 Panel Resolution Color Viewing angle Contrast ratio Brightness...


