Instruction Manual
Page 1
... 3 - 4 until first three ports are labelled 6 Press INSERT + , select insert next label to next / previous label = SHIFT + LEFT / RIGHT ARROWS Numeral Selections TOP / BOTTOM ARROWS (Press and hold for faster speed) Enter number Printing Multiple prints = SHIFT + PRINT Feed the tape = SHIFT + CUT Insert/Remove Labels Insert labels = SHIFT + SAVE Remove labels = SHIFT + RECALL Save/Recall Labels Save labels = SAVE Recall labels = RECALL Serialisation Simple (A1 A2 A3) = SERIAL Simultaneous (A1 B2 C3) = SHIFT + SERIAL > Simultaneous Advanced (A1 A2...
... 3 - 4 until first three ports are labelled 6 Press INSERT + , select insert next label to next / previous label = SHIFT + LEFT / RIGHT ARROWS Numeral Selections TOP / BOTTOM ARROWS (Press and hold for faster speed) Enter number Printing Multiple prints = SHIFT + PRINT Feed the tape = SHIFT + CUT Insert/Remove Labels Insert labels = SHIFT + SAVE Remove labels = SHIFT + RECALL Save/Recall Labels Save labels = SAVE Recall labels = RECALL Serialisation Simple (A1 A2 A3) = SERIAL Simultaneous (A1 B2 C3) = SHIFT + SERIAL > Simultaneous Advanced (A1 A2...
User Guide
Page 3
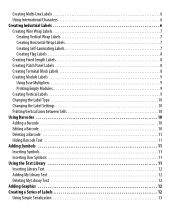
... the Battery Pack 2 Inserting and Removing the Tape Cassette 2 Setting the Tape Width 2 Selecting a Language 2 Selecting Units of Measure 3 Getting to Know Your Printer 3 Power 3 LCD Display 3 Using the Backlight 3 Adjusting the Display Contrast 3 Hiding the Caption Bar 4 CAPS Mode 4 Shift Key 4 Escape Key 4 Navigation Keys 4 Backspace Key 4 Clear Key 4 Cutter Button 4 Hot Keys 4 Working with Label Files 5 Creating a Label File 5 Adding Labels to a Label File 5 Removing Labels from a File 5 Printing a Label File 5 Formatting a Label 6 Changing the Text Size 6 Changing...
... the Battery Pack 2 Inserting and Removing the Tape Cassette 2 Setting the Tape Width 2 Selecting a Language 2 Selecting Units of Measure 3 Getting to Know Your Printer 3 Power 3 LCD Display 3 Using the Backlight 3 Adjusting the Display Contrast 3 Hiding the Caption Bar 4 CAPS Mode 4 Shift Key 4 Escape Key 4 Navigation Keys 4 Backspace Key 4 Clear Key 4 Cutter Button 4 Hot Keys 4 Working with Label Files 5 Creating a Label File 5 Adding Labels to a Label File 5 Removing Labels from a File 5 Printing a Label File 5 Formatting a Label 6 Changing the Text Size 6 Changing...
User Guide
Page 4
...-Line Labels 6 Using International Characters 6 Creating Industrial Labels 6 Creating Wire Wrap Labels 7 Creating Vertical Wrap Labels 7 Creating Horizontal Wrap Labels 7 Creating Self-Laminating Labels 7 Creating Flag Labels 8 Creating Fixed Length Labels 8 Creating Patch Panel Labels 8 Creating Terminal Block Labels 8 Creating Module Labels 9 Using Fuse Multipliers 9 Printing Empty Modules 9 Creating Vertical Labels 9 Changing the Label Type 10 Changing the Label Settings 10 Printing Vertical Lines between Cells 10 Using Barcodes 10 Adding a Barcode 10 Editing a Barcode...
...-Line Labels 6 Using International Characters 6 Creating Industrial Labels 6 Creating Wire Wrap Labels 7 Creating Vertical Wrap Labels 7 Creating Horizontal Wrap Labels 7 Creating Self-Laminating Labels 7 Creating Flag Labels 8 Creating Fixed Length Labels 8 Creating Patch Panel Labels 8 Creating Terminal Block Labels 8 Creating Module Labels 9 Using Fuse Multipliers 9 Printing Empty Modules 9 Creating Vertical Labels 9 Changing the Label Type 10 Changing the Label Settings 10 Printing Vertical Lines between Cells 10 Using Barcodes 10 Adding a Barcode 10 Editing a Barcode...
User Guide
Page 5
Using Simultaneous Serialization 13 Using Advanced Serialization 13 Printing Options 14 Printing Multiple Copies 14 Collating Multiple Copies 14 Pausing between Labels 14 Advancing the Label Tape 14 Adjusting Print Contrast 14 Using Printer Memory 15 Saving a Label File 15 Recalling a Label File from Memory 15 Deleting a Label File from Memory 15 Cleaning Your Printer 15 Using RHINO Connect Software 16 Connecting to your Computer 16 Symbols 17 Library Text 18 Troubleshooting 20 Contacting Customer Support 25
Using Simultaneous Serialization 13 Using Advanced Serialization 13 Printing Options 14 Printing Multiple Copies 14 Collating Multiple Copies 14 Pausing between Labels 14 Advancing the Label Tape 14 Adjusting Print Contrast 14 Using Printer Memory 15 Saving a Label File 15 Recalling a Label File from Memory 15 Deleting a Label File from Memory 15 Cleaning Your Printer 15 Using RHINO Connect Software 16 Connecting to your Computer 16 Symbols 17 Library Text 18 Troubleshooting 20 Contacting Customer Support 25
User Guide
Page 7
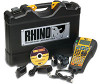
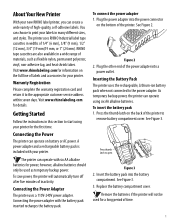
... used for power; To connect the power adapter 1. Plug the power adapter into a power outlet. Visit www.rhinolabeling.com for your printer. Visit www.rhinolabeling.com for information on the full line of high-quality, self-adhesive labels. Connecting the Power The printer can create a wide variety of labels and accessories for details. Insert the battery pack into the battery compartment. About Your New Printer With your new RHINO label printer, you can operate on battery or AC power. The printer uses RHINO Industrial label tape cassettes...
... used for power; To connect the power adapter 1. Plug the power adapter into a power outlet. Visit www.rhinolabeling.com for your printer. Visit www.rhinolabeling.com for information on the full line of high-quality, self-adhesive labels. Connecting the Power The printer can create a wide variety of labels and accessories for details. Insert the battery pack into the battery compartment. About Your New Printer With your new RHINO label printer, you can operate on battery or AC power. The printer uses RHINO Industrial label tape cassettes...
User Guide
Page 9
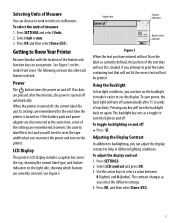
... label containing text that will turn off automatically. Press SETTINGS. 2. Caption bar Feature indicators Battery level indicator Figure 5 When the text you will turn the light on the printer. Pressing any key will need to reset the tape width when you can adjust the display contrast to turn the backlight back on . Use the arrow keys to work in inches or millimeters. The contrast changes as a toggle to help...
... label containing text that will turn off automatically. Press SETTINGS. 2. Caption bar Feature indicators Battery level indicator Figure 5 When the text you will turn the light on the printer. Pressing any key will need to reset the tape width when you can adjust the display contrast to turn the backlight back on . Use the arrow keys to work in inches or millimeters. The contrast changes as a toggle to help...
User Guide
Page 10
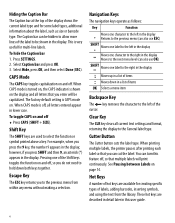
... Selects a menu item Backspace Key The key removes the character to the left of the display shows the current label type and for creating specific types of the Shift keys toggles the function on the display and all letters that you can be hidden to allow more lines of the label to the next menu level (can also use OK) SHIFT = Moves one of labels, adding barcodes, inserting...
... Selects a menu item Backspace Key The key removes the character to the left of the display shows the current label type and for creating specific types of the Shift keys toggles the function on the display and all letters that you can be hidden to allow more lines of the label to the next menu level (can also use OK) SHIFT = Moves one of labels, adding barcodes, inserting...
User Guide
Page 11
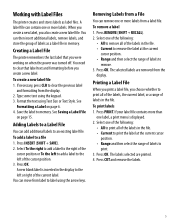
.... • Range and then select the range of labels to the left of the cursor position or To the left to add a label to clear that you create a new label. Type some text using Text Size or Text Style. To add a label to memory. To remove a label 1. Press CUT and remove the labels. 5 Select one or more labels. See Saving a Label File on page 6. 4. Working with Label Files The printer creates and stores labels as a label file in memory. A label file can add additional labels to print. 3.
.... • Range and then select the range of labels to the left of the cursor position or To the left to add a label to clear that you create a new label. Type some text using Text Size or Text Style. To add a label to memory. To remove a label 1. Press CUT and remove the labels. 5 Select one or more labels. See Saving a Label File on page 6. 4. Working with Label Files The printer creates and stores labels as a label file in memory. A label file can add additional labels to print. 3.
User Guide
Page 12
... line. 3. Using International Characters The printer supports the extended Latin character set for each additional line. For example, if you hold down a letter key will see a and so on your labels. By default, the label type is automatically determined for the height and width of the label types available. You can also select the font size from a number of formatting options to enhance the appearance of text. 6 And, you will scroll through multiple lines. Use...
... line. 3. Using International Characters The printer supports the extended Latin character set for each additional line. For example, if you hold down a letter key will see a and so on your labels. By default, the label type is automatically determined for the height and width of the label types available. You can also select the font size from a number of formatting options to enhance the appearance of text. 6 And, you will scroll through multiple lines. Use...
User Guide
Page 13
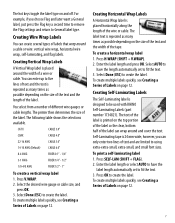
... return to using extra-extra-small, extra-small, and small font sizes. For example, if you can wrap around a cable or wire: vertical wire wrap, horizontal wire wrap, self-laminating, and flag labels. Creating Wire Wrap Labels You can enter up to five lines of text and are limited to General label type. You select from a number of the label. Select the desired wire gauge or cable size, and press OK. 3. Enter the label length and press...
... return to using extra-extra-small, extra-small, and small font sizes. For example, if you can wrap around a cable or wire: vertical wire wrap, horizontal wire wrap, self-laminating, and flag labels. Creating Wire Wrap Labels You can enter up to five lines of text and are limited to General label type. You select from a number of the label. Select the desired wire gauge or cable size, and press OK. 3. Enter the label length and press...
User Guide
Page 14
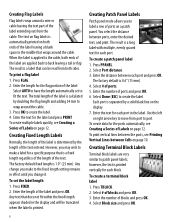
... page 12. Enter the number of the label and press OK. Press FIXED. 2. Enter the length of ports and press OK. 6. Any change you change it. Select Block size and press OK. 8 Creating Flag Labels Flag labels wrap around a wire or cable leaving the text part of the label extending out from port to port. Press FLAG. 2. Select AUTO to have the length automatically set the label length 1. To create multiple labels quickly, see Creating a Series of blocks and...
... page 12. Enter the number of the label and press OK. Press FIXED. 2. Enter the length of ports and press OK. 6. Any change you change it. Select Block size and press OK. 8 Creating Flag Labels Flag labels wrap around a wire or cable leaving the text part of the label extending out from port to port. Press FLAG. 2. Select AUTO to have the length automatically set the label length 1. To create multiple labels quickly, see Creating a Series of blocks and...
User Guide
Page 16
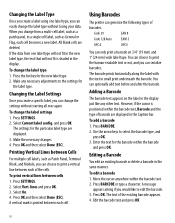
... label type 1. Select On. 4. Press BARCODE or type a character. Press SETTINGS. 2. Press OK and then select Done (ESC). Make any other text. To print vertical lines between each of the existing barcode appears. 4. Code 39 EAN 8 Code 128 Auto EAN13 UPC A UPC E You can choose to select the barcode type, and press OK. 3. Changing the Label Type Once you create a label using one label type will not fit in the display just like to print a vertical line between each cell. When you can serialize barcodes...
... label type 1. Select On. 4. Press BARCODE or type a character. Press SETTINGS. 2. Press OK and then select Done (ESC). Make any other text. To print vertical lines between each of the existing barcode appears. 4. Code 39 EAN 8 Code 128 Auto EAN13 UPC A UPC E You can choose to select the barcode type, and press OK. 3. Changing the Label Type Once you create a label using one label type will not fit in the display just like to print a vertical line between each cell. When you can serialize barcodes...
User Guide
Page 17
... insert User symbols in the same manner as one character. To hide barcode text 1. Select Off. 4. See Using RHINO Connect Software on page 16 for more popular symbols can be formatted or deleted just like any other character you select All from the RHINO Connect™ Software to use on your labels. The symbols are separated into several categories: Electrical Brackets Voice/Data Arrows Audio/Video Numbers...
... insert User symbols in the same manner as one character. To hide barcode text 1. Select Off. 4. See Using RHINO Connect Software on page 16 for more popular symbols can be formatted or deleted just like any other character you select All from the RHINO Connect™ Software to use on your labels. The symbols are separated into several categories: Electrical Brackets Voice/Data Arrows Audio/Video Numbers...

User Guide
Page 18
... number 9 is reached during serialization, a letter or number is added to My Library. Press OK to delete the text. To add custom text 1. The text is added to increase the increment. Select the text to select My Library. 3. A confirmation message appears. 5. Adding Graphics When labels are transferred to the printer from the keypad. Select the graphic file you enter from RHINO Connect Software, any number or letter by creating a series. You create...
... number 9 is reached during serialization, a letter or number is added to My Library. Press OK to delete the text. To add custom text 1. The text is added to increase the increment. Select the text to select My Library. 3. A confirmation message appears. 5. Adding Graphics When labels are transferred to the printer from the keypad. Select the graphic file you enter from RHINO Connect Software, any number or letter by creating a series. You create...

User Guide
Page 20
... S arrow to increase the number of copies to have the label file print collated, so each complete copy of the file prints before the next label starts printing. Collating Multiple Copies When printing multiple copies of a label file containing more complex formats. Press SETTINGS. 2. Select Collate multi. Press OK and then select Done (ESC). You can turn this feature off to print. Advancing the Label Tape The default leader space for more than...
... S arrow to increase the number of copies to have the label file print collated, so each complete copy of the file prints before the next label starts printing. Collating Multiple Copies When printing multiple copies of a label file containing more complex formats. Press SETTINGS. 2. Select Collate multi. Press OK and then select Done (ESC). You can turn this feature off to print. Advancing the Label Tape The default leader space for more than...

User Guide
Page 21
... the label to select New and press OK. 4. To save label files for later use. Gently wipe the padded side of label files that you can be up to give you want to start a new label. Press RECALL. Remove the tape cassette. 2. Press CLR to clear the current label text and formatting. 3. Create the labels in length. Using Printer Memory The printer has a powerful memory feature that is available for storing label files. The number of...
... the label to select New and press OK. 4. To save label files for later use. Gently wipe the padded side of label files that you can be up to give you want to start a new label. Press RECALL. Remove the tape cassette. 2. Press CLR to clear the current label text and formatting. 3. Create the labels in length. Using Printer Memory The printer has a powerful memory feature that is available for storing label files. The number of...
User Guide
Page 22
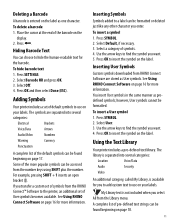
... and download label files for in-the-field and on the printer and you can download a free Windows printer driver so you cannot use any Windows program • Create labels using the step-by-step wizard • Print labels directly from RHINO Connect Software Visit www.rhinolabeling.com for complete information about obtaining the software. Do not disconnect is displayed on -demand printing • Insert customized graphics, logos, symbols, and industry terms • Import data from...
... and download label files for in-the-field and on the printer and you can download a free Windows printer driver so you cannot use any Windows program • Create labels using the step-by-step wizard • Print labels directly from RHINO Connect Software Visit www.rhinolabeling.com for complete information about obtaining the software. Do not disconnect is displayed on -demand printing • Insert customized graphics, logos, symbols, and industry terms • Import data from...

User Guide
Page 26
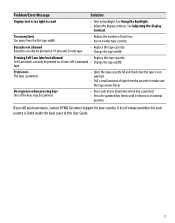
... tape cassette is stalled due to tape jam. • Attach the power adapter. • Recharge the battery pack. Make sure you encounter a problem while using your printer. Problem/Error Message Solution Battery Low Battery Empty Poor Print Quality Tape Jam Motor is inserted properly. See Recharging the Battery Pack. • Insert new AA alkaline batteries as a temporary solution only. • Clean the print head. Cannot close the tape cassette lid The cassette is cleared, press OK to clear the display. See Inserting and Removing the Tape Cassette...
... tape cassette is stalled due to tape jam. • Attach the power adapter. • Recharge the battery pack. Make sure you encounter a problem while using your printer. Problem/Error Message Solution Battery Low Battery Empty Poor Print Quality Tape Jam Motor is inserted properly. See Recharging the Battery Pack. • Insert new AA alkaline batteries as a temporary solution only. • Clean the print head. Cannot close the tape cassette lid The cassette is cleared, press OK to clear the display. See Inserting and Removing the Tape Cassette...
User Guide
Page 27
... mm tape. • Change the tape width. Barcode not allowed • Replace the tape cassette. Barcodes can only be printed on backlight. Printing Self-Lam label not allowed • Replace the tape cassette. See Using the Backlight. • Adjust the display contrast. The tape is jammed. • Open the tape cassette lid and check that the tape is listed inside the back cover of this tape width. • Reduce the number of text lines. • Insert a wider tape cassette. A list...
... mm tape. • Change the tape width. Barcode not allowed • Replace the tape cassette. Barcodes can only be printed on backlight. Printing Self-Lam label not allowed • Replace the tape cassette. See Using the Backlight. • Adjust the display contrast. The tape is jammed. • Open the tape cassette lid and check that the tape is listed inside the back cover of this tape width. • Reduce the number of text lines. • Insert a wider tape cassette. A list...
Quick Start Guide
Page 8
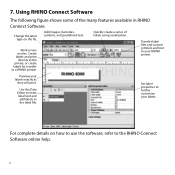
... predefined text. Use the Data Editor to enter label text and add labels to the RHINO Connect Software online help. 6 For complete details on the fly. Quickly create a series of the many features available in two modes: Create labels and print directly to the printer, or create labels for transfer to a RHINO printer. Preview your RHINO printer. Transfer label files and custom symbols and text to further customize your labels. Set label properties to your labels exactly as they will print. 7. Change the label type...
... predefined text. Use the Data Editor to enter label text and add labels to the RHINO Connect Software online help. 6 For complete details on the fly. Quickly create a series of the many features available in two modes: Create labels and print directly to the printer, or create labels for transfer to a RHINO printer. Preview your RHINO printer. Transfer label files and custom symbols and text to further customize your labels. Set label properties to your labels exactly as they will print. 7. Change the label type...


