
User Guide 1
Page 2
Contents About Your New Label Maker 5 Product Registration 5 Getting Started 5 Connecting the Power 5 Inserting the Battery Pack 6 Recharging the Battery Pack 6 Inserting the Label Cassette 7 Using the Label Maker for the First Time 8 Getting to Know the Label Maker 9 Power ...9 LCD Display 10 Format 11 Insert ...11 Settings 11 CAPS Mode 11 Backspace 11 Clear ...11 Navigation Keys 12 Cancel 12 Formatting Your Label 13 Font Type 14 Font Size 14 Font Styles 15 Adding Borders and Underline Styles 15 Using Mirror Text 16 2
Contents About Your New Label Maker 5 Product Registration 5 Getting Started 5 Connecting the Power 5 Inserting the Battery Pack 6 Recharging the Battery Pack 6 Inserting the Label Cassette 7 Using the Label Maker for the First Time 8 Getting to Know the Label Maker 9 Power ...9 LCD Display 10 Format 11 Insert ...11 Settings 11 CAPS Mode 11 Backspace 11 Clear ...11 Navigation Keys 12 Cancel 12 Formatting Your Label 13 Font Type 14 Font Size 14 Font Styles 15 Adding Borders and Underline Styles 15 Using Mirror Text 16 2

User Guide 1
Page 3
Aligning the Text 16 Creating Fixed-Length Labels 17 Creating Two-Line Labels 18 Using Clip Art, Symbols, and Special Characters 19 Adding Clip Art 19 Adding Symbols 20 Using the Symbol Keys 20 Adding International Characters 21 Printing Options 22 Previewing Your Label 22 Printing Multiple Labels 22 Using the Label Maker Memory 23 Saving a Label 23 Opening Saved Labels 23 Inserting Saved Text 24 Caring for Your Label Maker 25 Troubleshooting 26 Documentation Feedback 27 Environmental Information 28 3
Aligning the Text 16 Creating Fixed-Length Labels 17 Creating Two-Line Labels 18 Using Clip Art, Symbols, and Special Characters 19 Adding Clip Art 19 Adding Symbols 20 Using the Symbol Keys 20 Adding International Characters 21 Printing Options 22 Previewing Your Label 22 Printing Multiple Labels 22 Using the Label Maker Memory 23 Saving a Label 23 Opening Saved Labels 23 Inserting Saved Text 24 Caring for Your Label Maker 25 Troubleshooting 26 Documentation Feedback 27 Environmental Information 28 3
User Guide 1
Page 4
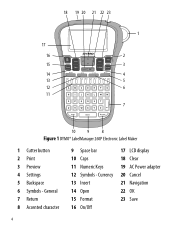
18 19 20 21 22 23 1 17 16 2 15 3 14 4 13 5 12 6 11 7 10 9 8 Figure 1 DYMO® LabelManager 260P Electronic Label Maker 1 Cutter button 2 Print 3 Preview 4 Settings 5 Backspace 6 Symbols - General 7 Return 8 Accented character 9 Space bar 10 Caps 11 Numeric Keys 12 Symbols - Currency 13 Insert 14 Open 15 Format 16 On/Off 17 LCD display 18 Clear 19 AC Power adapter 20 Cancel 21 Navigation 22 OK 23 Save 4
18 19 20 21 22 23 1 17 16 2 15 3 14 4 13 5 12 6 11 7 10 9 8 Figure 1 DYMO® LabelManager 260P Electronic Label Maker 1 Cutter button 2 Print 3 Preview 4 Settings 5 Backspace 6 Symbols - General 7 Return 8 Accented character 9 Space bar 10 Caps 11 Numeric Keys 12 Symbols - Currency 13 Insert 14 Open 15 Format 16 On/Off 17 LCD display 18 Clear 19 AC Power adapter 20 Cancel 21 Navigation 22 OK 23 Save 4

User Guide 1
Page 5
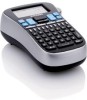
...-adhesive labels. Connecting the Power The label maker is powered by a rechargeable, Lithium-ion battery pack. Product Registration Visit www.dymo.com/register to print your first label. Getting Started Follow the instructions in this section to register your label maker online. You can create a wide variety of inactivity. 5 About Your New Label Maker With the DYMO® LabelManager 260P electronic label maker, you can choose to print your labels in many different fonts, font sizes, and styles. Visit www.dymo.com...
...-adhesive labels. Connecting the Power The label maker is powered by a rechargeable, Lithium-ion battery pack. Product Registration Visit www.dymo.com/register to print your first label. Getting Started Follow the instructions in this section to register your label maker online. You can create a wide variety of inactivity. 5 About Your New Label Maker With the DYMO® LabelManager 260P electronic label maker, you can choose to print your labels in many different fonts, font sizes, and styles. Visit www.dymo.com...

User Guide 1
Page 6
... to power the label maker. To recharge the battery pack 1 Plug the power adapter into the power connector on the top of the label maker. 2 Plug the other end of time. Recharging the Battery Pack A power adapter is only used for a long period of the power adapter into the battery compartment. 3 Replace the battery compartment cover. NOTE Remove the battery pack if the label maker will not be used for recharging the battery pack; To insert the battery...
... to power the label maker. To recharge the battery pack 1 Plug the power adapter into the power connector on the top of the label maker. 2 Plug the other end of time. Recharging the Battery Pack A power adapter is only used for a long period of the power adapter into the battery compartment. 3 Replace the battery compartment cover. NOTE Remove the battery pack if the label maker will not be used for recharging the battery pack; To insert the battery...
User Guide 1
Page 7
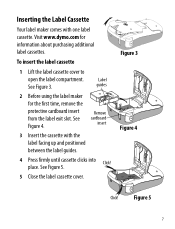
... the label guides. 4 Press firmly until cassette clicks into Click! To insert the label cassette 1 Lift the label cassette cover to open the label compartment. See Figure 4. Remove cardboard insert 3 Insert the cassette with one label cassette. Visit www.dymo.com for the first time, remove the protective cardboard insert from the label exit slot. Figure 3 Figure 4 Click! See Figure 5. 5 Close the label cassette cover. place. Figure 5 7 Label See Figure 3. guides 2 Before using the label maker for...
... the label guides. 4 Press firmly until cassette clicks into Click! To insert the label cassette 1 Lift the label cassette cover to open the label compartment. See Figure 4. Remove cardboard insert 3 Insert the cassette with one label cassette. Visit www.dymo.com for the first time, remove the protective cardboard insert from the label exit slot. Figure 3 Figure 4 Click! See Figure 5. 5 Close the label cassette cover. place. Figure 5 7 Label See Figure 3. guides 2 Before using the label maker for...

User Guide 1
Page 8
... you are now ready to print your first label. To print a label 1 Enter text to cut the label. These selections remain set up the label maker 1 Press to turn on the power. 2 Select the language and press . 3 Select the width of copies. 4 Press or to print. 5 Press the cutter button to create a simple label. 2 Press . 3 Select the number of the label cassette currently in the label maker and press . You can change them. Congratulations! You are asked to...
... you are now ready to print your first label. To print a label 1 Enter text to cut the label. These selections remain set up the label maker 1 Press to turn on the power. 2 Select the language and press . 3 Select the width of copies. 4 Press or to print. 5 Press the cutter button to create a simple label. 2 Press . 3 Select the number of the label cassette currently in the label maker and press . You can change them. Congratulations! You are asked to...

User Guide 1
Page 9
... . Refer to Figure 1. After two minutes of the feature and function keys on . Getting to Know the Label Maker Become familiar with the location of inactivity, the power is switched off automatically. Power The button turns the power on and off automatically, the last label created is remembered and displayed when the power is turned back on your label maker. The previously selected style settings are also restored.
... . Refer to Figure 1. After two minutes of the feature and function keys on . Getting to Know the Label Maker Become familiar with the location of inactivity, the power is switched off automatically. Power The button turns the power on and off automatically, the last label created is remembered and displayed when the power is turned back on your label maker. The previously selected style settings are also restored.

User Guide 1
Page 10
The number of text at a time. LCD Display The display can show two lines of characters displayed on each line will vary due to let you know when a feature is selected. 1 Font 6 Uppercase 2 Font size 7 Lowercase 3 Mirror text 8 Accented character 4 Text alignment 9 Fixed label length 5 Battery 10 Edit area 10 With DYMO's exclusive graphical display, most of the formatting you add is visible instantly. 1 2 3 4 5 6 7 8 9 10 Feature indicators along the top of the LCD display appear black to proportional spacing.
The number of text at a time. LCD Display The display can show two lines of characters displayed on each line will vary due to let you know when a feature is selected. 1 Font 6 Uppercase 2 Font size 7 Lowercase 3 Mirror text 8 Accented character 4 Text alignment 9 Fixed label length 5 Battery 10 Edit area 10 With DYMO's exclusive graphical display, most of the formatting you add is visible instantly. 1 2 3 4 5 6 7 8 9 10 Feature indicators along the top of the LCD display appear black to proportional spacing.

User Guide 1
Page 11
... this User Guide. When Caps mode is on, the Caps mode indicator is shown on the display and all label text, just the text formatting, or both. 11 Clear The key gives you a choice to clear all letters that you to the left of the cursor. Format The key displays the Font, Font Size, Style, Borders and Underline, Label Length, Alignment, and Mirror submenus. Settings The key displays the language, label width...
... this User Guide. When Caps mode is on, the Caps mode indicator is shown on the display and all label text, just the text formatting, or both. 11 Clear The key gives you a choice to clear all letters that you to the left of the cursor. Format The key displays the Font, Font Size, Style, Borders and Underline, Label Length, Alignment, and Mirror submenus. Settings The key displays the language, label width...

User Guide 1
Page 13
Formatting Your Label You can choose from several format options to enhance the appearance of your labels. 2 3 1 4 7 5 1 Font type 2 Font size 3 Font style 4 Borders/Underline 6 5 Mirror 6 Alignment 7 Label length To adjust the formatting 1 Press . 2 Use the navigation keys to select the formatting option to change and press . 3 Select the option to apply to your label and press . 13
Formatting Your Label You can choose from several format options to enhance the appearance of your labels. 2 3 1 4 7 5 1 Font type 2 Font size 3 Font style 4 Borders/Underline 6 5 Mirror 6 Alignment 7 Label length To adjust the formatting 1 Press . 2 Use the navigation keys to select the formatting option to change and press . 3 Select the option to apply to your label and press . 13

User Guide 1
Page 14
Label Width 1/4" (6 mm) 1/2" (12 mm) 1/2" (12 mm) Font Size Available 8 point 8, 12, 18 point 8, 12, 18, 24, 28, 32 point ♦ Use the up and down or left and right navigation keys to all characters on the label width you have selected. The font size applies to select the font size. 14 Font Size Six font sizes are available for your labels: { Basic Serif Fun ♦ Use the up and down navigation keys to select the font type. Font Type Three font types are available for your labels: The font sizes available depend on a label.
Label Width 1/4" (6 mm) 1/2" (12 mm) 1/2" (12 mm) Font Size Available 8 point 8, 12, 18 point 8, 12, 18, 24, 28, 32 point ♦ Use the up and down or left and right navigation keys to all characters on the label width you have selected. The font size applies to select the font size. 14 Font Size Six font sizes are available for your labels: { Basic Serif Fun ♦ Use the up and down navigation keys to select the font type. Font Type Three font types are available for your labels: The font sizes available depend on a label.

User Guide 1
Page 17
... to set a fixed length 1 Use the up and down navigation keys to select the fixed option. 2 Use the up to enter the label length. 17 When you can choose a fixed length label up and down navigation keys to select the label length, or use the number keys to 15" long. To set the length of the label for this text. Creating Fixed-Length Labels Normally, the length of the label is displayed showing the smallest possible label length for a specific application...
... to set a fixed length 1 Use the up and down navigation keys to select the fixed option. 2 Use the up to enter the label length. 17 When you can choose a fixed length label up and down navigation keys to select the label length, or use the number keys to 15" long. To set the length of the label for this text. Creating Fixed-Length Labels Normally, the length of the label is displayed showing the smallest possible label length for a specific application...

User Guide 1
Page 20
to add the symbol to select the desired symbol. 3 When you locate the symbol, press your label. Adding Symbols The label maker supports the extended symbol set shown below. ? ! _ - : ' " , . ; ' ¡ ¿ / \ & @ # % ‰ | ( ) { } [ ] ° • * + - x ÷ √ ^ ~ ≈ = ≠... Ρ Σ Τ Υ Φ Χ Ψ Ω To insert a symbol 1 Press Insert, select Symbols, and then press . 2 Use the up and down or left and right navigation keys to Using the Symbol Keys You can quickly add symbols by...
to add the symbol to select the desired symbol. 3 When you locate the symbol, press your label. Adding Symbols The label maker supports the extended symbol set shown below. ? ! _ - : ' " , . ; ' ¡ ¿ / \ & @ # % ‰ | ( ) { } [ ] ° • * + - x ÷ √ ^ ~ ≈ = ≠... Ρ Σ Τ Υ Φ Χ Ψ Ω To insert a symbol 1 Press Insert, select Symbols, and then press . 2 Use the up and down or left and right navigation keys to Using the Symbol Keys You can quickly add symbols by...

User Guide 1
Page 21
... the language and you press the Accent key and then the letter a, you have selected. After pressing the Accent key, pressing a letter brings up a menu containing all the variations available. The accent variations are displayed. 3 Use the left and right navigation keys to add a currency symbol. 2 Select the symbol you want and press . Adding International Characters The label maker supports the extended Latin character set.
... the language and you press the Accent key and then the letter a, you have selected. After pressing the Accent key, pressing a letter brings up a menu containing all the variations available. The accent variations are displayed. 3 Use the left and right navigation keys to add a currency symbol. 2 Select the symbol you want and press . Adding International Characters The label maker supports the extended Latin character set.

User Guide 1
Page 22
You can preview your label and print multiple labels. Previewing Your Label You can preview the text and formatting of 1. 22 To print multiple labels 1 Press . 2 Select or enter the number of copies to the default value of your label ♦ Press . To preview your label prior to printing. When printing is finished, the number of the label scrolls across the display. Printing Options You can print up to ten copies at...
You can preview your label and print multiple labels. Previewing Your Label You can preview the text and formatting of 1. 22 To print multiple labels 1 Press . 2 Select or enter the number of copies to the default value of your label ♦ Press . To preview your label prior to printing. When printing is finished, the number of the label scrolls across the display. Printing Options You can print up to ten copies at...

User Guide 1
Page 23
... a label, the text and all formatting are returned to the label. The first memory location is displayed 2 Use the navigation keys to select a label to open labels saved in any of up to move through the locations. To save up to nine frequently-used labels. Opening Saved Labels You can store a new label in memory to use at a later time. Using the Label Maker Memory The label maker has a powerful...
... a label, the text and all formatting are returned to the label. The first memory location is displayed 2 Use the navigation keys to select a label to open labels saved in any of up to move through the locations. To save up to nine frequently-used labels. Opening Saved Labels You can store a new label in memory to use at a later time. Using the Label Maker Memory The label maker has a powerful...

User Guide 1
Page 25
... from time to time to clean both sides of the tool across the print head. To clean the print head 1 Remove the label cassette. See Figure 6. 25 Clean your label maker from inside the label compartment cover. 3 Gently wipe the padded side of the blade. Clean the cutter blade each time you long and trouble-free service, while requiring very little maintenance. Press and hold the cutter button to give you replace the label cassette.
... from time to time to clean both sides of the tool across the print head. To clean the print head 1 Remove the label cassette. See Figure 6. 25 Clean your label maker from inside the label compartment cover. 3 Gently wipe the padded side of the blade. Clean the cutter blade each time you long and trouble-free service, while requiring very little maintenance. Press and hold the cutter button to give you replace the label cassette.

User Guide 1
Page 26
... number of lines. • Delete a line to recharge the battery pack. Problem/Error Message Solution No display • Ensure the label maker is installed properly. • Replace the label cassette. battery pack. Too many characters Exceeded maximum number of the buffer text. Charge Battery! Attach the power adapter to recharge the battery pack. Troubleshooting Review the following possible solutions if you encounter a problem while using your label maker. Delete some or all of characters in buffer. Poor Cutter Performance Clean the cutter blade...
... number of lines. • Delete a line to recharge the battery pack. Problem/Error Message Solution No display • Ensure the label maker is installed properly. • Replace the label cassette. battery pack. Too many characters Exceeded maximum number of the buffer text. Charge Battery! Attach the power adapter to recharge the battery pack. Troubleshooting Review the following possible solutions if you encounter a problem while using your label maker. Delete some or all of characters in buffer. Poor Cutter Performance Clean the cutter blade...

User Guide 1
Page 27
... suggestions about our user guides. Battery Charging Allow the battery pack to recharge before unplugging the label maker. Tape Jam • Remove jammed label; Wait - If you still need assistance, visit the DYMO Web site at www.dymo.com. Motor is inserted correctly. Please include the following information with your feedback: • Product name, model number, and User Guide page number • Brief description of instructions that this email address is needed...
... suggestions about our user guides. Battery Charging Allow the battery pack to recharge before unplugging the label maker. Tape Jam • Remove jammed label; Wait - If you still need assistance, visit the DYMO Web site at www.dymo.com. Motor is inserted correctly. Please include the following information with your feedback: • Product name, model number, and User Guide page number • Brief description of instructions that this email address is needed...


