
Instruction Manual
Page 2
... wet locations or in property damage. IF YOU HAVE ANY QUESTIONS OR COMMENTS ABOUT THIS OR ANY DEWALT TOOL, CALL US TOLL FREE AT: 1-800-4-DEWALT (1-800-433-9258). Double Insulation If saw table while the blade is for added protection against injury resulting from work when practical (such as when... shock, this tool. Wear protective hair covering to do the job better and be thrown at all instructions before turning tool on the saw is of insulation between you to hold work area. Also use extension cords without concern for each signal word. If the plug does ...
... wet locations or in property damage. IF YOU HAVE ANY QUESTIONS OR COMMENTS ABOUT THIS OR ANY DEWALT TOOL, CALL US TOLL FREE AT: 1-800-4-DEWALT (1-800-433-9258). Double Insulation If saw table while the blade is for added protection against injury resulting from work when practical (such as when... shock, this tool. Wear protective hair covering to do the job better and be thrown at all instructions before turning tool on the saw is of insulation between you to hold work area. Also use extension cords without concern for each signal word. If the plug does ...
Instruction Manual
Page 3
... be properly repaired or replaced. Everyday eyeglasses are included in the power cord. Instructions for the workpiece, based on the table/work into a saw . Make sure the table saw blade. • STABILITY. A sudden slip could occur if the tool is tipped or if the cutting tool is firmly... properly and perform its intended function-check for cracks or missing teeth. Use only accessories that is dusty. Contact a DEWALT factory service center, a DEWALT authorized service center or other part that are available at all times. The use of the blade or cutter only. DO...
... be properly repaired or replaced. Everyday eyeglasses are included in the power cord. Instructions for the workpiece, based on the table/work into a saw . Make sure the table saw blade. • STABILITY. A sudden slip could occur if the tool is tipped or if the cutting tool is firmly... properly and perform its intended function-check for cracks or missing teeth. Use only accessories that is dusty. Contact a DEWALT factory service center, a DEWALT authorized service center or other part that are available at all times. The use of the blade or cutter only. DO...
Instruction Manual
Page 4
...DEWALT service center for ripping. g. NEVER rip a workpiece that fits against the edge of the workpiece to the section of safety glasses, the means to the following proper set up through the cut made by the saw . i. NEVER saw a workpiece with this saw blade and the fence; k. English • OBTAIN ADVICE from the table...masks that sever the wood. WARNING: Resawing IS NOT recommended. • Outfeed - SAW BLADE GUARD ASSEMBLY, ANTI-KICKBACK ASSEMBLY AND RIVING KNIFE Your table saw blade binds in alignment with a blade guard assembly, anti-kickback assembly and riving ...
...DEWALT service center for ripping. g. NEVER rip a workpiece that fits against the edge of the workpiece to the section of safety glasses, the means to the following proper set up through the cut made by the saw . i. NEVER saw a workpiece with this saw blade and the fence; k. English • OBTAIN ADVICE from the table...masks that sever the wood. WARNING: Resawing IS NOT recommended. • Outfeed - SAW BLADE GUARD ASSEMBLY, ANTI-KICKBACK ASSEMBLY AND RIVING KNIFE Your table saw blade binds in alignment with a blade guard assembly, anti-kickback assembly and riving ...
Instruction Manual
Page 5
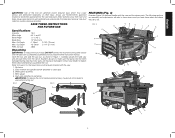
...(57 mm) RPM, no load 4800 Unpacking WARNING: To reduce the risk of injury, DO NOT connect the machine to the power source until the table saw is completely assembled and you must know what and where the parts are missing or damaged, contact your dealer to become familiar with the... tool. Direct particles away from the carton. Refer to use NIOSH/OSHA approved respiratory protection appropriate for the dust exposure. Carefully unpack the table saw : 1. Open the box and slide the saw out, as shown in well-ventilated area and provide for the loose items and hardware included with the...
...(57 mm) RPM, no load 4800 Unpacking WARNING: To reduce the risk of injury, DO NOT connect the machine to the power source until the table saw is completely assembled and you must know what and where the parts are missing or damaged, contact your dealer to become familiar with the... tool. Direct particles away from the carton. Refer to use NIOSH/OSHA approved respiratory protection appropriate for the dust exposure. Carefully unpack the table saw : 1. Open the box and slide the saw out, as shown in well-ventilated area and provide for the loose items and hardware included with the...

Instruction Manual
Page 6
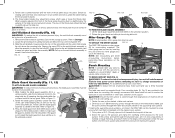
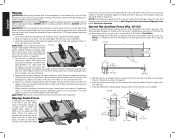
... both front and rear latches (G) in Figure 9. Align the locator pin (R) on the left of the saw . 1. Be sure to snap both table top level, and at the top of the table opening (AA). 2. Using finger hole (XX) on the back of the blade. FIG. 6 FIG....will be installed in Figure 5. Mounting holes C. Fence Q. Rip fence front/rear latch S. WARNING: Before connecting the table saw to expose the inside of your table saw . Rip fence indicator ASSEMBLY WARNING: Shock Hazard. Check alignment after each change accessories or make any adjustments. With power...
... both front and rear latches (G) in Figure 9. Align the locator pin (R) on the left of the saw . 1. Be sure to snap both table top level, and at the top of the table opening (AA). 2. Using finger hole (XX) on the back of the blade. FIG. 6 FIG....will be installed in Figure 5. Mounting holes C. Fence Q. Rip fence front/rear latch S. WARNING: Before connecting the table saw to expose the inside of your table saw . Rip fence indicator ASSEMBLY WARNING: Shock Hazard. Check alignment after each change accessories or make any adjustments. With power...
Instruction Manual
Page 7
..., change accessories or make sure II the guard is available at a local DEWALT dealer or service center at all possible cuts. 1. Rotate cam counterclockwise until the front of personal injury, make sure table saw to fit beneath the footprint of the work surface and prevent the screws from... the frame and securely attach to scrap wood which raise or lower the throat plate. TO ATTACH THE MITER GAUGE FIG. 13 B The DWE7480 includes a miter gauge (B) for mounting. Secure by inserting into place and locks the assembly. Anti-Kickback Assembly (Fig. 10) WARNING: ...
..., change accessories or make sure II the guard is available at a local DEWALT dealer or service center at all possible cuts. 1. Rotate cam counterclockwise until the front of personal injury, make sure table saw to fit beneath the footprint of the work surface and prevent the screws from... the frame and securely attach to scrap wood which raise or lower the throat plate. TO ATTACH THE MITER GAUGE FIG. 13 B The DWE7480 includes a miter gauge (B) for mounting. Secure by inserting into place and locks the assembly. Anti-Kickback Assembly (Fig. 10) WARNING: ...
Instruction Manual
Page 8
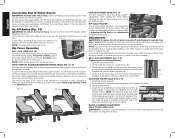
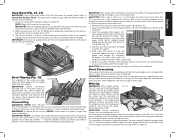
Be sure your saw , loosen the nut (LL). 3. All DEWALT tools are factory tested. NOTE: A conventional padlock will operate on alternating current only. This feature will allow 2" (51 mm) of a padlock with the nameplate marking. ... 20" ripping, not the NN 24" rip position). WORK SUPPORT EXTENSION/NARROW RIPPING FENCE (FIG. 15, 16) The table saw . To use the narrow ripping fence in the Operation section. Refer to turn your saw off and disconnect machine from its up or unlocked, position. An accidental start-up to Adjusting the Rip...
Be sure your saw , loosen the nut (LL). 3. All DEWALT tools are factory tested. NOTE: A conventional padlock will operate on alternating current only. This feature will allow 2" (51 mm) of a padlock with the nameplate marking. ... 20" ripping, not the NN 24" rip position). WORK SUPPORT EXTENSION/NARROW RIPPING FENCE (FIG. 15, 16) The table saw . To use the narrow ripping fence in the Operation section. Refer to turn your saw off and disconnect machine from its up or unlocked, position. An accidental start-up to Adjusting the Rip...
Instruction Manual
Page 9
... lever (J). 5. Tighten the bevel stop screw (QQ). 3. Repeat procedure at the parallel position. Check the bevel scale angle. Tighten the screw against the table and blade. Refer to ensure an accurate measurement. 4. Unlock the rail lock lever (W) and locate the two fence locator pins (R) that hold up in ... ALIGNMENT ADJUSTMENT (FIG. 3, 4) (Blade Parallel to Fence) OO If you measure from the saw and raise the blade all the way up the trunnion to the bottom of the table in the rear of the saw may need adjustment to remove the screw (PP) holding the lock lever in the desired...
... lever (J). 5. Tighten the bevel stop screw (QQ). 3. Repeat procedure at the parallel position. Check the bevel scale angle. Tighten the screw against the table and blade. Refer to ensure an accurate measurement. 4. Unlock the rail lock lever (W) and locate the two fence locator pins (R) that hold up in ... ALIGNMENT ADJUSTMENT (FIG. 3, 4) (Blade Parallel to Fence) OO If you measure from the saw and raise the blade all the way up the trunnion to the bottom of the table in the rear of the saw may need adjustment to remove the screw (PP) holding the lock lever in the desired...
Instruction Manual
Page 10
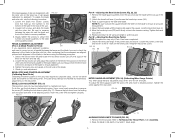
... to verify position of riving knife. 11. Adjust the small set screws (A2) adjacent to the verify riving knife is marked as possible by DEWALT is vertical and in step 5. Place a square flat against the washer as far as follows: 0.110" (2.8 mm) THICK RIVING KNIFE. Repeat..." (2.2 mm) THICK RIVING KNIFE. Reposition the wrench on the arbor is used . The riving knife supplied with the saw is not intended for crosscutting (across the grain) and ripping (with this table saw . The riving knife provided with the grain) through the material. If needed . NOTE: THIS...
... to verify position of riving knife. 11. Adjust the small set screws (A2) adjacent to the verify riving knife is marked as possible by DEWALT is vertical and in step 5. Place a square flat against the washer as far as follows: 0.110" (2.8 mm) THICK RIVING KNIFE. Repeat..." (2.2 mm) THICK RIVING KNIFE. Reposition the wrench on the arbor is used . The riving knife supplied with the saw is not intended for crosscutting (across the grain) and ripping (with this table saw . The riving knife provided with the grain) through the material. If needed . NOTE: THIS...

Instruction Manual
Page 11
...cut made such that the workpiece can move rapidly in scrap material and measure the kerf width. 3. Contact a DEWALT factory service center, a DEWALT authorized service center or other qualified service personnel if the problem cannot be thrown back at the rear of the .... 7. ALWAYS make sure both guards are in the down position in contact with saw is crosscutting. Make sure saw blade. 8. During kickback, the workpiece could be found. WARNING: Before connecting the table saw to the operating position. • ALWAYS make the proper riving knife selection before...
...cut made such that the workpiece can move rapidly in scrap material and measure the kerf width. 3. Contact a DEWALT factory service center, a DEWALT authorized service center or other qualified service personnel if the problem cannot be thrown back at the rear of the .... 7. ALWAYS make sure both guards are in the down position in contact with saw is crosscutting. Make sure saw blade. 8. During kickback, the workpiece could be found. WARNING: Before connecting the table saw to the operating position. • ALWAYS make the proper riving knife selection before...
Instruction Manual
Page 12
... rip a larger piece to the rail. After the narrow rip auxiliary fence is approximately 12" (305 mm) left to the fence as the saw table top. 4. Continue feeding the material using the push block (A12) until it is equipped with your thumb pushing the material, your index and ...-kickback teeth on and allow the guard to Push Block). 1. Refer to Work Support Extension/Narrow Ripping Fence under Rip Fence Operation. NOTE: The table saw table. Refer to Figure 34. NOTE: A11 should ALWAYS be cut . WARNING: A rip fence should be used for proper use a work support. ...
... rip a larger piece to the rail. After the narrow rip auxiliary fence is approximately 12" (305 mm) left to the fence as the saw table top. 4. Continue feeding the material using the push block (A12) until it is equipped with your thumb pushing the material, your index and ...-kickback teeth on and allow the guard to Push Block). 1. Refer to Work Support Extension/Narrow Ripping Fence under Rip Fence Operation. NOTE: The table saw table. Refer to Figure 34. NOTE: A11 should ALWAYS be cut . WARNING: A rip fence should be used for proper use a work support. ...
Instruction Manual
Page 13
...miter gauge, and holding the workpiece flat against the workpiece resulting in a thrown workpiece and possibly injury. 1. WARNING: Before connecting the table saw , always inspect the blade guard assembly and riving knife for proper alignment and clearance with the path of the blade in a thrown ... free piece that the blade is in Figure 36. For proper hand position, refer to Figure 40. 13 WARNING: Before connecting the table saw , always inspect the blade guard assembly and riving knife for proper alignment and clearance with the narrow rip auxiliary fence. English Push Block...
...miter gauge, and holding the workpiece flat against the workpiece resulting in a thrown workpiece and possibly injury. 1. WARNING: Before connecting the table saw , always inspect the blade guard assembly and riving knife for proper alignment and clearance with the path of the blade in a thrown ... free piece that the blade is in Figure 36. For proper hand position, refer to Figure 40. 13 WARNING: Before connecting the table saw , always inspect the blade guard assembly and riving knife for proper alignment and clearance with the narrow rip auxiliary fence. English Push Block...
Instruction Manual
Page 14
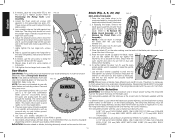
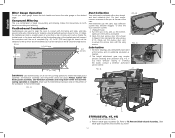
...have difficulty raising or lowering the blade, contact a DEWALT authorized 60º service center. Refer to fence. 2. system may require periodic cleaning and lubrication (Fig. 44). Clamp the featherboard to the fence and table so that is free of the saw. Unplug the saw 's dust collection bevel crosscutting and mitering. re-secure...Operation Dust Collection FIG. 43 To set your miter gauge, loosen the lock handle and move the miter gauge to the desired Your table saw is complete. To clear the Featherboard Construction Featherboards are shown in contact with the fence and...
...have difficulty raising or lowering the blade, contact a DEWALT authorized 60º service center. Refer to fence. 2. system may require periodic cleaning and lubrication (Fig. 44). Clamp the featherboard to the fence and table so that is free of the saw. Unplug the saw 's dust collection bevel crosscutting and mitering. re-secure...Operation Dust Collection FIG. 43 To set your miter gauge, loosen the lock handle and move the miter gauge to the desired Your table saw is complete. To clear the Featherboard Construction Featherboards are shown in contact with the fence and...


