
Instruction Manual
Page 5
... various operations. English Read all instructions listed below may make exposed metal parts of the spinning accessory. f) Do not use inspect the accessory such as a grinder, sander, wire brush, polisher or cut or snagged and your power tool, it does not assure safe operation. Incorrectly sized accessories cannot be capable of...
... various operations. English Read all instructions listed below may make exposed metal parts of the spinning accessory. f) Do not use inspect the accessory such as a grinder, sander, wire brush, polisher or cut or snagged and your power tool, it does not assure safe operation. Incorrectly sized accessories cannot be capable of...

Instruction Manual
Page 8
...; Avoid bouncing the wheel or giving it unstable and may result. • Do not operate this occurs, stop the tool and inspect the wheel for Grinders WARNING: The grinding wheel or accessory may expand in moving parts and should be sure each individual extension contains at speeds greater than 18 gauge.
...; Avoid bouncing the wheel or giving it unstable and may result. • Do not operate this occurs, stop the tool and inspect the wheel for Grinders WARNING: The grinding wheel or accessory may expand in moving parts and should be sure each individual extension contains at speeds greater than 18 gauge.
Instruction Manual
Page 10
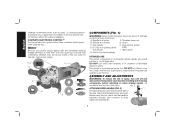
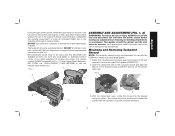
...ELECTRONIC CONTROL™ The internal electronic speed control offers consistent wheel speed while using the tool, check that the handle is designed for professional grinder, sander, wire brush, polisher or cut-off and disconnect it . Guard C. DO NOT use this tool does not operate, check power... occur, apply less force/weight on the tool until the tool will cause loss of more than 10% will function without the overload engaging. DEWALT tools are factory tested; Side handle H. FIG. 2 ATTACHING SIDE HANDLE (FIG. 2) C The side handle (C) can cause injury. Voltage ...
...ELECTRONIC CONTROL™ The internal electronic speed control offers consistent wheel speed while using the tool, check that the handle is designed for professional grinder, sander, wire brush, polisher or cut-off and disconnect it . Guard C. DO NOT use this tool does not operate, check power... occur, apply less force/weight on the tool until the tool will cause loss of more than 10% will function without the overload engaging. DEWALT tools are factory tested; Side handle H. FIG. 2 ATTACHING SIDE HANDLE (FIG. 2) C The side handle (C) can cause injury. Voltage ...
Instruction Manual
Page 11
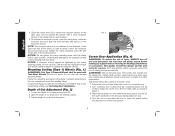
Overtightening could cause screws to use with grinder accessories. NOTE: If the gear case and motor housing 90˚ become separated by a DEWALT service center. WARNING: Accessories must be serviced and re-assembled by more than 1/8" 90˚ (3.17 mm), the tool must be used. Use only the ...
Overtightening could cause screws to use with grinder accessories. NOTE: If the gear case and motor housing 90˚ become separated by a DEWALT service center. WARNING: Accessories must be serviced and re-assembled by more than 1/8" 90˚ (3.17 mm), the tool must be used. Use only the ...

Instruction Manual
Page 13
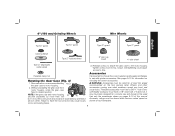
...guard M or the mounting hub may burst and cause injury. Use only the accessories shown on K the gear case (L). Do not operate the grinder with a loose guard or with the slots on pages 9-10. NOTE: Edge grinding and cutting can also be performed with Type 27 wheels ... be performed with Type 27 wheels designed and specified for this page for at the factory. Guards and Flanges It is closed position with the grinder accessories. See page 9-10 and this purpose; 1/4" (6.35 mm) thick wheels are designed for surface grinding while 1/8" (3.17 mm) wheels are designed ...
...guard M or the mounting hub may burst and cause injury. Use only the accessories shown on K the gear case (L). Do not operate the grinder with a loose guard or with the slots on pages 9-10. NOTE: Edge grinding and cutting can also be performed with Type 27 wheels ... be performed with Type 27 wheels designed and specified for this page for at the factory. Guards and Flanges It is closed position with the grinder accessories. See page 9-10 and this purpose; 1/4" (6.35 mm) thick wheels are designed for surface grinding while 1/8" (3.17 mm) wheels are designed ...

Instruction Manual
Page 14
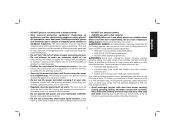
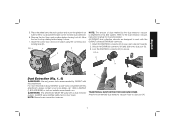
...to full speed before touching the work surface. NOTE: To reduce unexpected tool movement, do not switch the tool on the 5/8"-11threaded spindle. Allow the grinder to run up and during use a wrench to the tool or the wheel. Lift the tool from the power supply, and has come to a ... the wheel or accessory stops rotating. Backing flange is provided to remove the wheel. Reverse the above after any interruption in power supply to the grinder by hand. 3. Install the unthreaded backing flange (E) on the spindle by an O-ring (N) on may result in the off . Allow the tool to stop ...
...to full speed before touching the work surface. NOTE: To reduce unexpected tool movement, do not switch the tool on the 5/8"-11threaded spindle. Allow the grinder to run up and during use a wrench to the tool or the wheel. Lift the tool from the power supply, and has come to a ... the wheel or accessory stops rotating. Backing flange is provided to remove the wheel. Reverse the above after any interruption in power supply to the grinder by hand. 3. Install the unthreaded backing flange (E) on the spindle by an O-ring (N) on may result in the off . Allow the tool to stop ...

Instruction Manual
Page 17
...is greatest when the tool operates at high speed. 3. CAUTION: Wheel or brush must not touch guard when mounted or while in use of grinder may result in a circular motion causes burning and swirling marks on the spindle by hand. 2. Apply minimum pressure to work surface. Sanding ...3. Use only wire brushes or wheels provided with wire 5˚-10˚ wheels. 5. CAUTION: Wear work surface before turning the tool on the grinder spindle without the use . CAUTION: Failure to properly seat the wheel hub before turning tool off . USING WIRE CUP BRUSHES AND WIRE WHEELS (FIG ...
...is greatest when the tool operates at high speed. 3. CAUTION: Wheel or brush must not touch guard when mounted or while in use of grinder may result in a circular motion causes burning and swirling marks on the spindle by hand. 2. Apply minimum pressure to work surface. Sanding ...3. Use only wire brushes or wheels provided with wire 5˚-10˚ wheels. 5. CAUTION: Wear work surface before turning the tool on the grinder spindle without the use . CAUTION: Failure to properly seat the wheel hub before turning tool off . USING WIRE CUP BRUSHES AND WIRE WHEELS (FIG ...

Instruction Manual
Page 18
... hub. 3. Wheel breakage and injury may result. English Mounting and Using Cutting (Type 1) Wheels Cutting wheels include diamond wheels and abrasive discs. Do not operate grinder with clamp lever in L the groove on the raised section (pilot). 3. Undetectable damage to rotate the guard by hand when the latch is installed. 2. To...
... hub. 3. Wheel breakage and injury may result. English Mounting and Using Cutting (Type 1) Wheels Cutting wheels include diamond wheels and abrasive discs. Do not operate grinder with clamp lever in L the groove on the raised section (pilot). 3. Undetectable damage to rotate the guard by hand when the latch is installed. 2. To...

Instruction Manual - Shroud
Page 3
...these warnings may result in death or serious injury. IF YOU HAVE ANY QUESTIONS OR COMMENTS ABOUT THIS OR ANY DEWALT TOOL, CALL US TOLL FREE AT: 1-800-4-DEWALT (1-800-433-9258). Protective equipment such as pipes, radiators, ranges and refrigerators. Keep your hair, clothing and... body contact with earthed or grounded surfaces such as dust mask, nonskid safety shoes, hard hat, or hearing protection used for both the grinder tool and the dust extractor vacuum before using any accessory. CAUTION: Indicates a potentially hazardous situation which , if not avoided, may result ...
...these warnings may result in death or serious injury. IF YOU HAVE ANY QUESTIONS OR COMMENTS ABOUT THIS OR ANY DEWALT TOOL, CALL US TOLL FREE AT: 1-800-4-DEWALT (1-800-433-9258). Protective equipment such as pipes, radiators, ranges and refrigerators. Keep your hair, clothing and... body contact with earthed or grounded surfaces such as dust mask, nonskid safety shoes, hard hat, or hearing protection used for both the grinder tool and the dust extractor vacuum before using any accessory. CAUTION: Indicates a potentially hazardous situation which , if not avoided, may result ...
Instruction Manual - Shroud
Page 5
...; crystalline silica from bricks and cement and other reproductive harm. If you do this type of the spinning accessory. WARNING: When not in use, place grinder on how often you lose control, the cord may be cut or snagged and your hand or arm may be pulled into the spinning accessory...
...; crystalline silica from bricks and cement and other reproductive harm. If you do this type of the spinning accessory. WARNING: When not in use, place grinder on how often you lose control, the cord may be cut or snagged and your hand or arm may be pulled into the spinning accessory...
Instruction Manual - Shroud
Page 7
... to remove the guard from the power source before making any power tool, please contact DEWALT Industrial Tool Co., 701 East Joppa Road, Baltimore, MD 21286, call 1-800-4-DEWALT (1-800-433-9258) or visit our website www.dewalt.com. Open the clamp lever (G) on the tuckpoint shroud and align the tabs (I ... If you need assistance in presence of injury, ALWAYS turn off the tool and disconnect the tool from grinder (DWE46102). 2. English Using the appropriate grinder, wheel and dust extractor vacuum it can be positioned between the spindle and the operator to provide optimum efficiency...
... to remove the guard from the power source before making any power tool, please contact DEWALT Industrial Tool Co., 701 East Joppa Road, Baltimore, MD 21286, call 1-800-4-DEWALT (1-800-433-9258) or visit our website www.dewalt.com. Open the clamp lever (G) on the tuckpoint shroud and align the tabs (I ... If you need assistance in presence of injury, ALWAYS turn off the tool and disconnect the tool from grinder (DWE46102). 2. English Using the appropriate grinder, wheel and dust extractor vacuum it can be positioned between the spindle and the operator to provide optimum efficiency...
Instruction Manual - Shroud
Page 8
Take the tool and tuckpoint shroud to a service center to both the grinder and the dust extractor vacuum. Do not use tool. Loosen the depth of starting the tool accidentally. Such preventative safety measures reduce the risk of ... the tuckpoint shroud. Turn the tool on and allow the tool to install 6" (152.4 mm) tuckpointing wheels, see Cornering Door Application. Do not operate the grinder with a loose tuckpoint shroud or the clamp lever in open as shown in all times. Ensure corner door is facing away from you. 4. If, after...
Take the tool and tuckpoint shroud to a service center to both the grinder and the dust extractor vacuum. Do not use tool. Loosen the depth of starting the tool accidentally. Such preventative safety measures reduce the risk of ... the tuckpoint shroud. Turn the tool on and allow the tool to install 6" (152.4 mm) tuckpointing wheels, see Cornering Door Application. Do not operate the grinder with a loose tuckpoint shroud or the clamp lever in open as shown in all times. Ensure corner door is facing away from you. 4. If, after...
Instruction Manual - Shroud
Page 9
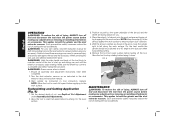
.... 1. FIG. 4 F F E NOTE: The amount of dust retained by DEWALT with this attachment. All DEWALT dust collection shrouds are designed to your local dealer, call 1-800-4-DEWALT (1-800-433-9258) or visit our website www.dewalt.com. Attach the DWV9000 connector (H) to work surface and move the grinder from work surface before laying it down. 7. For...
.... 1. FIG. 4 F F E NOTE: The amount of dust retained by DEWALT with this attachment. All DEWALT dust collection shrouds are designed to your local dealer, call 1-800-4-DEWALT (1-800-433-9258) or visit our website www.dewalt.com. Attach the DWV9000 connector (H) to work surface and move the grinder from work surface before laying it down. 7. For...
Instruction Manual - Shroud
Page 10
... and the dust extractor vacuum before turning off the tool. Failure to heed these warnings may result in Figure 6, move the grinder right to the tool and the accessory. When servicing this tool, use and until the wheel or accessory stops rotating. Tuckpointing and... Cutting Application (Fig. 6) 1. With the shroud oriented as instructed in tool instruction manual. For the best results the grinder should be positioned at start up and during use only identical replacement parts. Remove the tool from you. 4. Such preventative safety measures ...
... and the dust extractor vacuum before turning off the tool. Failure to heed these warnings may result in Figure 6, move the grinder right to the tool and the accessory. When servicing this tool, use and until the wheel or accessory stops rotating. Tuckpointing and... Cutting Application (Fig. 6) 1. With the shroud oriented as instructed in tool instruction manual. For the best results the grinder should be positioned at start up and during use only identical replacement parts. Remove the tool from you. 4. Such preventative safety measures ...


