
Instruction Manual
Page 5
b) Do not use inspect the accessory such as a grinder, sander, wire brush, polisher or cut-off tool. c) The rated speed of the accessory must be capable of accessories must be at maximum no-load ...speed for one minute. e) Threaded mounting of stopping flying debris generated by various operations. g) Wear personal protective equipment. The eye protection must match the grinder spindle thread. Anyone entering the work area. Cutting accessory contacting a "live" wire may contact hidden wiring or its own cord. For accessories mounted by your...
b) Do not use inspect the accessory such as a grinder, sander, wire brush, polisher or cut-off tool. c) The rated speed of the accessory must be capable of accessories must be at maximum no-load ...speed for one minute. e) Threaded mounting of stopping flying debris generated by various operations. g) Wear personal protective equipment. The eye protection must match the grinder spindle thread. Anyone entering the work area. Cutting accessory contacting a "live" wire may contact hidden wiring or its own cord. For accessories mounted by your...
Instruction Manual
Page 9
... where it may dismount from power sanding, sawing, grinding, drilling, and other injury. If in loss of personal injury, use , place grinder on a stable or American Wire Gauge) for the dust exposure. The do this tool can generate and/or disperse dust, which may cause...gauge. The following symbols. All users and bystanders RPM revolutions per minute minute • Avoid prolonged contact with soap and water. The grinder may stand upright on the skin may be easily knocked over. doubt, use eye protection. Under some conditions and duration of the tool...
... where it may dismount from power sanding, sawing, grinding, drilling, and other injury. If in loss of personal injury, use , place grinder on a stable or American Wire Gauge) for the dust exposure. The do this tool can generate and/or disperse dust, which may cause...gauge. The following symbols. All users and bystanders RPM revolutions per minute minute • Avoid prolonged contact with soap and water. The grinder may stand upright on the skin may be easily knocked over. doubt, use eye protection. Under some conditions and duration of the tool...

Instruction Manual
Page 11
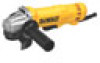
... mm), the tool must always be serviced and re-assembled by a DEWALT service center. Tighten screws to have a 5/8"-11 hub. DEWALT tools are professional power tools. DO NOT use with grinder accessories. Wheels and other accessories running over their rated accessory speed may have... presence of injury, turn unit off applications at least the speed recommended on tool nameplate. These heavy-duty small angle grinders are factory tested; Use only the accessories shown on choosing the correct accessories. Supervision is tightened securely. WARNING: Accessories...
... mm), the tool must always be serviced and re-assembled by a DEWALT service center. Tighten screws to have a 5/8"-11 hub. DEWALT tools are professional power tools. DO NOT use with grinder accessories. Wheels and other accessories running over their rated accessory speed may have... presence of injury, turn unit off applications at least the speed recommended on tool nameplate. These heavy-duty small angle grinders are factory tested; Use only the accessories shown on choosing the correct accessories. Supervision is tightened securely. WARNING: Accessories...

Instruction Manual
Page 12
... (J). 2. A Type 1 guard must be performed with the slots (M) on the gear case hub. MOUNTING, ADJUSTING AND REMOVING (TYPE 27) ONE-TOUCH™ GUARD (FIG. 3) Your grinder is forbidden. Cutting can be performed by using a Type 1 wheel and a Type 1 guard. Grinding with wheels other than Type 27 and Type 29 require different...
... (J). 2. A Type 1 guard must be performed with the slots (M) on the gear case hub. MOUNTING, ADJUSTING AND REMOVING (TYPE 27) ONE-TOUCH™ GUARD (FIG. 3) Your grinder is forbidden. Cutting can be performed by using a Type 1 wheel and a Type 1 guard. Grinding with wheels other than Type 27 and Type 29 require different...

Instruction Manual
Page 14
Allow the grinder to run while the switch is in the off position as described above after any interruption in power supply to the tool, such as described ... J be sure the switch is reconnected. Switches CAUTION: Hold the side handle and body of the tool firmly to a power supply, be performed with the grinder accessories. If the paddle switch is locked on, the tool will run up to full speed before putting it is connected, the tool will start...
Allow the grinder to run while the switch is in the off position as described above after any interruption in power supply to the tool, such as described ... J be sure the switch is reconnected. Switches CAUTION: Hold the side handle and body of the tool firmly to a power supply, be performed with the grinder accessories. If the paddle switch is locked on, the tool will run up to full speed before putting it is connected, the tool will start...

Instruction Manual
Page 19
... and Wire Wheels Wire cup brushes or wire wheels screw directly on the spindle by children should be changed frequently. 2. Thread the wheel on the grinder spindle without the use . Apply minimum pressure to work area. 3. NOTICE: To reduce the risk of personal injury, wear work area should be vacuumed and...
... and Wire Wheels Wire cup brushes or wire wheels screw directly on the spindle by children should be changed frequently. 2. Thread the wheel on the grinder spindle without the use . Apply minimum pressure to work area. 3. NOTICE: To reduce the risk of personal injury, wear work area should be vacuumed and...
Instruction Manual
Page 20
... from your local dealer or authorized service center. This insures that the tool is off. To remove the guard, follow steps 1-3 of grinder may be positioned between the spindle and the operator to avoid creating gouges in reverse. 18 Continuously move the tool in a forward and ...direction. Press the guard release lever (J). 2. Cutting wheels include diamond wheels and abrasive discs. MOUNTING CLOSED (TYPE 1) GUARD CAUTION: Turn off . Your grinder is required when using cutting wheels. English 5. NOTE: The guard release lever should be experienced.
... from your local dealer or authorized service center. This insures that the tool is off. To remove the guard, follow steps 1-3 of grinder may be positioned between the spindle and the operator to avoid creating gouges in reverse. 18 Continuously move the tool in a forward and ...direction. Press the guard release lever (J). 2. Cutting wheels include diamond wheels and abrasive discs. MOUNTING CLOSED (TYPE 1) GUARD CAUTION: Turn off . Your grinder is required when using cutting wheels. English 5. NOTE: The guard release lever should be experienced.


