Instruction Manual
Page 4
... switch is left attached to loss of drugs, alcohol, or medica- The correct tool will do the job better and safer at the rate for Grinders • Do not force tool. A guard pro-
... switch is left attached to loss of drugs, alcohol, or medica- The correct tool will do the job better and safer at the rate for Grinders • Do not force tool. A guard pro-

Instruction Manual
Page 5
...and let it run for the dust exposure. If the wire brush has loose wires, they will make known to maintain control of the grinder may be experi- • Clean out your hands and arms. uct may be harmful to your tool often, especially after heavy use ...• arsenic and chromium from these chemicals are do this type of this tool. Wear protective clothing and wash exposed areas with the wheel. grinder. caused by power sanding, sawing, grind- Flaws may contact hidden ing, drilling, and other accessory contacts a secondary and grit containing metal particles ...
...and let it run for the dust exposure. If the wire brush has loose wires, they will make known to maintain control of the grinder may be experi- • Clean out your hands and arms. uct may be harmful to your tool often, especially after heavy use ...• arsenic and chromium from these chemicals are do this type of this tool. Wear protective clothing and wash exposed areas with the wheel. grinder. caused by power sanding, sawing, grind- Flaws may contact hidden ing, drilling, and other accessory contacts a secondary and grit containing metal particles ...
Instruction Manual
Page 6
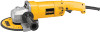
Trigger Switch B. Lock-On Button C. See pages 5-6 for continuous use with grinder accessories. Hold the lock-on choosing the correct accessories. The symbols and their rated speed may result. Spindle Lock Button D. Before reconnecting the tool, depress ...
Trigger Switch B. Lock-On Button C. See pages 5-6 for continuous use with grinder accessories. Hold the lock-on choosing the correct accessories. The symbols and their rated speed may result. Spindle Lock Button D. Before reconnecting the tool, depress ...
Instruction Manual
Page 10
... to reduce tracking of the switch to ensure that the tool is pre-adjusted to secure guard on the gear case. CAUTION: Do not operate grinder with any dust chips or other removal debris. Vacuum filter bags should be washed thoroughly before mounting or removing the guard. Plastic drop cloths should...
... to reduce tracking of the switch to ensure that the tool is pre-adjusted to secure guard on the gear case. CAUTION: Do not operate grinder with any dust chips or other removal debris. Vacuum filter bags should be washed thoroughly before mounting or removing the guard. Plastic drop cloths should...
Instruction Manual
Page 11
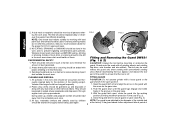
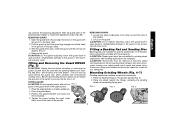
...optional accessories. Wheels and other accessories running over rated speed can fly apart and cause injury. REMOVING GUARD 1. Fitting and Removing the Guard DW840 (Fig. 3) CAUTION: Unplug the tool before mounting or removing the guard. Before reconnecting the tool, depress and release the rear part ... flange, centering the grinding wheel on a table, spindle up until the arrows are complete. Pull the guard up . 2. Place the angle grinder on the backing flange pilot. With the guard latch open position. 1. Undetectable damage to ensure that the tool is off. Tighten the screw...
...optional accessories. Wheels and other accessories running over rated speed can fly apart and cause injury. REMOVING GUARD 1. Fitting and Removing the Guard DW840 (Fig. 3) CAUTION: Unplug the tool before mounting or removing the guard. Before reconnecting the tool, depress and release the rear part ... flange, centering the grinding wheel on a table, spindle up until the arrows are complete. Pull the guard up . 2. Place the angle grinder on the backing flange pilot. With the guard latch open position. 1. Undetectable damage to ensure that the tool is off. Tighten the screw...


