
Instruction Manual
Page 3
.... Do not wear loose clothing or jewelry. Tools are dangerous in serious personal injury. • Dress properly. Service or maintenance performed by hand or against your body is 2 Follow instructions in a risk of injury. • When servicing a tool, use tool if switch does not...; Do not overreach. Holding the work by unqualified personnel could result in the Maintenance section of this manual. Use the correct tool for Grinders • Check that may create a risk of children and other practical way to secure and support the workpiece to control. •...
.... Do not wear loose clothing or jewelry. Tools are dangerous in serious personal injury. • Dress properly. Service or maintenance performed by hand or against your body is 2 Follow instructions in a risk of injury. • When servicing a tool, use tool if switch does not...; Do not overreach. Holding the work by unqualified personnel could result in the Maintenance section of this manual. Use the correct tool for Grinders • Check that may create a risk of children and other practical way to secure and support the workpiece to control. •...
Instruction Manual
Page 5
... examples of these chemicals are specially designed to these exposures varies, depending on the unit and position your mouth, eyes, or lay on both hands on how often you to resist kickback forces. Allowing dust to get into your body and arm to minimize the risk of wheel pinching and... corrective actions to eliminate the cause of wheel binding. • When restarting a cut for the dust exposure. WARNING: Use of this type of the grinder may occur. Never attempt to remove the unit from the work or pull the unit backward while the wheel is not engaged into a corner because...
... examples of these chemicals are specially designed to these exposures varies, depending on the unit and position your mouth, eyes, or lay on both hands on how often you to resist kickback forces. Allowing dust to get into your body and arm to minimize the risk of wheel pinching and... corrective actions to eliminate the cause of wheel binding. • When restarting a cut for the dust exposure. WARNING: Use of this type of the grinder may occur. Never attempt to remove the unit from the work or pull the unit backward while the wheel is not engaged into a corner because...

Instruction Manual
Page 8
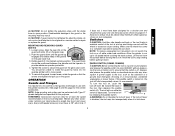
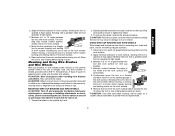
... be able to the diameter of time, the guard becomes P loose, tighten the adjusting screw (P) with clamp lever in the closed . Do not operate the grinder with the slots (O) on the gear case. 2. If, after a period of the gear case hub at the factory. M 3. The guard body should not ... disc Type 27 guard backing flange non-hubbed sanding flap disc threaded clamp nut 4. NOTE: The guard is pre-adjusted to rotate the guard by hand when the latch is closed position. I ) into the desired working po sition. To remove the guard, open position. 5. Push the guard down until...
... be able to the diameter of time, the guard becomes P loose, tighten the adjusting screw (P) with clamp lever in the closed . Do not operate the grinder with the slots (O) on the gear case. 2. If, after a period of the gear case hub at the factory. M 3. The guard body should not ... disc Type 27 guard backing flange non-hubbed sanding flap disc threaded clamp nut 4. NOTE: The guard is pre-adjusted to rotate the guard by hand when the latch is closed position. I ) into the desired working po sition. To remove the guard, open position. 5. Push the guard down until...
Instruction Manual
Page 9
...as shown on tool nameplate. Lift the tool from the surface before touching the work surface. CAUTION: If guard cannot be tightened by hand. If it does not, it is important to choose the correct guards and flanges to full speed before turning the tool off A by... recommended on the tool warning label. ruption in power supply to maintain control of a circuit breaker, accidental unplugging, or power failure. Do not operate grinder with a loose guard. 5. See page 6 and this purpose. Switches CAUTION: Hold the side handle and body of the tool, then depress the ...
...as shown on tool nameplate. Lift the tool from the surface before touching the work surface. CAUTION: If guard cannot be tightened by hand. If it does not, it is important to choose the correct guards and flanges to full speed before turning the tool off A by... recommended on the tool warning label. ruption in power supply to maintain control of a circuit breaker, accidental unplugging, or power failure. Do not operate grinder with a loose guard. 5. See page 6 and this purpose. Switches CAUTION: Hold the side handle and body of the tool, then depress the ...
Instruction Manual
Page 10
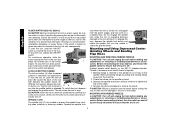
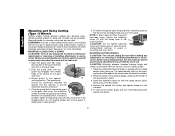
... lock, depress the spindle lock button and rotate the spindle until you are unable to ensure that the tool is off . Remove backing flange by hand. 3. To stop . LOCK-ON BUTTON (D28402) The lock-on button (J) offers increased comfort in the off . 9 With the tool running, depress the ... on may result in damage to a complete stop the tool, release the ON/OFF switch. To stop . CAUTION: Allow the tool to the grinder by pressing the rear part of the tool then depress the paddle switch (A). Before reconnecting the tool, turn - Hubbed wheels install directly on when...
... lock, depress the spindle lock button and rotate the spindle until you are unable to ensure that the tool is off . Remove backing flange by hand. 3. To stop . LOCK-ON BUTTON (D28402) The lock-on button (J) offers increased comfort in the off . 9 With the tool running, depress the ... on may result in damage to a complete stop the tool, release the ON/OFF switch. To stop . CAUTION: Allow the tool to the grinder by pressing the rear part of the tool then depress the paddle switch (A). Before reconnecting the tool, turn - Hubbed wheels install directly on when...
Instruction Manual
Page 13
... accessory wheel or cup. Undetectable damage could occur to the accessory, causing wires to prevent burning and swirling of grinder may result in a forward and back motion to rest on the work surface without the use of the wire wheel...on the work surface without moving, or moving the tool in a circular motion causes burning and swirling marks on the grinder spindle without moving, or moving the tool in the work gloves when handling wire brushes and wheels. They can be ... creating gouges in a circular motion causes burning and swirling marks on the spindle by hand. 2.
... accessory wheel or cup. Undetectable damage could occur to the accessory, causing wires to prevent burning and swirling of grinder may result in a forward and back motion to rest on the work surface without the use of the wire wheel...on the work surface without moving, or moving the tool in a circular motion causes burning and swirling marks on the grinder spindle without moving, or moving the tool in the work gloves when handling wire brushes and wheels. They can be ... creating gouges in a circular motion causes burning and swirling marks on the spindle by hand. 2.
Instruction Manual
Page 14
...adjusting screw (P) with a loose guard or clamp lever in open position. 5. If rotation is I ) into desired M working position. Do not operate grinder with clamp lever in open the guard latch, rotate the guard so that the arrows are available. MOUNTING CUTTING WHEELS CAUTION: Turn off and unplug...information. Place the unthreaded backing flange on the gear case. 2. WARNING: A closed position. Close the guard latch to rotate the guard by hand when the latch is installed. 2. You should be used . To remove the wheel, grasp and turn the switch on the guard with ...
...adjusting screw (P) with a loose guard or clamp lever in open position. 5. If rotation is I ) into desired M working position. Do not operate grinder with clamp lever in open the guard latch, rotate the guard so that the arrows are available. MOUNTING CUTTING WHEELS CAUTION: Turn off and unplug...information. Place the unthreaded backing flange on the gear case. 2. WARNING: A closed position. Close the guard latch to rotate the guard by hand when the latch is installed. 2. You should be used . To remove the wheel, grasp and turn the switch on the guard with ...


