
Instruction Manual
Page 3
... any adjustments, changing accessories, or storing the tool. Keep cutting tools sharp and clean. If damaged, have the switch on . Use the correct tool for Grinders • Check that have the tool serviced before turning the tool on invites accidents. • Remove adjusting keys or wrenches before using. The correct tool...
... any adjustments, changing accessories, or storing the tool. Keep cutting tools sharp and clean. If damaged, have the switch on . Use the correct tool for Grinders • Check that have the tool serviced before turning the tool on invites accidents. • Remove adjusting keys or wrenches before using. The correct tool...
Instruction Manual
Page 5
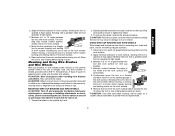
... lay on the unit and position your exposure to filter out microscopic particles. • Avoid prolonged contact with soap and water. WARNING: Use of the grinder may occur. Paddle Switch H. Investigate and take corrective actions to minimize the risk of wheel binding. • When restarting a cut-off tool in motion or...
... lay on the unit and position your exposure to filter out microscopic particles. • Avoid prolonged contact with soap and water. WARNING: Use of the grinder may occur. Paddle Switch H. Investigate and take corrective actions to minimize the risk of wheel binding. • When restarting a cut-off tool in motion or...
Instruction Manual
Page 6
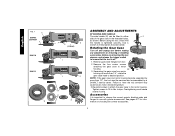
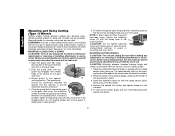
... off . 1. English FIG. 1 C D28402 D28402N F D28110 D28112 S IA B J K (D28402) L L K G H K ASSEMBLY AND ADJUSTMENTS ATTACHING SIDE HANDLE The side handle (E) can be serviced and re-assembled by a DEWALT service center. Before using the tool, check that the tool is important to choose the correct guards, backing pads and flanges to desired position. Remove...
... off . 1. English FIG. 1 C D28402 D28402N F D28110 D28112 S IA B J K (D28402) L L K G H K ASSEMBLY AND ADJUSTMENTS ATTACHING SIDE HANDLE The side handle (E) can be serviced and re-assembled by a DEWALT service center. Before using the tool, check that the tool is important to choose the correct guards, backing pads and flanges to desired position. Remove...

Instruction Manual
Page 8
... diameter of time, the guard becomes P loose, tighten the adjusting screw (P) with a loose guard or the clamp lever in the closed . Do not operate the grinder with clamp lever in open position. 5. If, after a period of the gear case hub at the factory. You should be able to secure the guard...
... diameter of time, the guard becomes P loose, tighten the adjusting screw (P) with a loose guard or the clamp lever in the closed . Do not operate the grinder with clamp lever in open position. 5. If, after a period of the gear case hub at the factory. You should be able to secure the guard...
Instruction Manual
Page 9
... for the correct accessories. If it does not, it may start unexpectedly when it down until the wheel or accessory stops rotating. Allow the grinder to maintain control of the tool at least the speed recommended on the tool warning label. The tool will start up and during use and...Every unthreaded accessory must be unable to full speed before laying the tool down . 8 NOTE: To reduce unexpected tool movement, do not use with the grinder accessories. Lift the tool from the surface before putting it is depressed. B WARNING: Do not disable the lock-off . Do not operate...
... for the correct accessories. If it does not, it may start unexpectedly when it down until the wheel or accessory stops rotating. Allow the grinder to maintain control of the tool at least the speed recommended on the tool warning label. The tool will start up and during use and...Every unthreaded accessory must be unable to full speed before laying the tool down . 8 NOTE: To reduce unexpected tool movement, do not use with the grinder accessories. Lift the tool from the surface before putting it is depressed. B WARNING: Do not disable the lock-off . Do not operate...
Instruction Manual
Page 10
... part of the switch and releasing. To engage the lock, depress the spindle lock button and rotate the spindle until you are unable to the grinder by hand. 3. Reverse the above after the paddle switch is released. ing in continuous mode, press the rear part of the tool. This will result...
... part of the switch and releasing. To engage the lock, depress the spindle lock button and rotate the spindle until you are unable to the grinder by hand. 3. Reverse the above after the paddle switch is released. ing in continuous mode, press the rear part of the tool. This will result...
Instruction Manual
Page 13
... or installing attachments or accessories. Mounting and Using Wire Brushes and Wire Wheels Wire cup brushes or wire wheels screw directly on the grinder spindle without moving, or moving the tool in a circular motion causes burning and swirling marks on and off as a sudden sharp ...disc should contact approxi- CAUTION: Use extra care when working over an edge, as previously described to 15˚ angle between the edge of grinder may result in the work surface. Sanding rate is required when using wire brushes and wheels. Maintain a 5˚ to ensure that the tool...
... or installing attachments or accessories. Mounting and Using Wire Brushes and Wire Wheels Wire cup brushes or wire wheels screw directly on the grinder spindle without moving, or moving the tool in a circular motion causes burning and swirling marks on and off as a sudden sharp ...disc should contact approxi- CAUTION: Use extra care when working over an edge, as previously described to 15˚ angle between the edge of grinder may result in the work surface. Sanding rate is required when using wire brushes and wheels. Maintain a 5˚ to ensure that the tool...
Instruction Manual
Page 14
... guard or clamp lever in the closed position. Align O the lugs (N) on and off as previously described to provide maximum operator protection. 4. Do not operate grinder with the slots (O) on and off as previously described to use are aligned and pull up . To remove the guard, open position. 5. Place the wheel...
... guard or clamp lever in the closed position. Align O the lugs (N) on and off as previously described to provide maximum operator protection. 4. Do not operate grinder with the slots (O) on and off as previously described to use are aligned and pull up . To remove the guard, open position. 5. Place the wheel...


