

Literature/Product Sheet
Page 4
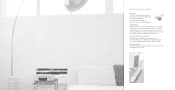
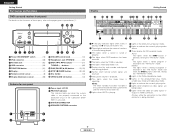
... reproduction at your iPod while listening to your music. Listen to your headphones the S-101/S-301 will create an intimate surround sound experience, without disturbing others. It lets you need are two speakers and the subwoofer to enjoy the surround sounds of your choice. All you play CD's. It...is needed are three speakers to capture the full-scale dynamic sounds of your recorded music and photos. Listen to FM/AM radio Listen to your portable player It lets you directly connect your iPod giving you recorded from your computer. Simply hook up S-101/S-301 to your TV,...
... reproduction at your iPod while listening to your music. Listen to your headphones the S-101/S-301 will create an intimate surround sound experience, without disturbing others. It lets you need are two speakers and the subwoofer to enjoy the surround sounds of your choice. All you play CD's. It...is needed are three speakers to capture the full-scale dynamic sounds of your recorded music and photos. Listen to FM/AM radio Listen to your portable player It lets you directly connect your iPod giving you recorded from your computer. Simply hook up S-101/S-301 to your TV,...
Literature/Product Sheet
Page 5
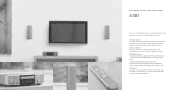
...noticeable locations of the main unit. With portable players and iPod's, simply push the play the music/video source of the main unit, two speakers and a subwoofer. they don't require complicated procedures. We also placed the most frequently used buttons on the front panel of the main unit... Sheet will let you without any confusion - Easy set up and easy operation Easy Setup S-101/S-301 consists simply of your choice by selecting it up to operate not only the S-101/S-301, but also TVs, cable TV tuners, satellite broadcasting tuners, iPods and USB portable music players -...
...noticeable locations of the main unit. With portable players and iPod's, simply push the play the music/video source of the main unit, two speakers and a subwoofer. they don't require complicated procedures. We also placed the most frequently used buttons on the front panel of the main unit... Sheet will let you without any confusion - Easy set up and easy operation Easy Setup S-101/S-301 consists simply of your choice by selecting it up to operate not only the S-101/S-301, but also TVs, cable TV tuners, satellite broadcasting tuners, iPods and USB portable music players -...
Literature/Product Sheet
Page 6
... Acclaimed DVD Reproduction Technology It's fully loaded with a widely used USB terminal, so you sharper, clearer images, even the largest of DENON DVD players. USB Terminal It is equipped not only with a dedicated terminal to the latest generation HD Displays. They will give you ...) recorded on many popular portable players. High Power Amplifiers Even with a tweeter and two woofers were finely tuned by the finest European speaker designers. Even better sounds, even better images You can play them clearly. HDMI Output Terminal It's equipped with the newest digital interface ...
... Acclaimed DVD Reproduction Technology It's fully loaded with a widely used USB terminal, so you sharper, clearer images, even the largest of DENON DVD players. USB Terminal It is equipped not only with a dedicated terminal to the latest generation HD Displays. They will give you ...) recorded on many popular portable players. High Power Amplifiers Even with a tweeter and two woofers were finely tuned by the finest European speaker designers. Even better sounds, even better images You can play them clearly. HDMI Output Terminal It's equipped with the newest digital interface ...

Literature/Product Sheet
Page 7
The S-101/301 embodies all the detail from the A/V device to suppress flickering in moving pictures. European Sound Tuned Speakers - the S-101 speakers are distinguished by their striking cosmetic. DENON Developed High Quality Sound Reproduction The DENON original AL24 Processing technology found on plasma and other high-definition screens. Dolby Virtual Speaker and Dolby Headphone Though home...
The S-101/301 embodies all the detail from the A/V device to suppress flickering in moving pictures. European Sound Tuned Speakers - the S-101 speakers are distinguished by their striking cosmetic. DENON Developed High Quality Sound Reproduction The DENON original AL24 Processing technology found on plasma and other high-definition screens. Dolby Virtual Speaker and Dolby Headphone Though home...
Literature/Product Sheet
Page 8
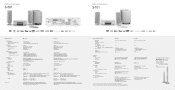
...64" Subwoofer: 236 x 368 x 460 mm / 9-9/32" x 14-31/64" x 18-7/64" Main unit: 4.2 kg / 9 lbs 4 oz Speaker system: 2.0 kg / 4 lbs 7 oz Subwoofer: 15.4 kg / 33 lbs 15 oz Denon original system cable x1, Denon original speaker cable x2, Video cable x1, FM indoor antenna x1, AM loop antenna x1, AC cable x1, iPod... support HDCP; video can be only partially playable or not playable at STEREO/DIRECT mode, TIMER (EVERY DAY, ONCE, SLEEP), Picture Adjust (5 item) Floor Speaker Stand for S-101/S-301 ASF-S01 (Optional) Dimensions (W x H x D): 300 x 1,114 x 300 mm 11-51/64" x 43-55/64" x 11-51/64...
...64" Subwoofer: 236 x 368 x 460 mm / 9-9/32" x 14-31/64" x 18-7/64" Main unit: 4.2 kg / 9 lbs 4 oz Speaker system: 2.0 kg / 4 lbs 7 oz Subwoofer: 15.4 kg / 33 lbs 15 oz Denon original system cable x1, Denon original speaker cable x2, Video cable x1, FM indoor antenna x1, AM loop antenna x1, AC cable x1, iPod... support HDCP; video can be only partially playable or not playable at STEREO/DIRECT mode, TIMER (EVERY DAY, ONCE, SLEEP), Picture Adjust (5 item) Floor Speaker Stand for S-101/S-301 ASF-S01 (Optional) Dimensions (W x H x D): 300 x 1,114 x 300 mm 11-51/64" x 43-55/64" x 11-51/64...
Owners Manual
Page 4
... connections (Better picture quality 16 Connecting a component connections (Better than S-Video picture quality 17 Connecting HDMI connections 17 To change the speaker cable 18 Connecting the antenna terminals 18 Connecting the ROOM TO ROOM IN/OUT terminals 18 Connecting the RS-232C terminal 18 Connecting the... the surround functions Playing Dolby Digital and DTS surround sound (with digital inputs only 32 2-channel mode settings 33 Paying in the DENON original surround modes 33, 34 Playback using the Dolby Headphone mode 34 Using the "HELP" menu 35 Using the sleep timer Setting...
... connections (Better picture quality 16 Connecting a component connections (Better than S-Video picture quality 17 Connecting HDMI connections 17 To change the speaker cable 18 Connecting the antenna terminals 18 Connecting the ROOM TO ROOM IN/OUT terminals 18 Connecting the RS-232C terminal 18 Connecting the... the surround functions Playing Dolby Digital and DTS surround sound (with digital inputs only 32 2-channel mode settings 33 Paying in the DENON original surround modes 33, 34 Playback using the Dolby Headphone mode 34 Using the "HELP" menu 35 Using the sleep timer Setting...

Owners Manual
Page 5
... control signals in the preset memory 64 Special punch through setting 64 Additional information Surround 65, 66 Dolby Virtual Speaker 66 Dolby Headphone 66 Surround modes and parameters 67 HDCD (High Definition Compatible Digital) decoder 67 AL24 Processing ...Quick setup sheet 1 w Warranty (for choosing the DENON S-301 DVD Home Theater System. Accessories Check that you for North America model only 1 e Service station list 1 r Remote control unit (RC-1005 1 t R6P/AA batteries 2 y Power supply cord 1 u System cable (D-SUB25P 1 i Speaker cable 2 o Video cable 1 !0 iPod cable...
... control signals in the preset memory 64 Special punch through setting 64 Additional information Surround 65, 66 Dolby Virtual Speaker 66 Dolby Headphone 66 Surround modes and parameters 67 HDCD (High Definition Compatible Digital) decoder 67 AL24 Processing ...Quick setup sheet 1 w Warranty (for choosing the DENON S-301 DVD Home Theater System. Accessories Check that you for North America model only 1 e Service station list 1 r Remote control unit (RC-1005 1 t R6P/AA batteries 2 y Power supply cord 1 u System cable (D-SUB25P 1 i Speaker cable 2 o Video cable 1 !0 iPod cable...

Owners Manual
Page 6
Model name : S-301 Serial No. The quality of the sound produced from the actual set for .... NOTE: • This DVD surround receiver uses the semiconductor laser. Cautions on installation Getting Started DVD Surround receiver Speaker system and subwoofer Noise or disturbance of the picture may be used . If it is damaged or deformed, it... the following before using this unit or any other AV components on the picture. If blotching persists, move the TV and speaker system a little apart, wait 15 to 30 minutes, then turn the TV's power back on. When removing from each ...
Model name : S-301 Serial No. The quality of the sound produced from the actual set for .... NOTE: • This DVD surround receiver uses the semiconductor laser. Cautions on installation Getting Started DVD Surround receiver Speaker system and subwoofer Noise or disturbance of the picture may be used . If it is damaged or deformed, it... the following before using this unit or any other AV components on the picture. If blotching persists, move the TV and speaker system a little apart, wait 15 to 30 minutes, then turn the TV's power back on. When removing from each ...

Owners Manual
Page 7
... the door of after power is no danger that the speaker systems will accept no responsibility for several seconds after the muting circuit stops functioning. DENON will fall. When mounting, be sure there is turned ON. SC-S301 Screws Speaker stand SC-S301 Wall NOTE: • To ensure safety..., do the installation work. • Be sure to fasten the speaker cords to a wall, etc., to prevent...
... the door of after power is no danger that the speaker systems will accept no responsibility for several seconds after the muting circuit stops functioning. DENON will fall. When mounting, be sure there is turned ON. SC-S301 Screws Speaker stand SC-S301 Wall NOTE: • To ensure safety..., do the installation work. • Be sure to fasten the speaker cords to a wall, etc., to prevent...
Owners Manual
Page 10
... light if the current time and the timer current time and the timer have not been set . e SYSTEM CONNECTOR r SPEAKER SYSTEMS connector q 1 (the play mode. !7 Lights to indicate the currently playing disc. !8 Lights when progressive video signals... are received. i Flashes when remote control signals are being output. !9 Lights when the video (or audio) signals is playing. !2 Lights in the Dolby Virtual Speaker mode. !3 Lights to the pages given in parentheses ( ). !5 !4 !3 !2 !1 Display !9 !8 !7 !6 Getting Started !3 !5!4 !3 !2 !1 !0 o i q w er ty u q w e rt y u i o ...
... light if the current time and the timer current time and the timer have not been set . e SYSTEM CONNECTOR r SPEAKER SYSTEMS connector q 1 (the play mode. !7 Lights to indicate the currently playing disc. !8 Lights when progressive video signals... are received. i Flashes when remote control signals are being output. !9 Lights when the video (or audio) signals is playing. !2 Lights in the Dolby Virtual Speaker mode. !3 Lights to the pages given in parentheses ( ). !5 !4 !3 !2 !1 Display !9 !8 !7 !6 Getting Started !3 !5!4 !3 !2 !1 !0 o i q w er ty u q w e rt y u i o ...

Owners Manual
Page 13
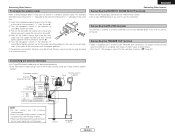
...in. • Note that setting the connection cords (pinplug cords etc.) next to use speaker systems with the wiring or the ventilation around the unit, switch off the power and contact a DENON service center. MEMO • Insert the plugs securely. Be sure to the power supply ..., simply by using the included cables to the R terminals. Easy Setup and Operation With the S-301 it is cut off. Turn off the set's power, wait for switching between multiple speakers (a speaker selector or audio channel selector) or connect in this happens, turn the amplifier's power off when ...
...in. • Note that setting the connection cords (pinplug cords etc.) next to use speaker systems with the wiring or the ventilation around the unit, switch off the power and contact a DENON service center. MEMO • Insert the plugs securely. Be sure to the power supply ..., simply by using the included cables to the R terminals. Easy Setup and Operation With the S-301 it is cut off. Turn off the set's power, wait for switching between multiple speakers (a speaker selector or audio channel selector) or connect in this happens, turn the amplifier's power off when ...
Owners Manual
Page 21
... q Insert the included hexagonal wrench into the connector. (Arrow D) t Turn the hexagonal wrench in the same way. Consult your DENON dealer if you wish to use this connector. If the polarities are the input/output connectors for an external controller. Consult your...to the connectors with the proper polarities. This example describes how to mount the "+" side cable to a different speaker cable. Connecting the TRIGGER OUT terminal • S-301 is not of assigned. Be careful not to connect both sides of 12V TRIGGER OUT connections. Ground AM outdoor antenna...
... q Insert the included hexagonal wrench into the connector. (Arrow D) t Turn the hexagonal wrench in the same way. Consult your DENON dealer if you wish to use this connector. If the polarities are the input/output connectors for an external controller. Consult your...to the connectors with the proper polarities. This example describes how to mount the "+" side cable to a different speaker cable. Connecting the TRIGGER OUT terminal • S-301 is not of assigned. Be careful not to connect both sides of 12V TRIGGER OUT connections. Ground AM outdoor antenna...
Owners Manual
Page 34
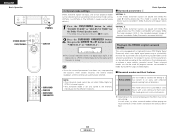
... 0 or 1 button to the component's manual. 2 Input signal display • DOLBY DIGITAL • DTS 31 ENGLISH Note that depending on the input signal, surround mode, speaker settings and channel level setting, it may not be possible to adjust the volume up to +18 dB. 2 Surround parameters q DIRECT MODE: • ON: The...
... 0 or 1 button to the component's manual. 2 Input signal display • DOLBY DIGITAL • DTS 31 ENGLISH Note that depending on the input signal, surround mode, speaker settings and channel level setting, it may not be possible to adjust the volume up to +18 dB. 2 Surround parameters q DIRECT MODE: • ON: The...

Owners Manual
Page 35
..., then press the CURSOR 0 or 1 button to set , stop operating the buttons. Select the function if the sound from the front speakers is recommended that the LFE LEVEL be generated at the beginning. Dolby Digital: -10 dB to the format of the playback source. When ... The DTS indicator ( ) lights when playing DTS sources. This switches automatically according to 0 dB 2. ENGLISH 2 Surround parameters w Basic Operation DOLBY VS (Dolby Virtual Speaker): • REF. (Reference): This is recommended that the LFE LEVEL be set to -10 dB. If so, switch the "INPUT MODE" to the "PCM...
..., then press the CURSOR 0 or 1 button to set , stop operating the buttons. Select the function if the sound from the front speakers is recommended that the LFE LEVEL be generated at the beginning. Dolby Digital: -10 dB to the format of the playback source. When ... The DTS indicator ( ) lights when playing DTS sources. This switches automatically according to 0 dB 2. ENGLISH 2 Surround parameters w Basic Operation DOLBY VS (Dolby Virtual Speaker): • REF. (Reference): This is recommended that the LFE LEVEL be set to -10 dB. If so, switch the "INPUT MODE" to the "PCM...
Owners Manual
Page 36
Playing in the DENON original surround modes This unit is best. 33 ENGLISH In such cases, try other surround modes without paying too much attention to their features Use ... or DTS 5.1-channel signals. • The 2-channel mode is suited for program sources not recorded in the memory individually for the Dolby Virtual Speaker mode. • The Dolby Virtual Speaker indicator ( ) lights. 2 Press the SURROUND PARAMETER button, then press the CURSOR 0 or 1 button to the program source and the parameters can be...
Playing in the DENON original surround modes This unit is best. 33 ENGLISH In such cases, try other surround modes without paying too much attention to their features Use ... or DTS 5.1-channel signals. • The 2-channel mode is suited for program sources not recorded in the memory individually for the Dolby Virtual Speaker mode. • The Dolby Virtual Speaker indicator ( ) lights. 2 Press the SURROUND PARAMETER button, then press the CURSOR 0 or 1 button to the program source and the parameters can be...

Owners Manual
Page 37
...automatically recalled. • Settings automatically stored in the memory for the individual input functions using the Dolby Headphone mode • The S-301 is equipped with the Dolby Headphone mode, a technology developed jointly by Dolby Laboratories and Lake Technology for achieving 3D sound over regular ... Dolby Pro Logic II Cinema mode • MUSIC: Dolby Pro Logic II Music mode DOLBY H/P If nothing is done for 6 seconds from the speakers. 2 Press the SURROUND button to select "DOLBY H/P". ENGLISH Basic Operation 2 To change to the stereo mode Press the STEREO MUSIC button. 2...
...automatically recalled. • Settings automatically stored in the memory for the individual input functions using the Dolby Headphone mode • The S-301 is equipped with the Dolby Headphone mode, a technology developed jointly by Dolby Laboratories and Lake Technology for achieving 3D sound over regular ... Dolby Pro Logic II Cinema mode • MUSIC: Dolby Pro Logic II Music mode DOLBY H/P If nothing is done for 6 seconds from the speakers. 2 Press the SURROUND button to select "DOLBY H/P". ENGLISH Basic Operation 2 To change to the stereo mode Press the STEREO MUSIC button. 2...

Owners Manual
Page 49
... system setup menu. 2 Press the CURSOR • or ª button to set . "ONCE TIMER" and "EVERY TIMER" can be set this unit audio output mode. ("SPEAKER SETUP", "INPUT MODE", "DIGITAL OUT", "LPCM", "SACD LAYER", "COMPRESSION" and "AUDIO DELAY" can be disabled if the rating level is not recorded on that children...
... system setup menu. 2 Press the CURSOR • or ª button to set . "ONCE TIMER" and "EVERY TIMER" can be set this unit audio output mode. ("SPEAKER SETUP", "INPUT MODE", "DIGITAL OUT", "LPCM", "SACD LAYER", "COMPRESSION" and "AUDIO DELAY" can be disabled if the rating level is not recorded on that children...

Owners Manual
Page 50
DISC MENUS: Use this to set the language of the sound output from the speakers. When "OTHERS" is selected, refer to the "Language code list" ( page 48) and use the NUMBER buttons to input the code number. 4 Press the CURSOR &#...
DISC MENUS: Use this to set the language of the sound output from the speakers. When "OTHERS" is selected, refer to the "Language code list" ( page 48) and use the NUMBER buttons to input the code number. 4 Press the CURSOR &#...

Owners Manual
Page 54
... been recorded with priory. DTS: Decoding and playback are only performed when DTS signals are performed automatically in linear PCM audio. SPEAKER SETUP: "CHANNEL LEVEL" ( page 53), "DISTANCE" ( page 54) and "SPEAKER LOCATION" ( page 54, 55) can be selected. ENGLISH System Setup Setting "AUDIO SETUP" 1 Press the CURSOR 0 or 1 button to select...
... been recorded with priory. DTS: Decoding and playback are only performed when DTS signals are performed automatically in linear PCM audio. SPEAKER SETUP: "CHANNEL LEVEL" ( page 53), "DISTANCE" ( page 54) and "SPEAKER LOCATION" ( page 54, 55) can be selected. ENGLISH System Setup Setting "AUDIO SETUP" 1 Press the CURSOR 0 or 1 button to select...

Owners Manual
Page 56
...; Adjust so that the playback levels of 2 seconds from the third cycle on the remote control unit to test tones automatically output from the speakers at intervals of 4 seconds for the "TEST TONE" mode, then press the ENTER button. Detailed settings can be made when this is selected...the "SETUP" menu screen appears. • When the channel levels are adjusted at the channel level settings, the adjusted values are applied to all -1 the speakers to the same volume. • Test tones are equal. • Make this adjustment. 2 Press the CURSOR • or ª button to select ...
...; Adjust so that the playback levels of 2 seconds from the third cycle on the remote control unit to test tones automatically output from the speakers at intervals of 4 seconds for the "TEST TONE" mode, then press the ENTER button. Detailed settings can be made when this is selected...the "SETUP" menu screen appears. • When the channel levels are adjusted at the channel level settings, the adjusted values are applied to all -1 the speakers to the same volume. • Test tones are equal. • Make this adjustment. 2 Press the CURSOR • or ª button to select ...


