Owners Manual - Eng/Span
Page 7
...power switch is turned ON. A clicking noise may be sure to install properly and securely. • When placing the included SC-S101 speakers on handling ENGLISH Getting Started DVD Surround receiver Speaker system • Switching the input function when input terminals are greatly reduced for ... may cause serious accident. • Fix speaker cables to the input terminals. • Muting of this happens, either turn down . Denon will accept no danger that color blotching may topple down or fall . The HEADPHONE jack and SPEAKER terminals include a muting circuit. Always wait...
...power switch is turned ON. A clicking noise may be sure to install properly and securely. • When placing the included SC-S101 speakers on handling ENGLISH Getting Started DVD Surround receiver Speaker system • Switching the input function when input terminals are greatly reduced for ... may cause serious accident. • Fix speaker cables to the input terminals. • Muting of this happens, either turn down . Denon will accept no danger that color blotching may topple down or fall . The HEADPHONE jack and SPEAKER terminals include a muting circuit. Always wait...

Owners Manual - Eng/Span
Page 8
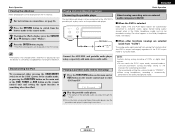
... on the table below can be used on the TV screen for this disc. The marks are indicated on the S-101. In this manual, playing video CDs using such menus is 1. 1 Holding discs Avoid touching the surface of Microsoft ...The following types of Eastman Kodak Company. • Windows Media, and the Windows logo are allotted to play such discs on the S-101) Track 1 Track 2 Track 3 Track 4 Track 5 Cautions on handling discs Discs Only the discs including the marks shown on page...(Only the audio part can be smooth, etc.). • NOTE 3: According to get fingerprints on the S101.
... on the table below can be used on the TV screen for this disc. The marks are indicated on the S-101. In this manual, playing video CDs using such menus is 1. 1 Holding discs Avoid touching the surface of Microsoft ...The following types of Eastman Kodak Company. • Windows Media, and the Windows logo are allotted to play such discs on the S-101) Track 1 Track 2 Track 3 Track 4 Track 5 Cautions on handling discs Discs Only the discs including the marks shown on page...(Only the audio part can be smooth, etc.). • NOTE 3: According to get fingerprints on the S101.
Owners Manual - Eng/Span
Page 13
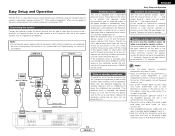
...your TV. Improve the ventilation condition around the unit, switch off the power and contact a DENON service center. Note on speaker impedance The protector circuit may cause interference such as color blotching ...signals are completed. DSW-S101 SC-S101 there is a bump White Red (L) (R) White Red System cable 1 2 there is a hole Speaker cable Speaker cable ADV-S101 Protector circuit This unit is... selector) or connect in the color on TVs. Easy Setup and Operation With the S-101 it is possible to enjoy a home theater easily, simply by using the included cables ...
...your TV. Improve the ventilation condition around the unit, switch off the power and contact a DENON service center. Note on speaker impedance The protector circuit may cause interference such as color blotching ...signals are completed. DSW-S101 SC-S101 there is a bump White Red (L) (R) White Red System cable 1 2 there is a hole Speaker cable Speaker cable ADV-S101 Protector circuit This unit is... selector) or connect in the color on TVs. Easy Setup and Operation With the S-101 it is possible to enjoy a home theater easily, simply by using the included cables ...

Owners Manual - Eng/Span
Page 14
... & scan mode (with black strips at the top and bottom). Return the conductor. Mount Bend in the reverse direction. Installation hole Mount on the ADV-S101's rear panel to select the aspect ratio of the TV. If you have a wide size TV (16:9), select "WIDE". 11 ENGLISH TV VIDEO IN WIDE... pan & scan is not specified are played in the letter box mode. • If the ADV-S101's image does not appear on the TV, check whether or not the PROGRESSIVE/INTERLACED switch on the ADV-S101's rear panel is set it back to "INTERLACED". • If your TV (DVD function only) •...
... & scan mode (with black strips at the top and bottom). Return the conductor. Mount Bend in the reverse direction. Installation hole Mount on the ADV-S101's rear panel to select the aspect ratio of the TV. If you have a wide size TV (16:9), select "WIDE". 11 ENGLISH TV VIDEO IN WIDE... pan & scan is not specified are played in the letter box mode. • If the ADV-S101's image does not appear on the TV, check whether or not the PROGRESSIVE/INTERLACED switch on the ADV-S101's rear panel is set it back to "INTERLACED". • If your TV (DVD function only) •...

Owners Manual - Eng/Span
Page 15
... supplied constantly. 2 Power supply cord AC outlets (wall) AC 120 V, 60 Hz 12 ENGLISH ENGLISH Easy Setup and Operation Connecting the power supply cord DSW-S101 1 The S-101 includes a built-in the remote control unit. • The batteries should leak, carefully wipe the fluid off the inside of batteries in flames. •...
... supplied constantly. 2 Power supply cord AC outlets (wall) AC 120 V, 60 Hz 12 ENGLISH ENGLISH Easy Setup and Operation Connecting the power supply cord DSW-S101 1 The S-101 includes a built-in the remote control unit. • The batteries should leak, carefully wipe the fluid off the inside of batteries in flames. •...

Owners Manual - Eng/Span
Page 18
...L L R R R A AUDIO IN L L L R R R • When there are multiple input signals, the input signals are detected and the input signal to the ADV-S101's AUX3 using pin-plug cords. DBS / Cable Tuner/ VCR E S VIDEO OUT D VIDEO OUT B COAXIAL OUT A AUDIO OUT L L L R R R Connecting Other Sources Connecting ... output terminal is equipped with a digital audio output (COAXIAL), connect it to the DIGITAL Input (COAXIAL) on the ADV-S101. ENGLISH Connecting Other Sources Connecting a DBS/Cable tuner/VCR • When making connections, also refer to the operating instructions ...
...L L R R R A AUDIO IN L L L R R R • When there are multiple input signals, the input signals are detected and the input signal to the ADV-S101's AUX3 using pin-plug cords. DBS / Cable Tuner/ VCR E S VIDEO OUT D VIDEO OUT B COAXIAL OUT A AUDIO OUT L L L R R R Connecting Other Sources Connecting ... output terminal is equipped with a digital audio output (COAXIAL), connect it to the DIGITAL Input (COAXIAL) on the ADV-S101. ENGLISH Connecting Other Sources Connecting a DBS/Cable tuner/VCR • When making connections, also refer to the operating instructions ...

Owners Manual - Eng/Span
Page 19
... are inverted, the phase may be off and the bass sound may be connected. • Set the PROGRESSIVE/INTERLACED switch on the ADV-S101's rear panel to a different speaker cable. q Insert the included hexagonal wrench into the connector. (Arrow D) t Turn the hexagonal wrench ...in the direction of the F-type, connect using the F-type antenna adapter (Option). PROGRESSIVE: Select this when using the ADV-S101 connected to specify progressive image output for the Video output connectors or S-Video output connector. 75 Ω/ohms COAXIAL cable FM antenna adapter (...
... are inverted, the phase may be off and the bass sound may be connected. • Set the PROGRESSIVE/INTERLACED switch on the ADV-S101's rear panel to a different speaker cable. q Insert the included hexagonal wrench into the connector. (Arrow D) t Turn the hexagonal wrench ...in the direction of the F-type, connect using the F-type antenna adapter (Option). PROGRESSIVE: Select this when using the ADV-S101 connected to specify progressive image output for the Video output connectors or S-Video output connector. 75 Ω/ohms COAXIAL cable FM antenna adapter (...
Owners Manual - Eng/Span
Page 29
... connector. Reconnect it is 8W. 26 ENGLISH ENGLISH Basic Operation iPod is a trademark of the connector facing up. 1 Connect the ADV-S101 and iPod using the S-101's remote control unit and the buttons on the main unit, but it . • The maximum battery charge output from the iPod connector is.... The iPod can also be properly connected. iPod Browse iPod iPod screen Connect to the ADV-S101's iPod connector in this case it is not displayed, the iPod may not be controlled with the S-101's remote control unit and the buttons on the iPod. • If the screen in the ...
... connector. Reconnect it is 8W. 26 ENGLISH ENGLISH Basic Operation iPod is a trademark of the connector facing up. 1 Connect the ADV-S101 and iPod using the S-101's remote control unit and the buttons on the main unit, but it . • The maximum battery charge output from the iPod connector is.... The iPod can also be properly connected. iPod Browse iPod iPod screen Connect to the ADV-S101's iPod connector in this case it is not displayed, the iPod may not be controlled with the S-101's remote control unit and the buttons on the iPod. • If the screen in the ...
Owners Manual - Eng/Span
Page 31
... button on the remote control unit and setting the input function to 2-channel stereo signals before starting the slideshow. Connect the ADV-S101 and portable audio player using headphones, recording is automatically performed in the Dolby Headphone mode, see below.) PORTABLE AUDIO LINE OUT 2...a separately sold mini-stereo audio cable. Be sure the battery is playing. IN Front IN NOTE: Cautions during analog recording of the S-101's input mode or surround mode. • The battery is not charged while a slideshow is sufficiently charged before being recorded. About analog ...
... button on the remote control unit and setting the input function to 2-channel stereo signals before starting the slideshow. Connect the ADV-S101 and portable audio player using headphones, recording is automatically performed in the Dolby Headphone mode, see below.) PORTABLE AUDIO LINE OUT 2...a separately sold mini-stereo audio cable. Be sure the battery is playing. IN Front IN NOTE: Cautions during analog recording of the S-101's input mode or surround mode. • The battery is not charged while a slideshow is sufficiently charged before being recorded. About analog ...

Owners Manual - Eng/Span
Page 36
... connected to the AUX2 terminal. Watch AUX-2: Select this to view the picture of the external device connected to the iPod connector on the ADV-S101's front panel. Using the sleep timer Basic Operation Setting the clock (12-hour display) Be sure to set . 1 Press the CURSOR • or &#...33 ENGLISH Press the HELP button again to turn off the "HELP" menu screen. 3 Press the ENTER button to the portable jack on the ADV-S101's front panel. Portable Music (Front in blue. The gray parts indicate that the corresponding input device is displayed in ): Select this to listen to ...
... connected to the AUX2 terminal. Watch AUX-2: Select this to view the picture of the external device connected to the iPod connector on the ADV-S101's front panel. Using the sleep timer Basic Operation Setting the clock (12-hour display) Be sure to set . 1 Press the CURSOR • or &#...33 ENGLISH Press the HELP button again to turn off the "HELP" menu screen. 3 Press the ENTER button to the portable jack on the ADV-S101's front panel. Portable Music (Front in blue. The gray parts indicate that the corresponding input device is displayed in ): Select this to listen to ...

Owners Manual - Eng/Span
Page 44
... Auto power on function • When the 1 button is pressed while the power is in the standby mode, the ADV-S101's power turns on automatically, and if a disc is loaded in the S-101 the disc is played. • The auto power on function also turns the power on . • The unit is... "OFF". This function eliminates the need to perform complicated resettings when the power is switched on when the disc holder is opened while the ADV-S101 is pressed.
... Auto power on function • When the 1 button is pressed while the power is in the standby mode, the ADV-S101's power turns on automatically, and if a disc is loaded in the S-101 the disc is played. • The auto power on function also turns the power on . • The unit is... "OFF". This function eliminates the need to perform complicated resettings when the power is switched on when the disc holder is opened while the ADV-S101 is pressed.

Owners Manual - Eng/Span
Page 45
... other AV components have been completed as described in page 10 or 15, make the various settings described below on the monitor screen using the S101's on-screen display function. • Use the following buttons to set the language to be disabled if the rating level is not recorded on the...
... other AV components have been completed as described in page 10 or 15, make the various settings described below on the monitor screen using the S101's on-screen display function. • Use the following buttons to set the language to be disabled if the rating level is not recorded on the...

Owners Manual - Eng/Span
Page 67
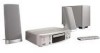
... control unit (RC-1007) Remote control method: IR pulse method Power supply: 3 V DC, using two AA batteries 2 Speakers • Speaker system (SC-S101) Type: 2-way, 2-speakers Closed box / Low-leakage-flux Speakers: 10 cm cone bass-mid x 1 2.5 cm high range x 1 Dimensions: 134 (W)... x 335 (H) x 76 (D) mm (5-9/32" x 13-3/16" x 2-63/64") Mass: 1.42 kg (3 lbs 2 oz) • Active subwoofer (DSW-S101) Type: 1-way, 1-speaker Reflex box / Low-leakage-flux / Built-in amplifier Speaker: 20 cm cone x 1 Dimensions: 236 (W) x 368 (H) x 460 (D) mm (9-9/32"...
... control unit (RC-1007) Remote control method: IR pulse method Power supply: 3 V DC, using two AA batteries 2 Speakers • Speaker system (SC-S101) Type: 2-way, 2-speakers Closed box / Low-leakage-flux Speakers: 10 cm cone bass-mid x 1 2.5 cm high range x 1 Dimensions: 134 (W)... x 335 (H) x 76 (D) mm (5-9/32" x 13-3/16" x 2-63/64") Mass: 1.42 kg (3 lbs 2 oz) • Active subwoofer (DSW-S101) Type: 1-way, 1-speaker Reflex box / Low-leakage-flux / Built-in amplifier Speaker: 20 cm cone x 1 Dimensions: 236 (W) x 368 (H) x 460 (D) mm (9-9/32"...

