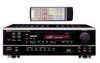
Owners Manual
Page 10
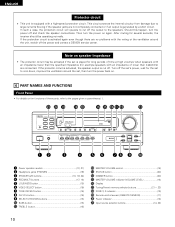
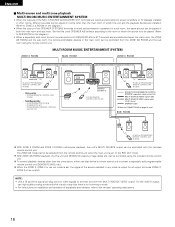
... ). @1 @0 !9 !8 !7 !6 !5 !4 !38 !2 !1 B PRECISION AUDIO COMPONENT / STEREO RECEIVER DRA-395 CD PHONO TUNER CDR / TAPE VCR DVD / VDP V.AUX REMOTE SENSOR ON / STANDBY Multi Room Music...VOLUME control 14) !3 STATUS button 20) !4 DIMMER button 20) !5 MASTER VOLUME indicator (VOLUME LEVEL 14) !6 Display !7 Tuning/Preset memory selector buttons 21ʙ 23) !8 ZONE 2, 3 indicator 18) !9 Remote control sensor (..., improve the ventilation around the unit, switch off the power and contact a DENON service center. If the protector circuit is activated, the speaker output is generated ...
... ). @1 @0 !9 !8 !7 !6 !5 !4 !38 !2 !1 B PRECISION AUDIO COMPONENT / STEREO RECEIVER DRA-395 CD PHONO TUNER CDR / TAPE VCR DVD / VDP V.AUX REMOTE SENSOR ON / STANDBY Multi Room Music...VOLUME control 14) !3 STATUS button 20) !4 DIMMER button 20) !5 MASTER VOLUME indicator (VOLUME LEVEL 14) !6 Display !7 Tuning/Preset memory selector buttons 21ʙ 23) !8 ZONE 2, 3 indicator 18) !9 Remote control sensor (..., improve the ventilation around the unit, switch off the power and contact a DENON service center. If the protector circuit is activated, the speaker output is generated ...
Owners Manual
Page 13
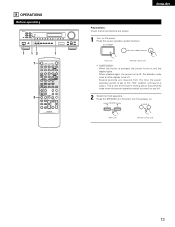
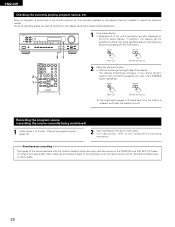
...ZONE 3 MULTI ROOM ON • VOLUME OFF ª TUNER PHONO V. Several seconds are required from the time the power operation switch is set and the display turns off . 2 Select the front speakers. Press the SPEAKER A or B button turn the speaker on the power. This is due to the "ON"... until sound is pressed, the power turns on and off . When pressed again, the power turns off, the standby mode is turned on and the display lights. AUX DIMMER CH VOL SHIFT STATUS • VIDEO SELECT ª • • PRESET MASTER VOL ª MUTING ª B REMOTE CONTROL UNIT ...
...ZONE 3 MULTI ROOM ON • VOLUME OFF ª TUNER PHONO V. Several seconds are required from the time the power operation switch is set and the display turns off . 2 Select the front speakers. Press the SPEAKER A or B button turn the speaker on the power. This is due to the "ON"... until sound is pressed, the power turns on and off . When pressed again, the power turns off, the standby mode is turned on and the display lights. AUX DIMMER CH VOL SHIFT STATUS • VIDEO SELECT ª • • PRESET MASTER VOL ª MUTING ª B REMOTE CONTROL UNIT ...
Owners Manual
Page 14
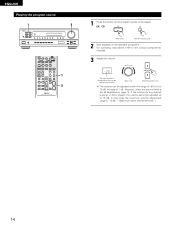
...• • PRESET MASTER VOL ª MUTING ª B REMOTE CONTROL UNIT RC-894 1 3 1 Press the button for any channel is displayed on the selected component. MASTER VOLUME • MASTER VOL The volume level is set as described on page 15, if the volume for the program... to 18 dB, in steps of channel level)".) 14 EX: CD CD CD (Main unit) (Remote control unit) 2 Start playback on the master volume level display. (Main unit) ª (Remote control unit) The volume can be played. ENGLISH Playing the program source 1 3 B MAIN OFF 6 7 0 TAPE 1 ZONE ...
...• • PRESET MASTER VOL ª MUTING ª B REMOTE CONTROL UNIT RC-894 1 3 1 Press the button for any channel is displayed on the selected component. MASTER VOLUME • MASTER VOL The volume level is set as described on page 15, if the volume for the program... to 18 dB, in steps of channel level)".) 14 EX: CD CD CD (Main unit) (Remote control unit) 2 Start playback on the master volume level display. (Main unit) ª (Remote control unit) The volume can be played. ENGLISH Playing the program source 1 3 B MAIN OFF 6 7 0 TAPE 1 ZONE ...
Owners Manual
Page 16
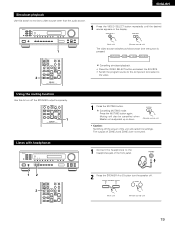
...RC-616 • IR SENSOR RC-617 • PROGRAMABLE REMOTE CONTROL UNIT RC-770 RC-616 B DRA-395 SPEAKER SYSTEM -B SYSTEM REMOTE CONTROL UNIT RC-894 RC-617 TV AMPLIFIRE RC-894 (or PROGRAMABLE REMOTE CONTROL...refer to the devices' operating instructions. 16 With ZONE 2/3 ROOM playback, the this unit and DENON CD players or tape decks etc, can be controlled from the remote control unit when the main ... the this unit and the playback devices are wired and connected to power amplifiers or TV displays installed in other rooms, different sources can be played in rooms other than the main room...
...RC-616 • IR SENSOR RC-617 • PROGRAMABLE REMOTE CONTROL UNIT RC-770 RC-616 B DRA-395 SPEAKER SYSTEM -B SYSTEM REMOTE CONTROL UNIT RC-894 RC-617 TV AMPLIFIRE RC-894 (or PROGRAMABLE REMOTE CONTROL...refer to the devices' operating instructions. 16 With ZONE 2/3 ROOM playback, the this unit and DENON CD players or tape decks etc, can be controlled from the remote control unit when the main ... the this unit and the playback devices are wired and connected to power amplifiers or TV displays installed in other rooms, different sources can be played in rooms other than the main room...
Owners Manual
Page 17
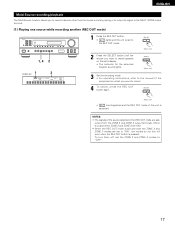
... (REC OUT mode) B 1 Press the REC OUT button. • REC lights and the unit is set to REC OUT the REC OUT mode. (Main unit) 1, 4 2 DISPLAY 1 2 2 Press the SELECT button until the source you want to record appears on which you want to record. 4 To cancel, press the REC OUT button... again. SELECT (Main unit) 3 Set the recording mode. • For operating instructions, refer to the manual of the component on the set's display. • The indicator for the selected program source lights.
... (REC OUT mode) B 1 Press the REC OUT button. • REC lights and the unit is set to REC OUT the REC OUT mode. (Main unit) 1, 4 2 DISPLAY 1 2 2 Press the SELECT button until the source you want to record appears on which you want to record. 4 To cancel, press the REC OUT button... again. SELECT (Main unit) 3 Set the recording mode. • For operating instructions, refer to the manual of the component on the set's display. • The indicator for the selected program source lights.
Owners Manual
Page 18
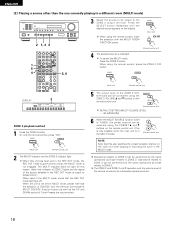
...well as the UP and DOWN control of Tuner Presets are not permitted. AUX DIMMER CH VOL SHIFT • STATUS • PRESET • MASTER VOL 3, 6 DISPLAY 2 ZONE 2 playback method 1 Press the ZONE 2 button. When using the PRESET • and ª buttons on /off . To cancel the MULTI mode... VOLUME LEVEL) : - - - Or, with the MULTI ROOM FUNCTION button. When using the ZONE 2 VOLUME • and ª buttons on the display. Press the ZONE 2 button. ENGLISH [2] Playing a source other than the one currently playing in the MULTI mode, check that the REC OUT mode setting ...
...well as the UP and DOWN control of Tuner Presets are not permitted. AUX DIMMER CH VOL SHIFT • STATUS • PRESET • MASTER VOL 3, 6 DISPLAY 2 ZONE 2 playback method 1 Press the ZONE 2 button. When using the PRESET • and ª buttons on /off . To cancel the MULTI mode... VOLUME LEVEL) : - - - Or, with the MULTI ROOM FUNCTION button. When using the ZONE 2 VOLUME • and ª buttons on the display. Press the ZONE 2 button. ENGLISH [2] Playing a source other than the one currently playing in the MULTI mode, check that the REC OUT mode setting ...
Owners Manual
Page 19
... muted. 1 Connect the headphones to the video. Press the MUTING button again. B 1 Press the VIDEO SELECT button repeatedly until the desired source appears on the display. ENGLISH Simulcast playback Use this to monitor a video source other than the audio source. Muting will cancel the settings.
... muted. 1 Connect the headphones to the video. Press the MUTING button again. B 1 Press the VIDEO SELECT button repeatedly until the desired source appears on the display. ENGLISH Simulcast playback Use this to monitor a video source other than the audio source. Muting will cancel the settings.
Owners Manual
Page 20
... currently being monitored) 1 Follow steps 1 to 3 under "Playing the program source" (page 14). 2 Start recording on the front panel display. Simultaneous recording The signals of the source selected with the function selector button are output simultaneously to change the brightness of the... display. AUX DIMMER CH VOL SHIFT STATUS • VIDEO SELECT ª • • PRESET MASTER VOL ª MUTING ª B REMOTE CONTROL ...
... currently being monitored) 1 Follow steps 1 to 3 under "Playing the program source" (page 14). 2 Start recording on the front panel display. Simultaneous recording The signals of the source selected with the function selector button are output simultaneously to change the brightness of the... display. AUX DIMMER CH VOL SHIFT STATUS • VIDEO SELECT ª • • PRESET MASTER VOL ª MUTING ª B REMOTE CONTROL ...
Owners Manual
Page 22
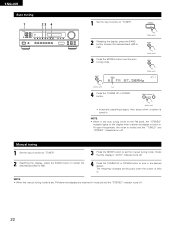
... 2 Watching the display, press the BAND button to select the desired band (AM or FM). 4 Press the TUNING UP or DOWN button to tune in monaural and the "STEREO" indicator turns off . NOTE: • When the manual tuning mode is set, FM stereo broadcasts are received in the desired station... open frequencies, the noise is tuned in. NOTE: • When in the auto tuning mode on the FM band, the "STEREO" indicator lights on the display when a stereo broadcast is muted and the "TUNED" and "STEREO" indicators turn off . 22 ENGLISH Auto tuning 1 B 23 4 1 Set the input function to "...
... 2 Watching the display, press the BAND button to select the desired band (AM or FM). 4 Press the TUNING UP or DOWN button to tune in monaural and the "STEREO" indicator turns off . NOTE: • When the manual tuning mode is set, FM stereo broadcasts are received in the desired station... open frequencies, the noise is tuned in. NOTE: • When in the auto tuning mode on the FM band, the "STEREO" indicator lights on the display when a stereo broadcast is muted and the "TUNED" and "STEREO" indicators turn off . 22 ENGLISH Auto tuning 1 B 23 4 1 Set the input function to "...
Owners Manual
Page 23
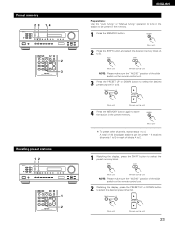
...the preset memory block. SHIFT SHIFT (Main unit) (Remote control unit) NOTE: Please make sure the "AUDIO" position of blocks A to E. 1 Watching the display, press the SHIFT button to 8). SHIFT SHIFT (Main unit) (Remote control unit) NOTE: Please make sure the "AUDIO" position of 40 broadcast stations can be... block (A to 4. Preset memory 2 3 1, 4 B ª A SPEAKER B TUNER CDR / TAPE V. A total of the slide switch on the remote control unit. 2 Watching the display, press the PRESET UP or DOWN button to store the station in the memory. 1 Press the MEMORY button.
...the preset memory block. SHIFT SHIFT (Main unit) (Remote control unit) NOTE: Please make sure the "AUDIO" position of blocks A to E. 1 Watching the display, press the SHIFT button to 8). SHIFT SHIFT (Main unit) (Remote control unit) NOTE: Please make sure the "AUDIO" position of 40 broadcast stations can be... block (A to 4. Preset memory 2 3 1, 4 B ª A SPEAKER B TUNER CDR / TAPE V. A total of the slide switch on the remote control unit. 2 Watching the display, press the PRESET UP or DOWN button to store the station in the memory. 1 Press the MEMORY button.
Owners Manual
Page 24
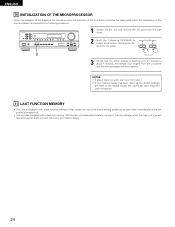
ENGLISH 10 INITIALIZATION OF THE MICROPROCESSOR When the indication of the display is not normal or when the operation of the unit does not shows the reasonable result, the initialization of about 1 second, and release your fingers ... switch is required by the following SPEAKER A button and B button, and plug the AC cord into the outlet. SPEAKER A B 2 (Main unit) 3 Check that the entire display is flashing with an interval of the microprocessor is off the unit and remove the AC cord from the factory). 11 LAST FUNCTION MEMORY •...
ENGLISH 10 INITIALIZATION OF THE MICROPROCESSOR When the indication of the display is not normal or when the operation of the unit does not shows the reasonable result, the initialization of about 1 second, and release your fingers ... switch is required by the following SPEAKER A button and B button, and plug the AC cord into the outlet. SPEAKER A B 2 (Main unit) 3 Check that the entire display is flashing with an interval of the microprocessor is off the unit and remove the AC cord from the factory). 11 LAST FUNCTION MEMORY •...
Owners Manual
Page 25
... with new batteries. • Move closer. • Remove obstacle. • Press the proper button. • Insert batteries properly. DISPLAY not displayed and the "ON/STANDBY" LED flashes at continuous high power conditions and/or inadequate ventilation. • Incomplete connection of speaker cords. ... securely. • Contact your store of instruments reversed during stereo playback. Have you operated the receiver according to the CD, records, tapes, and FM broadcasts, etc. Symptom DISPLAY not lit and sound not produced when power operation switch set . • The unit is operating...
... with new batteries. • Move closer. • Remove obstacle. • Press the proper button. • Insert batteries properly. DISPLAY not displayed and the "ON/STANDBY" LED flashes at continuous high power conditions and/or inadequate ventilation. • Incomplete connection of speaker cords. ... securely. • Contact your store of instruments reversed during stereo playback. Have you operated the receiver according to the CD, records, tapes, and FM broadcasts, etc. Symptom DISPLAY not lit and sound not produced when power operation switch set . • The unit is operating...


