Operating Instructions
Page 2
.... 8. Power Lines - An outside antenna or cable system is connected to the product, be sure the service technician has used replacement parts specified by the manufacturer. 25. Heat - The product should not be followed. 5. Any mounting of overhead power lines or other electric light or power circuits, or where it is no guarantee that could result in installation such as a bookcase or rack unless...
.... 8. Power Lines - An outside antenna or cable system is connected to the product, be sure the service technician has used replacement parts specified by the manufacturer. 25. Heat - The product should not be followed. 5. Any mounting of overhead power lines or other electric light or power circuits, or where it is no guarantee that could result in installation such as a bookcase or rack unless...
Operating Instructions
Page 5
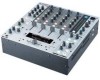
.../gain LOW, MID, HI and GAIN controls are available on every input channel. 10. t BOOTH LEVEL control • Adjusts the level of the MASTER outputs. Digital output The DN-X1500S allows you to record directly to provide you with the main unit in sound quality. Fader or by using the Crossfader left to right or right to left. (This function can record up to make sure the following items are also provided for purchasing the DENON DN-X1500S DJ MIXER. Effect SEND...
.../gain LOW, MID, HI and GAIN controls are available on every input channel. 10. t BOOTH LEVEL control • Adjusts the level of the MASTER outputs. Digital output The DN-X1500S allows you to record directly to provide you with the main unit in sound quality. Fader or by using the Crossfader left to right or right to left. (This function can record up to make sure the following items are also provided for purchasing the DENON DN-X1500S DJ MIXER. Effect SEND...
Operating Instructions
Page 6
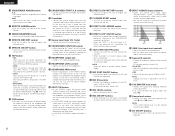
... scratch effects. @1 HEADPHONE output jack • Accepts 1/4" stereo headphone plugs. @2 HEADPHONE LEVEL control • Adjusts the volume for the headphones. @3 HEADPHONE PAN control • Serves two purposes...In the STEREO mode it possible to derive mixed sound from the selected sources. !7 CROSSFADER START A, B switches • Use this to adjust the ratio of the selected inputs. In the SPLIT CUE (MONO) mode, mono Cue level is displayed on the Left meter and mono Program (CUE MASTER) level is displayed on the Right meter. • In the SPLIT CUE (MONO) mode, the button is...
... scratch effects. @1 HEADPHONE output jack • Accepts 1/4" stereo headphone plugs. @2 HEADPHONE LEVEL control • Adjusts the volume for the headphones. @3 HEADPHONE PAN control • Serves two purposes...In the STEREO mode it possible to derive mixed sound from the selected sources. !7 CROSSFADER START A, B switches • Use this to adjust the ratio of the selected inputs. In the SPLIT CUE (MONO) mode, mono Cue level is displayed on the Left meter and mono Program (CUE MASTER) level is displayed on the Right meter. • In the SPLIT CUE (MONO) mode, the button is...

Operating Instructions
Page 7
...; These switches change the input from PHONO to a LINE level inputs. • These switches set a LINE level inputs when turntable is unaffected by the MASTER LEVEL control. • We recommend using the 3.5 mm stereo mini cord. $8 SEND / RETURN jacks • These 1/4" TS mono jacks allow external processing of the selected channel. The signal is unaffected by MODE PARAMETER knob. ^4 Cue button indicators • Channels of CUE selected are selected. Cold $6 Maintenance connector NOTE: This connector can input desired BPM by the MASTER LEVEL control...
...; These switches change the input from PHONO to a LINE level inputs. • These switches set a LINE level inputs when turntable is unaffected by the MASTER LEVEL control. • We recommend using the 3.5 mm stereo mini cord. $8 SEND / RETURN jacks • These 1/4" TS mono jacks allow external processing of the selected channel. The signal is unaffected by MODE PARAMETER knob. ^4 Cue button indicators • Channels of CUE selected are selected. Cold $6 Maintenance connector NOTE: This connector can input desired BPM by the MASTER LEVEL control...
Operating Instructions
Page 8
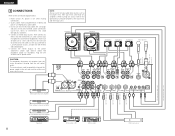
.... Use high-quality, audio cables. 3. Connect all faders are securely fastened. When turning off while making connections. 2. CD player CAUTION: To completely disconnect this operation by the user. Be sure plugs and jacks are at a time. Connect your speakers. 4. Connect the stereo outputs to the connection diagram below. 1. ENGLISH 4 CONNECTIONS Refer to the power amplifier(s) and/or tape deck(s) and/or MD recorder(s) and/or CD recorder(s). RL CD player Turntable 3 43 210 4 SLOW BRAKE OFF ON POWER START...
.... Use high-quality, audio cables. 3. Connect all faders are securely fastened. When turning off while making connections. 2. CD player CAUTION: To completely disconnect this operation by the user. Be sure plugs and jacks are at a time. Connect your speakers. 4. Connect the stereo outputs to the connection diagram below. 1. ENGLISH 4 CONNECTIONS Refer to the power amplifier(s) and/or tape deck(s) and/or MD recorder(s) and/or CD recorder(s). RL CD player Turntable 3 43 210 4 SLOW BRAKE OFF ON POWER START...
Operating Instructions
Page 9
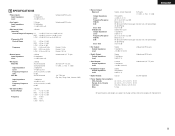
... noise gate function set with presettings) 70 dB (Phono) Over 70 dB • Rec Output: Output Impedance Level Stereo 1 kΩ/kohms -10 dBV (316 mV) Unbalanced RCA jacks • Booth Output: Output Impedance Level Stereo 1 kΩ/kohms 0 dBV (1 V) Unbalanced RCA jacks • Send Output: Output Impedance Level 2 mono 1 kΩ/kohms -14 dBV (200 mV) Unbalanced 1/4" TS jacks • Headphone Output: Output Impedance Level Stereo 100 Ω/ohms 0 dBV (1 V) • Digital Output: Coaxial IEC958 Type II • Power Supply...
... noise gate function set with presettings) 70 dB (Phono) Over 70 dB • Rec Output: Output Impedance Level Stereo 1 kΩ/kohms -10 dBV (316 mV) Unbalanced RCA jacks • Booth Output: Output Impedance Level Stereo 1 kΩ/kohms 0 dBV (1 V) Unbalanced RCA jacks • Send Output: Output Impedance Level 2 mono 1 kΩ/kohms -14 dBV (200 mV) Unbalanced 1/4" TS jacks • Headphone Output: Output Impedance Level Stereo 100 Ω/ohms 0 dBV (1 V) • Digital Output: Coaxial IEC958 Type II • Power Supply...

Operating Instructions
Page 10
... opposite direction, CD player play will not operate simultaneously. Fader) !9 and 5 the CD player will be started using a screwdriver, move up the source input fader (Ch. Channel Fader Start Turn the INPUT ASSIGN switch #4 to control the cross fader startup curve. Turn on CD player. 6 Use the CROSSFADER CONTOUR control @0 to select the desired source from LINE2, 1 4, 6 or 8. You must select from the set to the desired torque. 4. ENGLISH 6 FADER START If the separately sold DN-S5000, DN-S3500, DN-D9000, DN...
... opposite direction, CD player play will not operate simultaneously. Fader) !9 and 5 the CD player will be started using a screwdriver, move up the source input fader (Ch. Channel Fader Start Turn the INPUT ASSIGN switch #4 to control the cross fader startup curve. Turn on CD player. 6 Use the CROSSFADER CONTOUR control @0 to select the desired source from LINE2, 1 4, 6 or 8. You must select from the set to the desired torque. 4. ENGLISH 6 FADER START If the separately sold DN-S5000, DN-S3500, DN-D9000, DN...
Operating Instructions
Page 11
... effected sound using the auto BPM function, perform the lock operation. First selection Delay Second selection Beat Effect mode Manual input mode Third selection Delay time is selectable 1/4, 1/2, 3/4, 1/1, 2/1, 4/1, 8/1 of BPM. Beat Effect mode Manual input mode Echo time is selectable 1/4, 1/2, 3/4, 1/1, 2/1, 4/1, 8/1 of BPM. You can be set in the preset mode. Echo 2 (Normal Echo) Preset functions Beat Effect mode Manual input mode Filter 1 (Manual Filter) • When the WET/DRY control is turned, the Filter frequency is looped. Flanger Beat Effect mode Manual...
... effected sound using the auto BPM function, perform the lock operation. First selection Delay Second selection Beat Effect mode Manual input mode Third selection Delay time is selectable 1/4, 1/2, 3/4, 1/1, 2/1, 4/1, 8/1 of BPM. Beat Effect mode Manual input mode Echo time is selectable 1/4, 1/2, 3/4, 1/1, 2/1, 4/1, 8/1 of BPM. You can be set in the preset mode. Echo 2 (Normal Echo) Preset functions Beat Effect mode Manual input mode Filter 1 (Manual Filter) • When the WET/DRY control is turned, the Filter frequency is looped. Flanger Beat Effect mode Manual...
Operating Instructions
Page 12
... B button o. • The B button o illumination flashes. Single + Reverse: Reverse Sampler stops at your mix using the Crossfader !8 or Ch. Press the SPLIT CUE button @4. 2. Monitoring the Sampler data (SAMPLER CUE) • When the SAMPLER CUE button !6 is recorded to Sampler 2 memory up to or left on reference line 8. • This adjustment can check the Sampler data. Turn the GAIN control #5 until the meters peak at the 0 dB level. 4. You can perform the Sampler Fader Start...
... B button o. • The B button o illumination flashes. Single + Reverse: Reverse Sampler stops at your mix using the Crossfader !8 or Ch. Press the SPLIT CUE button @4. 2. Monitoring the Sampler data (SAMPLER CUE) • When the SAMPLER CUE button !6 is recorded to Sampler 2 memory up to or left on reference line 8. • This adjustment can check the Sampler data. Turn the GAIN control #5 until the meters peak at the 0 dB level. 4. You can perform the Sampler Fader Start...
Operating Instructions
Page 13
... select Auto or Parametric. Echo 2 : ON / OFF* ENGLISH (15) Filter2 (Auto Filter) ON/OFF : Setting of whether or not to perform the Manual parameter mode of the internal Effector. displays on the analog circuitry using internal digital signal processing. Preset mode q Turn the EFFECTS ASSIGN switch !1 to select the preset item. r After selecting an item, push the MODE PARAMETERS knob !2 to perform the Pan of the function for attenuating the noise on...
... select Auto or Parametric. Echo 2 : ON / OFF* ENGLISH (15) Filter2 (Auto Filter) ON/OFF : Setting of whether or not to perform the Manual parameter mode of the internal Effector. displays on the analog circuitry using internal digital signal processing. Preset mode q Turn the EFFECTS ASSIGN switch !1 to select the preset item. r After selecting an item, push the MODE PARAMETERS knob !2 to perform the Pan of the function for attenuating the noise on...
Operating Instructions
Page 70
...;p p̛ᅺˉᜑͪ CUE MASTERཥ̻f SPLIT CUE MONO ᅼόɨp f @5 EFFECT LOOP WET / DRYછՓ f @6 CH FADER STARTකᗫ ONձᗫௐ€OFF ̌ঐf @7 EFFECT LOOP ASSIGNකᗫ f @8 EFFECT LOOP ON / OFFᒟ SEND / RETURN f EFFECTක઼€ON...
...;p p̛ᅺˉᜑͪ CUE MASTERཥ̻f SPLIT CUE MONO ᅼόɨp f @5 EFFECT LOOP WET / DRYછՓ f @6 CH FADER STARTකᗫ ONձᗫௐ€OFF ̌ঐf @7 EFFECT LOOP ASSIGNකᗫ f @8 EFFECT LOOP ON / OFFᒟ SEND / RETURN f EFFECTක઼€ON...

Operating Instructions
Page 71
...;ࠪࠐf ^2 ࠪࣖ BPM ᜑͪ BPMf ^3 BPM Іਗ€AUTOj • BPM BPM€AUTO BPMࣛp༈ f BPM€AUTO BPMᕁ֛ࣛp༈ܸͪዱ ৪ᖒf ˓ਗ€MANUALj • BPM BPM ፩ɝࣛp ৎf MODE PARAMETER BPM ࠽f ^4 CUEࠪࠐf ^5 ΫЗ BPM BPMf ءj ߰...
...;ࠪࠐf ^2 ࠪࣖ BPM ᜑͪ BPMf ^3 BPM Іਗ€AUTOj • BPM BPM€AUTO BPMࣛp༈ f BPM€AUTO BPMᕁ֛ࣛp༈ܸͪዱ ৪ᖒf ˓ਗ€MANUALj • BPM BPM ፩ɝࣛp ৎf MODE PARAMETER BPM ࠽f ^4 CUEࠪࠐf ^5 ΫЗ BPM BPMf ءj ߰...
Operating Instructions
Page 72
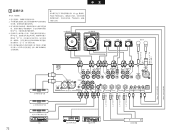
...;f 5 MD CD fౢɝ DN-X1500S ٙ f ءj pν CD p p f p p p f CD CD ਨᆵ 3 43 210 4 SLOW BRAKE OFF ON POWER START /STOP 78 33 45 KATING 0 KEY ADJUST PITCH -12 Quartz 0 +12 DP-DJ151 Digital 765 765 765 ਨᆵ 2 43 210 4 SLOW BRAKE OFF ON POWER START /STOP 78 33 45 KATING 0 KEY ADJUST PITCH -12 Quartz 0 +12 DP...
...;f 5 MD CD fౢɝ DN-X1500S ٙ f ءj pν CD p p f p p p f CD CD ਨᆵ 3 43 210 4 SLOW BRAKE OFF ON POWER START /STOP 78 33 45 KATING 0 KEY ADJUST PITCH -12 Quartz 0 +12 DP-DJ151 Digital 765 765 765 ਨᆵ 2 43 210 4 SLOW BRAKE OFF ON POWER START /STOP 78 33 45 KATING 0 KEY ADJUST PITCH -12 Quartz 0 +12 DP...
Operating Instructions
Page 73
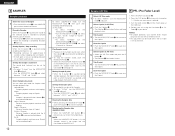
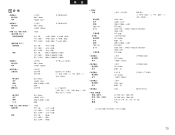
... +6dB€60Hz ৷ࠪ€HIj -40 Ї +10dB ʕࠪ€MIDj -40 Ї +10dB Эࠪ€LOWj -40 Ї +6dB ৷ࠪ€HIj 6kHz Ї 20kHz ᎰႩ 13kHz ʕࠪ€MIDj 200Hz Ї 6kHz ...ᎰႩ 1kHz Эࠪ€LOWj 20Hz Ї 200Hz ᎰႩ 100Hz 2 ఊᑊ༸ 50kƸ / kohms -14dBV€200mV 1 / 4©TS ౢɹ 2 &#...
... +6dB€60Hz ৷ࠪ€HIj -40 Ї +10dB ʕࠪ€MIDj -40 Ї +10dB Эࠪ€LOWj -40 Ї +6dB ৷ࠪ€HIj 6kHz Ї 20kHz ᎰႩ 13kHz ʕࠪ€MIDj 200Hz Ї 6kHz ...ᎰႩ 1kHz Эࠪ€LOWj 20Hz Ї 200Hz ᎰႩ 100Hz 2 ఊᑊ༸ 50kƸ / kohms -14dBV€200mV 1 / 4©TS ౢɹ 2 &#...
Operating Instructions
Page 77
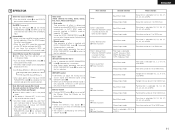
...q EFFECTS ASSIGNකᗫ !1 OFF©f w TAPᒟ !5 ൴ཀ 2 f e MODE PARAMETERSૅඐ !2 f r p MODE PARAMETERSૅඐ !2 f t f y TAP...1030;ਗ BPMjܲɨΫЗ€CUEᒟ !6 BPMf AutoBPM€Іਗ BPMjON€ක઼/ OFF*€&#...Key jON€ක઼/ OFF*€ᗫௐ* €19 CHj 1 Ї 4 f N.Gate CH jOFF Low€Эࠪ/ Hi€৷ࠪ €20 MICj MIC f N.Gate MIC...
...q EFFECTS ASSIGNකᗫ !1 OFF©f w TAPᒟ !5 ൴ཀ 2 f e MODE PARAMETERSૅඐ !2 f r p MODE PARAMETERSૅඐ !2 f t f y TAP...1030;ਗ BPMjܲɨΫЗ€CUEᒟ !6 BPMf AutoBPM€Іਗ BPMjON€ක઼/ OFF*€&#...Key jON€ක઼/ OFF*€ᗫௐ* €19 CHj 1 Ї 4 f N.Gate CH jOFF Low€Эࠪ/ Hi€৷ࠪ €20 MICj MIC f N.Gate MIC...


