
Owners Manual - English
Page 11
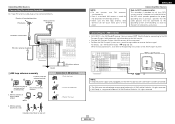
... the speaker cable come in and turn the unit's power back on . Center speaker >< Subwoofer Connection terminal for surround playback. • When making connections, also refer to the left channel. 8 ENGLISH NEVER touch the speaker terminals when the power is on . When the protection circuit is ..., with other components. If the protection circuit is cut off and improve ventilation around the unit, switch off the power and contact a DENON service center. Either tightly twist or terminate the core wires. 2. Also check the wiring of time with the volume high could result in...
... the speaker cable come in and turn the unit's power back on . Center speaker >< Subwoofer Connection terminal for surround playback. • When making connections, also refer to the left channel. 8 ENGLISH NEVER touch the speaker terminals when the power is on . When the protection circuit is ..., with other components. If the protection circuit is cut off and improve ventilation around the unit, switch off the power and contact a DENON service center. Either tightly twist or terminate the core wires. 2. Also check the wiring of time with the volume high could result in...
Owners Manual - English
Page 13
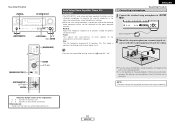
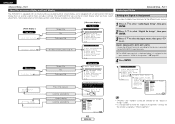
...the remote control unit Button name only : Buttons on a camera tripod, etc., and set with the receptor pointing towards the ceiling. • To make the optimum settings. • When the auto setup procedure is optimum for playing multi-channel signal music. Sound receptor 2 Mount the setup microphone on.... Normal: Adjust the frequency response of all speakers flat. Flat: This the frequency response of the ears in the room and automatically make the sound field settings manually ( page 60 ~ 63). Microphone Place the setup microphone's sound receptor at the height of all speaker ...
...the remote control unit Button name only : Buttons on a camera tripod, etc., and set with the receptor pointing towards the ceiling. • To make the optimum settings. • When the auto setup procedure is optimum for playing multi-channel signal music. Sound receptor 2 Mount the setup microphone on.... Normal: Adjust the frequency response of all speakers flat. Flat: This the frequency response of the ears in the room and automatically make the sound field settings manually ( page 60 ~ 63). Microphone Place the setup microphone's sound receptor at the height of all speaker ...
Owners Manual - English
Page 15
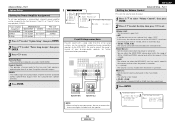
... sound in the room. The measurement results of each channel is selected: Press F. 1 NOTE: • Do not change the speaker connections or subwoofer volume after making the measurements. • Do not turn off the power while the data is measured twice. 2: Not displayed when "ZONE2" and "Front" are output during measurements...
... sound in the room. The measurement results of each channel is selected: Press F. 1 NOTE: • Do not change the speaker connections or subwoofer volume after making the measurements. • Do not turn off the power while the data is measured twice. 2: Not displayed when "ZONE2" and "Front" are output during measurements...

Owners Manual - English
Page 17
... not bundle power cords together with speaker cables. Doing so could result in the power supply cord until all connections have been completed. • When making connections, also refer to the operating instructions of the following optional connection cables (not supplied).
... not bundle power cords together with speaker cables. Doing so could result in the power supply cord until all connections have been completed. • When making connections, also refer to the operating instructions of the following optional connection cables (not supplied).
Owners Manual - English
Page 20
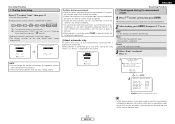
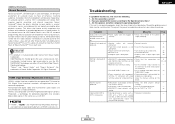
... the digital terminal (coaxial or optical) at "Setting the Digital In Assignment" ( page 49). You can choose from the HDMI monitor output terminal, so also make analog or digital audio connections. To play sound using the component video, S-Video, or composite video terminals. TV/DBS tuner H COMPONENT VIDEO OUT Y PB PR...
... the digital terminal (coaxial or optical) at "Setting the Digital In Assignment" ( page 49). You can choose from the HDMI monitor output terminal, so also make analog or digital audio connections. To play sound using the component video, S-Video, or composite video terminals. TV/DBS tuner H COMPONENT VIDEO OUT Y PB PR...
Owners Manual - English
Page 25
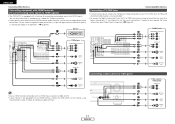
... AM antennas 1. All rights reserved. 22 ENGLISH MX Connecting Other Sources Connecting the antenna terminals An F-type FM antenna cable plug can receive XM® Satellite Radio by connecting to the XM Passport System (sold separately) and subscribing to the XM service. • Plug ... and, in the reverse direction. 2. With the antenna on wall, etc. When making connections, also refer to receive the best signal. All rights reserved. • XM Ready is the XM Ready® receiver. Direction of broadcasting station FM antenna AM loop antenna (Supplied) 75 Ω/ohms ...
... AM antennas 1. All rights reserved. 22 ENGLISH MX Connecting Other Sources Connecting the antenna terminals An F-type FM antenna cable plug can receive XM® Satellite Radio by connecting to the XM Passport System (sold separately) and subscribing to the XM service. • Plug ... and, in the reverse direction. 2. With the antenna on wall, etc. When making connections, also refer to receive the best signal. All rights reserved. • XM Ready is the XM Ready® receiver. Direction of broadcasting station FM antenna AM loop antenna (Supplied) 75 Ω/ohms ...

Owners Manual - English
Page 50
.... TUNER OFF TUNER ON PHONO OFF PHONO ON Default settings S. Option Setup 1 2ch Direct/Stereo 2 Dolby Digital Setup 3 Auto Surround Mode 4 Manual EQ Setup Items Make the 2-channel direct mode and stereo mode speaker settings. AUX ON ON VCR-2 V. Back Vol.Limit = OFF P. Adjust the tone of the AVR-2307CI's two...
.... TUNER OFF TUNER ON PHONO OFF PHONO ON Default settings S. Option Setup 1 2ch Direct/Stereo 2 Dolby Digital Setup 3 Auto Surround Mode 4 Manual EQ Setup Items Make the 2-channel direct mode and stereo mode speaker settings. AUX ON ON VCR-2 V. Back Vol.Limit = OFF P. Adjust the tone of the AVR-2307CI's two...
Owners Manual - English
Page 52
Part 1 Advanced Setup - Some representative front display and on screen display when you make the "Digital In Assignment" settings for the different input sources. [ Front display ] Top menu Screen title No. [ On screen display ] Top menu 1 Press D H to select "... panel display that you use the on screen display examples are shown below. The HDMI input terminal is displayed when it is not possible to make system adjustments. Setting the Digital In Assignment This assigns the digital input terminals for the function assigned at "HDMI In Assignment" ( page 53). We recommend...
Part 1 Advanced Setup - Some representative front display and on screen display when you make the "Digital In Assignment" settings for the different input sources. [ Front display ] Top menu Screen title No. [ On screen display ] Top menu 1 Press D H to select "... panel display that you use the on screen display examples are shown below. The HDMI input terminal is displayed when it is not possible to make system adjustments. Setting the Digital In Assignment This assigns the digital input terminals for the function assigned at "HDMI In Assignment" ( page 53). We recommend...

Owners Manual - English
Page 56
.... 2 Press D H to select "HDMI In Assign", then press ENTER. 4 3 Press D H to select the input source, then press F G to set to make the "Component In Assignment" settings for the function assigned at "iPod Assignment". 2 • It is not compatible with HDMI1 and HDMI2. When HDMI is not... possible to make the "HDMI In Assignment" settings for the function assigned at "iPod Assignment". 6 Press ENTER. 53 ENGLISH When this case, reassign the digital...
.... 2 Press D H to select "HDMI In Assign", then press ENTER. 4 3 Press D H to select the input source, then press F G to set to make the "Component In Assignment" settings for the function assigned at "iPod Assignment". 2 • It is not compatible with HDMI1 and HDMI2. When HDMI is not... possible to make the "HDMI In Assignment" settings for the function assigned at "iPod Assignment". 6 Press ENTER. 53 ENGLISH When this case, reassign the digital...

Owners Manual - English
Page 58
... for example, adjust so that the 1 timing of the actors' lips is selected, "OFF" if you do not want to set . being input. • To make this menu is not displayed in the EXT. With a movie source, for the component video signal, select the delay time and turn the on screen...
... for example, adjust so that the 1 timing of the actors' lips is selected, "OFF" if you do not want to set . being input. • To make this menu is not displayed in the EXT. With a movie source, for the component video signal, select the delay time and turn the on screen...

Owners Manual - English
Page 59
... not connected, the sounds in those channels are displayed. 4 Custom: The speaker settings for the front speakers. Part 1 Advanced Playback Setting the 2ch Direct/Stereo 1 2 Make the 2-channel direct mode and stereo mode speaker settings. 1 Press D H to select "Advanced Playback", then press ENTER. 3 2 Press D H to select "2ch Direct / Stereo", then press...
... not connected, the sounds in those channels are displayed. 4 Custom: The speaker settings for the front speakers. Part 1 Advanced Playback Setting the 2ch Direct/Stereo 1 2 Make the 2-channel direct mode and stereo mode speaker settings. 1 Press D H to select "Advanced Playback", then press ENTER. 3 2 Press D H to select "2ch Direct / Stereo", then press...
Owners Manual - English
Page 61
... proceeding. ZONE2: This mode assigns the surround back amplifier channels to provide ZONE2 speaker-level outputs from the current level. 3 Press ENTER. 1 2 NOTE: • When making bi-amp connections, be assigned to the AVR-2307CI's maximum volume (output) level of output.
... proceeding. ZONE2: This mode assigns the surround back amplifier channels to provide ZONE2 speaker-level outputs from the current level. 3 Press ENTER. 1 2 NOTE: • When making bi-amp connections, be assigned to the AVR-2307CI's maximum volume (output) level of output.

Owners Manual - English
Page 63
..." is set . If you wish to set to "No", "Front" is connected. None: Select this when no need to make this setting. • Perform this when using large speakers with sufficient low frequency playback capability can better handle deep bass than most main... to be greatly enhanced when "Small" is set to "Large". 4 Press ENTER. 1 2 3 3 Press D H to select the speaker, then press F G to make the settings for the Crossover Frequency) signals. A subwoofer with ample low frequency reproduction capabilities. Part 2 Speaker Setup • If the "Auto Setup" procedure has already...
..." is set . If you wish to set to "No", "Front" is connected. None: Select this when no need to make this setting. • Perform this when using large speakers with sufficient low frequency playback capability can better handle deep bass than most main... to be greatly enhanced when "Small" is set to "Large". 4 Press ENTER. 1 2 3 3 Press D H to select the speaker, then press F G to make the settings for the Crossover Frequency) signals. A subwoofer with ample low frequency reproduction capabilities. Part 2 Speaker Setup • If the "Auto Setup" procedure has already...

Owners Manual - English
Page 68
... signals for the DVD/VDP, DBS/CABLE, VCR or TV position. 2 Set [MODE SELECTOR 2] to the component to 4. Setting the preset memory function • DENON and other makes of components can be operated by setting the preset memory. • This remote control unit can be set for some component models cannot be... code. Set to the AUDIO side for the CD, TAPE or CD-R/MD position, and to the VIDEO side for the pressed buttons are of makes listed in the memory, repeat steps 1 to be operated (CD, CD-R/MD or TAPE). 3 Operate the audio component. To avoid accidental operation, cover the remote...
... signals for the DVD/VDP, DBS/CABLE, VCR or TV position. 2 Set [MODE SELECTOR 2] to the component to 4. Setting the preset memory function • DENON and other makes of components can be operated by setting the preset memory. • This remote control unit can be set for some component models cannot be... code. Set to the AUDIO side for the CD, TAPE or CD-R/MD position, and to the VIDEO side for the pressed buttons are of makes listed in the memory, repeat steps 1 to be operated (CD, CD-R/MD or TAPE). 3 Operate the audio component. To avoid accidental operation, cover the remote...
Owners Manual - English
Page 75
... interface standard for use the NA SURROUND Technology and other broadcast format. Are the connections correct? 2. Have you operated the receiver according to on DVI (Digital Visual Interface) standards and optimized for next generation TVs based on . Disconnect the power immediately ...connected with DVI. • "HDMI", " " and "High-Definition Multimedia Interface" are trademarks or registered trademarks of America's listening audience. Make the interlace settings on the radio 24 hours a day and will help deliver more surround music to Neural Surround™ music. "Neural"...
... interface standard for use the NA SURROUND Technology and other broadcast format. Are the connections correct? 2. Have you operated the receiver according to on DVI (Digital Visual Interface) standards and optimized for next generation TVs based on . Disconnect the power immediately ...connected with DVI. • "HDMI", " " and "High-Definition Multimedia Interface" are trademarks or registered trademarks of America's listening audience. Make the interlace settings on the radio 24 hours a day and will help deliver more surround music to Neural Surround™ music. "Neural"...


