Owners Manual - English
Page 3
... B digital device, pursuant to distribute this manual, meets FCC requirements. However, there is subject to the following measures: • Reorient or relocate the receiving antenna. • Increase the separation between the equipment and receiver. • Connect the product into the apparatus... cord carefully. Modification not expressly approved by DENON may cause harmful interference to radio or television reception, which can radiate radio frequency energy and, if not installed and used in any interference received, including interference that interference will not occur ...
... B digital device, pursuant to distribute this manual, meets FCC requirements. However, there is subject to the following measures: • Reorient or relocate the receiving antenna. • Increase the separation between the equipment and receiver. • Connect the product into the apparatus... cord carefully. Modification not expressly approved by DENON may cause harmful interference to radio or television reception, which can radiate radio frequency energy and, if not installed and used in any interference received, including interference that interference will not occur ...

Owners Manual - English
Page 4
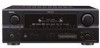
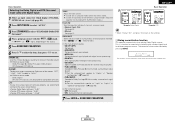
... SURROUND mode 30 Checking the input signals 30 Surround modes and parameters 31 ~ 33 Using the DENON original surround modes Types of surround modes and their features 34 Selecting the DSP surround simulation 35 ...Adjusting the speaker volume 36 Using the fader function 36 Listening to the radio Auto tuning 37 Manual tuning 37 Preset memory 38 Checking the preset stations 38 Recalling preset stations 38 XM Satellite ... still pictures and videos (only for choosing the DENON AVR-2307CI AV Surround Receiver. ENGLISH Thank you review the contents of this manual before proceeding.
... SURROUND mode 30 Checking the input signals 30 Surround modes and parameters 31 ~ 33 Using the DENON original surround modes Types of surround modes and their features 34 Selecting the DSP surround simulation 35 ...Adjusting the speaker volume 36 Using the fader function 36 Listening to the radio Auto tuning 37 Manual tuning 37 Preset memory 38 Checking the preset stations 38 Recalling preset stations 38 XM Satellite ... still pictures and videos (only for choosing the DENON AVR-2307CI AV Surround Receiver. ENGLISH Thank you review the contents of this manual before proceeding.

Owners Manual - English
Page 5
...values 45 ~ 47 Navigating through function 69 Additional Information 70 ~ 72 Troubleshooting 72, 73 Specifications 74 List of preset codes End of this manual Getting Started Accessories Check that the following parts are attached in addition to the main unit: q Operating instructions 1 w Warranty (for North ... 58 Setting the Volume Control 58 Setting the Trigger Out 59 Setting the Setup Lock 59 Operating the remote control unit Operating DENON audio components 65 Setting the preset memory function 65 Operating a component stored in the preset memory····66...
...values 45 ~ 47 Navigating through function 69 Additional Information 70 ~ 72 Troubleshooting 72, 73 Specifications 74 List of preset codes End of this manual Getting Started Accessories Check that the following parts are attached in addition to the main unit: q Operating instructions 1 w Warranty (for North ... 58 Setting the Volume Control 58 Setting the Trigger Out 59 Setting the Setup Lock 59 Operating the remote control unit Operating DENON audio components 65 Setting the preset memory function 65 Operating a component stored in the preset memory····66...

Owners Manual - English
Page 10
... AVR-2307CI's monitor output terminal to your listening room environment and the source equipment and loudspeakers you are using. • To set the sound field manually ( page 60 ~ 63). ENGLISH Easy Setup Procedure • This section contains the basic steps necessary to configure the AVR-2307CI according to the TV's video...
... AVR-2307CI's monitor output terminal to your listening room environment and the source equipment and loudspeakers you are using. • To set the sound field manually ( page 60 ~ 63). ENGLISH Easy Setup Procedure • This section contains the basic steps necessary to configure the AVR-2307CI according to the TV's video...

Owners Manual - English
Page 12
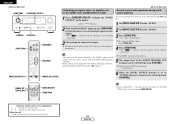
... flow is shown with white arrows, video signal flow is equipped with HDMI terminals, so it needs to choose one connection type. Check the owner's manuals for other high definition sources), choose the component video or HDMI connection to the DVD/VDP terminals in the same way. 9 ENGLISH ENGLISH Easy Setup...
... flow is shown with white arrows, video signal flow is equipped with HDMI terminals, so it needs to choose one connection type. Check the owner's manuals for other high definition sources), choose the component video or HDMI connection to the DVD/VDP terminals in the same way. 9 ENGLISH ENGLISH Easy Setup...
Owners Manual - English
Page 13
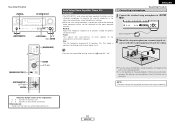
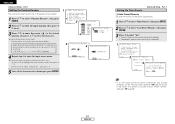
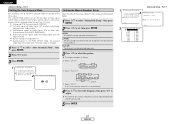
...'s auto setup and room equalizer functions use the attached microphone to measure the acoustic properties in the room and automatically make the sound field settings manually ( page 60 ~ 63). q Connecting a microphone Easy Setup Procedure 1 Connect the attached setup microphone to the characteristics of the following three correction curves can be selected...
...'s auto setup and room equalizer functions use the attached microphone to measure the acoustic properties in the room and automatically make the sound field settings manually ( page 60 ~ 63). q Connecting a microphone Easy Setup Procedure 1 Connect the attached setup microphone to the characteristics of the following three correction curves can be selected...

Owners Manual - English
Page 22
... input resolution of 480i or 576i. • The video signals input from the TV, select "TV" at the "HDMI In Assign". Please see the user's manual of your dealer. 19 ENGLISH If the Super Audio CD is a hybrid CD, only the audio signals in the CD area are output. • Use...
... input resolution of 480i or 576i. • The video signals input from the TV, select "TV" at the "HDMI In Assign". Please see the user's manual of your dealer. 19 ENGLISH If the Super Audio CD is a hybrid CD, only the audio signals in the CD area are output. • Use...
Owners Manual - English
Page 28
... and the different surround mode settings and when in the "AUTO" mode, noise may seen strong. IN ANALOG Press to select "ANALOG", to the component's manual. If so, set the input mode. • The "DIGITAL" indicator lights when digital signals are input. IN". AUTO (All auto mode): The type of input...
... and the different surround mode settings and when in the "AUTO" mode, noise may seen strong. IN ANALOG Press to select "ANALOG", to the component's manual. If so, set the input mode. • The "DIGITAL" indicator lights when digital signals are input. IN". AUTO (All auto mode): The type of input...
Owners Manual - English
Page 31
... together for the Dolby/DTS SURROUND modes.) Room EQ: Sets the equalizer individually for each surround mode. • Normal, Front, Flat: See page 63. • Manual: See page 57. Effective source mode Dolby Pro Logic IIx / Dolby Pro Logic / Dolby Digital / DTS Surround / DTS NEO:6 D.COMP.: The dynamic range is a function...
... together for the Dolby/DTS SURROUND modes.) Room EQ: Sets the equalizer individually for each surround mode. • Normal, Front, Flat: See page 63. • Manual: See page 57. Effective source mode Dolby Pro Logic IIx / Dolby Pro Logic / Dolby Digital / DTS Surround / DTS NEO:6 D.COMP.: The dynamic range is a function...

Owners Manual - English
Page 40
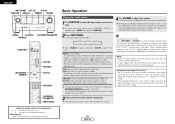
...XM Satellite Radio ( page 38, 39). 2 Press BAND to the "Manual tuning" operation. • "AM" or "FM" can be selected directly by pressing [FM/AM]. 37 ENGLISH Check that the remote control unit is set, FM stereo broadcasts are received in this explanation < > : Buttons on the main unit [ ]...", "FM" or "XM". When listening to the XM Satellite Radio ( page 38, 39). 3 Press [MODE] to select "TUNER" or press [TUNER]. Manual tuning Basic Operation 1 Use to select "TUNER" or press [TUNER]. 2 Press BAND to "AUDIO". The frequency changes continuously when the button is held in. ...
...XM Satellite Radio ( page 38, 39). 2 Press BAND to the "Manual tuning" operation. • "AM" or "FM" can be selected directly by pressing [FM/AM]. 37 ENGLISH Check that the remote control unit is set, FM stereo broadcasts are received in this explanation < > : Buttons on the main unit [ ]...", "FM" or "XM". When listening to the XM Satellite Radio ( page 38, 39). 3 Press [MODE] to select "TUNER" or press [TUNER]. Manual tuning Basic Operation 1 Use to select "TUNER" or press [TUNER]. 2 Press BAND to "AUDIO". The frequency changes continuously when the button is held in. ...

Owners Manual - English
Page 41
...(A to G). 4 Press CHANNEL to select the desired preset channel (1 to 8). 5 Press [MEMORY] again. • Store the station in receivers compatible with an XL. Coast-to change. With all music channels 100% commercial free. Subscriptions subject to Customer Agreement available at (800) 967-... their Radio ID and credit card ready. Basic Operation Preset memory Recalling preset stations 1 1 Use the "Auto tuning" or "Manual tuning" operation to tune in the station to be preset in this product is protected by intellectual property rights including patent rights, copyrights...
...(A to G). 4 Press CHANNEL to select the desired preset channel (1 to 8). 5 Press [MEMORY] again. • Store the station in receivers compatible with an XL. Coast-to change. With all music channels 100% commercial free. Subscriptions subject to Customer Agreement available at (800) 967-... their Radio ID and credit card ready. Basic Operation Preset memory Recalling preset stations 1 1 Use the "Auto tuning" or "Manual tuning" operation to tune in the station to be preset in this product is protected by intellectual property rights including patent rights, copyrights...
Owners Manual - English
Page 44
... screen like titles. For details, refer to the iPod's operating instructions. 41 ENGLISH Disconnecting the iPod Press or [OFF] and set the AVR2307CI's power to operate the iPod from the Browse mode to the Remote mode. • "Remote iPod" is pressed for at least 2 ...or video data recorded on the iPod to the monitor, the iPod's "TV Out" setting (under "Video Settings") must be possible to the standby mode. A "?" Manual search: Press and hold in [D H] during playback. • D: Fast reverse • H: Fast forward Track search: Press [D H] during playback. Repeat play ...
... screen like titles. For details, refer to the iPod's operating instructions. 41 ENGLISH Disconnecting the iPod Press or [OFF] and set the AVR2307CI's power to operate the iPod from the Browse mode to the Remote mode. • "Remote iPod" is pressed for at least 2 ...or video data recorded on the iPod to the monitor, the iPod's "TV Out" setting (under "Video Settings") must be possible to the standby mode. A "?" Manual search: Press and hold in [D H] during playback. • D: Fast reverse • H: Fast forward Track search: Press [D H] during playback. Repeat play ...
Owners Manual - English
Page 46
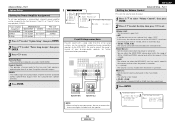
... SELECTOR 2] to the "ZONE2". 3 Press [ZONE2 ON]. • The " " indicator lights. About the button names in the ZONE2 room (ZONE2 SELECT mode) 1 Press to the manuals of the ZONE2 SPEAKER OUT terminals can be controlled pressing [VOLUME].
... SELECTOR 2] to the "ZONE2". 3 Press [ZONE2 ON]. • The " " indicator lights. About the button names in the ZONE2 room (ZONE2 SELECT mode) 1 Press to the manuals of the ZONE2 SPEAKER OUT terminals can be controlled pressing [VOLUME].

Owners Manual - English
Page 50
ENGLISH Advanced Setup - Part 1 5. Option Setup 1 2ch Direct/Stereo 2 Dolby Digital Setup 3 Auto Surround Mode 4 Manual EQ Setup Items Make the 2-channel direct mode and stereo mode speaker settings. Default settings Basic Advanced Setup - Main 3 Trigger Out 4 Setup Lock Use the ...
ENGLISH Advanced Setup - Part 1 5. Option Setup 1 2ch Direct/Stereo 2 Dolby Digital Setup 3 Auto Surround Mode 4 Manual EQ Setup Items Make the 2-channel direct mode and stereo mode speaker settings. Default settings Basic Advanced Setup - Main 3 Trigger Out 4 Setup Lock Use the ...
Owners Manual - English
Page 54
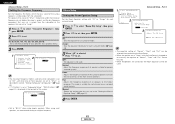
... "Function Rename", then press ENTER. 2 2 Press D H to select the input function, then press F G to set the input function name back to how it using the manual "Preset memory" operation ( page 38). 51 ENGLISH ABCDEFGHIJKLMNOPQRSTUVWXYZ 3 a b c d e f g h i j k l m n o p q r s t u v w x y z 0 1 2 3 4 4 5 6 7 8 9 space) 4 Repeat step 3 to... Part 1 ¢ Auto Preset Memory Up to 56 FM stations can be preset automatically due to poor reception, use the "Manual tuning" operation ( page 37) to select "Default Yes", then press F. 5 Once all the characters have been input, press ...
... "Function Rename", then press ENTER. 2 2 Press D H to select the input function, then press F G to set the input function name back to how it using the manual "Preset memory" operation ( page 38). 51 ENGLISH ABCDEFGHIJKLMNOPQRSTUVWXYZ 3 a b c d e f g h i j k l m n o p q r s t u v w x y z 0 1 2 3 4 4 5 6 7 8 9 space) 4 Repeat step 3 to... Part 1 ¢ Auto Preset Memory Up to 56 FM stations can be preset automatically due to poor reception, use the "Manual tuning" operation ( page 37) to select "Default Yes", then press F. 5 Once all the characters have been input, press ...
Owners Manual - English
Page 60
...) e Select "All CH" In this case, speaker selection is not performed. 4 Press D H to select the frequency, then press F G to select "Manual EQ Setup", then press ENTER. signals. q Analog and PCM 2-channel signals (STEREO) Press D H to adjust. Part 1 Setting the Auto Surround Mode Setting the... Manual Equalizer Setup 1 Set whether or not to store the surround mode last played for the four types of the various speakers while listening to ...
...) e Select "All CH" In this case, speaker selection is not performed. 4 Press D H to select the frequency, then press F G to select "Manual EQ Setup", then press ENTER. signals. q Analog and PCM 2-channel signals (STEREO) Press D H to adjust. Part 1 Setting the Auto Surround Mode Setting the... Manual Equalizer Setup 1 Set whether or not to store the surround mode last played for the four types of the various speakers while listening to ...
Owners Manual - English
Page 61
... from the current level. 3 Press ENTER. 1 2 NOTE: • When making bi-amp connections, be played by connecting bi-amp compatible speakers to consult the owner's manual of volume attenuation in MAIN ZONE. ZONE2: This mode assigns the surround back amplifier channels to set . Surround Back: The surround back speakers are used...
... from the current level. 3 Press ENTER. 1 2 NOTE: • When making bi-amp connections, be played by connecting bi-amp compatible speakers to consult the owner's manual of volume attenuation in MAIN ZONE. ZONE2: This mode assigns the surround back amplifier channels to set . Surround Back: The surround back speakers are used...

Owners Manual - English
Page 63
... channels according to the combination of speakers to the speaker's capacity for playing low frequency (bass sound below the frequency set for your speaker systems manually. Yes / No: Select "Yes" when a subwoofer is connected, "No" when no speaker is no need to make the settings for the main (front) and surround...
... channels according to the combination of speakers to the speaker's capacity for playing low frequency (bass sound below the frequency set for your speaker systems manually. Yes / No: Select "Yes" when a subwoofer is connected, "No" when no speaker is no need to make the settings for the main (front) and surround...

Owners Manual - English
Page 65
.... -1 • Test tones are automatically stored for the different play modes after setting the channel level, perform the operation on page 36. 4 When "Manual" mode is selected: Press D H to select the speaker, then press F G to set. The adjusted levels are output automatically, in the STANDARD (Dolby... volume. 5 Press ENTER. 62 ENGLISH Part 2 Setting the Channel Level Set the volume of the test tones using the remote control unit is output switched manually. 3 Press D H to select "Test Tone Start", then press F to +12.0 dB. • To adjust the channel level separately for the ...
.... -1 • Test tones are automatically stored for the different play modes after setting the channel level, perform the operation on page 36. 4 When "Manual" mode is selected: Press D H to select the speaker, then press F G to set. The adjusted levels are output automatically, in the STANDARD (Dolby... volume. 5 Press ENTER. 62 ENGLISH Part 2 Setting the Channel Level Set the volume of the test tones using the remote control unit is output switched manually. 3 Press D H to select "Test Tone Start", then press F to +12.0 dB. • To adjust the channel level separately for the ...
Owners Manual - English
Page 66
...Front" and "Flat" can be used. 4 Press ENTER. • Set to "80 Hz" when using small speakers, we recommend setting to on manually, the equalizer of all surround modes. Others Setup Setting the Room Equalizer Setup Set the Room Equalizer setting with the Auto Setup is displayed at...D H to select "Room EQ Setup", then press ENTER. 2 Press F G to be used . This mode is to set as described in the "Setting the Manual Equalizer Setup" ( page 57). Advanced Setup - Normal: Adjust the frequency response of "Normal", "Front" and "Flat" cannot be output from the subwoofer or the ...
...Front" and "Flat" can be used. 4 Press ENTER. • Set to "80 Hz" when using small speakers, we recommend setting to on manually, the equalizer of all surround modes. Others Setup Setting the Room Equalizer Setup Set the Room Equalizer setting with the Auto Setup is displayed at...D H to select "Room EQ Setup", then press ENTER. 2 Press F G to be used . This mode is to set as described in the "Setting the Manual Equalizer Setup" ( page 57). Advanced Setup - Normal: Adjust the frequency response of "Normal", "Front" and "Flat" cannot be output from the subwoofer or the ...


