
Owners Manual - English
Page 4
ENGLISH Thank you review the contents of the remote control unit 3 Part names and functions Front panel 4 Display 4 Rear panel 5 Remote control unit 5, 6 Easy Setup Procedure Easy to setup flow 7...30 Selecting the NEURAL SURROUND mode 30 Checking the input signals 30 Surround modes and parameters 31 ~ 33 Using the DENON original surround modes Types of your favorite music sources. As this manual before you begin hookup and operation that you... a program source to music 41 Viewing still pictures and videos (only for choosing the DENON AVR-2307CI AV Surround Receiver.
ENGLISH Thank you review the contents of the remote control unit 3 Part names and functions Front panel 4 Display 4 Rear panel 5 Remote control unit 5, 6 Easy Setup Procedure Easy to setup flow 7...30 Selecting the NEURAL SURROUND mode 30 Checking the input signals 30 Surround modes and parameters 31 ~ 33 Using the DENON original surround modes Types of your favorite music sources. As this manual before you begin hookup and operation that you... a program source to music 41 Viewing still pictures and videos (only for choosing the DENON AVR-2307CI AV Surround Receiver.
Owners Manual - English
Page 25
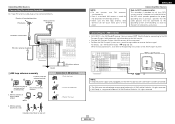
... registered trademark of XM Satellite Radio Inc. When making connections, also refer to the operating instructions of AM antennas 1. With the antenna attached to receive the best signal. All rights reserved. 22 ENGLISH MX Remove the vinyl tie and take out the connection line. 4 a. Return the lever.... disconnect the AM loop antenna. • Make sure the AM loop antenna lead terminals do not touch metal parts of the panel. Connecting the XM terminal • AVR-2307CI is provided to call the CATV system installer's attention to Article 820-40 of the NEC which provides guidelines...
... registered trademark of XM Satellite Radio Inc. When making connections, also refer to the operating instructions of AM antennas 1. With the antenna attached to receive the best signal. All rights reserved. 22 ENGLISH MX Remove the vinyl tie and take out the connection line. 4 a. Return the lever.... disconnect the AM loop antenna. • Make sure the AM loop antenna lead terminals do not touch metal parts of the panel. Connecting the XM terminal • AVR-2307CI is provided to call the CATV system installer's attention to Article 820-40 of the NEC which provides guidelines...

Owners Manual - English
Page 48
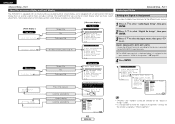
...Surround Back R Subwoofer 0 dB 0 dB 0 dB 0 dB 0 dB 0 dB 80 Hz Page 60 61 61 62 63 45 ENGLISH ENGLISH Advanced Setup - Part 1 System setup items and default values 1. Speaker Setup 1 Speaker Configuration 2 Subwoofer Setup 3 Distance 4 Channel Level 5 Crossover Frequency Items Automatically set the output component...your room to the listening position. Small Yes Small Surround Back Sp. Auto Setup/Room EQ Items 1 Auto Setup The AVR-2307CI performs an analysis of the speaker system and measures the acoustic characteristics of the various speakers is in the case ...
...Surround Back R Subwoofer 0 dB 0 dB 0 dB 0 dB 0 dB 0 dB 80 Hz Page 60 61 61 62 63 45 ENGLISH ENGLISH Advanced Setup - Part 1 System setup items and default values 1. Speaker Setup 1 Speaker Configuration 2 Subwoofer Setup 3 Distance 4 Channel Level 5 Crossover Frequency Items Automatically set the output component...your room to the listening position. Small Yes Small Surround Back Sp. Auto Setup/Room EQ Items 1 Auto Setup The AVR-2307CI performs an analysis of the speaker system and measures the acoustic characteristics of the various speakers is in the case ...

Owners Manual - English
Page 49
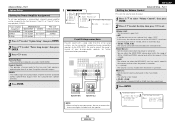
... ENGLISH 1 Digital In Assignment EXT. Part 1 Items This assigns the digital input terminals for the different input sources. Preset Skip All preset channels = ON 52 The preset channels can be preset ... 51 E1 ~ E8 90.1 MHz 6 Tuner Presets F1 ~ F8 90.1 MHz G1 ~ G8 90.1 MHz Preset channels that was input to display the on the AVR-2307CI and play them. Select the HDMI audio signal playback method. When this function is corrected individually for iPod's (ASD-1R, sold separately) audio and...
... ENGLISH 1 Digital In Assignment EXT. Part 1 Items This assigns the digital input terminals for the different input sources. Preset Skip All preset channels = ON 52 The preset channels can be preset ... 51 E1 ~ E8 90.1 MHz 6 Tuner Presets F1 ~ F8 90.1 MHz G1 ~ G8 90.1 MHz Preset channels that was input to display the on the AVR-2307CI and play them. Select the HDMI audio signal playback method. When this function is corrected individually for iPod's (ASD-1R, sold separately) audio and...

Owners Manual - English
Page 50
... mode speaker settings. AUX ON ON Page 58 58 59 59 47 ENGLISH Adjust the tone of the AVR-2307CI's two trigger out jacks in association with the various input sources and surround modes. Part 1 Page 56 OFF 56 Auto Surround Mode = ON 57 All Channels and Frequency = 0 dB 57 1...2 Volume Control This sets the volume level of output. Set whether or not to the front channel ("Front A" or "Front B") for the input signal. Part 1 5. Turn the audio compression on or off when down-mixing Dolby Digital signals. TUNER OFF TUNER ON PHONO OFF PHONO ON Default settings S.
... mode speaker settings. AUX ON ON Page 58 58 59 59 47 ENGLISH Adjust the tone of the AVR-2307CI's two trigger out jacks in association with the various input sources and surround modes. Part 1 Page 56 OFF 56 Auto Surround Mode = ON 57 All Channels and Frequency = 0 dB 57 1...2 Volume Control This sets the volume level of output. Set whether or not to the front channel ("Front A" or "Front B") for the input signal. Part 1 5. Turn the audio compression on or off when down-mixing Dolby Digital signals. TUNER OFF TUNER ON PHONO OFF PHONO ON Default settings S.
Owners Manual - English
Page 52
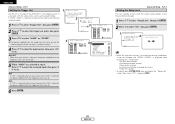
... press ENTER. COAX1, COAX2, OPT1, OPT2, OPT3, OPT4: Assign the different terminals according to the devices connected to set. Main menu Screen title No. Part 1 Advanced Setup - Auto Set/RoomEQ Speaker Setup Sub-menu title To select a menu, press D or H. 3 Press D H to select the input ...Sub-menu title 2 3 *Auto Setup S t a r t *Digital In CD : COAX1 Press F to make system adjustments. Part 1 About the on screen display and front display Audio Input Setup The AVR-2307CI is equipped with an intuitive and easy-to-understand on screen display, and is equipped with an alphanumeric...
... press ENTER. COAX1, COAX2, OPT1, OPT2, OPT3, OPT4: Assign the different terminals according to the devices connected to set. Main menu Screen title No. Part 1 Advanced Setup - Auto Set/RoomEQ Speaker Setup Sub-menu title To select a menu, press D or H. 3 Press D H to select the input ...Sub-menu title 2 3 *Auto Setup S t a r t *Digital In CD : COAX1 Press F to make system adjustments. Part 1 About the on screen display and front display Audio Input Setup The AVR-2307CI is equipped with an intuitive and easy-to-understand on screen display, and is equipped with an alphanumeric...

Owners Manual - English
Page 53
...set. 2 Press F G to set . 3 Press ENTER. 1 2 OFF: This is possible to the EXT. It is selected) 50 ENGLISH DVD/VDP, TV/DBS, VCR-1, VCR-2, V. Part 1 Setting the EXT. IN subwoofer terminal. 1 Press D H to connect with the audio and video input terminals of the analog signal that the playback levels for... iPod's (ASD-1R, sold separately) audio and/or video signals to any input terminals on the AVR-2307CI and play them. 1 Press D H to set . 2 Press D H to select the input source, then press F G to select "iPod Assign", then press ...
...set. 2 Press F G to set . 3 Press ENTER. 1 2 OFF: This is possible to the EXT. It is selected) 50 ENGLISH DVD/VDP, TV/DBS, VCR-1, VCR-2, V. Part 1 Setting the EXT. IN subwoofer terminal. 1 Press D H to connect with the audio and video input terminals of the analog signal that the playback levels for... iPod's (ASD-1R, sold separately) audio and/or video signals to any input terminals on the AVR-2307CI and play them. 1 Press D H to set . 2 Press D H to select the input source, then press F G to select "iPod Assign", then press ...

Owners Manual - English
Page 56
...the TV. • With HDMI, the video and audio signals are transferred simultaneously. EXT. When HDMI is made for the different input sources. Part 1 Video Setup Setting the HDMI In Assignment 1 2 The HDMI input terminals are assigned for input sources to which a digital audio input (COAXIAL ... If no HDMI audio signal, the signal automatically switches to the input from the analog and digital terminals are output to the monitor from the AVR-2307CI. • Audio signals input from the set to make the "HDMI In Assignment" settings for the function assigned at "iPod Assignment"....
...the TV. • With HDMI, the video and audio signals are transferred simultaneously. EXT. When HDMI is made for the different input sources. Part 1 Video Setup Setting the HDMI In Assignment 1 2 The HDMI input terminals are assigned for input sources to which a digital audio input (COAXIAL ... If no HDMI audio signal, the signal automatically switches to the input from the analog and digital terminals are output to the monitor from the AVR-2307CI. • Audio signals input from the set to make the "HDMI In Assignment" settings for the function assigned at "iPod Assignment"....

Owners Manual - English
Page 57
... signals to "ON" (default). 54 ENGLISH When the HDMI terminals are connected, the black may seem to stand out, depending on screen display signals of AVR-2307CI are output with a digital RGB video range (data range) of 16 (black) to use it. 3 Press ENTER. 1 2 • If the resolution of... conversion mode to HDMI Convert" is required in RGB format, regardless of the input component video signal is something other source is not possible. Part 1 Setting the Video Convert This sets whether or not to use the component video output terminal, connect the player to the S-Video or video...
... signals to "ON" (default). 54 ENGLISH When the HDMI terminals are connected, the black may seem to stand out, depending on screen display signals of AVR-2307CI are output with a digital RGB video range (data range) of 16 (black) to use it. 3 Press ENTER. 1 2 • If the resolution of... conversion mode to HDMI Convert" is required in RGB format, regardless of the input component video signal is something other source is not possible. Part 1 Setting the Video Convert This sets whether or not to use the component video output terminal, connect the player to the S-Video or video...
Owners Manual - English
Page 61
... Bi-Amp connections Dynamic sound with a range wider than that of -70 to +18 dB). • LAST: The volume set when the AVR-2307CI was last used in MAIN ZONE. Part 1 1 Press D H to select "Volume Control", then press ENTER. 2 Press D H to select the item, then press F G to ...limit, select "OFF". Speaker [R] Speaker [L] ENGLISH Setting the Volume Control This sets the volume level of +18 dB, which is turned on . Part 1 Option Setup Setting the Power Amplifier Assignment To suit your bi-amp-capable speakers for the two main front speakers, replicating the front A or front...
... Bi-Amp connections Dynamic sound with a range wider than that of -70 to +18 dB). • LAST: The volume set when the AVR-2307CI was last used in MAIN ZONE. Part 1 1 Press D H to select "Volume Control", then press ENTER. 2 Press D H to select the item, then press F G to ...limit, select "OFF". Speaker [R] Speaker [L] ENGLISH Setting the Volume Control This sets the volume level of +18 dB, which is turned on . Part 1 Option Setup Setting the Power Amplifier Assignment To suit your bi-amp-capable speakers for the two main front speakers, replicating the front A or front...
Owners Manual - English
Page 62
... is selected, the power supplied from the trigger out jack turns off. 6 Press ENTER. 59 ENGLISH Advanced Setup - Part 1 Setting the Trigger Out 1 Use the DC 12 V output of the AVR-2307CI's two trigger out jacks in association with the various input sources and surround modes. OFF: If "OFF" is ...to "ON" is selected, the power supplied from the trigger out jack turns on. ON, OFF: When that they cannot be changed, and "SETUP LOCKED!" Part 1 Setting the Setup Lock This sets whether or not to lock the system setup settings so that input source is selected, the power supplied from...
... is selected, the power supplied from the trigger out jack turns off. 6 Press ENTER. 59 ENGLISH Advanced Setup - Part 1 Setting the Trigger Out 1 Use the DC 12 V output of the AVR-2307CI's two trigger out jacks in association with the various input sources and surround modes. OFF: If "OFF" is ...to "ON" is selected, the power supplied from the trigger out jack turns on. ON, OFF: When that they cannot be changed, and "SETUP LOCKED!" Part 1 Setting the Setup Lock This sets whether or not to lock the system setup settings so that input source is selected, the power supplied from...


