Auto Setup Room EQ Features
Page 1
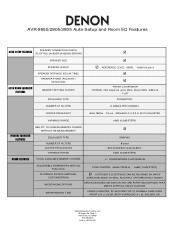
...MANUAL EQUALIZER FEATURES OTHER FEATURES ABILITY TO CHANGE MEMORY CURVES WITHOUT RE-MEASUREMENT EQUALIZER TYPE NUMBER OF FILTERS CENTER FREQUENCIES VARIABLE RANGE TOTAL AVAILABLE MEMORY CURVES þ GRAPHIC 8 band 63/125/250/500/1k/2k/4k/8kHz ±6dB (0.5dB/STEPS) 4 - Pine Brook, NJ. 07058 973-396-0810 www.usa.denon.com AVR-985S...; þ þ REFERENCE LEVEL - 65SPL : -10dB Vol point þ þ - FRONT/NORMAL/FLAT/MANUAL ADJUSTABLE PARAMETERS WITH EQ FUNCTION PLAYBACK SOURCE MATERIAL CUSTOMIZATION MICROPHONE OPTIONS MEASUREMENT TIME TONE CONTROL (BASS/TREBLE) - ±6dB...
...MANUAL EQUALIZER FEATURES OTHER FEATURES ABILITY TO CHANGE MEMORY CURVES WITHOUT RE-MEASUREMENT EQUALIZER TYPE NUMBER OF FILTERS CENTER FREQUENCIES VARIABLE RANGE TOTAL AVAILABLE MEMORY CURVES þ GRAPHIC 8 band 63/125/250/500/1k/2k/4k/8kHz ±6dB (0.5dB/STEPS) 4 - Pine Brook, NJ. 07058 973-396-0810 www.usa.denon.com AVR-985S...; þ þ REFERENCE LEVEL - 65SPL : -10dB Vol point þ þ - FRONT/NORMAL/FLAT/MANUAL ADJUSTABLE PARAMETERS WITH EQ FUNCTION PLAYBACK SOURCE MATERIAL CUSTOMIZATION MICROPHONE OPTIONS MEASUREMENT TIME TONE CONTROL (BASS/TREBLE) - ±6dB...

IR Codes
Page 3
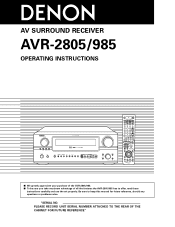
Data (C6~C11) Key Name No. DENON AVR2805 RC CODE FORMAT SHARP DATA CONSTRUCTION 15bits C14 0 C15 0=NOT INVERTED,1=INVERTED SYSTEM ADDRESS(C1~C5 EXTENSION BIT (C12,C13) : 10 No. ... 12 TUNER MEMORY 28 13 TUNER SHIFT 29 14 30 15 31 Key Name TUNER PRESET DOWN TUNER PRESET UP TUNER BAND TUNING MODE(AUTO/MANUAL) TUNER TUNING UP TUNER TUNING DOWN DIMMER Data (C6~C11) Key Name No.
Data (C6~C11) Key Name No. DENON AVR2805 RC CODE FORMAT SHARP DATA CONSTRUCTION 15bits C14 0 C15 0=NOT INVERTED,1=INVERTED SYSTEM ADDRESS(C1~C5 EXTENSION BIT (C12,C13) : 10 No. ... 12 TUNER MEMORY 28 13 TUNER SHIFT 29 14 30 15 31 Key Name TUNER PRESET DOWN TUNER PRESET UP TUNER BAND TUNING MODE(AUTO/MANUAL) TUNER TUNING UP TUNER TUNING DOWN DIMMER Data (C6~C11) Key Name No.
Owners Manual
Page 1
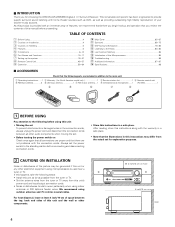
IN MASTER VOLUME 2 We greatly appreciate your purchase of the AVR-2805/985. 2 To be sure you take maximum advantage of all the features the AVR-2805/985 has to keep this manual for future reference, should any questions or problems arise. "SERIAL NO. PLEASE RECORD UNIT SERIAL NUMBER ATTACHED TO THE REAR OF THE CABINET FOR FUTURE REFERENCE" AV SURROUND RECEIVER AVR-2805/985 OPERATING INSTRUCTIONS FUNCTION SOURCE TUNING PRESET ZONE 2 / REC SELECT VIDEO SELECT ON / STANDBY MODE ANALOG EXT. Be sure to offer, read these instructions carefully and use the set properly.
IN MASTER VOLUME 2 We greatly appreciate your purchase of the AVR-2805/985. 2 To be sure you take maximum advantage of all the features the AVR-2805/985 has to keep this manual for future reference, should any questions or problems arise. "SERIAL NO. PLEASE RECORD UNIT SERIAL NUMBER ATTACHED TO THE REAR OF THE CABINET FOR FUTURE REFERENCE" AV SURROUND RECEIVER AVR-2805/985 OPERATING INSTRUCTIONS FUNCTION SOURCE TUNING PRESET ZONE 2 / REC SELECT VIDEO SELECT ON / STANDBY MODE ANALOG EXT. Be sure to offer, read these instructions carefully and use the set properly.
Owners Manual
Page 4
... or TV. • Set the antenna wires from the tuner or TV away from the actual set for choosing the DENON AVR-2805/985 Digital A / V Surround Receiver. This remarkable component has been engineered to the standby position before proceeding. Always set the power switch to provide superb surround... in the connection cords, always unplug the power cord and disconnect the connection cords between the top, back and sides of this manual before connecting and disconnecting connection cords. • Store this instructions in this instructions may be generated if this unit or any other...
... or TV. • Set the antenna wires from the tuner or TV away from the actual set for choosing the DENON AVR-2805/985 Digital A / V Surround Receiver. This remarkable component has been engineered to the standby position before proceeding. Always set the power switch to provide superb surround... in the connection cords, always unplug the power cord and disconnect the connection cords between the top, back and sides of this manual before connecting and disconnecting connection cords. • Store this instructions in this instructions may be generated if this unit or any other...
Owners Manual
Page 18
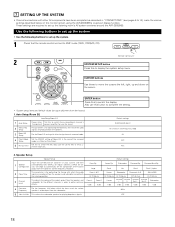
... to move the cursors the left, right, up the system. 1 Check that the remote control unit set up the listening room's AV system centered around the AVR-2805/985. Also use this to complete the setting. • System setup items and default values (set upon shipment from the speakers and subwoofer...Auto Setup/Room EQ Auto Setup/Room EQ 1 Auto Setup Power Amp Set this to switch the Mic Input jack for use for zone2. 2 Manual EQ Setup This parameter is for playing deep bass signals. Speaker Setup Speaker Setup Input the combination of the signals output from the factory) 1....
... to move the cursors the left, right, up the system. 1 Check that the remote control unit set up the listening room's AV system centered around the AVR-2805/985. Also use this to complete the setting. • System setup items and default values (set upon shipment from the speakers and subwoofer...Auto Setup/Room EQ Auto Setup/Room EQ 1 Auto Setup Power Amp Set this to switch the Mic Input jack for use for zone2. 2 Manual EQ Setup This parameter is for playing deep bass signals. Speaker Setup Speaker Setup Input the combination of the signals output from the factory) 1....
Owners Manual
Page 25
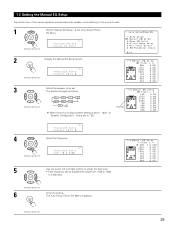
... 1spkr When the surround back speaker setting is set to "1spkr" at the Auto Setup / Room EQ Menu. (Remote control unit) *AutoSet/RoomEQ Manual EQ Setup 2 Display the Manual EQ Setup screen. (Remote control unit) *ManualEQ Setup Channel : FL 3 Select the speaker to be adjusted the range from -6dB to +6dB ...) *ManualEQ Setup 63Hz : 0.0dB 5 Use the cursor left and right buttons to adjust the Gain level. • Each frequency can be set. 1-2 Setting the Manual EQ Setup Adjust the tone of the various speakers except subwoofer speaker while listening to the sound (music). 1 Select...
... 1spkr When the surround back speaker setting is set to "1spkr" at the Auto Setup / Room EQ Menu. (Remote control unit) *AutoSet/RoomEQ Manual EQ Setup 2 Display the Manual EQ Setup screen. (Remote control unit) *ManualEQ Setup Channel : FL 3 Select the speaker to be adjusted the range from -6dB to +6dB ...) *ManualEQ Setup 63Hz : 0.0dB 5 Use the cursor left and right buttons to adjust the Gain level. • Each frequency can be set. 1-2 Setting the Manual EQ Setup Adjust the tone of the various speakers except subwoofer speaker while listening to the sound (music). 1 Select...
Owners Manual
Page 26
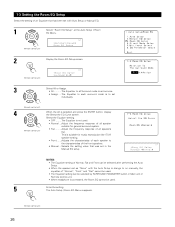
...Flat and Front can be used . • Normal ....Adjust the frequency response of the front speakers. • Manual ....Selects the setting value that has been set with Auto Setup or Manual EQ. 1 Select "Room EQ Setup" at the Auto Setup / Room EQ Menu. (Remote control unit) *...response of all speaker suitable for music reproduction like ITU-R speaker setting. • Front........Adjusts the characteristics of each surround mode is to on manually, the equalizer of "Normal", "Front" and "Flat" cannot be used. • The Equalizer setting can be selected by SURROUND PARAMETER ...
...Flat and Front can be used . • Normal ....Adjust the frequency response of the front speakers. • Manual ....Selects the setting value that has been set with Auto Setup or Manual EQ. 1 Select "Room EQ Setup" at the Auto Setup / Room EQ Menu. (Remote control unit) *...response of all speaker suitable for music reproduction like ITU-R speaker setting. • Front........Adjusts the characteristics of each surround mode is to on manually, the equalizer of "Normal", "Front" and "Flat" cannot be used. • The Equalizer setting can be selected by SURROUND PARAMETER ...

Owners Manual
Page 33
... back speaker setting is set to "1spkr" for "Speaker Configuration", this is set to the test tones produced automatically from each speaker. • Manual: Example: When the "Auto" mode is selected : q Select the speaker. (Remote control unit) w Adjust all the speakers to adjust the...Remote control unit) 6 a. TestTone Auto FL : -11.5dB b. Select "Auto" or "Manual". *Channel Level T.Tone: Auto (Remote control unit) • Auto: Adjust the level while listening to "SB". When the "Manual" mode is selected Select the speaker from each speaker in units of 0.5 dB. The test ...
... back speaker setting is set to "1spkr" for "Speaker Configuration", this is set to the test tones produced automatically from each speaker. • Manual: Example: When the "Auto" mode is selected : q Select the speaker. (Remote control unit) w Adjust all the speakers to adjust the...Remote control unit) 6 a. TestTone Auto FL : -11.5dB b. Select "Auto" or "Manual". *Channel Level T.Tone: Auto (Remote control unit) • Auto: Adjust the level while listening to "SB". When the "Manual" mode is selected Select the speaker from each speaker in units of 0.5 dB. The test ...
Owners Manual
Page 40
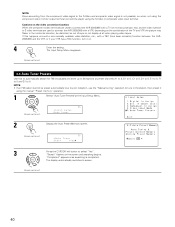
...in the horizontal direction, be distorted, be preset automatically due to poor reception, use the "Manual tuning" operation to tune in the station, then preset it on the screen and searching ...once searching is not possible, so when not using the component video monitor output terminal connect the player using the manual "Preset memory" operation. 1 Select "Auto Tuner Presets"at preset channels A1 to 8, B1 to 8, C1...function: When the component video terminals are used to connect the AVR-2805/985 with a TV (or monitor, projector, etc.) and the video (yellow) or S video terminals are used ...
...in the horizontal direction, be distorted, be preset automatically due to poor reception, use the "Manual tuning" operation to tune in the station, then preset it on the screen and searching ...once searching is not possible, so when not using the component video monitor output terminal connect the player using the manual "Preset memory" operation. 1 Select "Auto Tuner Presets"at preset channels A1 to 8, B1 to 8, C1...function: When the component video terminals are used to connect the AVR-2805/985 with a TV (or monitor, projector, etc.) and the video (yellow) or S video terminals are used ...

Owners Manual
Page 49
... recorder (MD), CD recorder (CDR) system buttons 6 : Rewind 7 : Fast forward 2 : Stop 1 : Forward play 3 : Pause 0 : Reverse play A/B : Switch between AUTO and MANUAL MEMORY : Preset memory SHIFT : Switch preset channel range CHANNEL +, - : Preset channel up/down The tuner can be possible to beginning of track) : Pause Default setting...sides A and B 4. The function will change one step in the amplifier (CD, CDR/MD, or TAPE) mode. 49 Operating DENON audio components 1 Use the mode selector buttons to select the component you want to the component's operating instructions.
... recorder (MD), CD recorder (CDR) system buttons 6 : Rewind 7 : Fast forward 2 : Stop 1 : Forward play 3 : Pause 0 : Reverse play A/B : Switch between AUTO and MANUAL MEMORY : Preset memory SHIFT : Switch preset channel range CHANNEL +, - : Preset channel up/down The tuner can be possible to beginning of track) : Pause Default setting...sides A and B 4. The function will change one step in the amplifier (CD, CDR/MD, or TAPE) mode. 49 Operating DENON audio components 1 Use the mode selector buttons to select the component you want to the component's operating instructions.

Owners Manual
Page 51
Digital video disc player (DVD, DVD SETUP) system buttons POWER : Power on /standby (ON/SOURCE) 6,7 : Manual search (forward and reverse) 2 : Stop 1 : Play 8,9 : Auto search (cue) 3 : Pause 0~9, +10 : 10 key 51 Some models cannot be operated ... control buttons, function names may differ according to the component's operating instructions. Video disc player (VDP) system buttons POWER : Power on /standby (ON/SOURCE) 6,7 : Manual search (forward and reverse) 2 : Stop 1 : Play 8,9 : Auto search (to beginning of the various components. 2 Operate the component. • For details, ...
Digital video disc player (DVD, DVD SETUP) system buttons POWER : Power on /standby (ON/SOURCE) 6,7 : Manual search (forward and reverse) 2 : Stop 1 : Play 8,9 : Auto search (cue) 3 : Pause 0~9, +10 : 10 key 51 Some models cannot be operated ... control buttons, function names may differ according to the component's operating instructions. Video disc player (VDP) system buttons POWER : Power on /standby (ON/SOURCE) 6,7 : Manual search (forward and reverse) 2 : Stop 1 : Play 8,9 : Auto search (to beginning of the various components. 2 Operate the component. • For details, ...

Owners Manual
Page 52
... DISPLAY : Switch display RETURN : Return NOTES: • For this CD, CDR, MD and TAPE components, buttons can be operated in the same way as for Denon audio components. • The television can be operated in the DVD/VDP, VCR and TV modes. 52 Monitor TV (TV), digital broadcast satellite (DBS) tuner...
... DISPLAY : Switch display RETURN : Return NOTES: • For this CD, CDR, MD and TAPE components, buttons can be operated in the same way as for Denon audio components. • The television can be operated in the DVD/VDP, VCR and TV modes. 52 Monitor TV (TV), digital broadcast satellite (DBS) tuner...
Owners Manual
Page 55
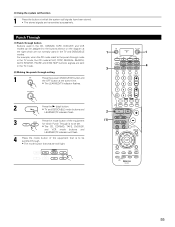
For example, when the CD mode is set to the punch through mode in the TV mode, the CD mode's PLAY, STOP, MANUAL SEARCH, AUTO SEARCH, PAUSE and DISC SKIP buttons' signals are sent in the TV mode. 4 3 (2) Making the punch through . • The mode button that was ...
For example, when the CD mode is set to the punch through mode in the TV mode, the CD mode's PLAY, STOP, MANUAL SEARCH, AUTO SEARCH, PAUSE and DISC SKIP buttons' signals are sent in the TV mode. 4 3 (2) Making the punch through . • The mode button that was ...
Owners Manual
Page 60
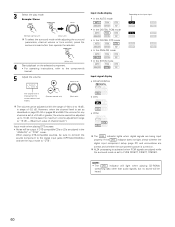
... (OPTICAL/COAXIAL) and set to PURE DIRECT, DIRECT, STEREO. When playing DTS-compatible sources, be adjusted within the range of -80 to 0 to the component's manual. 5 Adjust the volume. If the DIG. MASTER VOLUME • In the EXT.IN mode Input signal display • DOLBY DIGITAL The volume level is displayed...
... (OPTICAL/COAXIAL) and set to PURE DIRECT, DIRECT, STEREO. When playing DTS-compatible sources, be adjusted within the range of -80 to 0 to the component's manual. 5 Adjust the volume. If the DIG. MASTER VOLUME • In the EXT.IN mode Input signal display • DOLBY DIGITAL The volume level is displayed...

Owners Manual
Page 64
... as the position of the input selector and the surround parameter settings is performed, a description of that operation appears on the display connected to the manual of the component on the front panel display. ZONE 2 / REC SELECT (Main unit) 2 FUNCTION With "RECOUT SOURCE" displayed, turn the FUNCTION knob to select the...
... as the position of the input selector and the surround parameter settings is performed, a description of that operation appears on the display connected to the manual of the component on the front panel display. ZONE 2 / REC SELECT (Main unit) 2 FUNCTION With "RECOUT SOURCE" displayed, turn the FUNCTION knob to select the...
Owners Manual
Page 67
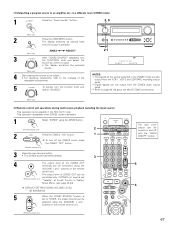
... to output. • The display switches the selected source. (Main unit) 4 Start playing the source to be output. • For operating instructions, refer to the manuals of the respective components. 5 FUNCTION To cancel, turn off with the "MAIN ON/OFF" button. 5 4 67 buttons on the remote control unit. buttons on the...
... to output. • The display switches the selected source. (Main unit) 4 Start playing the source to be output. • For operating instructions, refer to the manuals of the respective components. 5 FUNCTION To cancel, turn off with the "MAIN ON/OFF" button. 5 4 67 buttons on the remote control unit. buttons on the...

Owners Manual
Page 69
Fader function • This function makes it for example to the manuals of the front channels (FL, C and FR) or the rear channels (SL, SR, SBL and SBR) together. If the channel levels are adjusted separately after ...
Fader function • This function makes it for example to the manuals of the front channels (FL, C and FR) or the rear channels (SL, SR, SBL and SBR) together. If the channel levels are adjusted separately after ...

Owners Manual
Page 79
... the Room EQ and the tone control from the remote control unit. 1 Press the surround parameter button. Display the surround parameter screen. OFF Normal Front Manual Flat (Remote control unit) NOTES: • The equalizer setting of Normal, Flat, and Front can be selected after performing the Auto Setup. • When headphone...
... the Room EQ and the tone control from the remote control unit. 1 Press the surround parameter button. Display the surround parameter screen. OFF Normal Front Manual Flat (Remote control unit) NOTES: • The equalizer setting of Normal, Flat, and Front can be selected after performing the Auto Setup. • When headphone...
Owners Manual
Page 81
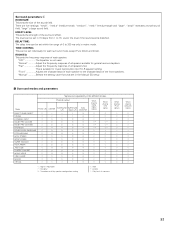
... of the sound field. The level can be set in 15 steps from 1 to 15. DELAY TIME: The delay time can be set in the Manual EQ setup 2 Surround modes and parameters Signals and adjustability in matrix mode. "OFF The Equalizer is suitable for 2 ch contents When playing PCM signals C C E C C C E...suitable for each surround mode except Pure Direct and Direct. "small" recreates a small sound field, "large" a large sound field. "Manual Selects the setting value that was set individually for general surround system. This is not used. There are five settings: "small", "...
... of the sound field. The level can be set in 15 steps from 1 to 15. DELAY TIME: The delay time can be set in the Manual EQ setup 2 Surround modes and parameters Signals and adjustability in matrix mode. "OFF The Equalizer is suitable for 2 ch contents When playing PCM signals C C E C C C E...suitable for each surround mode except Pure Direct and Direct. "small" recreates a small sound field, "large" a large sound field. "Manual Selects the setting value that was set individually for general surround system. This is not used. There are five settings: "small", "...
Owners Manual
Page 83
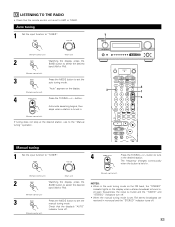
...Remote control unit) (Main unit) (Remote control unit) 2 Watching the display, press the BAND button to "TUNER". 4 FUNCTION Press the TUNING + or - Manual tuning 1 Set the input function to select the desired band (AM or FM). The frequency changes continuously when the button is set, FM stereo broadcasts... are 3 Press the MODE button to set to set the auto tuning mode. received in monaural and the "STEREO" indicator turns off . • When the manual tuning mode is held in . 13 LISTENING TO THE RADIO • Check that the display's "AUTO" ...
...Remote control unit) (Main unit) (Remote control unit) 2 Watching the display, press the BAND button to "TUNER". 4 FUNCTION Press the TUNING + or - Manual tuning 1 Set the input function to select the desired band (AM or FM). The frequency changes continuously when the button is set, FM stereo broadcasts... are 3 Press the MODE button to set to set the auto tuning mode. received in monaural and the "STEREO" indicator turns off . • When the manual tuning mode is held in . 13 LISTENING TO THE RADIO • Check that the display's "AUTO" ...


