Owners Manual
Page 6
...Stereo 101 Setting the Dolby Digital Setup 102 Setting the Auto Surround Mode 102 Setting the Manual EQ Setup 103, 104 Procedure for non-DENON microphone 123, 124 Check the parameter 124, 125 System setup items and default values 126~128 Troubleshooting 129, 130 Additional information 131~...display 88 Audio Input Setup Setting the Digital In Assignment 89 Setting the DENON LINK 90 Setting the EXT. Part 1 Navigating through 77 Setting the back light's lighting time 78 Setting the brightness 78 Resetting 78, 79 Multi zone music entertainment system 80 Multi-zone playback using ...
...Stereo 101 Setting the Dolby Digital Setup 102 Setting the Auto Surround Mode 102 Setting the Manual EQ Setup 103, 104 Procedure for non-DENON microphone 123, 124 Check the parameter 124, 125 System setup items and default values 126~128 Troubleshooting 129, 130 Additional information 131~...display 88 Audio Input Setup Setting the Digital In Assignment 89 Setting the DENON LINK 90 Setting the EXT. Part 1 Navigating through 77 Setting the back light's lighting time 78 Setting the brightness 78 Resetting 78, 79 Multi zone music entertainment system 80 Multi-zone playback using ...
Owners Manual
Page 25
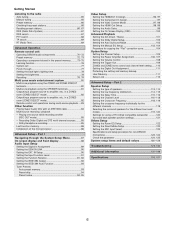
... check the contents. If multiple errors occur, press the CURSOR F or G button to check the contents. Be sure to turn off the AVR-4806's power before checking the speaker connections. w The speaker polarity is quieter. • Check the placement and orientation of the pertinent speakers. &#...8226; For some speakers, the screen below may be displayed even though the speakers are properly connected. Please check the following matters, reset the pertinent items, and measure again. r The sound level that the pertinent speakers are properly connected. • Check the polarity of...
... check the contents. If multiple errors occur, press the CURSOR F or G button to check the contents. Be sure to turn off the AVR-4806's power before checking the speaker connections. w The speaker polarity is quieter. • Check the placement and orientation of the pertinent speakers. &#...8226; For some speakers, the screen below may be displayed even though the speakers are properly connected. Please check the following matters, reset the pertinent items, and measure again. r The sound level that the pertinent speakers are properly connected. • Check the polarity of...

Owners Manual
Page 53
.... • When "Default" is selected and the CURSOR F button is displayed. Lights when the Surround Back CH is on. are automatically turned off, "LFE" is reset, and "TONE" is set to the "DOLBY DIGITAL + PLIIx CINEMA" mode. Basic Operation Dolby Digital mode and DTS Surround (only with digital input) 1 Press the...
.... • When "Default" is selected and the CURSOR F button is displayed. Lights when the Surround Back CH is on. are automatically turned off, "LFE" is reset, and "TONE" is set to the "DOLBY DIGITAL + PLIIx CINEMA" mode. Basic Operation Dolby Digital mode and DTS Surround (only with digital input) 1 Press the...

Owners Manual
Page 57
... and SB channels). • Music: This mode is optimum for playing movies. The front channel (FL and FR) signals bypass the decoder and are automatically reset to DTS surround. 2 Surround parameters t DTS NEO:6 Mode: • Cinema: This mode is suited mainly for playing music. When the input signal switches to a DTS...
... and SB channels). • Music: This mode is optimum for playing movies. The front channel (FL and FR) signals bypass the decoder and are automatically reset to DTS surround. 2 Surround parameters t DTS NEO:6 Mode: • Cinema: This mode is suited mainly for playing music. When the input signal switches to a DTS...

Owners Manual
Page 72
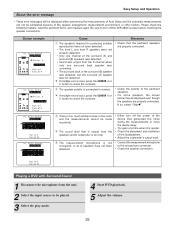
... control unit can be used to operate devices of different brands by registering the preset number corresponding to store your device. For instructions on resetting the preset memory ( page 78). 1 Press the ON and OFF button at the same time. 2 Press the 1 button to preset... the component you want to select preset memory. 2 Setup List 1 : Preset memory 2 : Learning setup 3 : System call 4 : Punch through 5 : Light setup 6 : Reset 3 Press the MODE SELECTOR button for the AMP, ZONE2, ZONE3, ZONE4, TUNER and D-TUNER modes. 72 Tuner system buttons OFF ON MODE SELECTOR NUMBER ENTER...
... control unit can be used to operate devices of different brands by registering the preset number corresponding to store your device. For instructions on resetting the preset memory ( page 78). 1 Press the ON and OFF button at the same time. 2 Press the 1 button to preset... the component you want to select preset memory. 2 Setup List 1 : Preset memory 2 : Learning setup 3 : System call 4 : Punch through 5 : Light setup 6 : Reset 3 Press the MODE SELECTOR button for the AMP, ZONE2, ZONE3, ZONE4, TUNER and D-TUNER modes. 72 Tuner system buttons OFF ON MODE SELECTOR NUMBER ENTER...

Owners Manual
Page 73
... the mode is displayed when the signals are as follows upon shipment from the factory and after resetting: • TV, VCR1 HITACHI • CD, CDR, VDP, DVD, DVDR DENON • VCR2, DBS SONY DVD preset codes DENON Model No. 0000 (default) DVD-555 DVD-755 DVD-900 DVD-910 DVD-955 DVD-1000...
... the mode is displayed when the signals are as follows upon shipment from the factory and after resetting: • TV, VCR1 HITACHI • CD, CDR, VDP, DVD, DVDR DENON • VCR2, DBS SONY DVD preset codes DENON Model No. 0000 (default) DVD-555 DVD-755 DVD-900 DVD-910 DVD-955 DVD-1000...

Owners Manual
Page 78
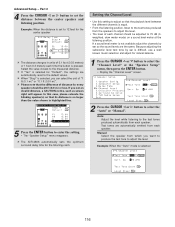
...MODE SELECTOR buttons will all light. 4 Press the MODE SELECTOR button you want to resetting, then press the ENTER button. • The set returns to the normal operating mode. 2 Resetting the learned buttons 1 Press the ON and OFF button at the same time. 2... Press the 6 button to select resetting. 3 Press the 1 button to resetting the preset memory. 2 Resetting List 1 : Resetting the preset memory 2 : Resetting the "Learned" buttons 3 : Resetting the system call 4 : Resetting the punch through setting +10 : All reset function (factory default) • The MODE SELECTOR buttons...
...MODE SELECTOR buttons will all light. 4 Press the MODE SELECTOR button you want to resetting, then press the ENTER button. • The set returns to the normal operating mode. 2 Resetting the learned buttons 1 Press the ON and OFF button at the same time. 2... Press the 6 button to select resetting. 3 Press the 1 button to resetting the preset memory. 2 Resetting List 1 : Resetting the preset memory 2 : Resetting the "Learned" buttons 3 : Resetting the system call 4 : Resetting the punch through setting +10 : All reset function (factory default) • The MODE SELECTOR buttons...

Owners Manual
Page 79
.... • All buttons of system call will light. 4 Press the MODE SELECTOR button you want to resetting, then press the ENTER button. • The set returns to the normal operating mode. 2 Resetting the punch through setting 1 Press the ON and OFF button at the same time. 2 Press the 6... the entire system memory, which will take approximately 20 seconds. Only use this if you want to resetting, then press the ENTER button. • The set returns to the normal operating mode. 2 All reset function Advanced Operation 1 Press the ON and OFF button at the same time. 2 Press the ...
.... • All buttons of system call will light. 4 Press the MODE SELECTOR button you want to resetting, then press the ENTER button. • The set returns to the normal operating mode. 2 Resetting the punch through setting 1 Press the ON and OFF button at the same time. 2 Press the 6... the entire system memory, which will take approximately 20 seconds. Only use this if you want to resetting, then press the ENTER button. • The set returns to the normal operating mode. 2 All reset function Advanced Operation 1 Press the ON and OFF button at the same time. 2 Press the ...

Owners Manual
Page 86
... of the Microprocesssor • In very rare instances, the AVR-4806 internal microprocessor might be caused due to an AC line surge...are sure that the microprocessor requires re-initialization. 1 Switch off . This function eliminates the need to perform complicated resetting when the power is switched on . 3 Check that the entire display is also equipped with an interval of... does not work, start over from step 1. • If the microprocessor has been reset, all custom memories and settings erased, and the original factory default settings restored. Only use this procedure if you...
... of the Microprocesssor • In very rare instances, the AVR-4806 internal microprocessor might be caused due to an AC line surge...are sure that the microprocessor requires re-initialization. 1 Switch off . This function eliminates the need to perform complicated resetting when the power is switched on . 3 Check that the entire display is also equipped with an interval of... does not work, start over from step 1. • If the microprocessor has been reset, all custom memories and settings erased, and the original factory default settings restored. Only use this procedure if you...

Owners Manual
Page 89
The HDMI input terminal is displayed when it is selected, the setting for "Default", the settings are automatically reset to the default values. 4 Press the ENTER button to enter the setting. • The "Audio Input Setup" menu reappears. • The OPTICAL 2, 3 and ... for digital recording between a digital audio source (stereo - 2 channel) and a digital audio recorder. • "PHONO" and "TUNER" cannot be selected on the AVR-4806's rear panel are equipped with an IEEE1394 cable at "HDMI/DVI In Assign" ( page 96, 97). Advanced Setup - If the same digital input terminal is...
The HDMI input terminal is displayed when it is selected, the setting for "Default", the settings are automatically reset to the default values. 4 Press the ENTER button to enter the setting. • The "Audio Input Setup" menu reappears. • The OPTICAL 2, 3 and ... for digital recording between a digital audio source (stereo - 2 channel) and a digital audio recorder. • "PHONO" and "TUNER" cannot be selected on the AVR-4806's rear panel are equipped with an IEEE1394 cable at "HDMI/DVI In Assign" ( page 96, 97). Advanced Setup - If the same digital input terminal is...

Owners Manual
Page 91
... D or H button to select the input source, then press the CURSOR F or G button to select that the playback levels for the different sources are automatically reset to the default values. 3 Press the ENTER button to enter the setting. • The "Audio Input Setup" menu reappears. 2 Press the CURSOR D or H button to...
... D or H button to select the input source, then press the CURSOR F or G button to select that the playback levels for the different sources are automatically reset to the default values. 3 Press the ENTER button to enter the setting. • The "Audio Input Setup" menu reappears. 2 Press the CURSOR D or H button to...

Owners Manual
Page 92
...to be acquired from the connected IEEE1394 device, "UNKNOWN" is displayed. • If an IEEE1394 device other than one for "Default", the setting are automatically reset to select the "IEEE1394 Assign" at the "Audio Input Setup" menu, then press the ENTER button. • Display the "IEEE1394 Assign" screen. 5 ... wish to set the input source back to an input source, the IEEE1394 input can be turned on ahead of the connected device or the AVR-4806 is selected for IEEE1394 audio playback is connected, "Not Play" is as it was initially, press the CURSOR H button with the input source...
...to be acquired from the connected IEEE1394 device, "UNKNOWN" is displayed. • If an IEEE1394 device other than one for "Default", the setting are automatically reset to select the "IEEE1394 Assign" at the "Audio Input Setup" menu, then press the ENTER button. • Display the "IEEE1394 Assign" screen. 5 ... wish to set the input source back to an input source, the IEEE1394 input can be turned on ahead of the connected device or the AVR-4806 is selected for IEEE1394 audio playback is connected, "Not Play" is as it was initially, press the CURSOR H button with the input source...

Owners Manual
Page 95
... to as well. 6 When the CURSOR H button is pressed at the very bottom of the screen. • The screen for "Default", the setting are automatically reset to the default name. Use the same procedure to change other input source names as it was initially, press the CURSOR H button with the preset...
... to as well. 6 When the CURSOR H button is pressed at the very bottom of the screen. • The screen for "Default", the setting are automatically reset to the default name. Use the same procedure to change other input source names as it was initially, press the CURSOR H button with the preset...

Owners Manual
Page 97
...to enter the setting. • The "Video Setup" menu reappears. AUTO: When there are multiple input signals, the input signals are reset to the default values. 3 Press the ENTER button to HDMI. No image is output from the composite and component monitor output terminal. 97...input (DENON LINK, IEEE1394 etc.) is previously assigned, the digital audio assignment is set for the input source that was previously assigned switches to select the component video input terminal. Setting the Component In Assign • This setting assigns the component video input terminal of the AVR-4806 for...
...to enter the setting. • The "Video Setup" menu reappears. AUTO: When there are multiple input signals, the input signals are reset to the default values. 3 Press the ENTER button to HDMI. No image is output from the composite and component monitor output terminal. 97...input (DENON LINK, IEEE1394 etc.) is previously assigned, the digital audio assignment is set for the input source that was previously assigned switches to select the component video input terminal. Setting the Component In Assign • This setting assigns the component video input terminal of the AVR-4806 for...

Owners Manual
Page 109
..., then press the ENTER button. • Display the "Trigger Out" screen. Use the same procedure to make the settings for "Default", the setting are automatically reset to the default values. 109 OFF: When that surround mode is selected when an input source set to "ON" is selected, the power supplied from...
..., then press the ENTER button. • Display the "Trigger Out" screen. Use the same procedure to make the settings for "Default", the setting are automatically reset to the default values. 109 OFF: When that surround mode is selected when an input source set to "ON" is selected, the power supplied from...
Owners Manual
Page 116
...Auto: Adjust the level while listening to the default values. Because adjusting the subwoofer level test tone by ear so the sound levels are automatically reset to the test tones produced automatically from each speaker. Example: When the "Auto" mode is no larger than the value shown in highlighted ... adjust the channels by ear is difficult, use a well known music selection and adjust for the listening room. Advanced Setup - The AVR-4806 automatically sets the optimum surround delay time for natural balance. 1 Press the CURSOR D or H button to the measured distance.
...Auto: Adjust the level while listening to the default values. Because adjusting the subwoofer level test tone by ear so the sound levels are automatically reset to the test tones produced automatically from each speaker. Example: When the "Auto" mode is no larger than the value shown in highlighted ... adjust the channels by ear is difficult, use a well known music selection and adjust for the listening room. Advanced Setup - The AVR-4806 automatically sets the optimum surround delay time for natural balance. 1 Press the CURSOR D or H button to the measured distance.

Owners Manual
Page 125
... H button to select the "Restore Yes 0", then press the CURSOR F button. The display is only an approximate picture of the "Auto Setup" procedure can be reset even if the settings have been changed after performing the "Auto Setup" procedure: Press the CURSOR D or H button to select the "Exit", then press the...
... H button to select the "Restore Yes 0", then press the CURSOR F button. The display is only an approximate picture of the "Auto Setup" procedure can be reset even if the settings have been changed after performing the "Auto Setup" procedure: Press the CURSOR D or H button to select the "Exit", then press the...


