HDMI Specifications Guide
Page 1
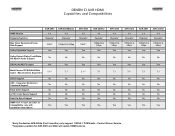
...) only support 1080i/5.1 PCM Audio - Max Channels Supported 5.1** 7.1 5.1** SACD Support No No No CEC - DENON CI AVR HDMI Capabilites and Compatibilities HDMI Version Repeater/Switcher Max Video Resolution/Frame Rate Support Dolby Digital/dts Support AVR-5805 1.1 Repeater AVR-5805Mk2/CI 1.1 Repeater AVR-4806 1.1 Repeater 1080i** 1080p/24 & 60fps 1080i** Yes Yes Yes Dolby Digital+/Dolby TrueHD/dtsHD...
...) only support 1080i/5.1 PCM Audio - Max Channels Supported 5.1** 7.1 5.1** SACD Support No No No CEC - DENON CI AVR HDMI Capabilites and Compatibilities HDMI Version Repeater/Switcher Max Video Resolution/Frame Rate Support Dolby Digital/dts Support AVR-5805 1.1 Repeater AVR-5805Mk2/CI 1.1 Repeater AVR-4806 1.1 Repeater 1080i** 1080p/24 & 60fps 1080i** Yes Yes Yes Dolby Digital+/Dolby TrueHD/dtsHD...
Literature/Product Sheet
Page 1
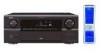
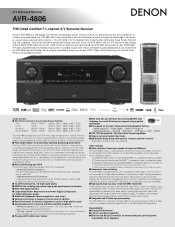
... playback. A/V Surround Receiver AVR-4806 THX Ultra2 Certified 7.1-channel A/V Surround Receiver Denon's AVR-4806 has technology, the reference sound quality and an extensive feature set, that previously was only available on one HDMI cable. Digital is switched. Down-conversion from Denon to be changed each... I Analog EXT IN terminal I 3 Source and Zone Capability I Component video switching The AVR-4806 is the first A/V receiver to offer Analog Video to digital HDMI output conversion, which high-performance ICs are endowed with greater fidelity to XM services also required...
... playback. A/V Surround Receiver AVR-4806 THX Ultra2 Certified 7.1-channel A/V Surround Receiver Denon's AVR-4806 has technology, the reference sound quality and an extensive feature set, that previously was only available on one HDMI cable. Digital is switched. Down-conversion from Denon to be changed each... I Analog EXT IN terminal I 3 Source and Zone Capability I Component video switching The AVR-4806 is the first A/V receiver to offer Analog Video to digital HDMI output conversion, which high-performance ICs are endowed with greater fidelity to XM services also required...
Literature/Product Sheet
Page 2
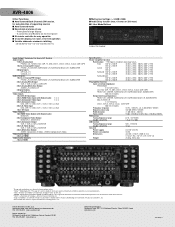
... Apple Creek Blvd, Unit 5, Markham, Ontario, Canada L3R 5B1 TEL: 905-475-4085 www.denon.ca Denon Brand Company Kayabacho Tower 14F 1-21-2 Shinkawa, Chuo-ku, Tokyo 104-0033, Japan www.denon.com 16210505 A MultEQ and the Audyssey MultEQ logo are trademarks of Audyssey Laboratories, Inc. * NSV... Video/Audio Inputs 3 Sets of HDMI Video/Audio Outputs 1 Set of the trapdoor Input/Output Terminals For Every A/V System Audio Inputs 12 Sets Analog Input PHONO, CD, TUNER, DVD, VDP, TV, DBS, VCR-1, VCR-2, VCR-3, V.AUX, CDR/TAPE 1 Set 8-ch Analog EXT. AVR-4806 Other Functions I Auto Surround Back...
... Apple Creek Blvd, Unit 5, Markham, Ontario, Canada L3R 5B1 TEL: 905-475-4085 www.denon.ca Denon Brand Company Kayabacho Tower 14F 1-21-2 Shinkawa, Chuo-ku, Tokyo 104-0033, Japan www.denon.com 16210505 A MultEQ and the Audyssey MultEQ logo are trademarks of Audyssey Laboratories, Inc. * NSV... Video/Audio Inputs 3 Sets of HDMI Video/Audio Outputs 1 Set of the trapdoor Input/Output Terminals For Every A/V System Audio Inputs 12 Sets Analog Input PHONO, CD, TUNER, DVD, VDP, TV, DBS, VCR-1, VCR-2, VCR-3, V.AUX, CDR/TAPE 1 Set 8-ch Analog EXT. AVR-4806 Other Functions I Auto Surround Back...
Owners Manual
Page 5
... remarkable component has been engineered to HDMI signals 28 Connecting a TV tuner 29 Connecting a DBS tuner 29 Connecting the external inputs (EXT. Getting Started Thank you review the contents of this manual before you begin hookup and operation that you for choosing the DENON AVR-4806 Digital Surround A / V receiver. IN) terminals 30 Connecting a video camera...
... remarkable component has been engineered to HDMI signals 28 Connecting a TV tuner 29 Connecting a DBS tuner 29 Connecting the external inputs (EXT. Getting Started Thank you review the contents of this manual before you begin hookup and operation that you for choosing the DENON AVR-4806 Digital Surround A / V receiver. IN) terminals 30 Connecting a video camera...
Owners Manual
Page 6
... memory 93 Preset skip 94 Preset name 94, 95 Video Setup Setting the HDMI/DVI In Assign 96, 97 Setting the Component In Assign 97 Setting the Video Convert Mode 97, 98 ...Setting the HDMI Out Setup 98, 99 Setting the Audio Delay 99 Setting the On Screen Display (OSD 100 ...Dolby Digital Setup 102 Setting the Auto Surround Mode 102 Setting the Manual EQ Setup 103, 104 Procedure for non-DENON microphone 123, 124 Check the parameter 124, 125 System setup items and default values 126~128 Troubleshooting 129, ...
... memory 93 Preset skip 94 Preset name 94, 95 Video Setup Setting the HDMI/DVI In Assign 96, 97 Setting the Component In Assign 97 Setting the Video Convert Mode 97, 98 ...Setting the HDMI Out Setup 98, 99 Setting the Audio Delay 99 Setting the On Screen Display (OSD 100 ...Dolby Digital Setup 102 Setting the Auto Surround Mode 102 Setting the Manual EQ Setup 103, 104 Procedure for non-DENON microphone 123, 124 Check the parameter 124, 125 System setup items and default values 126~128 Troubleshooting 129, ...

Owners Manual
Page 17
... player J COMPONENT VIDEO OUT Y PB PR L HDMI OUT H VIDEO OUT I S VIDEO OUT A AUDIO OUT L L L R R R D OPTICAL OUT C COAXIAL OUT 17 If you only need to use the optical connection, it can choose from the DVD player to the AVR-4806, you choose to choose one connection type. For ...more information about Digital Input Assignment ( page 89). • The AVR-4806 is equipped with HDMI connectors, so it needs to be connected to a DVD player or ...
... player J COMPONENT VIDEO OUT Y PB PR L HDMI OUT H VIDEO OUT I S VIDEO OUT A AUDIO OUT L L L R R R D OPTICAL OUT C COAXIAL OUT 17 If you only need to use the optical connection, it can choose from the DVD player to the AVR-4806, you choose to choose one connection type. For ...more information about Digital Input Assignment ( page 89). • The AVR-4806 is equipped with HDMI connectors, so it needs to be connected to a DVD player or ...

Owners Manual
Page 18
... high definition sources) choose the component video connection to the HDMI input connector. • When connecting the AVR-4806 and DVD player using an HDMI cable, also connect the AVR-4806 and monitor TV using an HDMI cable ( page 35). 18 Monitor TV J COMPONENT VIDEO IN Y PB PR L HDMI IN H VIDEO IN I S VIDEO IN NOTE: • The component...
... high definition sources) choose the component video connection to the HDMI input connector. • When connecting the AVR-4806 and DVD player using an HDMI cable, also connect the AVR-4806 and monitor TV using an HDMI cable ( page 35). 18 Monitor TV J COMPONENT VIDEO IN Y PB PR L HDMI IN H VIDEO IN I S VIDEO IN NOTE: • The component...
Owners Manual
Page 26
... terminal DENON LINK cable F IEEE1394 terminal 4-pin, S400 IEEE1394 cable G Speaker terminal Speaker cable S-Video cable J Component video terminal (Green) (Blue) (Red) Component video cable K DVI-D terminal (Y) (PB/CB) (PR/CR) 24-pin DVI-D cable Audio and Video cable L HDMI terminal HDMI cable Signal ...8226; Note that binding pin-plug cables together with a Dolby Digital RF Output The AVR-4806 does not have been completed. • When making connections, also refer to use of the AVR-4806 available digital inputs. Therefore, you need to the operating instructions of the other noise. ...
... terminal DENON LINK cable F IEEE1394 terminal 4-pin, S400 IEEE1394 cable G Speaker terminal Speaker cable S-Video cable J Component video terminal (Green) (Blue) (Red) Component video cable K DVI-D terminal (Y) (PB/CB) (PR/CR) 24-pin DVI-D cable Audio and Video cable L HDMI terminal HDMI cable Signal ...8226; Note that binding pin-plug cables together with a Dolby Digital RF Output The AVR-4806 does not have been completed. • When making connections, also refer to use of the AVR-4806 available digital inputs. Therefore, you need to the operating instructions of the other noise. ...

Owners Manual
Page 27
...highest quality playback, followed by connections using the S-Video terminals, then connections using an HDMI monitor, set of cables offering a higher quality connection, regardless of how the player and the AVR-4806's video input terminals are connected. On screen display for video up and down conversion... ZONE ( page 97, 98). Because of this, if the monitor equipped with HDMI terminal is compatible with the 480i/576i resolution, all the signals the AVR-4806 handles can be output to the HDMI monitor output terminal with the original resolution. • The on screen display signals ...
...highest quality playback, followed by connections using the S-Video terminals, then connections using an HDMI monitor, set of cables offering a higher quality connection, regardless of how the player and the AVR-4806's video input terminals are connected. On screen display for video up and down conversion... ZONE ( page 97, 98). Because of this, if the monitor equipped with HDMI terminal is compatible with the 480i/576i resolution, all the signals the AVR-4806 handles can be output to the HDMI monitor output terminal with the original resolution. • The on screen display signals ...

Owners Manual
Page 28
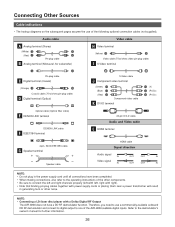
...A AUDIO OUT L L L R R R NOTE: • Use an HDMI monitor compatible with an HDMI input resolution of 480i or 576i. • If your monitor is equipped with an HDMI terminal, connect the AVR-4806 to the monitor using digital audio connections, assign the digital terminal (coaxial or ...page 89). Connecting Other Souces Connecting equipment with HDMI (High-Definition Multimedia Interface) terminals [To convert analog video signals to HDMI signals] • The AVR-4806 is not equipped with a function for converting analog video signals into HDMI signals. You can do this by either ...
...A AUDIO OUT L L L R R R NOTE: • Use an HDMI monitor compatible with an HDMI input resolution of 480i or 576i. • If your monitor is equipped with an HDMI terminal, connect the AVR-4806 to the monitor using digital audio connections, assign the digital terminal (coaxial or ...page 89). Connecting Other Souces Connecting equipment with HDMI (High-Definition Multimedia Interface) terminals [To convert analog video signals to HDMI signals] • The AVR-4806 is not equipped with a function for converting analog video signals into HDMI signals. You can do this by either ...

Owners Manual
Page 35
...(High-bandwidth Digital Content Protection System). however, the AVR-4806 cannot be controlled by another device via the HDMI connector; To provide audio output from AVR-4806's audio output connector, select "Amp" at the System Setup. The AVR-4806 supports HDCP. For details, see the user's manual...PACKED PCM C (with CPPM / without CPPM) CD LINEAR PCM C Multi area E Super Audio CD Stereo area E CD area C The AVR-4806 is HDMI Ver. 1.1 compatible. 2 Copyright Protection System To play DVD Audio discs that are copyright protected by the equipment that is connected. • ...
...(High-bandwidth Digital Content Protection System). however, the AVR-4806 cannot be controlled by another device via the HDMI connector; To provide audio output from AVR-4806's audio output connector, select "Amp" at the System Setup. The AVR-4806 supports HDCP. For details, see the user's manual...PACKED PCM C (with CPPM / without CPPM) CD LINEAR PCM C Multi area E Super Audio CD Stereo area E CD area C The AVR-4806 is HDMI Ver. 1.1 compatible. 2 Copyright Protection System To play DVD Audio discs that are copyright protected by the equipment that is connected. • ...

Owners Manual
Page 36
... Connecting equipment with DVI (Digital Visual Interface) terminals • Connection with DVI-D. The AVR-4806 supports the 24-pin DVI-D cable. • The AVR-4806 supports HDCP. Make an analog or digital audio connection also. Monitor TV L HDMI IN DVD player K DVI-D OUT D OPTICAL OUT C COAXIAL OUT A AUDIO OUT ...permits the transfer of 5 meters in 24-pin and 29-pin types. Use an HDCP-compatible HDMI monitor. 2 Connections with an HDMI/DVI-D conversion cable (adapter) • The HDMI video stream signals (video signals) are a maximum of digital images. When connecting to a ...
... Connecting equipment with DVI (Digital Visual Interface) terminals • Connection with DVI-D. The AVR-4806 supports the 24-pin DVI-D cable. • The AVR-4806 supports HDCP. Make an analog or digital audio connection also. Monitor TV L HDMI IN DVD player K DVI-D OUT D OPTICAL OUT C COAXIAL OUT A AUDIO OUT ...permits the transfer of 5 meters in 24-pin and 29-pin types. Use an HDCP-compatible HDMI monitor. 2 Connections with an HDMI/DVI-D conversion cable (adapter) • The HDMI video stream signals (video signals) are a maximum of digital images. When connecting to a ...
Owners Manual
Page 44
..., HOME THX CINEMA, STANDARD, 7CH STEREO, WIDE SCREEN or DSP SIMULATION) cannot be played. NOTE: • To prevent hearing loss, be set this to select HDMI and DVI-D input signals. • Cancelling MUTING mode: Press the MUTING button again, or press the VOLUME button on the remote control, or adjust the...
..., HOME THX CINEMA, STANDARD, 7CH STEREO, WIDE SCREEN or DSP SIMULATION) cannot be played. NOTE: • To prevent hearing loss, be set this to select HDMI and DVI-D input signals. • Cancelling MUTING mode: Press the MUTING button again, or press the VOLUME button on the remote control, or adjust the...

Owners Manual
Page 49
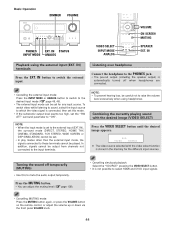
...Basic Operation PURE DIRECT DIRECT/STEREO PURE DIRECT SURROUND DIRECT STEREO Playing audio sources (CDs and DVDs) 2-channel playback modes • The AVR-4806 is pressed. When this mode, the audio signals bypass such circuits as the tone circuit and are automatically turned off so the music signals... control, as well as in good quality sound. To use the system setup function, cancel the PURE DIRECT mode. • If the HDMI input terminal is set , all circuits and processes not required for analog audio inputs) are transmitted directly, resulting in the DIRECT mode. Press...
...Basic Operation PURE DIRECT DIRECT/STEREO PURE DIRECT SURROUND DIRECT STEREO Playing audio sources (CDs and DVDs) 2-channel playback modes • The AVR-4806 is pressed. When this mode, the audio signals bypass such circuits as the tone circuit and are automatically turned off so the music signals... control, as well as in good quality sound. To use the system setup function, cancel the PURE DIRECT mode. • If the HDMI input terminal is set , all circuits and processes not required for analog audio inputs) are transmitted directly, resulting in the DIRECT mode. Press...
Owners Manual
Page 51
... MODE 1 OSD-6 USER MODE 2 OSD-7 USER MODE 3 OSD-8~14 Tuner preset stations NOTE: • OSD-2: The monitor's resolution is displayed when an HDMI monitor is connected to the AVR-4806. • OSD-4: This is displayed when the auto surround mode is set to "AUTO". SIGNAL: Displays the type of channels. FORMAT: Displays the...
... MODE 1 OSD-6 USER MODE 2 OSD-7 USER MODE 3 OSD-8~14 Tuner preset stations NOTE: • OSD-2: The monitor's resolution is displayed when an HDMI monitor is connected to the AVR-4806. • OSD-4: This is displayed when the auto surround mode is set to "AUTO". SIGNAL: Displays the type of channels. FORMAT: Displays the...

Owners Manual
Page 89
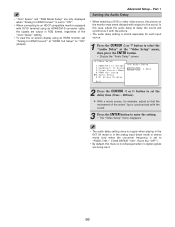
... source is selected, the setting for the different input sources. 1 Press the CURSOR D or H button to select "Audio Input Setup" at "HDMI/DVI In Assign" ( page 96, 97). If the same digital input terminal is assigned to a device connected with an optical digital output terminal ... between a digital audio source (stereo - 2 channel) and a digital audio recorder. • "PHONO" and "TUNER" cannot be selected on the AVR-4806's rear panel are automatically reset to the default values. 4 Press the ENTER button to a CD recorder, MD recorder, or other digital audio recording deck.
... source is selected, the setting for the different input sources. 1 Press the CURSOR D or H button to select "Audio Input Setup" at "HDMI/DVI In Assign" ( page 96, 97). If the same digital input terminal is assigned to a device connected with an optical digital output terminal ... between a digital audio source (stereo - 2 channel) and a digital audio recorder. • "PHONO" and "TUNER" cannot be selected on the AVR-4806's rear panel are automatically reset to the default values. 4 Press the ENTER button to a CD recorder, MD recorder, or other digital audio recording deck.

Owners Manual
Page 96
TV: Play the audio signals on speakers connected to the AVR-4806. 2 Press the CURSOR D or H button to select the "HDMI / DVI In Assign", then press the ENTER button. • Display the "HDMI / DVI In Assign" screen. 5 Press the CURSOR D or H button to select the input for the input source ... DVI input terminal is selected, the setting for the playback of signals when the audio signal of HDMI has become unlocked, the unit automatically changes over to the AVR-4806. Advanced Setup - AMP: Play the audio signals on a monitor TV connected to the set connector (ANALOG or EXT. Part 1 ...
TV: Play the audio signals on speakers connected to the AVR-4806. 2 Press the CURSOR D or H button to select the "HDMI / DVI In Assign", then press the ENTER button. • Display the "HDMI / DVI In Assign" screen. 5 Press the CURSOR D or H button to select the input for the input source ... DVI input terminal is selected, the setting for the playback of signals when the audio signal of HDMI has become unlocked, the unit automatically changes over to the AVR-4806. Advanced Setup - AMP: Play the audio signals on a monitor TV connected to the set connector (ANALOG or EXT. Part 1 ...

Owners Manual
Page 97
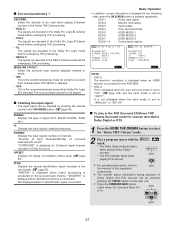
... press the CURSOR F or G button to the monitor from the AVR-4806 (DVI mode). Setting the Component In Assign • This setting assigns the component video input terminal of the AVR-4806 for outputting HDMI signals from the AVR-4806 (HDMI and DVI modes). • Input signals input from the composite and... the Video Convert Mode • Select the input signal to 3-RCA. Press the STATUS button to check which a digital audio input (DENON LINK, IEEE1394 etc.) is previously assigned, the digital audio assignment is converted and output from among 1-RCA to be output from the monitor...
... press the CURSOR F or G button to the monitor from the AVR-4806 (DVI mode). Setting the Component In Assign • This setting assigns the component video input terminal of the AVR-4806 for outputting HDMI signals from the AVR-4806 (HDMI and DVI modes). • Input signals input from the composite and... the Video Convert Mode • Select the input signal to 3-RCA. Press the STATUS button to check which a digital audio input (DENON LINK, IEEE1394 etc.) is previously assigned, the digital audio assignment is converted and output from among 1-RCA to be output from the monitor...
Owners Manual
Page 98
... always played. Color Space: • Y Cb Cr: The Y Cb Cr format video signals is output via the HDMI output connector. • RGB: The RGB format video signals is output via the HDMI output connector with a digital RGB video range (data range) of 0 (black) to enter the setting. • ...might not be output. The S-Video signal input from the S-Video and component monitor output terminals. Setting the HDMI Out Setup • Set whether to use the analog video signals to HDMI conversion function. • When using this happens, please set the conversion mode to OFF. • When ...
... always played. Color Space: • Y Cb Cr: The Y Cb Cr format video signals is output via the HDMI output connector. • RGB: The RGB format video signals is output via the HDMI output connector with a digital RGB video range (data range) of 0 (black) to enter the setting. • ...might not be output. The S-Video signal input from the S-Video and component monitor output terminals. Setting the HDMI Out Setup • Set whether to use the analog video signals to HDMI conversion function. • When using this happens, please set the conversion mode to OFF. • When ...
Owners Manual
Page 99
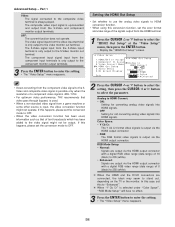
... when playing in the EXT. Part 1 Setting the Audio Delay • When watching a DVD or other video source, the picture on -screen display using an HDMI/DVI-D converter cable, the signals are being input. 99 • "Color Space" and "RGB Mode Setup" are only displayed when "Analog to... is synchronized with respect to the sound. With a movie source, for each input source. 1 Press the CURSOR D or H button to select the "Audio Delay" at "HDMI Out Setup" to "ON" (default). In this menu is not displayed when no digital signals are output in the analog input direct mode or stereo...
... when playing in the EXT. Part 1 Setting the Audio Delay • When watching a DVD or other video source, the picture on -screen display using an HDMI/DVI-D converter cable, the signals are being input. 99 • "Color Space" and "RGB Mode Setup" are only displayed when "Analog to... is synchronized with respect to the sound. With a movie source, for each input source. 1 Press the CURSOR D or H button to select the "Audio Delay" at "HDMI Out Setup" to "ON" (default). In this menu is not displayed when no digital signals are output in the analog input direct mode or stereo...


