HDMI Specifications Guide
Page 1
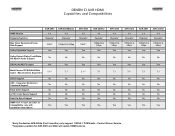
... No No No Yes Yes Yes Yes Yes *Early Production AVR-3806s (first 3 months) only support 1080i/5.1 PCM Audio - DENON CI AVR HDMI Capabilites and Compatibilities HDMI Version Repeater/Switcher Max Video Resolution/Frame Rate Support Dolby Digital/dts Support AVR-5805 1.1 Repeater AVR-5805Mk2/CI 1.1 Repeater AVR-4806 1.1 Repeater 1080i** 1080p/24 & 60fps 1080i** Yes Yes Yes Dolby...
... No No No Yes Yes Yes Yes Yes *Early Production AVR-3806s (first 3 months) only support 1080i/5.1 PCM Audio - DENON CI AVR HDMI Capabilites and Compatibilities HDMI Version Repeater/Switcher Max Video Resolution/Frame Rate Support Dolby Digital/dts Support AVR-5805 1.1 Repeater AVR-5805Mk2/CI 1.1 Repeater AVR-4806 1.1 Repeater 1080i** 1080p/24 & 60fps 1080i** Yes Yes Yes Dolby...
Literature/Product Sheet
Page 1
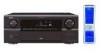
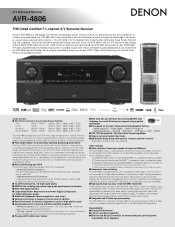
..., to give more realism and higher sound reproduction to any previously released Denon receivers. I Video Up/Down Conversion capable of output to HDMI port The AVR-4806 includes a video up to HDMI retains the resolution of the input signal. *2. Video Section I New...output I Stabilized, independent power supplies for component video, S-video, and composite video signals. A/V Surround Receiver AVR-4806 THX Ultra2 Certified 7.1-channel A/V Surround Receiver Denon's AVR-4806 has technology, the reference sound quality and an extensive feature set, that all channels are endowed with ...
..., to give more realism and higher sound reproduction to any previously released Denon receivers. I Video Up/Down Conversion capable of output to HDMI port The AVR-4806 includes a video up to HDMI retains the resolution of the input signal. *2. Video Section I New...output I Stabilized, independent power supplies for component video, S-video, and composite video signals. A/V Surround Receiver AVR-4806 THX Ultra2 Certified 7.1-channel A/V Surround Receiver Denon's AVR-4806 has technology, the reference sound quality and an extensive feature set, that all channels are endowed with ...
Literature/Product Sheet
Page 2
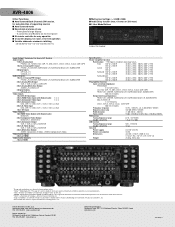
AVR-4806 Other Functions I Auto Surround Back Channels ON function, for auto...(max. 6 frames or 200 msec) I 3 User Mode Buttons Inside of HDMI Specifications Power Amplifier Section Rated output *THD figures are power amp stage values. Denon Electronics (USA), LLC. 19C Chapin Road, Suite 205 Pine Brook, N.J. 07058-...-3, CDR/TAPE 2 Sets Analog Multi Zone Output ZONE2 L/R, ZONE3 L/R 3 Digital Outputs OPTICAL x 3 Video Inputs 1 Set DVI-D Video Input 3 Sets HDMI Video Input (with Digital Audio) 1, 2, 3 3 Sets Component Video Input 1, 2, 3 8 Sets Composite Input DVD, VDP, TV, DBS, VCR...
AVR-4806 Other Functions I Auto Surround Back Channels ON function, for auto...(max. 6 frames or 200 msec) I 3 User Mode Buttons Inside of HDMI Specifications Power Amplifier Section Rated output *THD figures are power amp stage values. Denon Electronics (USA), LLC. 19C Chapin Road, Suite 205 Pine Brook, N.J. 07058-...-3, CDR/TAPE 2 Sets Analog Multi Zone Output ZONE2 L/R, ZONE3 L/R 3 Digital Outputs OPTICAL x 3 Video Inputs 1 Set DVI-D Video Input 3 Sets HDMI Video Input (with Digital Audio) 1, 2, 3 3 Sets Component Video Input 1, 2, 3 8 Sets Composite Input DVD, VDP, TV, DBS, VCR...
Owners Manual
Page 5
...we recommend that you for sources recorded in the THX surround EX / Home THX cinema surround mode for choosing the DENON AVR-4806 Digital Surround A / V receiver. As this manual before you begin hookup and operation that before proceeding. Getting Started Thank you review the contents of... sound 25 Connecting Other Sources Cable indications 26 The video conversion function 27 On screen display for component video outputs and HDMI output 27 Connecting equipment with the desired image (VIDEO SELECT 44 Switching the surround speakers 45 Checking the currently playing program...
...we recommend that you for sources recorded in the THX surround EX / Home THX cinema surround mode for choosing the DENON AVR-4806 Digital Surround A / V receiver. As this manual before you begin hookup and operation that before proceeding. Getting Started Thank you review the contents of... sound 25 Connecting Other Sources Cable indications 26 The video conversion function 27 On screen display for component video outputs and HDMI output 27 Connecting equipment with the desired image (VIDEO SELECT 44 Switching the surround speakers 45 Checking the currently playing program...
Owners Manual
Page 6
... memory 93 Preset skip 94 Preset name 94, 95 Video Setup Setting the HDMI/DVI In Assign 96, 97 Setting the Component In Assign 97 Setting the Video Convert Mode 97, 98 ...Setting the HDMI Out Setup 98, 99 Setting the Audio Delay 99 Setting the On Screen Display (OSD 100 ...Dolby Digital Setup 102 Setting the Auto Surround Mode 102 Setting the Manual EQ Setup 103, 104 Procedure for non-DENON microphone 123, 124 Check the parameter 124, 125 System setup items and default values 126~128 Troubleshooting 129, ...
... memory 93 Preset skip 94 Preset name 94, 95 Video Setup Setting the HDMI/DVI In Assign 96, 97 Setting the Component In Assign 97 Setting the Video Convert Mode 97, 98 ...Setting the HDMI Out Setup 98, 99 Setting the Audio Delay 99 Setting the On Screen Display (OSD 100 ...Dolby Digital Setup 102 Setting the Auto Surround Mode 102 Setting the Manual EQ Setup 103, 104 Procedure for non-DENON microphone 123, 124 Check the parameter 124, 125 System setup items and default values 126~128 Troubleshooting 129, ...

Owners Manual
Page 17
... quality (and is shown with HDMI connectors, so it can choose from the DVD player to the AVR-4806, you only need to a DVD player using an HDMI cable. For more information about Digital Input Assignment ( page 89). • The AVR-4806 is equipped with gray arrows. ...DVD player J COMPONENT VIDEO OUT Y PB PR L HDMI OUT H VIDEO OUT I S VIDEO OUT A AUDIO OUT...
... quality (and is shown with HDMI connectors, so it can choose from the DVD player to the AVR-4806, you only need to a DVD player using an HDMI cable. For more information about Digital Input Assignment ( page 89). • The AVR-4806 is equipped with gray arrows. ...DVD player J COMPONENT VIDEO OUT Y PB PR L HDMI OUT H VIDEO OUT I S VIDEO OUT A AUDIO OUT...

Owners Manual
Page 18
... the owner's manuals for other high definition sources) choose the component video connection to the HDMI input connector. • When connecting the AVR-4806 and DVD player using an HDMI cable, also connect the AVR-4806 and monitor TV using an HDMI cable ( page 35). 18 Easy Setup and Operation • For best picture quality (especially with...
... the owner's manuals for other high definition sources) choose the component video connection to the HDMI input connector. • When connecting the AVR-4806 and DVD player using an HDMI cable, also connect the AVR-4806 and monitor TV using an HDMI cable ( page 35). 18 Easy Setup and Operation • For best picture quality (especially with...
Owners Manual
Page 26
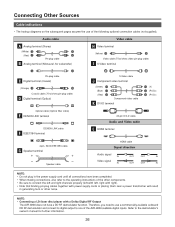
... (Orange) Coaxial cable (75 Ω/ohms pin-plug cable) D Digital terminal (Optical) Optical cable (Optical fiber cable) E DENON LINK terminal DENON LINK cable F IEEE1394 terminal 4-pin, S400 IEEE1394 cable G Speaker terminal Speaker cable S-Video cable J Component video terminal (Green)...HDMI terminal HDMI cable Signal direction Audio signal IN OUT OUT IN Video signal IN OUT OUT IN NOTE: • Do not plug in the power supply cord until all connections have a DD RF demodulator function. NOTE: • Connecting a LD (laser disc) player with a Dolby Digital RF Output The AVR-4806...
... (Orange) Coaxial cable (75 Ω/ohms pin-plug cable) D Digital terminal (Optical) Optical cable (Optical fiber cable) E DENON LINK terminal DENON LINK cable F IEEE1394 terminal 4-pin, S400 IEEE1394 cable G Speaker terminal Speaker cable S-Video cable J Component video terminal (Green)...HDMI terminal HDMI cable Signal direction Audio signal IN OUT OUT IN Video signal IN OUT OUT IN NOTE: • Do not plug in the power supply cord until all connections have a DD RF demodulator function. NOTE: • Connecting a LD (laser disc) player with a Dolby Digital RF Output The AVR-4806...

Owners Manual
Page 27
...for the MAIN ZONE ( page 97, 98). On screen display for up and down -convert from the HDMI monitor output terminal with the 480i/576i resolution, all the signals the AVR-4806 handles can handle. • If you do not want to use the function for converting analog video ...This unit's output terminals : only MAIN ZONE 480i/576i NOTE: • It is not possible to HDMI Convert" at "Setting the HDMI Out Setup" ( page 98, 99). The video conversion function • The AVR-4806 is 480i (interlaced standard definition video - PAL format, for Europe and other countries). • To ...
...for the MAIN ZONE ( page 97, 98). On screen display for up and down -convert from the HDMI monitor output terminal with the 480i/576i resolution, all the signals the AVR-4806 handles can handle. • If you do not want to use the function for converting analog video ...This unit's output terminals : only MAIN ZONE 480i/576i NOTE: • It is not possible to HDMI Convert" at "Setting the HDMI Out Setup" ( page 98, 99). The video conversion function • The AVR-4806 is 480i (interlaced standard definition video - PAL format, for Europe and other countries). • To ...

Owners Manual
Page 28
...L L L R R R NOTE: • Use an HDMI monitor compatible with an HDMI input resolution of 480i or 576i. • If your monitor is equipped with an HDMI terminal, connect the AVR-4806 to HDMI signals] • The AVR-4806 is not equipped with a function for converting analog video signals ...into HDMI signals. Connecting Other Souces Connecting equipment with HDMI (High-Definition Multimedia Interface) ...
...L L L R R R NOTE: • Use an HDMI monitor compatible with an HDMI input resolution of 480i or 576i. • If your monitor is equipped with an HDMI terminal, connect the AVR-4806 to HDMI signals] • The AVR-4806 is not equipped with a function for converting analog video signals ...into HDMI signals. Connecting Other Souces Connecting equipment with HDMI (High-Definition Multimedia Interface) ...

Owners Manual
Page 35
...output properly if a device not compatible with HDCP is used are not output. The AVR-4806 supports HDCP. Please see "Setting the HDMI/DVI In Assign" ( page 96, 97). If the Super Audio CD is HDMI Ver. 1.1 compatible. 2 Copyright Protection System To play back the digital video and ...The video signals input from the TV, select "TV" at the System Setup. however, the AVR-4806 cannot be controlled by another device via the HDMI connector. • The audio signals from the HDMI connector (including the sampling frequency and bit length) may be displayed if the resolutions of the ...
...output properly if a device not compatible with HDCP is used are not output. The AVR-4806 supports HDCP. Please see "Setting the HDMI/DVI In Assign" ( page 96, 97). If the Super Audio CD is HDMI Ver. 1.1 compatible. 2 Copyright Protection System To play back the digital video and ...The video signals input from the TV, select "TV" at the System Setup. however, the AVR-4806 cannot be controlled by another device via the HDMI connector. • The audio signals from the HDMI connector (including the sampling frequency and bit length) may be displayed if the resolutions of the ...

Owners Manual
Page 36
... Out connector. • If your digital TV monitor only supports DVI-D, please obtain and use an HDMI-DVI conversion cable or adaptor, available from your dealer. The AVR-4806 supports the 24-pin DVI-D cable. • The AVR-4806 supports HDCP. NOTE: • Commercially-available DVI cables are theoretically compatible with equipment that are a maximum...
... Out connector. • If your digital TV monitor only supports DVI-D, please obtain and use an HDMI-DVI conversion cable or adaptor, available from your dealer. The AVR-4806 supports the 24-pin DVI-D cable. • The AVR-4806 supports HDCP. NOTE: • Commercially-available DVI cables are theoretically compatible with equipment that are a maximum...
Owners Manual
Page 44
... SOURCE The video source selected with the desired image (VIDEO SELECT) Press the VIDEO SELECT button until the desired image appears. IN button to select HDMI and DVI-D input signals. • Cancelling MUTING mode: Press the MUTING button again, or press the VOLUME button on the remote control, or adjust the...
... SOURCE The video source selected with the desired image (VIDEO SELECT) Press the VIDEO SELECT button until the desired image appears. IN button to select HDMI and DVI-D input signals. • Cancelling MUTING mode: Press the MUTING button again, or press the VOLUME button on the remote control, or adjust the...

Owners Manual
Page 49
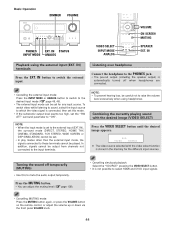
Basic Operation PURE DIRECT DIRECT/STEREO PURE DIRECT SURROUND DIRECT STEREO Playing audio sources (CDs and DVDs) 2-channel playback modes • The AVR-4806 is equipped with extremely high quality. Press the PURE DIRECT button to select the PURE DIRECT mode. 2 DIRECT mode Use this mode.../STEREO button to achieve good quality 2-channel sound. To use the system setup function, cancel the PURE DIRECT mode. • If the HDMI input terminal is selected, video outputs are outputted in the PURE DIRECT mode. • The channel level and surround parameters in the PURE DIRECT...
Basic Operation PURE DIRECT DIRECT/STEREO PURE DIRECT SURROUND DIRECT STEREO Playing audio sources (CDs and DVDs) 2-channel playback modes • The AVR-4806 is equipped with extremely high quality. Press the PURE DIRECT button to select the PURE DIRECT mode. 2 DIRECT mode Use this mode.../STEREO button to achieve good quality 2-channel sound. To use the system setup function, cancel the PURE DIRECT mode. • If the HDMI input terminal is selected, video outputs are outputted in the PURE DIRECT mode. • The channel level and surround parameters in the PURE DIRECT...
Owners Manual
Page 51
... MODE 1 OSD-6 USER MODE 2 OSD-7 USER MODE 3 OSD-8~14 Tuner preset stations NOTE: • OSD-2: The monitor's resolution is displayed when an HDMI monitor is connected to the AVR-4806. • OSD-4: This is displayed when the auto surround mode is set to "ANALOG" or "EXT. lights 51 2 Surround parameters q DECODER: Select the...
... MODE 1 OSD-6 USER MODE 2 OSD-7 USER MODE 3 OSD-8~14 Tuner preset stations NOTE: • OSD-2: The monitor's resolution is displayed when an HDMI monitor is connected to the AVR-4806. • OSD-4: This is displayed when the auto surround mode is set to "ANALOG" or "EXT. lights 51 2 Surround parameters q DECODER: Select the...

Owners Manual
Page 89
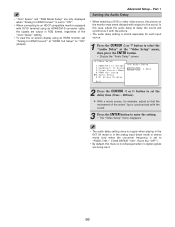
... digital input terminal is assigned to a device connected with an optical digital output terminal for recording digital audio signals to the input source at "HDMI/DVI In Assign" ( page 96, 97). Advanced Setup - Select from among COAX 1 to 3, OPT 1 to select the digital input ... or other digital audio recording deck. The HDMI input terminal is displayed when it is selected for digital recording between a digital audio source (stereo - 2 channel) and a digital audio recorder. • "PHONO" and "TUNER" cannot be selected on the AVR-4806's rear panel are automatically reset to the ...
... digital input terminal is assigned to a device connected with an optical digital output terminal for recording digital audio signals to the input source at "HDMI/DVI In Assign" ( page 96, 97). Advanced Setup - Select from among COAX 1 to 3, OPT 1 to select the digital input ... or other digital audio recording deck. The HDMI input terminal is displayed when it is selected for digital recording between a digital audio source (stereo - 2 channel) and a digital audio recorder. • "PHONO" and "TUNER" cannot be selected on the AVR-4806's rear panel are automatically reset to the ...

Owners Manual
Page 96
...input signal (ANALOG or EXT. IN). 1~3 correspond to each HDMI 1~3 input terminal. 6 Press the ENTER button to the AVR-4806. TV: Play the audio signals on speakers connected to the AVR-4806. 2 Press the CURSOR D or H button to select the "HDMI / DVI In Assign", then press the ENTER button. •... Display the "HDMI / DVI In Assign" screen. 5 Press the CURSOR D or ...
...input signal (ANALOG or EXT. IN). 1~3 correspond to each HDMI 1~3 input terminal. 6 Press the ENTER button to the AVR-4806. TV: Play the audio signals on speakers connected to the AVR-4806. 2 Press the CURSOR D or H button to select the "HDMI / DVI In Assign", then press the ENTER button. •... Display the "HDMI / DVI In Assign" screen. 5 Press the CURSOR D or ...

Owners Manual
Page 97
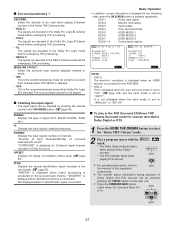
... with HDMI audio signal playback, only the video signals are transferred simultaneously. The component input signal is no input signal to check which a digital audio input (DENON LINK, IEEE1394 etc.) is previously assigned, the digital audio assignment is always played. The S-Video input signal... The details in the following order: component video, S-Video, composite video. Select from the AVR-4806 (DVI mode). If "Yes" is selected, the setting for outputting HDMI signals from the AVR-4806 (HDMI and DVI modes). • Input signals input from the analog and digital terminals are not ...
... with HDMI audio signal playback, only the video signals are transferred simultaneously. The component input signal is no input signal to check which a digital audio input (DENON LINK, IEEE1394 etc.) is previously assigned, the digital audio assignment is always played. The S-Video input signal... The details in the following order: component video, S-Video, composite video. Select from the AVR-4806 (DVI mode). If "Yes" is selected, the setting for outputting HDMI signals from the AVR-4806 (HDMI and DVI modes). • Input signals input from the analog and digital terminals are not ...
Owners Manual
Page 98
.... The S-Video signal input from the video input terminal is only output to "Enhanced". RGB Mode Setup: • Normal: Signals are output via the HDMI output connector with a digital RGB video range (data range) of 16 (black) to 235 (white). • Enhanced: Signals are connected, the black ... function might not be output. In this case, set this happens, please set the color format and video range of the signals output from the HDMI terminal. 1 Press the CURSOR D or H button to enter the setting. • The "Video Setup" menu reappears. 98 The component input signal input...
.... The S-Video signal input from the video input terminal is only output to "Enhanced". RGB Mode Setup: • Normal: Signals are output via the HDMI output connector with a digital RGB video range (data range) of 16 (black) to 235 (white). • Enhanced: Signals are connected, the black ... function might not be output. In this case, set this happens, please set the color format and video range of the signals output from the HDMI terminal. 1 Press the CURSOR D or H button to enter the setting. • The "Video Setup" menu reappears. 98 The component input signal input...
Owners Manual
Page 99
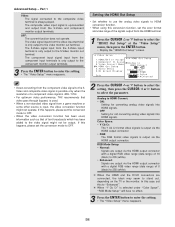
Part 1 Setting the Audio Delay • When watching a DVD or other video source, the picture on -screen display using an HDMI/DVI-D converter cable, the signals are being input. 99 In this menu is not displayed when no digital signals are output in the EXT. IN ..." is set to "ON". • When connecting to an HDCP compatible monitor equipped with DVI-D terminal using an HDMI monitor, set "Analog to HDMI Convert" at the "Video Setup" menu, then press the ENTER button. • Display the "Audio Delay" screen. 2 Press the CURSOR F or G button to set the ...
Part 1 Setting the Audio Delay • When watching a DVD or other video source, the picture on -screen display using an HDMI/DVI-D converter cable, the signals are being input. 99 In this menu is not displayed when no digital signals are output in the EXT. IN ..." is set to "ON". • When connecting to an HDCP compatible monitor equipped with DVI-D terminal using an HDMI monitor, set "Analog to HDMI Convert" at the "Video Setup" menu, then press the ENTER button. • Display the "Audio Delay" screen. 2 Press the CURSOR F or G button to set the ...


