
Firmware Update Instructions
Page 4
Basic Operation (AMP mode) NUMBER ENTER AUX CURSOR MEMORY MEMORY BLOCK Operating the remote control unit The digital tuner system buttons shown on the display when connecting to an Internet radio station for the first time. 1 Press the AUX (AMP ...
Basic Operation (AMP mode) NUMBER ENTER AUX CURSOR MEMORY MEMORY BLOCK Operating the remote control unit The digital tuner system buttons shown on the display when connecting to an Internet radio station for the first time. 1 Press the AUX (AMP ...

Firmware Update Instructions
Page 5
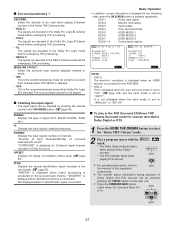
... them. 6 Select the station, then press the ENTER or CURSOR G button to register stations: by presetting them or by storing them in directly from the remote control unit. 1 Press the MEMORY button while playing the Internet radio station you want to register the station at the top of Internet radio stations is...
... them. 6 Select the station, then press the ENTER or CURSOR G button to register stations: by presetting them or by storing them in directly from the remote control unit. 1 Press the MEMORY button while playing the Internet radio station you want to register the station at the top of Internet radio stations is...
Literature/Product Sheet
Page 2
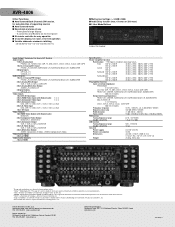
... Inc. 505 Apple Creek Blvd, Unit 5, Markham, Ontario, Canada L3R 5B1 TEL: 905-475-4085 www.denon.ca Denon Brand Company Kayabacho Tower 14F 1-21-2 Shinkawa, Chuo-ku, Tokyo 104-0033, Japan www.denon.com 16210505 A Front 140 W + 140 W (8 ohms, 20Hz - 20kHz, 0.05 % THD) 165 W + 165 W (6 ohms, ...Audyssey Laboratories. AVR-4806 Other Functions I Auto Surround Back Channels ON function, for auto-detection of supporting sources I Auto Surround mode I New design and ease-of-use • Front panel's large display. • A cursor key and Buttons on the front panel I EL remote controller for easy ...
... Inc. 505 Apple Creek Blvd, Unit 5, Markham, Ontario, Canada L3R 5B1 TEL: 905-475-4085 www.denon.ca Denon Brand Company Kayabacho Tower 14F 1-21-2 Shinkawa, Chuo-ku, Tokyo 104-0033, Japan www.denon.com 16210505 A Front 140 W + 140 W (8 ohms, 20Hz - 20kHz, 0.05 % THD) 165 W + 165 W (6 ohms, ...Audyssey Laboratories. AVR-4806 Other Functions I Auto Surround Back Channels ON function, for auto-detection of supporting sources I Auto Surround mode I New design and ease-of-use • Front panel's large display. • A cursor key and Buttons on the front panel I EL remote controller for easy ...
Owners Manual
Page 5
...DENON AVR-4806 Digital Surround A / V receiver. IN) terminals 44 Turning the sound off temporarily (MUTING 44 Listening over headphone 44 Combining the currently playing sound with DVI (Digital Visual Interface) terminals 36 Connecting IEEE1394 devices 37 Connecting the antenna terminals 38 Connecting the CONTROL...speaker out connections 40 Connecting the pre-out terminals 41 Connecting the power supply cord 41 Basic Operation Playback Operating the remote control unit 42 Playing the input source 43 Playback using 7 Cautions on installation 7 Cautions on the power 21 Starting ...
...DENON AVR-4806 Digital Surround A / V receiver. IN) terminals 44 Turning the sound off temporarily (MUTING 44 Listening over headphone 44 Combining the currently playing sound with DVI (Digital Visual Interface) terminals 36 Connecting IEEE1394 devices 37 Connecting the antenna terminals 38 Connecting the CONTROL...speaker out connections 40 Connecting the pre-out terminals 41 Connecting the power supply cord 41 Basic Operation Playback Operating the remote control unit 42 Playing the input source 43 Playback using 7 Cautions on installation 7 Cautions on the power 21 Starting ...
Owners Manual
Page 6
... Setting the Dolby Digital Setup 102 Setting the Auto Surround Mode 102 Setting the Manual EQ Setup 103, 104 Procedure for non-DENON microphone 123, 124 Check the parameter 124, 125 System setup items and default values 126~128 Troubleshooting 129, 130 Additional information ...search 68 TP search 69 RT (Radio Text 69 Advanced Operation Remote control unit Operating DENON audio components 70~72 Preset memory 72, 73 Operating a component stored in a ZONE3 room (ZONE3 SELECT mode 82 Remote control unit operations during multi-source playback.....83 Other function Playing Super Audio...
... Setting the Dolby Digital Setup 102 Setting the Auto Surround Mode 102 Setting the Manual EQ Setup 103, 104 Procedure for non-DENON microphone 123, 124 Check the parameter 124, 125 System setup items and default values 126~128 Troubleshooting 129, 130 Additional information ...search 68 TP search 69 RT (Radio Text 69 Advanced Operation Remote control unit Operating DENON audio components 70~72 Preset memory 72, 73 Operating a component stored in a ZONE3 room (ZONE3 SELECT mode 82 Remote control unit operations during multi-source playback.....83 Other function Playing Super Audio...

Owners Manual
Page 7
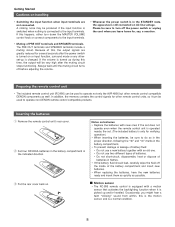
...; Set the antenna wires from the tuner or TV away from the actual set for North America model only 1 e Service station list 1 r Power supply cord 1 t Remote control unit (RC-995 1 y R03/AAA alkaline batteries 4 u AM loop antenna 1 i FM indoor antenna 1 o List of the picture may differ from this unit's power supply cord...
...; Set the antenna wires from the tuner or TV away from the actual set for North America model only 1 e Service station list 1 r Power supply cord 1 t Remote control unit (RC-995 1 y R03/AAA alkaline batteries 4 u AM loop antenna 1 i FM indoor antenna 1 o List of the picture may differ from this unit's power supply cord...
Owners Manual
Page 8
...replacing the batteries, have the new batteries ready and insert them as quickly as well. Please be sure to operate non-DENON remote control compatible products. Inserting the batteries q Remove the remote control unit's rear cover. e Put the rear cover back on or input function, surround mode or any otherset-up is only... when you might hear a faint "clicking" sound from within, this is the motion sensor, and is connected to operate not only the AVR-4806 but other remote control units, so it can be very high after the power switch is turned on . 2 Motion sensor • The RC-995...
...replacing the batteries, have the new batteries ready and insert them as quickly as well. Please be sure to operate non-DENON remote control compatible products. Inserting the batteries q Remove the remote control unit's rear cover. e Put the rear cover back on or input function, surround mode or any otherset-up is only... when you might hear a faint "clicking" sound from within, this is the motion sensor, and is connected to operate not only the AVR-4806 but other remote control units, so it can be very high after the power switch is turned on . 2 Motion sensor • The RC-995...

Owners Manual
Page 9
...signs or other devices emitting pulse-type noise nearby may be difficult to operate the remote control unit if the remote sensor is not pointed directly at the remote sensor. • The remote control unit can be operated at the remote sensor on the main unit as possible. Part names and functions Front panel &#...sunlight or strong artificial light. • Do not press buttons on the diagram. • The remote control unit can be shorter if there are obstacles in the way or if the remote control unit is exposed to the pages given in malfunction, so keep the set as far away from the...
...signs or other devices emitting pulse-type noise nearby may be difficult to operate the remote control unit if the remote sensor is not pointed directly at the remote sensor. • The remote control unit can be operated at the remote sensor on the main unit as possible. Part names and functions Front panel &#...sunlight or strong artificial light. • Do not press buttons on the diagram. • The remote control unit can be shorter if there are obstacles in the way or if the remote control unit is exposed to the pages given in malfunction, so keep the set as far away from the...
Owners Manual
Page 10
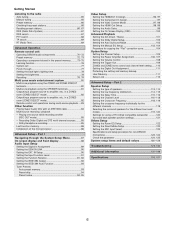
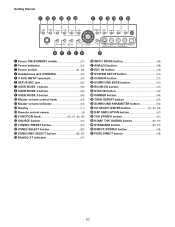
... INPUT terminals 30) y SETUP MIC jack 20) u USER MODE 1 button 59) i USER MODE 2 button 59) o USER MODE 3 button 59) !0 Master volume control knob 43) !1 Master volume indicator 43) !2 Display 11) !3 Remote control sensor 9) !4 FUNCTION knob 43, 67, 82, 85) !5 SOURCE button 43) !6 TUNING PRESET button 67) !7 ZONE2 SELECT button 82) !8 ZONE3/REC SELECT...
... INPUT terminals 30) y SETUP MIC jack 20) u USER MODE 1 button 59) i USER MODE 2 button 59) o USER MODE 3 button 59) !0 Master volume control knob 43) !1 Master volume indicator 43) !2 Display 11) !3 Remote control sensor 9) !4 FUNCTION knob 43, 67, 82, 85) !5 SOURCE button 43) !6 TUNING PRESET button 67) !7 ZONE2 SELECT button 82) !8 ZONE3/REC SELECT...

Owners Manual
Page 12
... "SCALE" buttons cannot be used. • The AVR-4806's 7CH STEREO surround mode can be operated using the "9CH" button. • For instructions on the functions of these parts, refer to the pages given in parentheses ( ). Getting Started Remote control unit • For details on setting the remote control unit back light's lighting time ( page 78...
... "SCALE" buttons cannot be used. • The AVR-4806's 7CH STEREO surround mode can be operated using the "9CH" button. • For instructions on the functions of these parts, refer to the pages given in parentheses ( ). Getting Started Remote control unit • For details on setting the remote control unit back light's lighting time ( page 78...

Owners Manual
Page 21
... or Low pass filter off if your subwoofer. If so, connect the auto setup microphone. 21 Please be turned on and off from the included remote control unit. £ OFF: The power turns off and indicator is off. Set the POWER switch to this position, the power cannot be sure to turn... off. Turning on the power Easy Setup and Operation Starting Auto Setup 1 Turn on and off from the remote control unit. 4 Press the ON/STANDBY switch on the main unit or ON button on the remote control unit. • When pressed, the power turns on and the power indicator lights. Set the volume to...
... or Low pass filter off if your subwoofer. If so, connect the auto setup microphone. 21 Please be turned on and off from the included remote control unit. £ OFF: The power turns off and indicator is off. Set the POWER switch to this position, the power cannot be sure to turn... off. Turning on the power Easy Setup and Operation Starting Auto Setup 1 Turn on and off from the remote control unit. 4 Press the ON/STANDBY switch on the main unit or ON button on the remote control unit. • When pressed, the power turns on and the power indicator lights. Set the volume to...

Owners Manual
Page 27
... monitor equipped with HDMI terminal is compatible with the 480i/576i resolution, all the signals the AVR-4806 handles can be checked using the STATUS button on the main unit or the ON SCREEN button on the remote control unit. (HDMI / DVI-D terminals) (Component video terminals) (S-Video terminal) (HDMI terminal...HDMI output • When viewing component video signals or HDMI signals via the AVR-4806, the on screen display is displayed on the monitor when the "System Setup" operations are performed and when the remote control unit's ON SCREEN button is operated. • To view the on-screen...
... monitor equipped with HDMI terminal is compatible with the 480i/576i resolution, all the signals the AVR-4806 handles can be checked using the STATUS button on the main unit or the ON SCREEN button on the remote control unit. (HDMI / DVI-D terminals) (Component video terminals) (S-Video terminal) (HDMI terminal...HDMI output • When viewing component video signals or HDMI signals via the AVR-4806, the on screen display is displayed on the monitor when the "System Setup" operations are performed and when the remote control unit's ON SCREEN button is operated. • To view the on-screen...

Owners Manual
Page 39
...the ZONE2 (or ZONE3). • When a sold devices, refer to -room remote control unit (DENON RC-616, 617 or 618) is wired and connected between the MAIN ZONE and ZONE2 (ZONE3), the remote-controllable devices in such a way that there is no humming or noise. • For... installation and operation of separately sold separately room-to the devices' operating instructions. 39 Connecting the MULTI ZONE terminals For instructions on operations using the remote control unit. For details, see "Setting the Trigger Out" ( page 109). Monitor TV (ZONE2 or ZONE3) H VIDEO IN I S VIDEO IN Power ...
...the ZONE2 (or ZONE3). • When a sold devices, refer to -room remote control unit (DENON RC-616, 617 or 618) is wired and connected between the MAIN ZONE and ZONE2 (ZONE3), the remote-controllable devices in such a way that there is no humming or noise. • For... installation and operation of separately sold separately room-to the devices' operating instructions. 39 Connecting the MULTI ZONE terminals For instructions on operations using the remote control unit. For details, see "Setting the Trigger Out" ( page 109). Monitor TV (ZONE2 or ZONE3) H VIDEO IN I S VIDEO IN Power ...

Owners Manual
Page 41
... if you wish to connect external power amplifier(s) to increase the power of noise. 41 Never connect equipment whose total capacity is supplied from the remote control unit. Never use the AC OUTLETS for hair driers, TVs or other electrical appliances. • Insert the plugs securely. Power amplifier B CENTER A SURROUND BACK L L L R R R A SURROUND...
... if you wish to connect external power amplifier(s) to increase the power of noise. 41 Never connect equipment whose total capacity is supplied from the remote control unit. Never use the AC OUTLETS for hair driers, TVs or other electrical appliances. • Insert the plugs securely. Power amplifier B CENTER A SURROUND BACK L L L R R R A SURROUND...

Owners Manual
Page 42
Basic Operation Playback Operating the remote control unit • The RC-995 remote control has a backlit LCD screen whose contents change according to the mode or function selected, with the AVR-4806.) Press the NUMBER/SYSTEM CALL button to display the screen below. 2 SOURCE MENU To operate the system's source components. AMP/...one of the MODE SELECTOR buttons is the main mode for that you can not be used with the appropriate remote commands for controlling the AVR-4806 in the main room (MAIN ZONE). 2 NUMBER/SYSTEM CALL MENU Operate the "Number/System call" menu function.
Basic Operation Playback Operating the remote control unit • The RC-995 remote control has a backlit LCD screen whose contents change according to the mode or function selected, with the AVR-4806.) Press the NUMBER/SYSTEM CALL button to display the screen below. 2 SOURCE MENU To operate the system's source components. AMP/...one of the MODE SELECTOR buttons is the main mode for that you can not be used with the appropriate remote commands for controlling the AVR-4806 in the main room (MAIN ZONE). 2 NUMBER/SYSTEM CALL MENU Operate the "Number/System call" menu function.
Owners Manual
Page 43
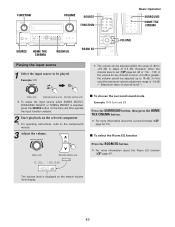
...display. 43 Example: CD ROOM EQ VOLUME The volume can be adjusted up to +18 dB, in steps of channel level)".) (Main unit) (Remote control unit) (Remote control unit) To select the input source when ZONE2 SELECT, ZONE3/REC SELECT or TUNING PRESET is "18 dB - (Maximum value of 0.5 dB....SOURCE HOME THX CINEMA ROOM EQ Playing the input source 1 Select the input source to the component's manual. 3 Adjust the volume. (Main unit) (Remote control unit) M.VOL. -80.0dB 2 To choose the surround sound mode Example: THX Surround EX Press the SURROUND button, then press the HOME THX CINEMA...
...display. 43 Example: CD ROOM EQ VOLUME The volume can be adjusted up to +18 dB, in steps of channel level)".) (Main unit) (Remote control unit) (Remote control unit) To select the input source when ZONE2 SELECT, ZONE3/REC SELECT or TUNING PRESET is "18 dB - (Maximum value of 0.5 dB....SOURCE HOME THX CINEMA ROOM EQ Playing the input source 1 Select the input source to the component's manual. 3 Adjust the volume. (Main unit) (Remote control unit) M.VOL. -80.0dB 2 To choose the surround sound mode Example: THX Surround EX Press the SURROUND button, then press the HOME THX CINEMA...
Owners Manual
Page 44
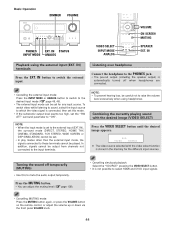
... set this to select HDMI and DVI-D input signals. • Cancelling MUTING mode: Press the MUTING button again, or press the VOLUME button on the remote control, or adjust the volume up or down via the front panel VOLUME knob. 44 IN), the surround mode (DIRECT, STEREO, HOME THX CINEMA, STANDARD, 7CH...
... set this to select HDMI and DVI-D input signals. • Cancelling MUTING mode: Press the MUTING button again, or press the VOLUME button on the remote control, or adjust the volume up or down via the front panel VOLUME knob. 44 IN), the surround mode (DIRECT, STEREO, HOME THX CINEMA, STANDARD, 7CH...
Owners Manual
Page 51
...2 OSD-7 USER MODE 3 OSD-8~14 Tuner preset stations NOTE: • OSD-2: The monitor's resolution is displayed when an HDMI monitor is connected to the AVR-4806. • OSD-4: This is displayed when the auto surround mode is set to "ON" ( page 102) and the input mode is the recommended play ... playback method or mode. • ON: This is set to lights the manuals of Dolby Digital and DTS sources can be checked by pressing the remote control unit's ON SCREEN button ( page 45). IN". 2 To play mode for 2-channel signal sources recorded in Dolby Digital or DTS 1 Press the HOME...
...2 OSD-7 USER MODE 3 OSD-8~14 Tuner preset stations NOTE: • OSD-2: The monitor's resolution is displayed when an HDMI monitor is connected to the AVR-4806. • OSD-4: This is displayed when the auto surround mode is set to "ON" ( page 102) and the input mode is the recommended play ... playback method or mode. • ON: This is set to lights the manuals of Dolby Digital and DTS sources can be checked by pressing the remote control unit's ON SCREEN button ( page 45). IN". 2 To play mode for 2-channel signal sources recorded in Dolby Digital or DTS 1 Press the HOME...

Owners Manual
Page 56
...center speaker; The control can only be set in Dolby Surround. Basic Operation SURROUND STANDARD ENTER PARAMETER STANDARD SURROUND CURSOR ENTER CURSOR SURROUND PARAMETER 5 Press the CURSOR D or H button to varying degrees. The AVR-4806 sets the mode ... may be set in the MUSIC mode, set during the system setup process ( page 113, 114). The control can be heard only from 0 to 6. or from the left/right speakers as a phantom image; Press...for an exciting "wraparound" effect with the on screen display using the remote control unit while in 7 steps from 0 to 7. 56
...center speaker; The control can only be set in Dolby Surround. Basic Operation SURROUND STANDARD ENTER PARAMETER STANDARD SURROUND CURSOR ENTER CURSOR SURROUND PARAMETER 5 Press the CURSOR D or H button to varying degrees. The AVR-4806 sets the mode ... may be set in the MUSIC mode, set during the system setup process ( page 113, 114). The control can be heard only from 0 to 6. or from the left/right speakers as a phantom image; Press...for an exciting "wraparound" effect with the on screen display using the remote control unit while in 7 steps from 0 to 7. 56

Owners Manual
Page 61
Example: DSP surround simulation mode (Remote control unit) (Remote control unit) Example: 7CH STEREO mode (Remote control unit) (Remote control unit) The surround mode switches in terms of the size of the sound field, not the actual size of the listening room. SURROUND 7CH STEREO ...
Example: DSP surround simulation mode (Remote control unit) (Remote control unit) Example: 7CH STEREO mode (Remote control unit) (Remote control unit) The surround mode switches in terms of the size of the sound field, not the actual size of the listening room. SURROUND 7CH STEREO ...

