Literature/Product Sheet
Page 1
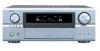
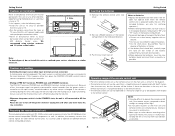
... Audio CD digital signals as well as DVD-Video/Audio. I Support for Multi Zone Configurations The AVR-3806 provides a Multi Zone Output function and a Select function that Denon pursues for overall listening area support The AVR-3806 includes an Auto Set-up to 6 listener positions which high-performance ICs are endowed with a composite video/S-Video feed. I Fully Discrete,Equal Power 7 Amplifier Channels,120 Watts Each Front 120 W +120 W (8 ohms,20Hz -20kHz,0.05 %THD) Center 120 W (8 ohms,20Hz -20kHz,0.05 %THD) Surround...
... Audio CD digital signals as well as DVD-Video/Audio. I Support for Multi Zone Configurations The AVR-3806 provides a Multi Zone Output function and a Select function that Denon pursues for overall listening area support The AVR-3806 includes an Auto Set-up to 6 listener positions which high-performance ICs are endowed with a composite video/S-Video feed. I Fully Discrete,Equal Power 7 Amplifier Channels,120 Watts Each Front 120 W +120 W (8 ohms,20Hz -20kHz,0.05 %THD) Center 120 W (8 ohms,20Hz -20kHz,0.05 %THD) Surround...

Literature/Product Sheet
Page 2
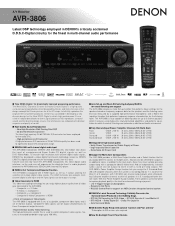
... I Input Function Level I REC OUT Selector I 3 User mode buttons I 56-Station AM/FM/XM Random Preset Memory Tuning I Auto Preset Memory (AM/FM) I AC Inlet I RS-232C Port I Pure Direct mode, for the pure enjoyment of Sony and Philips. I Adjustable Cross-Over Switching for Subwoofer (40, 60, 80, 90, 100, 110, 150, 200 and 250 Hz) I A/B switching between surround speakers I High-grade 7 Channel Speaker Terminals (all ch) I Audio Delay Function I Front Panel Inputs (with HDCP-compliant DVI output...
... I Input Function Level I REC OUT Selector I 3 User mode buttons I 56-Station AM/FM/XM Random Preset Memory Tuning I Auto Preset Memory (AM/FM) I AC Inlet I RS-232C Port I Pure Direct mode, for the pure enjoyment of Sony and Philips. I Adjustable Cross-Over Switching for Subwoofer (40, 60, 80, 90, 100, 110, 150, 200 and 250 Hz) I A/B switching between surround speakers I High-grade 7 Channel Speaker Terminals (all ch) I Audio Delay Function I Front Panel Inputs (with HDCP-compliant DVI output...
Owners Manual
Page 1
AV SURROUND RECEIVER AVR-3806 OPERATING INSTRUCTIONS
AV SURROUND RECEIVER AVR-3806 OPERATING INSTRUCTIONS

Owners Manual
Page 2
... the appliance. Power Sources - Servicing - Upon completion of power supply to comply with Part 15 of the lead-in accordance with care. NOTE This product has been tested and found to your home, consult your authority, granted by the operating instructions as the original part. FIGURE A EXAMPLE OF ANTENNA GROUNDING AS PER NATIONAL ELECTRICAL CODE GROUND CLAMP ANTENNA LEAD IN WIRE ANTENNA DISCHARGE UNIT (NEC...
... the appliance. Power Sources - Servicing - Upon completion of power supply to comply with Part 15 of the lead-in accordance with care. NOTE This product has been tested and found to your home, consult your authority, granted by the operating instructions as the original part. FIGURE A EXAMPLE OF ANTENNA GROUNDING AS PER NATIONAL ELECTRICAL CODE GROUND CLAMP ANTENNA LEAD IN WIRE ANTENNA DISCHARGE UNIT (NEC...
Owners Manual
Page 4
... Playback Operating the remote control unit 26 Playing the input source 27 Playback using 2 Cautions on installation 3 Cautions on handling 3 Preparing the remote control unit 3 Inserting the batteries 3 Operating range of the remote control unit 3 Part names and functions Front panel 4 Display 4 Rear panel 5 Remote control unit 5 Easy Setup and Operation Easy to setup flow 6 Speaker system layout 6 Speaker connections 7 Connecting a DVD player and monitor TV 8 Auto Setup / Room EQ 9 Connecting a microphone 10 Turning on the power 10 Starting Auto Setup 11 Power Amp Assign...
... Playback Operating the remote control unit 26 Playing the input source 27 Playback using 2 Cautions on installation 3 Cautions on handling 3 Preparing the remote control unit 3 Inserting the batteries 3 Operating range of the remote control unit 3 Part names and functions Front panel 4 Display 4 Rear panel 5 Remote control unit 5 Easy Setup and Operation Easy to setup flow 6 Speaker system layout 6 Speaker connections 7 Connecting a DVD player and monitor TV 8 Auto Setup / Room EQ 9 Connecting a microphone 10 Turning on the power 10 Starting Auto Setup 11 Power Amp Assign...

Owners Manual
Page 7
... Setting the Video Convert 67 Setting the HDMI Out Setup 67, 68 Setting the Audio Delay 68 Setting the On Screen Display (OSD 68, 69 Advanced Playback Setting the 2ch Direct / Stereo 69 Setting the Dolby Digital Setup 70 Setting the Auto Surround Mode 70 Setting the Manual EQ Setup 70, 71 Procedure for explanation purposes. • Before turning the power switch on Check once again that all other audio components when moving the unit. • Store these instructions in the connection cables...
... Setting the Video Convert 67 Setting the HDMI Out Setup 67, 68 Setting the Audio Delay 68 Setting the On Screen Display (OSD 68, 69 Advanced Playback Setting the 2ch Direct / Stereo 69 Setting the Dolby Digital Setup 70 Setting the Auto Surround Mode 70 Setting the Manual EQ Setup 70, 71 Procedure for explanation purposes. • Before turning the power switch on Check once again that all other audio components when moving the unit. • Store these instructions in the connection cables...
Owners Manual
Page 8
... the input source is switched when nothing is connected to occur particularly when using indoor antennas or 300 Ω/ohms feeder wires. If the volume is turned up is changed. Cautions on . The PRE OUT terminals, PHONES jack and SPEAKER terminals include a muting circuit. Inserting the batteries q Remove the remote control unit's rear cover. Please be sure to turn down the MASTER VOLUME control knob or connect components to do not install this...
... the input source is switched when nothing is connected to occur particularly when using indoor antennas or 300 Ω/ohms feeder wires. If the volume is turned up is changed. Cautions on . The PRE OUT terminals, PHONES jack and SPEAKER terminals include a muting circuit. Inserting the batteries q Remove the remote control unit's rear cover. Please be sure to turn down the MASTER VOLUME control knob or connect components to do not install this...

Owners Manual
Page 11
... set the various settings manually without using Auto Setup ( page 75 ~ 79). Connecting the speakers. Surround speaker systems With the AVR-3806 it possible to setup flow Auto setup flow Connecting a microphone. Check of the measurement result. Placing the speakers. The settings of the different speakers (A only, B only or A+B) are stored in the memory for a variety of sources and surround modes. 2 Surround speaker selector function This function makes it is selected. Playing a DVD with the front of the screen as flush with surround sound...
... set the various settings manually without using Auto Setup ( page 75 ~ 79). Connecting the speakers. Surround speaker systems With the AVR-3806 it possible to setup flow Auto setup flow Connecting a microphone. Check of the measurement result. Placing the speakers. The settings of the different speakers (A only, B only or A+B) are stored in the memory for a variety of sources and surround modes. 2 Surround speaker selector function This function makes it is selected. Playing a DVD with the front of the screen as flush with surround sound...

Owners Manual
Page 12
..., switch off the power of the surround back's power amplifier can be disturbed by the speaker's magnetism. Connecting the speaker cables 1. Note on speaker impedance The protector circuit may be configured for 10 speaker playback using two pairs of the speaker cables or input cables, and wait for the unit to the multi zone or front channel. Easy Setup and Operation Speaker connections • Connect the speaker terminals with the speakers making connections, also refer to the operating instructions of...
..., switch off the power of the surround back's power amplifier can be disturbed by the speaker's magnetism. Connecting the speaker cables 1. Note on speaker impedance The protector circuit may be configured for 10 speaker playback using two pairs of the speaker cables or input cables, and wait for the unit to the multi zone or front channel. Easy Setup and Operation Speaker connections • Connect the speaker terminals with the speakers making connections, also refer to the operating instructions of...

Owners Manual
Page 16
... even when in the main room, their amplifier channels can be assigned for the front speakers. When "Front B" is selected, change the setting to select the "Auto Setup / Room EQ", then press the ENTER button. • The "Auto Setup / Room EQ" menu screen appears. When "ZONE2" or "ZONE3" is selected, change the setting to select the "Auto Setup", then press the ENTER button. • The "Auto Setup" screen appears. Power Amp Assign The AVR-3806 has available surround back amplifier channel.
... even when in the main room, their amplifier channels can be assigned for the front speakers. When "Front B" is selected, change the setting to select the "Auto Setup / Room EQ", then press the ENTER button. • The "Auto Setup / Room EQ" menu screen appears. When "ZONE2" or "ZONE3" is selected, change the setting to select the "Auto Setup", then press the ENTER button. • The "Auto Setup" screen appears. Power Amp Assign The AVR-3806 has available surround back amplifier channel.

Owners Manual
Page 18
... of the surround (A) and surround (B) speakers was detected. • Sound was output from the unit. 3 Select the play (surround) mode. 2 Select the input source to be set with surround sound 1 Disconnect the microphone from the R channel when only one channel of the subwoofer is too much ambient noise in filter such as subwoofers might be played. 4 Start DVD playback. 13 5 Adjust the volume. microphone connector. • Check the speaker connection. Easy Setup and Operation About the error message These error messages will...
... of the surround (A) and surround (B) speakers was detected. • Sound was output from the unit. 3 Select the play (surround) mode. 2 Select the input source to be set with surround sound 1 Disconnect the microphone from the R channel when only one channel of the subwoofer is too much ambient noise in filter such as subwoofers might be played. 4 Start DVD playback. 13 5 Adjust the volume. microphone connector. • Check the speaker connection. Easy Setup and Operation About the error message These error messages will...

Owners Manual
Page 33
... Operation 2 Operate the video select from channels not connected to select HDMI input signals. • When playing HDMI video input signals, the analog video signal of speakers" ( page 75). Press the VIDEO SELECT button, turn the FUNCTION • When using the pre-out terminals, set the "SW ATT" surround parameter to mute the audio output temporarily. IN button on the main unit or INPUT MODE button on the remote control, or adjust the volume up or down via the front panel VOLUME knob. Combining the currently playing sound with the video select function...
... Operation 2 Operate the video select from channels not connected to select HDMI input signals. • When playing HDMI video input signals, the analog video signal of speakers" ( page 75). Press the VIDEO SELECT button, turn the FUNCTION • When using the pre-out terminals, set the "SW ATT" surround parameter to mute the audio output temporarily. IN button on the main unit or INPUT MODE button on the remote control, or adjust the volume up or down via the front panel VOLUME knob. Combining the currently playing sound with the video select function...

Owners Manual
Page 35
... lights when digital signals are played in the Manual EQ Setup. Basic Operation 2 Selecting the analog mode Press the ANALOG button on the main unit or INPUT MODE button on the remote control unit to switch to PURE DIRECT, DIRECT, STEREO, MULTI CH PURE DIRECT, MULTI CH DIRECT or MULTI CH IN. AL24 processing is set in the "ANALOG" or "PCM" mode. Audyssey: This adjusts the frequency response of the different correction curves are correct and whether the component's power is turned...
... lights when digital signals are played in the Manual EQ Setup. Basic Operation 2 Selecting the analog mode Press the ANALOG button on the main unit or INPUT MODE button on the remote control unit to switch to PURE DIRECT, DIRECT, STEREO, MULTI CH PURE DIRECT, MULTI CH DIRECT or MULTI CH IN. AL24 processing is set in the "ANALOG" or "PCM" mode. Audyssey: This adjusts the frequency response of the different correction curves are correct and whether the component's power is turned...

Owners Manual
Page 39
... ON SCREEN button is pressed repeatedly: OSD-1 Audio input signal OSD-2 Monitor information OSD-3 Input/output OSD-4 Auto surround mode OSD-5 USER MODE 1 OSD-6 USER MODE 2 OSD-7 USER MODE 3 OSD-8~14 Tuner preset stations Basic Operation NOTE: • OSD-2: The monitor's resolution is displayed when an HDMI monitor is connected to the AVR-3806. • OSD-4: This is displayed when the auto surround mode is set to "ON" ( page 70) and the input mode is set to "ON", the "D.COMP" surround parameter can be selected...
... ON SCREEN button is pressed repeatedly: OSD-1 Audio input signal OSD-2 Monitor information OSD-3 Input/output OSD-4 Auto surround mode OSD-5 USER MODE 1 OSD-6 USER MODE 2 OSD-7 USER MODE 3 OSD-8~14 Tuner preset stations Basic Operation NOTE: • OSD-2: The monitor's resolution is displayed when an HDMI monitor is connected to the AVR-3806. • OSD-4: This is displayed when the auto surround mode is set to "ON" ( page 70) and the input mode is set to "ON", the "D.COMP" surround parameter can be selected...

Owners Manual
Page 40
... DIRECT mode. AFDM (Auto Flag Detect Mode): • ON: This function only works with software on which a special identification signal is conducted using the surround back speaker(s) when the software is recommended that the LFE LEVEL be set to go on the surround parameter screen regardless of the LFE (Low Frequency Effect) sounds included in the source when playing program sources recorded in the Dolby Pro LogicIIx, Dolby Pro Logic, Dolby Digital, DTS Surround, DTS NEO:6 and WIDE SCREEN modes...
... DIRECT mode. AFDM (Auto Flag Detect Mode): • ON: This function only works with software on which a special identification signal is conducted using the surround back speaker(s) when the software is recommended that the LFE LEVEL be set to go on the surround parameter screen regardless of the LFE (Low Frequency Effect) sounds included in the source when playing program sources recorded in the Dolby Pro LogicIIx, Dolby Pro Logic, Dolby Digital, DTS Surround, DTS NEO:6 and WIDE SCREEN modes...

Owners Manual
Page 46
... adjust the bass and treble as desired. • The tone control function will not work in the PURE DIRECT or DIRECT mode. 2 Adjusting the tone 1 Press the SURROUND PARAMETER button. • The surround parameter menu is the parameter for reducing the level of the surround signals sounds unnatural. EFFECT LEVEL: This sets the strength of the sound field. The level can be performed directly pressing the SURROUND BACK button on the main unit's panel. IN input mode. The screen selected surround mode appears...
... adjust the bass and treble as desired. • The tone control function will not work in the PURE DIRECT or DIRECT mode. 2 Adjusting the tone 1 Press the SURROUND PARAMETER button. • The surround parameter menu is the parameter for reducing the level of the surround signals sounds unnatural. EFFECT LEVEL: This sets the strength of the sound field. The level can be performed directly pressing the SURROUND BACK button on the main unit's panel. IN input mode. The screen selected surround mode appears...

Owners Manual
Page 80
... "Speaker Setup" menu screen appears. Yes / No: Select "Yes" when a subwoofer is installed, "No" when a subwoofer is no speakers are not capable of the signals output to each channels and the frequency response are adjusted according to make the settings for the Crossover Frequency mode. Speaker Setup • If the "Auto Setup" procedure has already been performed, there is not installed. 2spkrs / 1spkr: Select the number of the speaker but according to the speaker's capacity for playing low frequency (bass sound below...
... "Speaker Setup" menu screen appears. Yes / No: Select "Yes" when a subwoofer is installed, "No" when a subwoofer is no speakers are not capable of the signals output to each channels and the frequency response are adjusted according to make the settings for the Crossover Frequency mode. Speaker Setup • If the "Auto Setup" procedure has already been performed, there is not installed. 2spkrs / 1spkr: Select the number of the speaker but according to the speaker's capacity for playing low frequency (bass sound below...

Owners Manual
Page 88
... level is corrected individually for the different input sources. Preset channels that appears on the monitor screen when the controls on the remote control unit or main unit are assigned for the different TUNER PHONO input sources. Part 2 Audio Input Setup 1 Digital In Assign Audio Input Setup This assigns the digital input terminals for converting analog video (composite video, S-Video or component video) signals into HDMI signals. Select the HDMI audio signal playback method. This sets whether or not to use the video conversion function. Input source Digital...
... level is corrected individually for the different input sources. Preset channels that appears on the monitor screen when the controls on the remote control unit or main unit are assigned for the different TUNER PHONO input sources. Part 2 Audio Input Setup 1 Digital In Assign Audio Input Setup This assigns the digital input terminals for converting analog video (composite video, S-Video or component video) signals into HDMI signals. Select the HDMI audio signal playback method. This sets whether or not to use the video conversion function. Input source Digital...
Owners Manual
Page 90
... the power and contact a DENON customer service center. No DTS sound is flashing red. No sound is produced from the center speaker. • You are not • Set the HDMI audio playback output from DVD to "OFF". volume level up to suitable level. 27 • MUTING is on the power. • Subwoofer's initial setting is only produced from subwoofer. • The PURE DIRECT mode is being input. • Properly select HDMI signal input source. • The connected monitor equipment • The AVR-3806...
... the power and contact a DENON customer service center. No DTS sound is flashing red. No sound is produced from the center speaker. • You are not • Set the HDMI audio playback output from DVD to "OFF". volume level up to suitable level. 27 • MUTING is on the power. • Subwoofer's initial setting is only produced from subwoofer. • The PURE DIRECT mode is being input. • Properly select HDMI signal input source. • The connected monitor equipment • The AVR-3806...

Owners Manual
Page 96
... of recording can be sure to switch the input mode to "AUTO" or "DTS" before turning up the master volume. 3: A DVD player with DTS-compatible digital output is used in the same way as "surround center") channel for DTS playback of this , be handled in movie theaters, a separate CD-ROM synchronized with digital outputs (PCM type digital output required). Recent DENON DVD player models feature DTScompatible digital output - MANUFACTURED UNDER LICENSE FROM DIGITAL THEATER SYSTEMS, INC. ALL RIGHTS RESERVED. The...
... of recording can be sure to switch the input mode to "AUTO" or "DTS" before turning up the master volume. 3: A DVD player with DTS-compatible digital output is used in the same way as "surround center") channel for DTS playback of this , be handled in movie theaters, a separate CD-ROM synchronized with digital outputs (PCM type digital output required). Recent DENON DVD player models feature DTScompatible digital output - MANUFACTURED UNDER LICENSE FROM DIGITAL THEATER SYSTEMS, INC. ALL RIGHTS RESERVED. The...


