IR Codes
Page 1
...SURR.) 52 37 SW LEVEL DOWN 53 38 DSP SIMULATION 54 39 SB/SBL LEVEL UP 55 40 41 56 57 42 TEST TONE 58 43 SB/SBL LEVEL DOWN 59 44 SW LEVEL UP 60 45 SPEAKER 61 46 62 47 63 Key Name MUTING...EQ OFF MULTI INPUT MODE ANALOG CURSOR RIGHT STATUS ON SCREEN SYSTEM ADDRESS(C1~C5 EXTENSION BIT(C12,C13) : 11 No. DENON AVR2805 RC CODE FORMAT SHARP DATA CONSTRUCTION 15bits C14 0 C15 0=NOT INVERTED,1=INVERTED SYSTEM ADDRESS(C1~C5 EXTENSION BIT(C12,C13) : &#...
...SURR.) 52 37 SW LEVEL DOWN 53 38 DSP SIMULATION 54 39 SB/SBL LEVEL UP 55 40 41 56 57 42 TEST TONE 58 43 SB/SBL LEVEL DOWN 59 44 SW LEVEL UP 60 45 SPEAKER 61 46 62 47 63 Key Name MUTING...EQ OFF MULTI INPUT MODE ANALOG CURSOR RIGHT STATUS ON SCREEN SYSTEM ADDRESS(C1~C5 EXTENSION BIT(C12,C13) : 11 No. DENON AVR2805 RC CODE FORMAT SHARP DATA CONSTRUCTION 15bits C14 0 C15 0=NOT INVERTED,1=INVERTED SYSTEM ADDRESS(C1~C5 EXTENSION BIT(C12,C13) : &#...
Owners Manual
Page 17
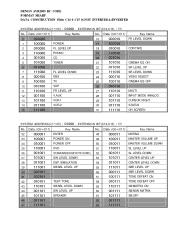
..., 83 ~ 85) MODE SELECT button 49) SYSTEM buttons 49 ~ 52) SYSTEM SETUP/SETUP button 18, 47) Cursor buttons 18) ON SCREEN/DISPLAY button ..........(64, 73) TEST TONE button 68) SYSTEM CALL buttons 54) USE/LEARN button 53, 56) Surround buttons 62, 69, ,71, 77) Master volume control buttons 60, 67) MUTING...
..., 83 ~ 85) MODE SELECT button 49) SYSTEM buttons 49 ~ 52) SYSTEM SETUP/SETUP button 18, 47) Cursor buttons 18) ON SCREEN/DISPLAY button ..........(64, 73) TEST TONE button 68) SYSTEM CALL buttons 54) USE/LEARN button 53, 56) Surround buttons 62, 69, ,71, 77) Master volume control buttons 60, 67) MUTING...

Owners Manual
Page 21
... setting details q : This sets the speaker connection mode, polarity, and bass reproduction ability. w : This sets the optimum delay time from each speaker. NOTE: • A loud test tone is required for Auto Setup at the actual listening position which will be planning night time measurements, and consider not allowing small children into...
... setting details q : This sets the speaker connection mode, polarity, and bass reproduction ability. w : This sets the optimum delay time from each speaker. NOTE: • A loud test tone is required for Auto Setup at the actual listening position which will be planning night time measurements, and consider not allowing small children into...

Owners Manual
Page 22
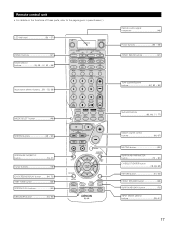
... *AutoSet/RoomEQ Auto Setup 2 Display the Auto Setup screen. (Remote control unit) 3 Check the "Power Amp Assign" setting. • When "Surround Back" is selected, the test tone during Auto Setup will be output from the Surround Back speaker. • When "ZONE2" is selected, change the setting to "ZONE2" The... test tone during Auto Setup is set so that it will not be output to ZONE2 (Another room). 1-1 Setting the Auto Setup 1 Select "Auto Setup" ...
... *AutoSet/RoomEQ Auto Setup 2 Display the Auto Setup screen. (Remote control unit) 3 Check the "Power Amp Assign" setting. • When "Surround Back" is selected, the test tone during Auto Setup will be output from the Surround Back speaker. • When "ZONE2" is selected, change the setting to "ZONE2" The... test tone during Auto Setup is set so that it will not be output to ZONE2 (Another room). 1-1 Setting the Auto Setup 1 Select "Auto Setup" ...
Owners Manual
Page 32
...ft (6.0 m) or less. Please note that the playback level between the center speaker and listening position. The Speaker Setup Menu reappears. The AVR-2805/985 automatically sets the optimum surround delay time for the listening room. (Remote control unit) NOTE: • If the distance unit is...*Channel Level T.Tone: Auto 32 6 Set the distance between the different channels is equal. • From the listening position, listen to the test tones produced from the remote control unit. (For details, see page 18). 2-3 Setting the Channel Level • Use this setting to adjust so...
...ft (6.0 m) or less. Please note that the playback level between the center speaker and listening position. The Speaker Setup Menu reappears. The AVR-2805/985 automatically sets the optimum surround delay time for the listening room. (Remote control unit) NOTE: • If the distance unit is...*Channel Level T.Tone: Auto 32 6 Set the distance between the different channels is equal. • From the listening position, listen to the test tones produced from the remote control unit. (For details, see page 18). 2-3 Setting the Channel Level • Use this setting to adjust so...

Owners Manual
Page 33
... Level T.Tone: Auto (Remote control unit) • Auto: Adjust the level while listening to the test tones produced automatically from which you want to produce the test tone to "SB". The test tones are automatically emitted from each speaker. The volume can be adjusted between -12 dB and +12... SL SW 2spkrs Example: When the volume is set to -11.5 dB When the surround back speaker setting is set to adjust the level. 4 Select "Test Tone Start". *Channel Level Tone Start:Yes (Remote control unit) 5 Select "Yes". (Remote control unit) 6 a. TestTone Auto FL : -11.5dB b. ...
... Level T.Tone: Auto (Remote control unit) • Auto: Adjust the level while listening to the test tones produced automatically from which you want to produce the test tone to "SB". The test tones are automatically emitted from each speaker. The volume can be adjusted between -12 dB and +12... SL SW 2spkrs Example: When the volume is set to -11.5 dB When the surround back speaker setting is set to adjust the level. 4 Select "Test Tone Start". *Channel Level Tone Start:Yes (Remote control unit) 5 Select "Yes". (Remote control unit) 6 a. TestTone Auto FL : -11.5dB b. ...
Owners Manual
Page 46
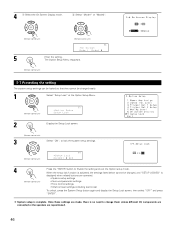
.... • System setup settings (Remote control unit) • Surround parameter settings • Tone control settings • Channel level settings (including test tones) To unlock, press the System Setup button again and display the Setup Lock screen, then select "OFF" and press "ENTER". Once these... lock the system setup settings. (Remote control unit) *Setup Lock ON/OFF: OFF 4 Press the "ENTER"button to change them unless different AV components are connected or the speakers are made, there is no need to finalize the setting and exit the Option setup mode. w Select "Mode1...
.... • System setup settings (Remote control unit) • Surround parameter settings • Tone control settings • Channel level settings (including test tones) To unlock, press the System Setup button again and display the Setup Lock screen, then select "OFF" and press "ENTER". Once these... lock the system setup settings. (Remote control unit) *Setup Lock ON/OFF: OFF 4 Press the "ENTER"button to change them unless different AV components are connected or the speakers are made, there is no need to finalize the setting and exit the Option setup mode. w Select "Mode1...

Owners Manual
Page 68
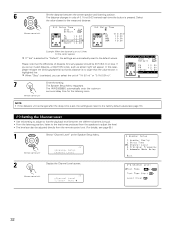
...the SW (subwoofer) setting one step from the remote control unit, as shown below . • Adjusting with the remote control unit using the test tones is set to "OFF"). 68 This adjustment can be performed with the system setup (see page 32~34) or from -12 dB (...same for "Speaker Configuration", this is only possible in the "Auto" mode and only effective in the memory. 1 Press the TEST TONE button. (Remote control unit) 2 Test tones are output from the different speakers. 11 SURROUND Before playing with the surround function • Before playing with the surround function...
...the SW (subwoofer) setting one step from the remote control unit, as shown below . • Adjusting with the remote control unit using the test tones is set to "OFF"). 68 This adjustment can be performed with the system setup (see page 32~34) or from -12 dB (...same for "Speaker Configuration", this is only possible in the "Auto" mode and only effective in the memory. 1 Press the TEST TONE button. (Remote control unit) 2 Test tones are output from the different speakers. 11 SURROUND Before playing with the surround function • Before playing with the surround function...