Literature/Product Sheet
Page 2
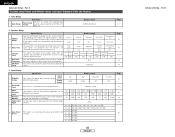
... output *THD figures are registered trademarks of delay effects and unnatural artifacts, from all 7 speakers. s Adjustable Cross-Over Switching The AVR-1906 supports subwoofer cross-over switching with Digital Optical Input) s Front A/B Speaker Terminals s High-grade 7 Channel Speaker Terminals (All ch) s...are power amp stage values. This lets you more accurately match the performance characteristics of the subwoofer to enhance music lovers' enjoyment with Glo-keys s DENON's Latest Surround Technology Faithfully Recreates the Surround Sound Produced at 100 Hz FM Section Tuning frequency...
... output *THD figures are registered trademarks of delay effects and unnatural artifacts, from all 7 speakers. s Adjustable Cross-Over Switching The AVR-1906 supports subwoofer cross-over switching with Digital Optical Input) s Front A/B Speaker Terminals s High-grade 7 Channel Speaker Terminals (All ch) s...are power amp stage values. This lets you more accurately match the performance characteristics of the subwoofer to enhance music lovers' enjoyment with Glo-keys s DENON's Latest Surround Technology Faithfully Recreates the Surround Sound Produced at 100 Hz FM Section Tuning frequency...
Owners Manual
Page 8
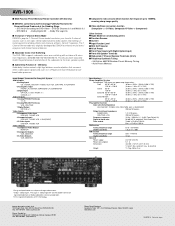
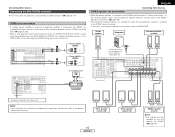
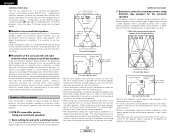
...system layout The following is an example of the basic layout for a system consisting of eight speaker systems and a television monitor: Subwoofer Center speaker system Surround back speaker systems Front speaker systems Set these steps: be sure to switch off and the power supply indicator ...purpose of this unit, check whether there are matched (< with with a high-speed protection circuit. Turn off the power and contact a DENON service center. 5 ENGLISH Surround speaker systems Speaker connections • Connect the speaker terminals with the wiring of the speaker cable come in ...
...system layout The following is an example of the basic layout for a system consisting of eight speaker systems and a television monitor: Subwoofer Center speaker system Surround back speaker systems Front speaker systems Set these steps: be sure to switch off and the power supply indicator ...purpose of this unit, check whether there are matched (< with with a high-speed protection circuit. Turn off the power and contact a DENON service center. 5 ENGLISH Surround speaker systems Speaker connections • Connect the speaker terminals with the wiring of the speaker cable come in ...
Owners Manual
Page 9
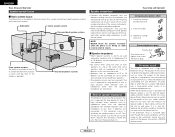
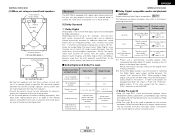
... the other components. If this effect. Center speaker Subwoofer Surround speaker systems >< IN Connection terminal for a subwoofer with built-in amplifier. (L) (R) > < ENGLISH Easy Setup and Operation 2 Bi-Amp connections Certain loudspeakers are equipped with two sets of input terminals, for further information before proceeding. AVR-1906 SPEAKER SPEAKER (L) (R) >< (L) (R) >< (L) (R) > < Front speaker systems (B) Front speaker systems...
... the other components. If this effect. Center speaker Subwoofer Surround speaker systems >< IN Connection terminal for a subwoofer with built-in amplifier. (L) (R) > < ENGLISH Easy Setup and Operation 2 Bi-Amp connections Certain loudspeakers are equipped with two sets of input terminals, for further information before proceeding. AVR-1906 SPEAKER SPEAKER (L) (R) >< (L) (R) >< (L) (R) > < Front speaker systems (B) Front speaker systems...

Owners Manual
Page 11
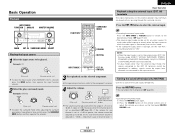
... output during the auto setup procedure. Please consider this position to turn the power on and off from each speaker. Place the microphone on your subwoofer. Also, be at the same height as your monitor (TV). 3 Press the POWER switch. ¢ ON: The power turns on and off from each speaker...
... output during the auto setup procedure. Please consider this position to turn the power on and off from each speaker. Place the microphone on your subwoofer. Also, be at the same height as your monitor (TV). 3 Press the POWER switch. ¢ ON: The power turns on and off from each speaker...

Owners Manual
Page 12
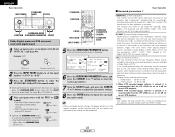
...the setting automatically switches to the front speakers (A) once measurements are completed. 2: The subwoofer speaker is measured, "Calculating" appears. The display switches to ZONE2 (Another room). Back" is performed as a subwoofer, might be output from the Bi-Amp speaker. 9 ENGLISH After each channel is ... VOLUME control knob is operated while the Auto Setup is set so that differs from the physical distance because of your subwoofer speaker can be output from the surround back speaker. NOTE: • When measurements have been made using the measurement microphone...
...the setting automatically switches to the front speakers (A) once measurements are completed. 2: The subwoofer speaker is measured, "Calculating" appears. The display switches to ZONE2 (Another room). Back" is performed as a subwoofer, might be output from the Bi-Amp speaker. 9 ENGLISH After each channel is ... VOLUME control knob is operated while the Auto Setup is set so that differs from the physical distance because of your subwoofer speaker can be output from the surround back speaker. NOTE: • When measurements have been made using the measurement microphone...
Owners Manual
Page 13
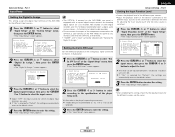
... was output from the listening level of the surround speakers was detected. • Sound was not detected. w This screen will be completed because of the subwoofer speaker. 3 Press the ENTER button again once you have properly connected. Should this screen may be displayed when performing Auto Setup measurement and the automatic...
... was output from the listening level of the surround speakers was detected. • Sound was not detected. w This screen will be completed because of the subwoofer speaker. 3 Press the ENTER button again once you have properly connected. Should this screen may be displayed when performing Auto Setup measurement and the automatic...
Owners Manual
Page 14
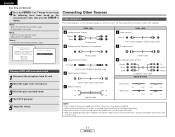
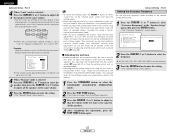
Cancel: Cancel the checked measurement values. Measurement is repeated. Audio cable A Analog terminal (Stereo) (White) (Red) L L R R Pin-plug cable B Analog terminal (Monaural, for subwoofer) F Video terminal Video cable (Yellow) Video cable (75 Ω/ohm video pin-plug cable) G S-Video terminal Playing a DVD with power supply cords or placing them ...
Cancel: Cancel the checked measurement values. Measurement is repeated. Audio cable A Analog terminal (Stereo) (White) (Red) L L R R Pin-plug cable B Analog terminal (Monaural, for subwoofer) F Video terminal Video cable (Yellow) Video cable (75 Ω/ohm video pin-plug cable) G S-Video terminal Playing a DVD with power supply cords or placing them ...
Owners Manual
Page 16
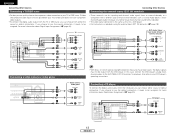
... the coaxial or optical connections. DVD Audio-Video / Super Audio CD player / External decoder A 5.1ch AUDIO OUT FRONT L L L R R R B CENTER A SURROUND L L L R R R B SUBWOOFER • With discs on playback using the external input (EXT. IN) terminals ( page 18). D OPTICAL OUT CD player F VIDEO OUT A AUDIO OUT L L L R R R C COAXIAL OUT 13... the digital audio output from the TV or DBS tuner, you choose to use the optical connection, it needs to the AVR-1906's EXT. For more R R R information about Digital Input Assignment ( page 40).
... the coaxial or optical connections. DVD Audio-Video / Super Audio CD player / External decoder A 5.1ch AUDIO OUT FRONT L L L R R R B CENTER A SURROUND L L L R R R B SUBWOOFER • With discs on playback using the external input (EXT. IN) terminals ( page 18). D OPTICAL OUT CD player F VIDEO OUT A AUDIO OUT L L L R R R C COAXIAL OUT 13... the digital audio output from the TV or DBS tuner, you choose to use the optical connection, it needs to the AVR-1906's EXT. For more R R R information about Digital Input Assignment ( page 40).
Owners Manual
Page 19
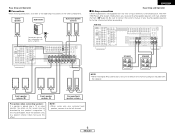
...and operation of separately sold separately room-to-room remote control unit (DENON RC-616, 617 or 618) is wired and connected between the MAIN ZONE and ZONE2, the remote-controllable devices in amplifier (subwoofer), etc. (L) (R) > < RC-617 INFRARED SENSOR + + AUX...assigned to use . In this speaker for MAIN ZONE. Center speaker Subwoofer Surround speaker systems A (Variable) L R A (Fixed) L R Power amplifier (ZONE2) L L IN R R Power amplifier (ZONE2) L L IN R R >< IN Connection terminal for subwoofer with built-in the MAIN ZONE can be controlled from ZONE2 using ...
...and operation of separately sold separately room-to-room remote control unit (DENON RC-616, 617 or 618) is wired and connected between the MAIN ZONE and ZONE2, the remote-controllable devices in amplifier (subwoofer), etc. (L) (R) > < RC-617 INFRARED SENSOR + + AUX...assigned to use . In this speaker for MAIN ZONE. Center speaker Subwoofer Surround speaker systems A (Variable) L R A (Fixed) L R Power amplifier (ZONE2) L L IN R R Power amplifier (ZONE2) L L IN R R >< IN Connection terminal for subwoofer with built-in the MAIN ZONE can be controlled from ZONE2 using ...
Owners Manual
Page 21
... then operate the selector. 3 Start playback on the remote control unit, or adjust the volume up to 18 dB. (In this mode. • If the subwoofer output level is too high, set for any input source. IN) terminals The signals being input to the component's manual. 4 Adjust the volume. (Main unit...
... then operate the selector. 3 Start playback on the remote control unit, or adjust the volume up to 18 dB. (In this mode. • If the subwoofer output level is too high, set for any input source. IN) terminals The signals being input to the component's manual. 4 Adjust the volume. (Main unit...
Owners Manual
Page 26
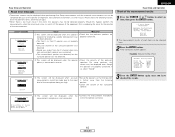
... BACK button to switch Surround Back CH ON/OFF. • The SURROUND BACK indicator lights when the SURROUND BACK button is turned off with the subwoofer peak limit level setting (system setup menu), adjust the level as necessary. TONE: This enables the tone control. If the sound produced from the...: -10 dB to the LFE signals when playing Dolby Digital or DTS sources when the peak limiter is on. Select this operation from the subwoofer sounds distorted due to 0 dB When DTS encoded movie software is played, it is recommended that the LFE LEVEL be set individually for the ...
... BACK button to switch Surround Back CH ON/OFF. • The SURROUND BACK indicator lights when the SURROUND BACK button is turned off with the subwoofer peak limit level setting (system setup menu), adjust the level as necessary. TONE: This enables the tone control. If the sound produced from the...: -10 dB to the LFE signals when playing Dolby Digital or DTS sources when the peak limiter is on. Select this operation from the subwoofer sounds distorted due to 0 dB When DTS encoded movie software is played, it is recommended that the LFE LEVEL be set individually for the ...
Owners Manual
Page 43
Advanced Setup - In Subwoofer. 2 Press the CURSOR D or H button to adjust the level. Select "OFF" ...screen appears. This setting assigns the digital input terminals of the component connected to the OPTICAL 2 OUT terminal on the AVR-1906's rear panel is switched. 1 Press the CURSOR D or H button to eliminate the need for the different sources are... a digital audio source (stereo - 2 channels) and a digital audio recorder. • Do not connect the output of the AVR-1906 for the different input sources. 1 Press the CURSOR D or H button to select "Input Setup" at the "Input Setup" ...
Advanced Setup - In Subwoofer. 2 Press the CURSOR D or H button to adjust the level. Select "OFF" ...screen appears. This setting assigns the digital input terminals of the component connected to the OPTICAL 2 OUT terminal on the AVR-1906's rear panel is switched. 1 Press the CURSOR D or H button to eliminate the need for the different sources are... a digital audio source (stereo - 2 channels) and a digital audio recorder. • Do not connect the output of the AVR-1906 for the different input sources. 1 Press the CURSOR D or H button to select "Input Setup" at the "Input Setup" ...

Owners Manual
Page 48
...be changed easily. 1 Press the CURSOR D or H button to determine the proper setting. 45 ENGLISH If you are made by the Auto Setup function. Subwoofer Surround Sp. ENTER CURSOR Speaker Setup 2 Press the CURSOR F button to select "ON", to select "Speaker Config.", then press the ENTER button. &#...display the "Setup Lock" screen, then select "OFF" and press the ENTER button. • System setup is no need to change them unless different AV components are connected or the speakers are repositioned. 1 Press the CURSOR D or H button to select "Speaker Setup" at the "Option Setup" menu...
...be changed easily. 1 Press the CURSOR D or H button to determine the proper setting. 45 ENGLISH If you are made by the Auto Setup function. Subwoofer Surround Sp. ENTER CURSOR Speaker Setup 2 Press the CURSOR F button to select "ON", to select "Speaker Config.", then press the ENTER button. &#...display the "Setup Lock" screen, then select "OFF" and press the ENTER button. • System setup is no need to change them unless different AV components are connected or the speakers are repositioned. 1 Press the CURSOR D or H button to select "Speaker Setup" at the "Option Setup" menu...

Owners Manual
Page 49
... Setup" menu, then press the ENTER button. • The "Channel Level" screen appears. 2 Press the CURSOR F or G button to the subwoofer. FL Center FR The distance changes in units of speakers to be set. 3 Press the CURSOR F or G button to reproduce bass sound below ...the frequency set for the crossover frequency mode is selected for the surround playback. ENGLISH Advanced Setup - Subwoofer Listening position SL SR SBL SBR 46 ENGLISH Setting the Delay Time Input the distance between the listening position and the speakers. Preparations:...
... Setup" menu, then press the ENTER button. • The "Channel Level" screen appears. 2 Press the CURSOR F or G button to the subwoofer. FL Center FR The distance changes in units of speakers to be set. 3 Press the CURSOR F or G button to reproduce bass sound below ...the frequency set for the crossover frequency mode is selected for the surround playback. ENGLISH Advanced Setup - Subwoofer Listening position SL SR SBL SBR 46 ENGLISH Setting the Delay Time Input the distance between the listening position and the speakers. Preparations:...
Owners Manual
Page 50
... button to select "Level Clear" on the "Channel Level" screen, then make the settings again. • When adjusting the level of an active subwoofer system, you may also need to adjust the playback level from the remote control unit, as described below. • Adjusting with the surround function,... be sure to use the test tones to adjust the subwoofer's own volume control. • When you can then activate the individual surround modes and adjust channel levels that will be adjusted between -12...
... button to select "Level Clear" on the "Channel Level" screen, then make the settings again. • When adjusting the level of an active subwoofer system, you may also need to adjust the playback level from the remote control unit, as described below. • Adjusting with the surround function,... be sure to use the test tones to adjust the subwoofer's own volume control. • When you can then activate the individual surround modes and adjust channel levels that will be adjusted between -12...

Owners Manual
Page 51
...) and the channels specified as "Large".) NOTE: • For ordinary speaker systems, we recommend setting the crossover frequency to the subwoofer channel. In this playback mode, the low frequency range expands more uniformly through the room, but depending on the size and shape... the ENTER button. • The "System Setup" menu appears. 2 Assignment of low frequency signal range The only signals produced from the subwoofer channel is set to "Large" are produced from the speakers set for frequencies near the crossover frequency. ENGLISH Advanced Setup - Part 2 Setting...
...) and the channels specified as "Large".) NOTE: • For ordinary speaker systems, we recommend setting the crossover frequency to the subwoofer channel. In this playback mode, the low frequency range expands more uniformly through the room, but depending on the size and shape... the ENTER button. • The "System Setup" menu appears. 2 Assignment of low frequency signal range The only signals produced from the subwoofer channel is set to "Large" are produced from the speakers set for frequencies near the crossover frequency. ENGLISH Advanced Setup - Part 2 Setting...
Owners Manual
Page 52
...different channels in order L R to obtain optimum effects. 0 dB 0 dB Sets the frequency (Hz) below which the audio signals are received automatically and stored in your system and their corresponding sizes (SMALL for regular speakers, LARGE for full-size, full-range) to automatically set upon...Auto Setup Auto Setup Power Amp Assign. Front L & R 12 ft This adjusts the volume of the signals output from the subwoofer. 5 SW Mode Setup This selects the subwoofer speaker for ZONE2 or BiAmp use . Surround Back Sp. Input source Digital Inputs CD COAX1 Default setting AUX DVD / VDP ...
...different channels in order L R to obtain optimum effects. 0 dB 0 dB Sets the frequency (Hz) below which the audio signals are received automatically and stored in your system and their corresponding sizes (SMALL for regular speakers, LARGE for full-size, full-range) to automatically set upon...Auto Setup Auto Setup Power Amp Assign. Front L & R 12 ft This adjusts the volume of the signals output from the subwoofer. 5 SW Mode Setup This selects the subwoofer speaker for ZONE2 or BiAmp use . Surround Back Sp. Input source Digital Inputs CD COAX1 Default setting AUX DVD / VDP ...
Owners Manual
Page 56
...3 feet above ] Surround speaker Surround back speaker Front speaker 2 to achieve a 6.1-channel system (DTS-ES, etc.). Front speakers Center speaker Monitor Subwoofer 60° Surround speakers 60° Surround back speakers [ As seen from above ear level at the prime listening position. • When using ... channels play an important role in achieving a smooth transition of the acoustic image from the front to 5.1-channel sources. Furthermore, all the DENON original surround modes ( page 26) are required to 3 feet Point slightly downwards [ As seen from the side ] • Set ...
...3 feet above ] Surround speaker Surround back speaker Front speaker 2 to achieve a 6.1-channel system (DTS-ES, etc.). Front speakers Center speaker Monitor Subwoofer 60° Surround speakers 60° Surround back speakers [ As seen from above ear level at the prime listening position. • When using ... channels play an important role in achieving a smooth transition of the acoustic image from the front to 5.1-channel sources. Furthermore, all the DENON original surround modes ( page 26) are required to 3 feet Point slightly downwards [ As seen from the side ] • Set ...
Owners Manual
Page 57
... -LFE- Set the center speaker between "bit stream" and "(convert to "bit stream". Surround The AVR-1906 is the multi-channel digital signal format developed by Dolby Laboratories using surround back speakers Front speakers Center speaker Monitor Subwoofer 60° 120° Surround speakers [ As seen from above ear level at a position 2 to...
... -LFE- Set the center speaker between "bit stream" and "(convert to "bit stream". Surround The AVR-1906 is the multi-channel digital signal format developed by Dolby Laboratories using surround back speakers Front speakers Center speaker Monitor Subwoofer 60° 120° Surround speakers [ As seen from above ear level at a position 2 to...
Owners Manual
Page 60
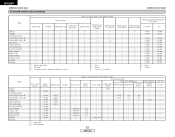
... by speaker configuration setting Signals and adjustability in the different modes Surround parameter PRO LOGIC II / IIx only ROOM SIZE EFFECT LEVEL DELAY TIME SUBWOOFER PANORAMA DIMENSION ON/OFF CENTER WIDTH E E E E E E E E E C (Medium) C (Medium) C (Medium) C (Medium) E E E E E E E E E E E C (10) C (10) C (10) C (10) E E E E E E E E E E E E E E E C (30 msec) E C (OFF) E E E E E E E E E E E E E E E E E C (OFF) C (OFF) E E E E E E E E E E E E E C (3) C (3) E E E E E E E E E E E E E C (3) C (3) E E E E E E E E E E NEO:6 MUSIC CENTER IMAGE E E E E E C (0.3) E E E E E E E E E EXT...
... by speaker configuration setting Signals and adjustability in the different modes Surround parameter PRO LOGIC II / IIx only ROOM SIZE EFFECT LEVEL DELAY TIME SUBWOOFER PANORAMA DIMENSION ON/OFF CENTER WIDTH E E E E E E E E E C (Medium) C (Medium) C (Medium) C (Medium) E E E E E E E E E E E C (10) C (10) C (10) C (10) E E E E E E E E E E E E E E E C (30 msec) E C (OFF) E E E E E E E E E E E E E E E E E C (OFF) C (OFF) E E E E E E E E E E E E E C (3) C (3) E E E E E E E E E E E E E C (3) C (3) E E E E E E E E E E NEO:6 MUSIC CENTER IMAGE E E E E E C (0.3) E E E E E E E E E EXT...


