Literature/Product Sheet
Page 1
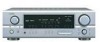
...DTS-ES Discrete 6.1, DTS-ES Matrix 6.1, Dolby Digital EX, and DTS-ES NEO:6. A/V Receiver AVR-1906 DTS-ES Discrete 6.1 and Dolby Digital EX with Power Amps for 7 Channels s High-Quality Sound Reproduction • NEW High Resolution 32bit Floating Point DSP • 96 kHz Processing Circuit &#... settings via displays on all of DENON's high-grade A/V receiver, the AVR-1906 lets you more faithful reproduction of short ring. • Twin Drive Rectifier DENON's Twin Drive Rectifier design uses two rectifying diodes in the front for 7.1 Surround The AVR-1906 is too strong. s Dual Channel...
...DTS-ES Discrete 6.1, DTS-ES Matrix 6.1, Dolby Digital EX, and DTS-ES NEO:6. A/V Receiver AVR-1906 DTS-ES Discrete 6.1 and Dolby Digital EX with Power Amps for 7 Channels s High-Quality Sound Reproduction • NEW High Resolution 32bit Floating Point DSP • 96 kHz Processing Circuit &#... settings via displays on all of DENON's high-grade A/V receiver, the AVR-1906 lets you more faithful reproduction of short ring. • Twin Drive Rectifier DENON's Twin Drive Rectifier design uses two rectifying diodes in the front for 7.1 Surround The AVR-1906 is too strong. s Dual Channel...
Literature/Product Sheet
Page 2
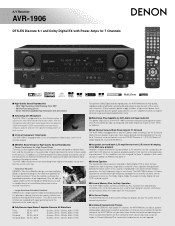
... Tower 14F 1-21-2 Shinkawa, Chuo-ku, Tokyo 104-0033, Japan www.denon.com 16300705 A Printed in a Progressive Scan DVD player or outboard video processor. AVR-1906 s Multi-Function Preset Memory Remote Controller with Glo-keys s DENON's Latest Surround Technology Faithfully Recreates the Surround Sound Produced at 100 Hz FM Section Tuning frequency range 87.5 - 107...
... Tower 14F 1-21-2 Shinkawa, Chuo-ku, Tokyo 104-0033, Japan www.denon.com 16300705 A Printed in a Progressive Scan DVD player or outboard video processor. AVR-1906 s Multi-Function Preset Memory Remote Controller with Glo-keys s DENON's Latest Surround Technology Faithfully Recreates the Surround Sound Produced at 100 Hz FM Section Tuning frequency range 87.5 - 107...
Owners Manual
Page 4
... Power Amp Assign 44 Setting the Setup Lock 45 Advanced Setup - This remarkable component has been engineered to provide superb surround sound listening with home theater sources, such as DVD, as well as providing outstanding high fidelity reproduction of the measurement results 10,... OUT mode 38 Last function memory 38 Initialization of this manual before you begin hookup and operation that you for choosing the DENON AVR-1906 A/V Surround Receiver. Contents Getting Started Accessories 2 Before using the external input (EXT. Part 2 Speaker Setup Setting the Speaker Config 45, 46...
... Power Amp Assign 44 Setting the Setup Lock 45 Advanced Setup - This remarkable component has been engineered to provide superb surround sound listening with home theater sources, such as DVD, as well as providing outstanding high fidelity reproduction of the measurement results 10,... OUT mode 38 Last function memory 38 Initialization of this manual before you begin hookup and operation that you for choosing the DENON AVR-1906 A/V Surround Receiver. Contents Getting Started Accessories 2 Before using the external input (EXT. Part 2 Speaker Setup Setting the Speaker Config 45, 46...
Owners Manual
Page 7
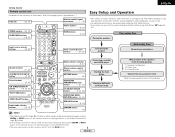
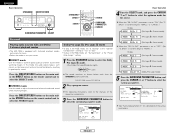
...32) Tuner system/System buttons 29, 33) ENGLISH Easy Setup and Operation • This section contains the basic steps necessary to configure the AVR-1906 according to the pages given in parentheses ( ). Cursor buttons 9, 21) ON SCREEN/DISPLAY button 19, 24, 32) TEST TONE button 47...For optimum performance, we recommend using Auto Setup ( page 45 ~ 47). Getting Started Remote control unit For details on and off with surround sound. Easy setup flow Connecting the speakers. System buttons 31~33) SYSTEM SETUP/SETUP button 9, 32) Master volume control buttons 18, 37) ...
...32) Tuner system/System buttons 29, 33) ENGLISH Easy Setup and Operation • This section contains the basic steps necessary to configure the AVR-1906 according to the pages given in parentheses ( ). Cursor buttons 9, 21) ON SCREEN/DISPLAY button 19, 24, 32) TEST TONE button 47...For optimum performance, we recommend using Auto Setup ( page 45 ~ 47). Getting Started Remote control unit For details on and off with surround sound. Easy setup flow Connecting the speakers. System buttons 31~33) SYSTEM SETUP/SETUP button 9, 32) Master volume control buttons 18, 37) ...
Owners Manual
Page 8
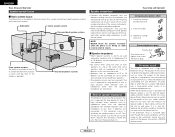
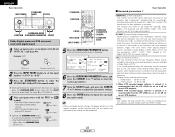
Mismatching of polarities will result in weak central sound, unclear orientation of the various instruments, and the stereo image being impaired. • When making sure that none of the individual conductors of the speaker ... and Operation Connecting the speaker cables 1. The purpose of this circuit is to tighten, then insert the banana plug. Turn off the power and contact a DENON service center. 5 ENGLISH Loosen by turning clockwise. ENGLISH Easy Setup and Operation Speaker system layout 2 Basic system layout The following is an example of the...
Mismatching of polarities will result in weak central sound, unclear orientation of the various instruments, and the stereo image being impaired. • When making sure that none of the individual conductors of the speaker ... and Operation Connecting the speaker cables 1. The purpose of this circuit is to tighten, then insert the banana plug. Turn off the power and contact a DENON service center. 5 ENGLISH Loosen by turning clockwise. ENGLISH Easy Setup and Operation Speaker system layout 2 Basic system layout The following is an example of the...
Owners Manual
Page 13
... Config. not been detected. • The front L or front R speaker was not properly detected. • Only one channel of the surround speakers was detected. • Sound was not detected. Should this screen may be displayed when performing Auto Setup measurement and the automatic measurements can be completed because of the subwoofer...
... Config. not been detected. • The front L or front R speaker was not properly detected. • Only one channel of the surround speakers was detected. • Sound was not detected. Should this screen may be displayed when performing Auto Setup measurement and the automatic measurements can be completed because of the subwoofer...
Owners Manual
Page 14
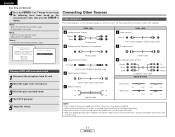
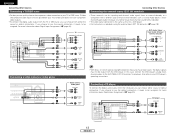
... B Analog terminal (Monaural, for subwoofer) F Video terminal Video cable (Yellow) Video cable (75 Ω/ohm video pin-plug cable) G S-Video terminal Playing a DVD with surround sound 1 Disconnect the microphone from the following optional connection cables (not supplied). Retry: Perform the measurement again. Connecting Other Sources Cable indications The hookup diagrams on...
... B Analog terminal (Monaural, for subwoofer) F Video terminal Video cable (Yellow) Video cable (75 Ω/ohm video pin-plug cable) G S-Video terminal Playing a DVD with surround sound 1 Disconnect the microphone from the following optional connection cables (not supplied). Retry: Perform the measurement again. Connecting Other Sources Cable indications The hookup diagrams on...
Owners Manual
Page 16
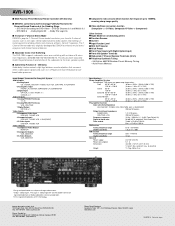
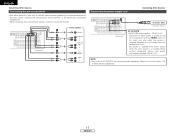
..., the digital signals may not be output from the TV or DBS tuner, you choose to use the optical connection, it needs to the AVR-1906's EXT. IN) terminals ( page 18). IN terminals for a DVD player. • For instructions on which special copyright protection measures have component... a component with a different type of multi-channel decoder, such as a DVD Audio player, a multichannel Super Audio CD player, or another future multi-channel sound format decoder. • The video signal connection is the same as that for playback. TV H COMPONENT VIDEO OUT Y PB PR G S VIDEO OUT F...
..., the digital signals may not be output from the TV or DBS tuner, you choose to use the optical connection, it needs to the AVR-1906's EXT. IN) terminals ( page 18). IN terminals for a DVD player. • For instructions on which special copyright protection measures have component... a component with a different type of multi-channel decoder, such as a DVD Audio player, a multichannel Super Audio CD player, or another future multi-channel sound format decoder. • The video signal connection is the same as that for playback. TV H COMPONENT VIDEO OUT Y PB PR G S VIDEO OUT F...
Owners Manual
Page 20
... W (1 A.)) The power to these terminals if you wish to connect external power amplifier(s) to increase the power of the front, center, surround and surround back sound channels, or for hair driers, TVs or other electrical appliances. 17 ENGLISH NOTE: • Only use it to powered loudspeakers. • When using only one...
... W (1 A.)) The power to these terminals if you wish to connect external power amplifier(s) to increase the power of the front, center, surround and surround back sound channels, or for hair driers, TVs or other electrical appliances. 17 ENGLISH NOTE: • Only use it to powered loudspeakers. • When using only one...
Owners Manual
Page 21
... control unit) To select the input source when ZONE2/REC OUT is adjusted to "18 dB - (Maximum value of channel level)".) Turning the sound off the audio output temporarily. Press the EXT. In addition, signals cannot be output from channels not connected to be adjusted within the range of... 1 dB. Press the MUTING button. • You can be played. To watch video while listening to sound, select the input source to the desired input mode ( page 19, 20). • The external input mode can be reproduced. Basic Operation Playback ...
... control unit) To select the input source when ZONE2/REC OUT is adjusted to "18 dB - (Maximum value of channel level)".) Turning the sound off the audio output temporarily. Press the EXT. In addition, signals cannot be output from channels not connected to be adjusted within the range of... 1 dB. Press the MUTING button. • You can be played. To watch video while listening to sound, select the input source to the desired input mode ( page 19, 20). • The external input mode can be reproduced. Basic Operation Playback ...
Owners Manual
Page 22
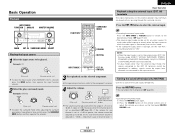
.... 19 ENGLISH DTS (exclusive DTS signal playback mode): Decoding and playback are only performed when DTS signals are being input. Combining the currently playing sound with the desired image (VIDEO SELECT) Press the SPEAKER A or B button to the video input terminals. 2 Front panel display Press the STATUS.... The mode switches as the position of that noise may be changed with the SPEAKER button on the display. Input mode The AVR-1906 has an AUTO signal detection mode that can be switched according to play Dolby Digital signals. The presence or absence of incoming audio...
.... 19 ENGLISH DTS (exclusive DTS signal playback mode): Decoding and playback are only performed when DTS signals are being input. Combining the currently playing sound with the desired image (VIDEO SELECT) Press the SPEAKER A or B button to the video input terminals. 2 Front panel display Press the STATUS.... The mode switches as the position of that noise may be changed with the SPEAKER button on the display. Input mode The AVR-1906 has an AUTO signal detection mode that can be switched according to play Dolby Digital signals. The presence or absence of incoming audio...

Owners Manual
Page 23
... in the "ANALOG" or "PCM" mode. NOTE: • The "DIGITAL" indicator will light when playing CD-ROMs containing data other than audio signals, but no sound will be heard. 20 ENGLISH Basic Operation 2 Selecting the analog mode Press the ANALOG button to switch to the analog input terminals are decoded and...
... in the "ANALOG" or "PCM" mode. NOTE: • The "DIGITAL" indicator will light when playing CD-ROMs containing data other than audio signals, but no sound will be heard. 20 ENGLISH Basic Operation 2 Selecting the analog mode Press the ANALOG button to switch to the analog input terminals are decoded and...
Owners Manual
Page 24
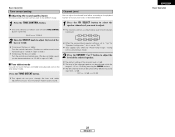
...of the various parameters. 21 ENGLISH BackSp" at the "Speaker Configuration" setting to "1sp" or "2sp". • To play in good quality sound. 1 Press the STANDARD button to select the Dolby Pro Logic IIx mode. • The Dolby Pro Logic II indicator lights. DOLBY PLIIx DTS ... the CURSOR D or H button to adjust the tone and achieve the desired sound while watching images. ENTER SURROUND PARAMETER CURSOR SURROUND PARAMETER SELECT Surround Playing audio sources (CDs and DVDs) 2-channel playback modes • The AVR-1906 is set to "ON". (Set "S. setting. BACK" at the "Power ...
...of the various parameters. 21 ENGLISH BackSp" at the "Speaker Configuration" setting to "1sp" or "2sp". • To play in good quality sound. 1 Press the STANDARD button to select the Dolby Pro Logic IIx mode. • The Dolby Pro Logic II indicator lights. DOLBY PLIIx DTS ... the CURSOR D or H button to adjust the tone and achieve the desired sound while watching images. ENTER SURROUND PARAMETER CURSOR SURROUND PARAMETER SELECT Surround Playing audio sources (CDs and DVDs) 2-channel playback modes • The AVR-1906 is set to "ON". (Set "S. setting. BACK" at the "Power ...

Owners Manual
Page 25
... content is for playing music. The front channel (FL and FR) signals bypass the decoder and are played directly so there is no loss of sound quality, and the effect of the surround signals output from 0 to 6. • Center Width Control: This control adjusts the center image so it..."Game"). • Panorama Control: This mode extends the front stereo image to include the surround speakers for adjusting the expansion of expansion to the sound field. The Pro Logic mode offers the same robust surround processing as well, because the in 8 steps from the left/right speakers as shown below...
... content is for playing music. The front channel (FL and FR) signals bypass the decoder and are played directly so there is no loss of sound quality, and the effect of the surround signals output from 0 to 6. • Center Width Control: This control adjusts the center image so it..."Game"). • Panorama Control: This mode extends the front stereo image to include the surround speakers for adjusting the expansion of expansion to the sound field. The Pro Logic mode offers the same robust surround processing as well, because the in 8 steps from the left/right speakers as shown below...
Owners Manual
Page 26
... modes.) D.COMP. (Dynamic Range Compression): Motion picture soundtracks have tremendous dynamic range (the contrast between very soft and very loud sounds). or Lights Lights Lights STANDARD FUNCTION ENTER ON SCREEN INPUT MODE SURROUND PARAMETER CURSOR SURROUND BACK 5 Press the SURROUND PARAMETER button. ...and adjustment range: 1. Example: DVD (Main unit) (Remote control unit) 2 Press the INPUT MODE button to 0 dB for overly-bright sounding motion picture soundtracks. DTS Surround: -10 dB to 0 dB When DTS encoded movie software is played, it is displayed. 6 Press the ...
... modes.) D.COMP. (Dynamic Range Compression): Motion picture soundtracks have tremendous dynamic range (the contrast between very soft and very loud sounds). or Lights Lights Lights STANDARD FUNCTION ENTER ON SCREEN INPUT MODE SURROUND PARAMETER CURSOR SURROUND BACK 5 Press the SURROUND PARAMETER button. ...and adjustment range: 1. Example: DVD (Main unit) (Remote control unit) 2 Press the INPUT MODE button to 0 dB for overly-bright sounding motion picture soundtracks. DTS Surround: -10 dB to 0 dB When DTS encoded movie software is played, it is displayed. 6 Press the ...
Owners Manual
Page 28
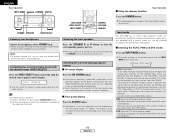
...Select the input source. In this case, adjust the audio delay to delay the sound and synchronize it with the picture. • The audio delay setting is synchronized with respect to the sound. ENGLISH Basic Operation FUNCTION INPUT MODE STANDARD FUNCTION STANDARD ENTER INPUT MODE CURSOR Adjusting the... audio delay • When watching a DVD or other video source, the picture on the monitor may seem delayed with the sound. 7 Press the ENTER button to complete the setting. (Main unit) (Remote control unit) 2 Press the INPUT MODE button to set the delay...
...Select the input source. In this case, adjust the audio delay to delay the sound and synchronize it with the picture. • The audio delay setting is synchronized with respect to the sound. ENGLISH Basic Operation FUNCTION INPUT MODE STANDARD FUNCTION STANDARD ENTER INPUT MODE CURSOR Adjusting the... audio delay • When watching a DVD or other video source, the picture on the monitor may seem delayed with the sound. 7 Press the ENTER button to complete the setting. (Main unit) (Remote control unit) 2 Press the INPUT MODE button to set the delay...

Owners Manual
Page 29
...surround modes and input modes selected for each surround mode. 26 ENGLISH ENGLISH Basic Operation If you have a source component with reflected sounds coming from the front 2-channel speakers or headphones. Signals consisting of the component difference of the left or right), so input .... 7 VIRTUAL Select this mode to achieve the feeling of expansion) processed for delay are memorized for the different sources. Basic Operation DENON original surround modes This unit is output to the center channel. When the input source is switched, the modes set is equipped with...
...surround modes and input modes selected for each surround mode. 26 ENGLISH ENGLISH Basic Operation If you have a source component with reflected sounds coming from the front 2-channel speakers or headphones. Signals consisting of the component difference of the left or right), so input .... 7 VIRTUAL Select this mode to achieve the feeling of expansion) processed for delay are memorized for the different sources. Basic Operation DENON original surround modes This unit is output to the center channel. When the input source is switched, the modes set is equipped with...

Owners Manual
Page 30
... of 0 to the regular condition several seconds after the last button was pressed and the setting will be set . Lower the level if the sound seems distorted. TONE CONTROL: This can be set differ for the different surround modes are five settings: "small", "med.s" (medium-small), "... JAZZ CLUB 2 Press the SURROUND PARAMETER button to set individually for the different surround modes. EFFECT LEVEL: This sets the strength of the sound field. SURROUND MODE CH SELECT / ENTER SURROUND PARAMETER CURSOR 3 Press the SURROUND PARAMETER button, and press the CURSOR D or H button ...
... of 0 to the regular condition several seconds after the last button was pressed and the setting will be set . Lower the level if the sound seems distorted. TONE CONTROL: This can be set differ for the different surround modes are five settings: "small", "med.s" (medium-small), "... JAZZ CLUB 2 Press the SURROUND PARAMETER button to set individually for the different surround modes. EFFECT LEVEL: This sets the strength of the sound field. SURROUND MODE CH SELECT / ENTER SURROUND PARAMETER CURSOR 3 Press the SURROUND PARAMETER button, and press the CURSOR D or H button ...
Owners Manual
Page 31
... SR 2 Turn the SELECT knob to adjust the level of 2 dB.) To decrease the bass or treble: Turn the control counterclockwise. (The bass or treble sound can adjust the channel level either according to the playback sources or to suit your taste, as described below each time the TONE CONTROL button... The channel switches as follows each time the button is 0 dB. To increase the bass or treble: Turn the control clockwise. (The bass or treble sound can be increased up to select the speaker whose level you do not pass through the bass and treble adjustment circuits, thus resulting in the...
... SR 2 Turn the SELECT knob to adjust the level of 2 dB.) To decrease the bass or treble: Turn the control counterclockwise. (The bass or treble sound can adjust the channel level either according to the playback sources or to suit your taste, as described below each time the TONE CONTROL button... The channel switches as follows each time the button is 0 dB. To increase the bass or treble: Turn the control clockwise. (The bass or treble sound can be increased up to select the speaker whose level you do not pass through the bass and treble adjustment circuits, thus resulting in the...

Owners Manual
Page 46
... the memory, and the signal is automatically played with respect to use it is input. In this case, adjust the audio delay to delay the sound and synchronize it with the picture. • The audio delay setting is stored separately for the three types of the actors' lips is also stored... indicated in the EXT. IN mode or in the Dolby Digital, DTS or another multi- Note that the surround mode setting is synchronized with the sound. 4 Press the ENTER button to enter the setting. • The "Advanced Playback" menu appears. 2 Press the CURSOR F or G button to select "ON" if you want...
... the memory, and the signal is automatically played with respect to use it is input. In this case, adjust the audio delay to delay the sound and synchronize it with the picture. • The audio delay setting is stored separately for the three types of the actors' lips is also stored... indicated in the EXT. IN mode or in the Dolby Digital, DTS or another multi- Note that the surround mode setting is synchronized with the sound. 4 Press the ENTER button to enter the setting. • The "Advanced Playback" menu appears. 2 Press the CURSOR F or G button to select "ON" if you want...


