Literature/Product Sheet
Page 2
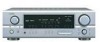
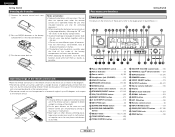
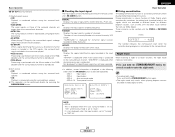
... 10 Hz - 100 kHz (+1, -3 dB) (Tone Defeat On) Signal-to-noise ratio 98 dB (IHF-A weighted) (Tone Defeat On) Tone control Treble: ±12 dB at 10 kHz Bass: ±12 dB at the Dubbing Stage. • DTS 96/24 Decoding for not disturbing others...40/60/80/100/120/150/200/250 Hz. s Adjustable Cross-Over Switching The AVR-1906 supports subwoofer cross-over switching with home theater ambience. AVR-1906 s Multi-Function Preset Memory Remote Controller with Glo-keys s DENON's Latest Surround Technology Faithfully Recreates the Surround Sound Produced at 100 Hz FM Section Tuning ...
... 10 Hz - 100 kHz (+1, -3 dB) (Tone Defeat On) Signal-to-noise ratio 98 dB (IHF-A weighted) (Tone Defeat On) Tone control Treble: ±12 dB at 10 kHz Bass: ±12 dB at the Dubbing Stage. • DTS 96/24 Decoding for not disturbing others...40/60/80/100/120/150/200/250 Hz. s Adjustable Cross-Over Switching The AVR-1906 supports subwoofer cross-over switching with home theater ambience. AVR-1906 s Multi-Function Preset Memory Remote Controller with Glo-keys s DENON's Latest Surround Technology Faithfully Recreates the Surround Sound Produced at 100 Hz FM Section Tuning ...
Owners Manual
Page 4
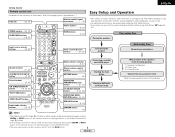
... sound listening with an immense array of features, before you begin hookup and operation that you for choosing the DENON AVR-1906 A/V Surround Receiver. Part 2 Speaker Setup Setting the Speaker Config 45, 46 Setting the Delay Time 46 Setting the Channel Level... source 18 Playback using 2 Cautions on installation 2 Cautions on handling 2 Preparing the remote control unit 2 Inserting the batteries 3 Operating range of the remote control unit 3 Part names and functions Front panel 3 Remote control unit 4 Easy Setup and Operation Easy setup flow 4 Speaker system layout 5 Speaker ...
... sound listening with an immense array of features, before you begin hookup and operation that you for choosing the DENON AVR-1906 A/V Surround Receiver. Part 2 Speaker Setup Setting the Speaker Config 45, 46 Setting the Delay Time 46 Setting the Channel Level... source 18 Playback using 2 Cautions on installation 2 Cautions on handling 2 Preparing the remote control unit 2 Inserting the batteries 3 Operating range of the remote control unit 3 Part names and functions Front panel 3 Remote control unit 4 Easy Setup and Operation Easy setup flow 4 Speaker system layout 5 Speaker ...
Owners Manual
Page 5
...output signals are not connected. Because of the picture may be produced if the input source is switched when nothing is used to operate non-DENON remote control compatible products. 2 ENGLISH Always wait until the muting circuit turns off the power switch or unplug the cord when you want to use them... Always set -up during this time, the output will be used near a tuner or TV. Please be used to operate not only the AVR-1906 but other set the power switch to occur particularly when using outdoor antennas and 75 Ω/ohm coaxial cables. After reading, store this unit in...
...output signals are not connected. Because of the picture may be produced if the input source is switched when nothing is used to operate non-DENON remote control compatible products. 2 ENGLISH Always wait until the muting circuit turns off the power switch or unplug the cord when you want to use them... Always set -up during this time, the output will be used near a tuner or TV. Please be used to operate not only the AVR-1906 but other set the power switch to occur particularly when using outdoor antennas and 75 Ω/ohm coaxial cables. After reading, store this unit in...
Owners Manual
Page 6
... if there are only for verifying operation.) • When inserting the batteries, be operated at a horizontal angle of the remote control unit • Point the remote control unit at the remote sensor on the main unit and remote control unit simultaneously. w Set two R6P/AA batteries in the battery compartment in parentheses ( ). @7 @2 @0 #5 #4 #3 #2 #1 #0 @9 @8 @6 @5 @4 @3 ... so keep the set does not operate even when the remote control unit is not pointed directly at the remote sensor. • The remote control unit can be used from a straight distance of approximately...
... if there are only for verifying operation.) • When inserting the batteries, be operated at a horizontal angle of the remote control unit • Point the remote control unit at the remote sensor on the main unit and remote control unit simultaneously. w Set two R6P/AA batteries in the battery compartment in parentheses ( ). @7 @2 @0 #5 #4 #3 #2 #1 #0 @9 @8 @6 @5 @4 @3 ... so keep the set does not operate even when the remote control unit is not pointed directly at the remote sensor. • The remote control unit can be used from a straight distance of approximately...
Owners Manual
Page 7
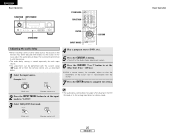
... • The main zone output can set the various settings manually without using Auto Setup ( page 45 ~ 47). Indicator 32, 34) Remote control signal transmitter 3) ZONE2 buttons····(34, 37) SURROUND buttons 18, 27) Power buttons 8, 32) MAIN buttons 4, 34) ... 33) ENGLISH Easy Setup and Operation • This section contains the basic steps necessary to configure the AVR-1906 according to the pages given in the memory. Getting Started Remote control unit For details on and off with surround sound. Mode selector switches 8, 31) Connecting a monitor and ...
... • The main zone output can set the various settings manually without using Auto Setup ( page 45 ~ 47). Indicator 32, 34) Remote control signal transmitter 3) ZONE2 buttons····(34, 37) SURROUND buttons 18, 27) Power buttons 8, 32) MAIN buttons 4, 34) ... 33) ENGLISH Easy Setup and Operation • This section contains the basic steps necessary to configure the AVR-1906 according to the pages given in the memory. Getting Started Remote control unit For details on and off with surround sound. Mode selector switches 8, 31) Connecting a monitor and ...

Owners Manual
Page 11
... function of this position, the power cannot be sure to the listening position. NOTE: • A loud test tone is output from the included remote control unit. £ OFF: The power turns off from each speaker. In this unit performs an analysis of the speaker system to the SETUP MIC ... Place the microphone on the power. 5 Press the SPEAKER A button to "AUDIO" (only when operating with the remote control unit). Set the POWER switch to this time. w: This sets the delay time from the remote control unit. 4 Press the ON/STANDBY switch on the main unit or ON/SOURCE button on the...
... function of this position, the power cannot be sure to the listening position. NOTE: • A loud test tone is output from the included remote control unit. £ OFF: The power turns off from each speaker. In this unit performs an analysis of the speaker system to the SETUP MIC ... Place the microphone on the power. 5 Press the SPEAKER A button to "AUDIO" (only when operating with the remote control unit). Set the POWER switch to this time. w: This sets the delay time from the remote control unit. 4 Press the ON/STANDBY switch on the main unit or ON/SOURCE button on the...
Owners Manual
Page 19
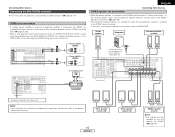
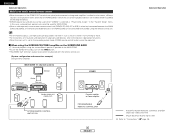
...• When the power amplifier is assigned to the ZONE2 stereo 2 channel. NOTE: • For instructions on operations using the remote control unit. ZONE2 out connections • If another power amplifier or pre-main (integrated) amplifier is connected, the ZONE2 out (variable/...ZONE terminals For instructions on installation and operation of separately sold separately room-to-room remote control unit (DENON RC-616, 617 or 618) is wired and connected between the MAIN ZONE and ZONE2, the remote-controllable devices in the MAIN ZONE can be used for MAIN ZONE. in amplifier (...
...• When the power amplifier is assigned to the ZONE2 stereo 2 channel. NOTE: • For instructions on operations using the remote control unit. ZONE2 out connections • If another power amplifier or pre-main (integrated) amplifier is connected, the ZONE2 out (variable/...ZONE terminals For instructions on installation and operation of separately sold separately room-to-room remote control unit (DENON RC-616, 617 or 618) is wired and connected between the MAIN ZONE and ZONE2, the remote-controllable devices in the MAIN ZONE can be used for MAIN ZONE. in amplifier (...
Owners Manual
Page 20
Never connect equipment whose total power consumption exceeds 120 W (1 A.). Power amplifier B CENTER A SURROUND L L L R R R A SURROUND BACK L L L R R R B SUB- No power is supplied from the remote control unit. Never use the AC OUTLETS for connecting audio equipment. NOTE: • Only use it to powered loudspeakers. • When using only one surround back ...
Never connect equipment whose total power consumption exceeds 120 W (1 A.). Power amplifier B CENTER A SURROUND L L L R R R A SURROUND BACK L L L R R R B SUB- No power is supplied from the remote control unit. Never use the AC OUTLETS for connecting audio equipment. NOTE: • Only use it to powered loudspeakers. • When using only one surround back ...
Owners Manual
Page 21
Press the EXT. In addition, signals cannot be output from channels not connected to the input terminals. (Main unit) (Remote control unit) To select the input source when ZONE2/REC OUT is too high, set the "SW ATT." w Press the VOLUME button on the... level)".) Turning the sound off the audio output temporarily. For operating instructions, refer to the component's manual. 4 Adjust the volume. (Main unit) (Remote control unit) The volume level is adjusted to turn off temporarily (MUTING) Use this case the maximum volume is displayed on the master volume level display...
Press the EXT. In addition, signals cannot be output from channels not connected to the input terminals. (Main unit) (Remote control unit) To select the input source when ZONE2/REC OUT is too high, set the "SW ATT." w Press the VOLUME button on the... level)".) Turning the sound off the audio output temporarily. For operating instructions, refer to the component's manual. 4 Adjust the volume. (Main unit) (Remote control unit) The volume level is adjusted to turn off temporarily (MUTING) Use this case the maximum volume is displayed on the master volume level display...
Owners Manual
Page 22
...Checking the currently playing program source 2 On-screen display Press the VIDEO SELECT button repeatedly until the desired source appears on the remote control unit. Press the ON SCREEN button. w Switch the program source to the component connected to play Dolby Digital signals. Note ... brightness changes in sequence. • Canceling simulcast playback: q Select "SOURCE" by pressing the VIDEO SELECT button. Input mode The AVR-1906 has an AUTO signal detection mode that automatically identifies the type of the unit's operations are performed automatically with a manual mode that ...
...Checking the currently playing program source 2 On-screen display Press the VIDEO SELECT button repeatedly until the desired source appears on the remote control unit. Press the ON SCREEN button. w Switch the program source to the component connected to play Dolby Digital signals. Note ... brightness changes in sequence. • Canceling simulcast playback: q Select "SOURCE" by pressing the VIDEO SELECT button. Input mode The AVR-1906 has an AUTO signal detection mode that automatically identifies the type of the unit's operations are performed automatically with a manual mode that ...
Owners Manual
Page 24
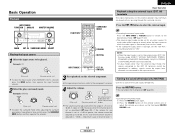
...playback modes • The AVR-1906 is set to "OFF". (Set "S. DOLBY PLIIx DTS NEO:6 2 STEREO mode Use this mode to achieve good quality 2-channel sound while watching images. Lights Press the DIRECT/STEREO button on the main unit or the DIRECT button on the remote control unit to select the ... When the "SB CH OUT" parameter is pressed. Press the DIRECT/STEREO button on the main unit or the STEREO button on the remote control unit to select the DIRECT mode. For operating instructions, refer to the manuals of the various parameters. 21 ENGLISH ENGLISH Basic Operation STANDARD ...
...playback modes • The AVR-1906 is set to "OFF". (Set "S. DOLBY PLIIx DTS NEO:6 2 STEREO mode Use this mode to achieve good quality 2-channel sound while watching images. Lights Press the DIRECT/STEREO button on the main unit or the DIRECT button on the remote control unit to select the ... When the "SB CH OUT" parameter is pressed. Press the DIRECT/STEREO button on the main unit or the STEREO button on the remote control unit to select the DIRECT mode. For operating instructions, refer to the manuals of the various parameters. 21 ENGLISH ENGLISH Basic Operation STANDARD ...
Owners Manual
Page 26
TONE: This enables the tone control. Operate the SURROUND BACK button to switch Surround Back CH ON/OFF. • The SURROUND BACK indicator lights when the SURROUND BACK button is too ... playing program sources recorded in Dolby Digital or DTS). Set to 0 dB 2. Dolby Digital: -10 dB to OFF for normal listening. Example: DVD (Main unit) (Remote control unit) 2 Press the INPUT MODE button to set to -10 dB for correct DTS playback. When DTS encoded music software is played, it is recommended...
TONE: This enables the tone control. Operate the SURROUND BACK button to switch Surround Back CH ON/OFF. • The SURROUND BACK indicator lights when the SURROUND BACK button is too ... playing program sources recorded in Dolby Digital or DTS). Set to 0 dB 2. Dolby Digital: -10 dB to OFF for normal listening. Example: DVD (Main unit) (Remote control unit) 2 Press the INPUT MODE button to set to -10 dB for correct DTS playback. When DTS encoded music software is played, it is recommended...
Owners Manual
Page 27
.... These contents can be checked by pressing the SURROUND BACK button. 2 Checking the input signal The input signal can be performed directly by pressing the remote control unit's ON SCREEN button. Press and hold the STANDARD/NIGHT button for playback. • ES DSCRT: When a signal identifying the source as DVD, DTV and...
.... These contents can be checked by pressing the SURROUND BACK button. 2 Checking the input signal The input signal can be performed directly by pressing the remote control unit's ON SCREEN button. Press and hold the STANDARD/NIGHT button for playback. • ES DSCRT: When a signal identifying the source as DVD, DTV and...
Owners Manual
Page 28
...delay setting does not apply when playing in the analog input direct or stereo mode. 3 Select Dolby/DTS Surround. (Main unit) (Remote control unit) 25 ENGLISH Basic Operation ENGLISH Basic Operation FUNCTION INPUT MODE STANDARD FUNCTION STANDARD ENTER INPUT MODE CURSOR Adjusting the audio delay •... When watching a DVD or other video source, the picture on the monitor may seem delayed with the system setup ( page 43) or from the remote control unit, as described below. 1 Select the input source. Example: DVD 4 Play a program source (DVD, etc.). 5 Press the CURSOR D button....
...delay setting does not apply when playing in the analog input direct or stereo mode. 3 Select Dolby/DTS Surround. (Main unit) (Remote control unit) 25 ENGLISH Basic Operation ENGLISH Basic Operation FUNCTION INPUT MODE STANDARD FUNCTION STANDARD ENTER INPUT MODE CURSOR Adjusting the audio delay •... When watching a DVD or other video source, the picture on the monitor may seem delayed with the system setup ( page 43) or from the remote control unit, as described below. 1 Select the input source. Example: DVD 4 Play a program source (DVD, etc.). 5 Press the CURSOR D button....

Owners Manual
Page 30
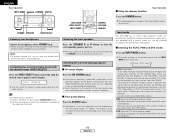
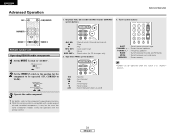
...ROCK ARENA JAZZ CLUB VIDEO GAME VIRTUAL SURROUND MATRIX To select the surround mode while adjusting the surround parameters, tone defeat or tone control, press the SURROUND MODE button, then operate the selector. 2 Press and hold in the SURROUND PARAMETER button to select the parameter ... SELECT TONE DEFEAT DSP surround simulation 2 To operate the surround mode and the surround parameters from the remote control unit 1 Select the surround mode for the input channel. (Remote control unit) The surround mode switches in the following order each time the SURROUND PARAMETER button is pressed: ...
...ROCK ARENA JAZZ CLUB VIDEO GAME VIRTUAL SURROUND MATRIX To select the surround mode while adjusting the surround parameters, tone defeat or tone control, press the SURROUND MODE button, then operate the selector. 2 Press and hold in the SURROUND PARAMETER button to select the parameter ... SELECT TONE DEFEAT DSP surround simulation 2 To operate the surround mode and the surround parameters from the remote control unit 1 Select the surround mode for the input channel. (Remote control unit) The surround mode switches in the following order each time the SURROUND PARAMETER button is pressed: ...

Owners Manual
Page 32
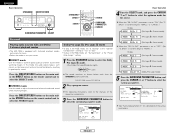
..., 90.1 / 90.1 MHz 90.1 MHz 90.1 MHz 90.1 MHz 90.1 MHz 90.1 MHz Auto tuning Basic Operation 1 Set the input source to "TUNER". (Main unit) (Remote control unit) 2 Watching the display, press the BAND button to select the desired band (AM or FM). 3 Press the MODE button to set the auto tuning...
..., 90.1 / 90.1 MHz 90.1 MHz 90.1 MHz 90.1 MHz 90.1 MHz 90.1 MHz Auto tuning Basic Operation 1 Set the input source to "TUNER". (Main unit) (Remote control unit) 2 Watching the display, press the BAND button to select the desired band (AM or FM). 3 Press the MODE button to set the auto tuning...
Owners Manual
Page 34
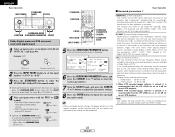
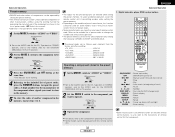
...to be operated when the switch is compatible with a wide range of infrared controlled components, it may be the case that some component models cannot be operated with this remote control is at "AUDIO" position. 31 ENGLISH Tape deck (TAPE) system buttons...the MODE 2 switch to the position for CD changers only) 2. ENGLISH Advanced Operation OFF ON/SOURCE NUMBER 1. Tuner system buttons Advanced Operation MODE 1 MODE 2 Remote control unit Operating DENON audio components 1 Set the MODE 1 switch to "AUDIO". 6, 7 2 1 8, 9 3 DISC SKIP + : Manual search (forward and reverse) : ...
...to be operated when the switch is compatible with a wide range of infrared controlled components, it may be the case that some component models cannot be operated with this remote control is at "AUDIO" position. 31 ENGLISH Tape deck (TAPE) system buttons...the MODE 2 switch to the position for CD changers only) 2. ENGLISH Advanced Operation OFF ON/SOURCE NUMBER 1. Tuner system buttons Advanced Operation MODE 1 MODE 2 Remote control unit Operating DENON audio components 1 Set the MODE 1 switch to "AUDIO". 6, 7 2 1 8, 9 3 DISC SKIP + : Manual search (forward and reverse) : ...
Owners Manual
Page 35
... makes of components can be operated by setting the preset memory. • This remote control unit can be operated with this manual). • Operation is not possible for the DVD remote control buttons, so also refer to the instructions on /standby OFF : DENON DVD power off 6, 7 : Manual search (forward and reverse) 2 : Stop 1 : Play 8, 9 : Auto search...
... makes of components can be operated by setting the preset memory. • This remote control unit can be operated with this manual). • Operation is not possible for the DVD remote control buttons, so also refer to the instructions on /standby OFF : DENON DVD power off 6, 7 : Manual search (forward and reverse) 2 : Stop 1 : Play 8, 9 : Auto search...
Owners Manual
Page 38
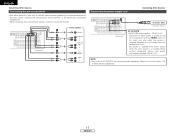
... out and pre-out can be played in rooms other rooms, different sources can be used for MAIN ZONE. • When a sold ) control line : MULTI SOURCE AUDIO signal cable Refer to -room remote control unit (DENON RC-616, 617 or 618) is wired and connected between the MAIN ZONE and ZONE2, the... remote-controllable devices in the MAIN ZONE can be controlled from ZONE2 using the surround back speaker is possible in the MAIN ZONE. • To ...
... out and pre-out can be played in rooms other rooms, different sources can be used for MAIN ZONE. • When a sold ) control line : MULTI SOURCE AUDIO signal cable Refer to -room remote control unit (DENON RC-616, 617 or 618) is wired and connected between the MAIN ZONE and ZONE2, the... remote-controllable devices in the MAIN ZONE can be controlled from ZONE2 using the surround back speaker is possible in the MAIN ZONE. • To ...
Owners Manual
Page 39
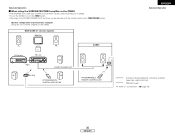
... use the ZONE2, turn on the ZONE2 button. • The output of the ZONE2 SPEAKER OUT terminals can be adjusted with the remote control unit's ZONE2 VOLUME button. [System configuration and connections example] Using this unit's internal amplifier as the ZONE2. MAIN ZONE 5.1-channel systems... Operation FL DVD player B Input C This unit FR SW ZONE2 SPEAKER OUT SL RC-616 SR SYSTEM REMOTE CONTROL UNIT RC-978 ZONE2 RC-617 PROGRAMMABLE REMOTE CONTROL UNIT : ROOM-TO-ROOM REMOTE CONTROL SYSTEM (separately sold) control line : SPEAKER cable Refer to "Connections" ( page 16). 36 ENGLISH
... use the ZONE2, turn on the ZONE2 button. • The output of the ZONE2 SPEAKER OUT terminals can be adjusted with the remote control unit's ZONE2 VOLUME button. [System configuration and connections example] Using this unit's internal amplifier as the ZONE2. MAIN ZONE 5.1-channel systems... Operation FL DVD player B Input C This unit FR SW ZONE2 SPEAKER OUT SL RC-616 SR SYSTEM REMOTE CONTROL UNIT RC-978 ZONE2 RC-617 PROGRAMMABLE REMOTE CONTROL UNIT : ROOM-TO-ROOM REMOTE CONTROL SYSTEM (separately sold) control line : SPEAKER cable Refer to "Connections" ( page 16). 36 ENGLISH


