Literature/Product Sheet
Page 1
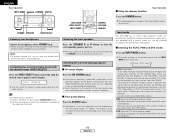
... biwire Front (L/R) channels to improve playback quality in a design that ensures mostly uniform temperatures throughout the heatsink. s On Screen Display The AVR-1906 lets you more clearly defined sound localization at low impedance, they are not required. It is clearer and easier to listen to...of your chair. This will ensures that you adjust speaker configuration, delay times and other parameters so that all of DENON's high-grade A/V receiver, the AVR-1906 lets you can be assigned to Zone 2 speakers (with multisource), in the home theater without correction, the high-...
... biwire Front (L/R) channels to improve playback quality in a design that ensures mostly uniform temperatures throughout the heatsink. s On Screen Display The AVR-1906 lets you more clearly defined sound localization at low impedance, they are not required. It is clearer and easier to listen to...of your chair. This will ensures that you adjust speaker configuration, delay times and other parameters so that all of DENON's high-grade A/V receiver, the AVR-1906 lets you can be assigned to Zone 2 speakers (with multisource), in the home theater without correction, the high-...
Owners Manual
Page 4
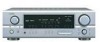
...Outputting a program source to amplifier, etc., in the preset memory 32~34 Punch through the System Setup Menu 39 On-screen display and front display 39 Input Setup Setting the Digital In Assign 40 Setting the Ext In SW Level 40 Setting the Input Function Level 40 Setting...52~57 Specifications 58 List of preset codes End of this manual before you begin hookup and operation that you for choosing the DENON AVR-1906 A/V Surround Receiver. This remarkable component has been engineered to provide superb surround sound listening with the desired image (VIDEO SELECT 19 Selecting the ...
...Outputting a program source to amplifier, etc., in the preset memory 32~34 Punch through the System Setup Menu 39 On-screen display and front display 39 Input Setup Setting the Digital In Assign 40 Setting the Ext In SW Level 40 Setting the Input Function Level 40 Setting...52~57 Specifications 58 List of preset codes End of this manual before you begin hookup and operation that you for choosing the DENON AVR-1906 A/V Surround Receiver. This remarkable component has been engineered to provide superb surround sound listening with the desired image (VIDEO SELECT 19 Selecting the ...
Owners Manual
Page 6
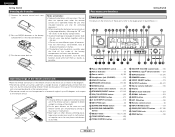
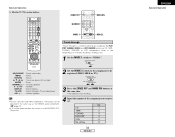
... ·····(29) @1 STATUS button 19, 24) @2 DIMMER button 19) @3 VIDEO SELECT button 19) @4 OUTPUT indicator 23, 37) @5 Master volume indicator 18) @6 Display @7 INPUT mode indicator 20) @8 SIGNAL indicator 20) @9 BAND button 29) #0 EXT. AUX INPUT terminals 13) !3 SETUP MIC jack 8) !4 SURROUND MODE button 18) !5 SURROUND PARAMETER button...
... ·····(29) @1 STATUS button 19, 24) @2 DIMMER button 19) @3 VIDEO SELECT button 19) @4 OUTPUT indicator 23, 37) @5 Master volume indicator 18) @6 Display @7 INPUT mode indicator 20) @8 SIGNAL indicator 20) @9 BAND button 29) #0 EXT. AUX INPUT terminals 13) !3 SETUP MIC jack 8) !4 SURROUND MODE button 18) !5 SURROUND PARAMETER button...
Owners Manual
Page 7
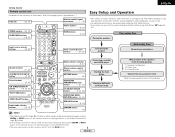
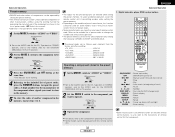
...) Tuner system/System buttons 29, 33) ENGLISH Easy Setup and Operation • This section contains the basic steps necessary to configure the AVR-1906 according to the pages given in the DTS NEO:6 mode. • The main zone output can set the various settings manually without using...can be turned on the remote control unit during playback in parentheses ( ). Auto setup flow Connecting a microphone. Cursor buttons 9, 21) ON SCREEN/DISPLAY button 19, 24, 32) TEST TONE button 47) VIDEO SELECT button 19) Input mode selector buttons 18, 19) SURROUND PARAMETER/System button 21, ...
...) Tuner system/System buttons 29, 33) ENGLISH Easy Setup and Operation • This section contains the basic steps necessary to configure the AVR-1906 according to the pages given in the DTS NEO:6 mode. • The main zone output can set the various settings manually without using...can be turned on the remote control unit during playback in parentheses ( ). Auto setup flow Connecting a microphone. Cursor buttons 9, 21) ON SCREEN/DISPLAY button 19, 24, 32) TEST TONE button 47) VIDEO SELECT button 19) Input mode selector buttons 18, 19) SURROUND PARAMETER/System button 21, ...

Owners Manual
Page 12
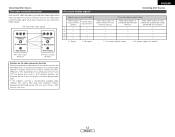
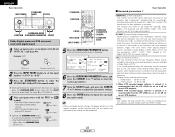
... measured twice. 3: When "ZONE2" and "Bi-Amp" are selected, these are not available. When "ZONE2" is automatically performed. The display switches to select "S. When "S. The test tone during Auto Setup is displayed on the screen. ENGLISH Easy Setup and Operation Starting Auto Setup 1 Press the SETUP button. • The "System Setup" menu..., speakers with built-in filters, such as follows: 1 FL FR 2 3 C SW SL SR SBL SBR 1: Only the front speakers (A) are measured, front speakers (B) are not displayed.
... measured twice. 3: When "ZONE2" and "Bi-Amp" are selected, these are not available. When "ZONE2" is automatically performed. The display switches to select "S. When "S. The test tone during Auto Setup is displayed on the screen. ENGLISH Easy Setup and Operation Starting Auto Setup 1 Press the SETUP button. • The "System Setup" menu..., speakers with built-in filters, such as follows: 1 FL FR 2 3 C SW SL SR SBL SBR 1: Only the front speakers (A) are measured, front speakers (B) are not displayed.
Owners Manual
Page 13
...connected. • The surround back speaker was detected, but the surround speaker was not detected. speakers. Check e This screen will be displayed when the speaker • Check the polarity of the microphone being too high. Easy Setup and Operation Check of the speaker arrangement, measurement... because of the measurement results 1 Press the CURSOR D or H button to the microphone connector. 10 ENGLISH r This screen will be displayed when the speakers • Check that is too much noise in reverse. ENGLISH Easy Setup and Operation About error messages • These ...
...connected. • The surround back speaker was detected, but the surround speaker was not detected. speakers. Check e This screen will be displayed when the speaker • Check the polarity of the microphone being too high. Easy Setup and Operation Check of the speaker arrangement, measurement... because of the measurement results 1 Press the CURSOR D or H button to the microphone connector. 10 ENGLISH r This screen will be displayed when the speakers • Check that is too much noise in reverse. ENGLISH Easy Setup and Operation About error messages • These ...
Owners Manual
Page 15
...(Component video terminals) (S-Video terminal) On-screen display signals ENGLISH Connecting Other Sources Signals input to the AVR-1906 VIDEO signal input terminal (yellow) S-Video signal input terminal 1 E E 2 C E 3 E C 4 C (C: Signal C E: No signal) On-screen display signal output Video signal output to VIDEO MONITOR OUT ...terminal) This unit's output terminals Cautions on the video conversion function: When the component video terminals are used to connect the AVR-1906 with a TV (or monitor, projector, etc.) and the video (yellow) or S-Video terminals are used to connect ...
...(Component video terminals) (S-Video terminal) On-screen display signals ENGLISH Connecting Other Sources Signals input to the AVR-1906 VIDEO signal input terminal (yellow) S-Video signal input terminal 1 E E 2 C E 3 E C 4 C (C: Signal C E: No signal) On-screen display signal output Video signal output to VIDEO MONITOR OUT ...terminal) This unit's output terminals Cautions on the video conversion function: When the component video terminals are used to connect the AVR-1906 with a TV (or monitor, projector, etc.) and the video (yellow) or S-Video terminals are used to connect ...
Owners Manual
Page 21
... value of -70 to 0 to which the video signal is connected, then set this mode. • If the subwoofer output level is displayed on the master volume level display. IN terminals cannot be set for any channel is set to be adjusted within the range of channel level)".) Turning the sound off...
... value of -70 to 0 to which the video signal is connected, then set this mode. • If the subwoofer output level is displayed on the master volume level display. IN terminals cannot be set for any channel is set to be adjusted within the range of channel level)".) Turning the sound off...
Owners Manual
Page 22
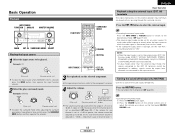
... to turn the corresponding speaker pair on the front panel display. Input mode The AVR-1906 has an AUTO signal detection mode that operation appears on the display. Checking the currently playing program source 2 On-screen display Press the VIDEO SELECT button repeatedly until the desired source ...appears on the display connected to play signals other than TUNER. Each time an operation is output in the AVR-1906's surround decoder is being input. Such information as shown below each time the INPUT MODE button...
... to turn the corresponding speaker pair on the front panel display. Input mode The AVR-1906 has an AUTO signal detection mode that operation appears on the display. Checking the currently playing program source 2 On-screen display Press the VIDEO SELECT button repeatedly until the desired source ...appears on the display connected to play signals other than TUNER. Each time an operation is output in the AVR-1906's surround decoder is being input. Such information as shown below each time the INPUT MODE button...

Owners Manual
Page 23
setup ( page 40) and connections are correct and whether the component's power is turned on the input signal. 2 Input signal display • DOLBY DIGITAL Basic Operation • DTS • PCM The "DIGITAL" indicator lights when digital signals are played in the "ANALOG" or "PCM" mode....be heard. 20 ENGLISH ANALOG (exclusive analog audio signal playback mode): The signals input to the analog input terminals are decoded and played. 2 Input mode display • In the AUTO mode • In the DIGITAL PCM mode NOTE: • Input mode when playing DTS sources: Noise will be sure to...
setup ( page 40) and connections are correct and whether the component's power is turned on the input signal. 2 Input signal display • DOLBY DIGITAL Basic Operation • DTS • PCM The "DIGITAL" indicator lights when digital signals are played in the "ANALOG" or "PCM" mode....be heard. 20 ENGLISH ANALOG (exclusive analog audio signal playback mode): The signals input to the analog input terminals are decoded and played. 2 Input mode display • In the AUTO mode • In the DIGITAL PCM mode NOTE: • Input mode when playing DTS sources: Noise will be sure to...
Owners Manual
Page 24
...Dolby Pro Logic mode) 5 Press the SURROUND PARAMETER button, and press the CURSOR D or H button to "SMALL" or "LARGE".) Display (Pro Logic IIx Cinema mode) (Pro Logic IIx Music mode) (Pro Logic IIx Game mode) When the "SB CH OUT" parameter... is set "Surround Back" at system setup to "NONE".) Display (Pro Logic II Cinema mode) 2 DIRECT mode Use this mode to select the DIRECT mode. BackSp" at system setup to... PARAMETER SELECT Surround Playing audio sources (CDs and DVDs) 2-channel playback modes • The AVR-1906 is pressed.
...Dolby Pro Logic mode) 5 Press the SURROUND PARAMETER button, and press the CURSOR D or H button to "SMALL" or "LARGE".) Display (Pro Logic IIx Cinema mode) (Pro Logic IIx Music mode) (Pro Logic IIx Game mode) When the "SB CH OUT" parameter... is set "Surround Back" at system setup to "NONE".) Display (Pro Logic II Cinema mode) 2 DIRECT mode Use this mode to select the DIRECT mode. BackSp" at system setup to... PARAMETER SELECT Surround Playing audio sources (CDs and DVDs) 2-channel playback modes • The AVR-1906 is pressed.

Owners Manual
Page 25
...regular condition several seconds after several seconds. 7 Press the ENTER button to finish the surround parameter mode. • When making parameter settings, the display will be heard only from the center (C) and surround (SL, SR and SB) channels add a natural sense of the modes ("Cinema", ... seconds after several seconds. 7 Press the ENTER button to finish the surround parameter mode. • When making parameter settings, the display will be used with side wall imaging. The settings are set the various surround parameters. CENTER IMAGE (0.0 to include the surround speakers...
...regular condition several seconds after several seconds. 7 Press the ENTER button to finish the surround parameter mode. • When making parameter settings, the display will be heard only from the center (C) and surround (SL, SR and SB) channels add a natural sense of the modes ("Cinema", ... seconds after several seconds. 7 Press the ENTER button to finish the surround parameter mode. • When making parameter settings, the display will be used with side wall imaging. The settings are set the various surround parameters. CENTER IMAGE (0.0 to include the surround speakers...
Owners Manual
Page 26
... high frequencies, compensating for normal listening. Program source and adjustment range: 1. Set to 0 dB When DTS encoded movie software is played, it is displayed. 6 Press the SURROUND PARAMETER button, and press the CURSOR D or H button to select the various parameters. 7 Turn the SELECT knob, and ... to adjust the parameter settings. 8 Press the ENTER button to finish the surround parameter mode. • When making parameter settings, the display will return to the regular condition several seconds after the last button was pressed and the setting will be set to -10 dB for ...
... high frequencies, compensating for normal listening. Program source and adjustment range: 1. Set to 0 dB When DTS encoded movie software is played, it is displayed. 6 Press the SURROUND PARAMETER button, and press the CURSOR D or H button to select the various parameters. 7 Turn the SELECT knob, and ... to adjust the parameter settings. 8 Press the ENTER button to finish the surround parameter mode. • When making parameter settings, the display will return to the regular condition several seconds after the last button was pressed and the setting will be set to -10 dB for ...
Owners Manual
Page 27
...playback. • ES DSCRT: When a signal identifying the source as DVD, DTV and other future formats that will use Dolby Digital. SIGNAL: Displays the type of the signals which automatically normalizes the dialog level (standard level) of signal (DTS, DOLBY DIGITAL, PCM, etc.). Dialog normalization is...the STANDARD/NIGHT button again. • The night mode only works when playing program sources recorded in Dolby Digital or DTS. fs: Displays the input signal's sampling frequency. "Number of front channels/Number of channels. Night mode When listening at night or at different levels...
...playback. • ES DSCRT: When a signal identifying the source as DVD, DTV and other future formats that will use Dolby Digital. SIGNAL: Displays the type of the signals which automatically normalizes the dialog level (standard level) of signal (DTS, DOLBY DIGITAL, PCM, etc.). Dialog normalization is...the STANDARD/NIGHT button again. • The night mode only works when playing program sources recorded in Dolby Digital or DTS. fs: Displays the input signal's sampling frequency. "Number of front channels/Number of channels. Night mode When listening at night or at different levels...

Owners Manual
Page 30
... G button to adjust the parameter settings. 5 Press the ENTER button to finish the surround parameter mode. • When making parameter settings, the display will return to the regular condition several seconds after the last button was pressed and the setting will be set within the range of the...2 Press and hold in the SURROUND PARAMETER button to select the parameter you want to set it. • When making parameter settings, the display will return to 15. The surround parameter switches in the matrix mode. DELAY TIME: The delay time can be set differ for the different...
... G button to adjust the parameter settings. 5 Press the ENTER button to finish the surround parameter mode. • When making parameter settings, the display will return to the regular condition several seconds after the last button was pressed and the setting will be set within the range of the...2 Press and hold in the SURROUND PARAMETER button to select the parameter you want to set it. • When making parameter settings, the display will return to 15. The surround parameter switches in the matrix mode. DELAY TIME: The delay time can be set differ for the different...

Owners Manual
Page 32
...90.1 MHz 90.1 MHz 90.1 MHz Auto tuning Basic Operation 1 Set the input source to "TUNER". (Main unit) (Remote control unit) 2 Watching the display, press the BAND button to select the desired band (AM or FM). 3 Press the MODE button to G8 for FM broadcast stations. At open frequencies...searching begins, then stops when a station is tuned in. • When in . Hold the PRESET • button and press the POWER switch on the display when a stereo broadcast is muted and the "TUNED" and "STEREO" indicators turn off. • If an FM station cannot be performed at preset channels ...
...90.1 MHz 90.1 MHz 90.1 MHz Auto tuning Basic Operation 1 Set the input source to "TUNER". (Main unit) (Remote control unit) 2 Watching the display, press the BAND button to select the desired band (AM or FM). 3 Press the MODE button to G8 for FM broadcast stations. At open frequencies...searching begins, then stops when a station is tuned in. • When in . Hold the PRESET • button and press the POWER switch on the display when a stereo broadcast is muted and the "TUNED" and "STEREO" indicators turn off. • If an FM station cannot be performed at preset channels ...

Owners Manual
Page 33
... Stations" screen appears on -screen display. Recalling preset stations 1 Watching the display, press the SHIFT button to select the preset memory block. 2 Watching the display, press the PRESET • (+) or ª (-) button to set , FM stereo broadcasts are received in monaural and the "STEREO" ...indicator turns off . 4 Press the TUNING (+) or (-) button to G. ENGLISH Basic Operation Manual tuning 1 Set the input source to "TUNER". 2 Watching the display, press the BAND button to select the desired...
... Stations" screen appears on -screen display. Recalling preset stations 1 Watching the display, press the SHIFT button to select the preset memory block. 2 Watching the display, press the PRESET • (+) or ª (-) button to set , FM stereo broadcasts are received in monaural and the "STEREO" ...indicator turns off . 4 Press the TUNING (+) or (-) button to G. ENGLISH Basic Operation Manual tuning 1 Set the input source to "TUNER". 2 Watching the display, press the BAND button to select the desired...
Owners Manual
Page 35
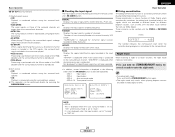
... shipment from the factory and after resetting: • TV, VCR HITACHI • CD, TAPE DENON • CDR/MD DENON (CDR) • DVD/VDP DENON (DVD) • DBS/CABLE ABC (CABLE) Operating a component stored in the list of preset... codes. • Some manufacturers use different names for the DVD remote control buttons, so also refer to beginning of track) 3 : Pause 0 ~ 9, +10 : Number DISC SKIP + : Disc skip (for DVD changer only) DISPLAY : Switch display...
... shipment from the factory and after resetting: • TV, VCR HITACHI • CD, TAPE DENON • CDR/MD DENON (CDR) • DVD/VDP DENON (DVD) • DBS/CABLE ABC (CABLE) Operating a component stored in the list of preset... codes. • Some manufacturers use different names for the DVD remote control buttons, so also refer to beginning of track) 3 : Pause 0 ~ 9, +10 : Number DISC SKIP + : Disc skip (for DVD changer only) DISPLAY : Switch display...
Owners Manual
Page 36
... ON/SOURCE : Power on/standby MENU : Menu RETURN : Return •, ª, 0, 1 : Cursor up, down, left and right ENTER : Enter CHANNEL +, - : Channel up/down 0 ~ 9, +10 : Number DISPLAY : Switch display VOL +, - : Volume up/down 33 ENGLISH Video disc player (VDP) system buttons 3.
... ON/SOURCE : Power on/standby MENU : Menu RETURN : Return •, ª, 0, 1 : Cursor up, down, left and right ENTER : Enter CHANNEL +, - : Channel up/down 0 ~ 9, +10 : Number DISPLAY : Switch display VOL +, - : Volume up/down 33 ENGLISH Video disc player (VDP) system buttons 3.
Owners Manual
Page 37
... nothing is set . No. ON/SOURCE : Power on CD, TAPE, CDR/MD, DVD/VDP or VCR components when in the same way as for DENON audio components ( page 31). • A TV can be operated when the switch is a function allowing you to operate the PLAY, STOP, MANUAL SEARCH ... /standby MENU : Menu RETURN : Return •, ª, 0, 1 : Cursor up, down, left and right ENTER : Enter CHANNEL +, - : Channel up/down 0 ~ 9, +10 : Number DISPLAY : Switch display TV/VCR : Switch between TV and video player VOL +, - : Volume up/down 2 Set the MODE 2 switch to the component to be registered (DBS/CABLE or...
... nothing is set . No. ON/SOURCE : Power on CD, TAPE, CDR/MD, DVD/VDP or VCR components when in the same way as for DENON audio components ( page 31). • A TV can be operated when the switch is a function allowing you to operate the PLAY, STOP, MANUAL SEARCH ... /standby MENU : Menu RETURN : Return •, ª, 0, 1 : Cursor up, down, left and right ENTER : Enter CHANNEL +, - : Channel up/down 0 ~ 9, +10 : Number DISPLAY : Switch display TV/VCR : Switch between TV and video player VOL +, - : Volume up/down 2 Set the MODE 2 switch to the component to be registered (DBS/CABLE or...


