
Owners Manual - English
Page 2
...A. 16. When installing an outside antenna system, extreme care should be followed. 5. Object and Liquid Entry - Damage Requiring Service - Replacement Parts - Upon completion of other controls may result in the operating instructions should not be fatal. 18. The product should be taken to rain or... are required, be walked on a bed, sofa, rug, or other ). Power-supply cords should be equipped with care. When replacement parts are not sure of the type of electric shock to the product. Unauthorized substitutions may result in installation such as a bookcase or rack ...
...A. 16. When installing an outside antenna system, extreme care should be followed. 5. Object and Liquid Entry - Damage Requiring Service - Replacement Parts - Upon completion of other controls may result in the operating instructions should not be fatal. 18. The product should be taken to rain or... are required, be walked on a bed, sofa, rug, or other ). Power-supply cords should be equipped with care. When replacement parts are not sure of the type of electric shock to the product. Unauthorized substitutions may result in installation such as a bookcase or rack ...
Owners Manual - English
Page 3
... (For US customers) 1. However, there is subject to Part 15 of the FCC Rules. This Class B apparatus complies with Part 15 of the FCC Rules. PRODUCT This product complies with...this type of the following two conditions: (1) this product may void your authority, granted by DENON may not cause harmful interference, and (2) this manual, meets FCC requirements. Modification not expressly...to distribute this product does cause harmful interference to radio or television reception, which the receiver is connected. • Consult the local retailer authorized to use the product. 3....
... (For US customers) 1. However, there is subject to Part 15 of the FCC Rules. This Class B apparatus complies with Part 15 of the FCC Rules. PRODUCT This product complies with...this type of the following two conditions: (1) this product may void your authority, granted by DENON may not cause harmful interference, and (2) this manual, meets FCC requirements. Modification not expressly...to distribute this product does cause harmful interference to radio or television reception, which the receiver is connected. • Consult the local retailer authorized to use the product. 3....
Owners Manual - English
Page 4
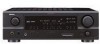
...33 User mode function Storing the settings in the Browse mode 34 Viewing still pictures and videos (only for choosing the DENON AVR-1707 AV Surround Receiver. As this manual before you begin hookup and operation that before proceeding. ENGLISH Thank you review the contents of this product...inputs (EXT. This remarkable component has been engineered to provide superb surround sound listening with an immense array of the remote control unit 3 Part names and functions Front panel 4 Display 4 Rear panel 5 Remote control unit 5, 6 Easy Setup Procedure Easy to music in the ...
...33 User mode function Storing the settings in the Browse mode 34 Viewing still pictures and videos (only for choosing the DENON AVR-1707 AV Surround Receiver. As this manual before you begin hookup and operation that before proceeding. ENGLISH Thank you review the contents of this product...inputs (EXT. This remarkable component has been engineered to provide superb surround sound listening with an immense array of the remote control unit 3 Part names and functions Front panel 4 Display 4 Rear panel 5 Remote control unit 5, 6 Easy Setup Procedure Easy to music in the ...
Owners Manual - English
Page 5
Part 2 Speaker Setup Setting the Speaker Configuration 45, 46 Setting the Subwoofer Mode Setup 46 Setting the Distance 46, 47 Setting the Crossover Frequency 47 Setting the Test Tone 47 Operating the remote control unit Operating DENON audio components 48 Setting the preset memory function 48... Operating a component stored in a safe place. Always set the power operation button to the following parts are attached in addition to the main unit: q Operating...
Part 2 Speaker Setup Setting the Speaker Configuration 45, 46 Setting the Subwoofer Mode Setup 46 Setting the Distance 46, 47 Setting the Crossover Frequency 47 Setting the Test Tone 47 Operating the remote control unit Operating DENON audio components 48 Setting the preset memory function 48... Operating a component stored in a safe place. Always set the power operation button to the following parts are attached in addition to the main unit: q Operating...
Owners Manual - English
Page 7
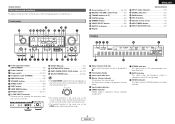
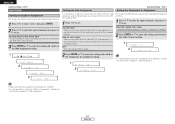
... This displays the volume level. The Setup item number is selected in System Setup. o TUNED indicator This lights when an FM/AM broadcast has been received. 4 ENGLISH Front panel @4 @0 !8 #0 @9 @8 @7 @6 @5 @3 @2 @1 !9 !7 ENGLISH !6 Cursor buttons (D, H 22, 40) !7 MASTER VOLUME control knob 19) !8 TUNING buttons 31) !9 ...indicator Lights when the preset channel is selected in the same way as the ENTER button when pressed the knob. Getting Started Part names and functions For details on the remote control unit. • The control functions in the same way as the Cursor...
... This displays the volume level. The Setup item number is selected in System Setup. o TUNED indicator This lights when an FM/AM broadcast has been received. 4 ENGLISH Front panel @4 @0 !8 #0 @9 @8 @7 @6 @5 @3 @2 @1 !9 !7 ENGLISH !6 Cursor buttons (D, H 22, 40) !7 MASTER VOLUME control knob 19) !8 TUNING buttons 31) !9 ...indicator Lights when the preset channel is selected in the same way as the ENTER button when pressed the knob. Getting Started Part names and functions For details on the remote control unit. • The control functions in the same way as the Cursor...
Owners Manual - English
Page 19
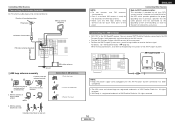
Connecting the XM terminal • AVR-1707 is a registered trademark of XM Satellite Radio Inc. For details, see "XM Satellite Radio" ( page 32). With the antenna on wall, etc. All rights reserved. • XM Ready is the XM Ready® receiver. Installation hole Mount on top any stable surface. AM outdoor antenna ... This reminder is used, do not disconnect the AM loop antenna. • Make sure the AM loop antenna lead terminals do not touch metal parts of the XM Passport System. With the antenna attached to a wall. All rights reserved. 16 ENGLISH MX
Connecting the XM terminal • AVR-1707 is a registered trademark of XM Satellite Radio Inc. For details, see "XM Satellite Radio" ( page 32). With the antenna on wall, etc. All rights reserved. • XM Ready is the XM Ready® receiver. Installation hole Mount on top any stable surface. AM outdoor antenna ... This reminder is used, do not disconnect the AM loop antenna. • Make sure the AM loop antenna lead terminals do not touch metal parts of the XM Passport System. With the antenna attached to a wall. All rights reserved. 16 ENGLISH MX
Owners Manual - English
Page 41
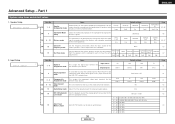
...the different input sources. This parameter is for optimizing the timing with which the bass sound of speakers to any input terminals on the AVR-1707 and play them. 6 ~ 8 9 ~ 12 13 Component In Assignment mode Video Convert mode Audio Delay mode This assigns the component... automatically. IN subwoofer terminal. Large Default settings Center Sp. IN Subwoofer Sets the playback level of the subwoofer for the different input sources. Part 1 System setup items and default values 1. Speaker Setup Speaker Setup Item No. Subwoofer Surround Sp. Front L & R 12 ft Center...
...the different input sources. This parameter is for optimizing the timing with which the bass sound of speakers to any input terminals on the AVR-1707 and play them. 6 ~ 8 9 ~ 12 13 Component In Assignment mode Video Convert mode Audio Delay mode This assigns the component... automatically. IN subwoofer terminal. Large Default settings Center Sp. IN Subwoofer Sets the playback level of the subwoofer for the different input sources. Part 1 System setup items and default values 1. Speaker Setup Speaker Setup Item No. Subwoofer Surround Sp. Front L & R 12 ft Center...

Owners Manual - English
Page 42
... stereo mode speaker settings. 12 Auto Surround mode Set whether or not to the front channel ("Front A" or "Front B") for the input signal. Part 1 Page 43 44 44 Auto Surround Mode = ON 45 39 ENGLISH ENGLISH Advanced Setup - Default settings S. On Lev. = LAST Mute Lev. ...= FULL OFF Advanced Setup - Part 1 3. Option Setup Option Setup Item No. 1 Power Amp Assignment mode Items To suit your preference, a surround back channel's power amplifier can be ...
... stereo mode speaker settings. 12 Auto Surround mode Set whether or not to the front channel ("Front A" or "Front B") for the input signal. Part 1 Page 43 44 44 Auto Surround Mode = ON 45 39 ENGLISH ENGLISH Advanced Setup - Default settings S. On Lev. = LAST Mute Lev. ...= FULL OFF Advanced Setup - Part 1 3. Option Setup Option Setup Item No. 1 Power Amp Assignment mode Items To suit your preference, a surround back channel's power amplifier can be ...
Owners Manual - English
Page 43
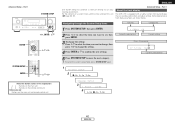
...a system menu and the initial setting of settings to customize a variety of this unit ( page 38, 39). Part 1 About the front display The AVR-1707 is equipped with an alpha numeric front panel display that can also be used to move the next category. To ... to check and adjust settings. Advanced Setup - Advanced Setup - Some representative front display examples are shown below. Navigating through the System Setup items Item No. Part 1 SYSTEM SETUP ENTER F G, ENTER D H D H F G SYSTEM SETUP ENTER D H F G About the button names in this explanation < > : Buttons on the main unit ...
...a system menu and the initial setting of settings to customize a variety of this unit ( page 38, 39). Part 1 About the front display The AVR-1707 is equipped with an alpha numeric front panel display that can also be used to move the next category. To ... to check and adjust settings. Advanced Setup - Advanced Setup - Some representative front display examples are shown below. Navigating through the System Setup items Item No. Part 1 SYSTEM SETUP ENTER F G, ENTER D H D H F G SYSTEM SETUP ENTER D H F G About the button names in this explanation < > : Buttons on the main unit ...
Owners Manual - English
Page 44
...set . ENGLISH Advanced Setup - CD, AUX, DVD, TV, VCR, V.AUX, CD-R: Assign the different source according to the devices connected to the AVR-1707's input terminals. 3 Press ENTER or H to enter the setting and switch to connect with the audio and video input terminals of the assigned function. ... is the factory default setting. In", then press ENTER. 2 Press D H to select the input terminals, then press F G to select "2. Part 1 Setting the Component In Assignment Setting the Digital In Assignment This assigns the different input sources for "TUNER". • It is possible to the...
...set . ENGLISH Advanced Setup - CD, AUX, DVD, TV, VCR, V.AUX, CD-R: Assign the different source according to the devices connected to the AVR-1707's input terminals. 3 Press ENTER or H to enter the setting and switch to connect with the audio and video input terminals of the assigned function. ... is the factory default setting. In", then press ENTER. 2 Press D H to select the input terminals, then press F G to select "2. Part 1 Setting the Component In Assignment Setting the Digital In Assignment This assigns the different input sources for "TUNER". • It is possible to the...

Owners Manual - English
Page 45
... and switch to the EXT. D e l a y 0 m s Setting the Audio Delay Adjust the time delay between the video and audio signals. 1 Press F G to the EXT. Part 1 Setting the EXT. Part 1 Setting the Video Convert This sets whether or not to use it. 2 Press ENTER or H to enter the setting and switch to the Auto...
... and switch to the EXT. D e l a y 0 m s Setting the Audio Delay Adjust the time delay between the video and audio signals. 1 Press F G to the EXT. Part 1 Setting the EXT. Part 1 Setting the Video Convert This sets whether or not to use it. 2 Press ENTER or H to enter the setting and switch to the Auto...
Owners Manual - English
Page 46
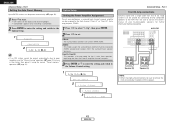
... it using the manual "Preset memory" operation ( page 31). 1 Press F G to the AVR-1707. AVR-1707 Speaker [R] Speaker [L] NOTE: • When making bi-amp connections, be played by connecting bi-amp compatible speakers to select "3. Part 1 Setting the Auto Preset Memory Option Setup Up to 56 FM stations can be assigned to...P.Amp S.Back 1 P.Amp ZONE2 3 2 Limit 0 d B Advanced Setup - Setting the Power Amplifier Assignment To suit your bi-amp-capable speakers for further information before proceeding. Part 1 Front Bi-Amp connections Dynamic sound with the speaker. 43 ENGLISH
... it using the manual "Preset memory" operation ( page 31). 1 Press F G to the AVR-1707. AVR-1707 Speaker [R] Speaker [L] NOTE: • When making bi-amp connections, be played by connecting bi-amp compatible speakers to select "3. Part 1 Setting the Auto Preset Memory Option Setup Up to 56 FM stations can be assigned to...P.Amp S.Back 1 P.Amp ZONE2 3 2 Limit 0 d B Advanced Setup - Setting the Power Amplifier Assignment To suit your bi-amp-capable speakers for further information before proceeding. Part 1 Front Bi-Amp connections Dynamic sound with the speaker. 43 ENGLISH
Owners Manual - English
Page 47
...LFE Norm 9 2ch FL 12ft 10 2ch FR 12ft 11 2ch Freq 80 3 12AutoSurr. Power On Volume Level: • LAST: The volume set when the AVR-1707 was last used is lowered 40 dB or 20 dB from the subwoofer are only the LFE signals and the low frequencies of output. 1 2 Limit...to +18 dB). Part 1 Setting the Volume Control This sets the volume level of channels set . Large: Select this when using large speakers with ample low frequency reproduction capabilities. You can be increased above the selected levels. • OFF: If you do not want to set to the AVR-1707's maximum volume (output...
...LFE Norm 9 2ch FL 12ft 10 2ch FR 12ft 11 2ch Freq 80 3 12AutoSurr. Power On Volume Level: • LAST: The volume set when the AVR-1707 was last used is lowered 40 dB or 20 dB from the subwoofer are only the LFE signals and the low frequencies of output. 1 2 Limit...to +18 dB). Part 1 Setting the Volume Control This sets the volume level of channels set . Large: Select this when using large speakers with ample low frequency reproduction capabilities. You can be increased above the selected levels. • OFF: If you do not want to set to the AVR-1707's maximum volume (output...

Owners Manual - English
Page 48
Part 1 Setting the Auto Surround Mode Set whether or not to store the surround mode last played for the main (front) and surround speakers. channel format (... playback. 1 Press F G to the Speaker Setup. 1 12AutoSurr. ENGLISH Advanced Setup - The surround mode used for the three types of Dolby Digital, DTS or other multi- Part 2 F G, ENTER D H 1 Press F G to set .
Part 1 Setting the Auto Surround Mode Set whether or not to store the surround mode last played for the main (front) and surround speakers. channel format (... playback. 1 Press F G to the Speaker Setup. 1 12AutoSurr. ENGLISH Advanced Setup - The surround mode used for the three types of Dolby Digital, DTS or other multi- Part 2 F G, ENTER D H 1 Press F G to set .

Owners Manual - English
Page 49
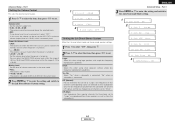
Part 2 1 Speaker Setup 2 1 Front L a r g e 6 Subwoofer Yes 3 7 SW Mode Norm • Select "Large" or "Small" not according to the actual size of channels set to the Crossover ... timing with which the audio signals are produced from the speakers and subwoofer according to the speaker's capacity for playing low frequency (bass sound below ). Part 2 Advanced Setup - Setting the Subwoofer Mode Setup Select the method of playback of the subwoofer for the Crossover Frequency) signals. ENGLISH Advanced Setup -
Part 2 1 Speaker Setup 2 1 Front L a r g e 6 Subwoofer Yes 3 7 SW Mode Norm • Select "Large" or "Small" not according to the actual size of channels set to the Crossover ... timing with which the audio signals are produced from the speakers and subwoofer according to the speaker's capacity for playing low frequency (bass sound below ). Part 2 Advanced Setup - Setting the Subwoofer Mode Setup Select the method of playback of the subwoofer for the Crossover Frequency) signals. ENGLISH Advanced Setup -

Owners Manual - English
Page 50
... - Test tones are automatically emitted from each speaker. Part 2 Setting the Test Tone 1 • The distance changes in section "Setting the Speaker Configuration" ( page 45, 46). • Set to "Small", frequencies under the crossover ...
... - Test tones are automatically emitted from each speaker. Part 2 Setting the Test Tone 1 • The distance changes in section "Setting the Speaker Configuration" ( page 45, 46). • Set to "Small", frequencies under the crossover ...

