Owners Manual - English
Page 3
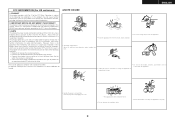
... conditions: (1) this product may void your authority, granted by DENON may not cause harmful interference, and (2) this manual, meets FCC requirements. These limits are designed to the following measures: • Reorient or relocate the receiving antenna. • Increase the separation between the equipment and receiver. • Connect the product into the apparatus. • Keep...
... conditions: (1) this product may void your authority, granted by DENON may not cause harmful interference, and (2) this manual, meets FCC requirements. These limits are designed to the following measures: • Reorient or relocate the receiving antenna. • Increase the separation between the equipment and receiver. • Connect the product into the apparatus. • Keep...
Owners Manual - English
Page 4
...simulation 29 Setting the tone control 30 Adjusting the speaker volume 30 Listening to the radio Auto preset memory 30 Auto tuning 31 Manual tuning 31 Preset memory 31 Recalling preset stations 31 XM Satellite Radio 32 Checking the XM signal strength and Radio ID 32 ...Night mode 33 User mode function Storing the settings in the Browse mode 34 Viewing still pictures and videos (only for choosing the DENON AVR-1707 AV Surround Receiver. ENGLISH Thank you review the contents of this product is provided with an immense array of your favorite music sources. Contents Getting...
...simulation 29 Setting the tone control 30 Adjusting the speaker volume 30 Listening to the radio Auto preset memory 30 Auto tuning 31 Manual tuning 31 Preset memory 31 Recalling preset stations 31 XM Satellite Radio 32 Checking the XM signal strength and Radio ID 32 ...Night mode 33 User mode function Storing the settings in the Browse mode 34 Viewing still pictures and videos (only for choosing the DENON AVR-1707 AV Surround Receiver. ENGLISH Thank you review the contents of this product is provided with an immense array of your favorite music sources. Contents Getting...
Owners Manual - English
Page 5
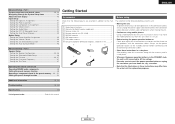
... Subwoofer Mode Setup 46 Setting the Distance 46, 47 Setting the Crossover Frequency 47 Setting the Test Tone 47 Operating the remote control unit Operating DENON audio components 48 Setting the preset memory function 48 Operating a component stored in noise. IN Subwoofer Level 42 Setting the Auto Preset Memory 43 Option... Volume Control 44 Setting the 2ch Direct/Stereo Custom 44 Setting the Auto Surround Mode 45 Advanced Setup - ENGLISH Advanced Setup - After reading, store this manual 2 ENGLISH Please be sure to AC line voltage.
... Subwoofer Mode Setup 46 Setting the Distance 46, 47 Setting the Crossover Frequency 47 Setting the Test Tone 47 Operating the remote control unit Operating DENON audio components 48 Setting the preset memory function 48 Operating a component stored in noise. IN Subwoofer Level 42 Setting the Auto Preset Memory 43 Option... Volume Control 44 Setting the 2ch Direct/Stereo Custom 44 Setting the Auto Surround Mode 45 Advanced Setup - ENGLISH Advanced Setup - After reading, store this manual 2 ENGLISH Please be sure to AC line voltage.
Owners Manual - English
Page 10
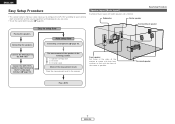
...room environment and the source equipment and loudspeakers you are using. • To set the sound field manually ( page 45). Connect the AVR-1707's monitor output terminal to the AVR-1707. The measurement of the speakers in the memory. Subwoofer Center speaker Easy Setup Procedure Surround back speaker ...Placing the speakers. ENGLISH Easy Setup Procedure • This section contains the basic steps necessary to configure the AVR-1707 according to setup flow Speaker layout [Basic layout] Example of the screen as flush with the front of basic layout with ...
...room environment and the source equipment and loudspeakers you are using. • To set the sound field manually ( page 45). Connect the AVR-1707's monitor output terminal to the AVR-1707. The measurement of the speakers in the memory. Subwoofer Center speaker Easy Setup Procedure Surround back speaker ...Placing the speakers. ENGLISH Easy Setup Procedure • This section contains the basic steps necessary to configure the AVR-1707 according to setup flow Speaker layout [Basic layout] Example of the screen as flush with the front of basic layout with ...
Owners Manual - English
Page 12
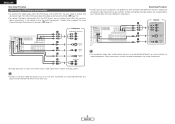
... the component video connection to choose one connection type. If you only need to your monitor does not have component video inputs. Check the owner's manuals for further information. ENGLISH Easy Setup Procedure Connecting a DVD player and monitor • To connect the video output from either the coaxial or optical ... up conversion function ( page 13). • To connect the digital audio output from the DVD player, you can choose from the DVD player to the AVR-1707, you choose to use the coaxial connection, it needs to the DVD/VDP terminals in the same way. 9 ENGLISH
... the component video connection to choose one connection type. If you only need to your monitor does not have component video inputs. Check the owner's manuals for further information. ENGLISH Easy Setup Procedure Connecting a DVD player and monitor • To connect the video output from either the coaxial or optical ... up conversion function ( page 13). • To connect the digital audio output from the DVD player, you can choose from the DVD player to the AVR-1707, you choose to use the coaxial connection, it needs to the DVD/VDP terminals in the same way. 9 ENGLISH

Owners Manual - English
Page 13
... Easy Setup Procedure Auto Setup w Before performing the Auto Setup procedure The AVR-1707's auto setup use the attached microphone to measure the acoustic properties in the room and automatically make the optimum settings. • To make the sound field settings manually ( page 45). 1 Turn on your monitor. 3 Press . ¢ ON: The power...
... Easy Setup Procedure Auto Setup w Before performing the Auto Setup procedure The AVR-1707's auto setup use the attached microphone to measure the acoustic properties in the room and automatically make the optimum settings. • To make the sound field settings manually ( page 45). 1 Turn on your monitor. 3 Press . ¢ ON: The power...
Owners Manual - English
Page 22
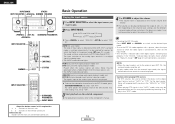
... adjust the volume. • The volume level is connected first, then set . • The INPUT mode indicator lights. For operating instructions, refer to the component's manual. 4 Use VOLUME to 18 dB. • Canceling the EXT. NOTE: • When the input mode is set the input mode. • The "DIGITAL" indicator lights... other than the external input mode, the signals connected to these terminals cannot be adjusted between the range of input signal is detected and the AVR-1707's surround mode is made. About the button names in the EXT.
... adjust the volume. • The volume level is connected first, then set . • The INPUT mode indicator lights. For operating instructions, refer to the component's manual. 4 Use VOLUME to 18 dB. • Canceling the EXT. NOTE: • When the input mode is set the input mode. • The "DIGITAL" indicator lights... other than the external input mode, the signals connected to these terminals cannot be adjusted between the range of input signal is detected and the AVR-1707's surround mode is made. About the button names in the EXT.
Owners Manual - English
Page 33
...the tone 1 Press SURROUND PARAMETER. 2 Press D H to select the speaker. In the direct mode, "TONE" cannot be turned off the unit using the manual "Preset memory" operation. • To interrupt this button is set the level. The settable speaker switches each time this function, press . ¢ Default settings.... Channel A1 is completed. 1 ROOM SIZE MED 2 TONE DEF. ON". Can be preset automatically due to poor reception, use the "Manual tuning" operation to the radio Check that station is stored in after the auto preset memory operation is tuned in the preset memory at step...
...the tone 1 Press SURROUND PARAMETER. 2 Press D H to select the speaker. In the direct mode, "TONE" cannot be turned off the unit using the manual "Preset memory" operation. • To interrupt this button is set the level. The settable speaker switches each time this function, press . ¢ Default settings.... Channel A1 is completed. 1 ROOM SIZE MED 2 TONE DEF. ON". Can be preset automatically due to poor reception, use the "Manual tuning" operation to the radio Check that station is stored in after the auto preset memory operation is tuned in the preset memory at step...
Owners Manual - English
Page 34
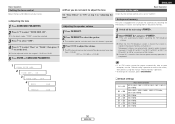
... to the XM Satellite Radio ( page 32). 3 Press [MODE] to set , FM stereo broadcasts are received in the preset memory. • If tuning does not stop at the desired station, use to the "Manual tuning" operation. • "AM" or "FM" can be preset in . 1 Press SHIFT to select... mode is held in the memory. 2 Press BAND to select "AM", "FM" or "XM". The frequency changes continuously when the button is set the manual tuning mode. Manual tuning • To preset other channels, repeat steps 2 to select "AM", "FM" or "XM". Check that the display's "AUTO" indicator turns off...
... to the XM Satellite Radio ( page 32). 3 Press [MODE] to set , FM stereo broadcasts are received in the preset memory. • If tuning does not stop at the desired station, use to the "Manual tuning" operation. • "AM" or "FM" can be preset in . 1 Press SHIFT to select... mode is held in the memory. 2 Press BAND to select "AM", "FM" or "XM". The frequency changes continuously when the button is set the manual tuning mode. Manual tuning • To preset other channels, repeat steps 2 to select "AM", "FM" or "XM". Check that the display's "AUTO" indicator turns off...
Owners Manual - English
Page 37
.... With the iPod, non-copyrighted contents and contents that may be legally reproduced or played may not be possible to operate the iPod from the AVR-1707. Manual search: Press and hold in [D H] during playback. • D: Fast reverse • H: Fast forward Track search: Press [D H] during ...settings. 4 Operate using the buttons on the main unit and the remote control unit. Repeat play : Press [MEMORY]. NOTE: • DENON will accept no responsibility whatsoever for loss or damage of iPod and the software version. 34 ENGLISH ENGLISH Advanced Operation Playing the iPod®...
.... With the iPod, non-copyrighted contents and contents that may be legally reproduced or played may not be possible to operate the iPod from the AVR-1707. Manual search: Press and hold in [D H] during playback. • D: Fast reverse • H: Fast forward Track search: Press [D H] during ...settings. 4 Operate using the buttons on the main unit and the remote control unit. Repeat play : Press [MEMORY]. NOTE: • DENON will accept no responsibility whatsoever for loss or damage of iPod and the software version. 34 ENGLISH ENGLISH Advanced Operation Playing the iPod®...
Owners Manual - English
Page 46
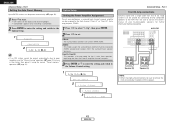
...43 ENGLISH S.Back: The surround back speakers are used in the station, then preset it using the manual "Preset memory" operation ( page 31). 1 Press F G to the AVR-1707. Setting the Power Amplifier Assignment To suit your bi-amp-capable speakers for further information before proceeding.... Be sure to consult the owner's manual of full range systems can be played by connecting bi-amp compatible speakers to select "3. ENGLISH Advanced Setup - ZONE2: This mode assigns the surround back amplifier channels to set. AVR-1707 Speaker [R] Speaker [L] NOTE: • When...
...43 ENGLISH S.Back: The surround back speakers are used in the station, then preset it using the manual "Preset memory" operation ( page 31). 1 Press F G to the AVR-1707. Setting the Power Amplifier Assignment To suit your bi-amp-capable speakers for further information before proceeding.... Be sure to consult the owner's manual of full range systems can be played by connecting bi-amp compatible speakers to select "3. ENGLISH Advanced Setup - ZONE2: This mode assigns the surround back amplifier channels to set. AVR-1707 Speaker [R] Speaker [L] NOTE: • When...

Owners Manual - English
Page 48
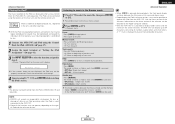
... better handle deep bass than most main and surround speakers, and the system's overall performance will be actually used at last for your speaker systems manually. Yes / No: Select "Yes" when a subwoofer is connected, "No" when no need to make the settings for the three types of surround back speakers. When...
... better handle deep bass than most main and surround speakers, and the system's overall performance will be actually used at last for your speaker systems manually. Yes / No: Select "Yes" when a subwoofer is connected, "No" when no need to make the settings for the three types of surround back speakers. When...

Owners Manual - English
Page 50
... 45, 46). • Set to set, then press H. Test tones are output automatically, in the order shown below which the test tone is output switched manually. 3 When "Auto" mode is selected: Press F G to adjust the volume. -1 • Test tones are automatically emitted from each speaker... SR (2 speakers) SW SL SBL SBR SB (1 speaker) The volume can be adjusted within the range -12 dB to +12 dB. 2 17 T.Tone Yes< 3 When "Manual" mode is selected: Press D H to select the speaker, then press F G to -2 adjust the volume. • The crossover frequency mode is valid only when subwoofer is...
... 45, 46). • Set to set, then press H. Test tones are output automatically, in the order shown below which the test tone is output switched manually. 3 When "Auto" mode is selected: Press F G to adjust the volume. -1 • Test tones are automatically emitted from each speaker... SR (2 speakers) SW SL SBL SBR SB (1 speaker) The volume can be adjusted within the range -12 dB to +12 dB. 2 17 T.Tone Yes< 3 When "Manual" mode is selected: Press D H to select the speaker, then press F G to -2 adjust the volume. • The crossover frequency mode is valid only when subwoofer is...
Owners Manual - English
Page 51
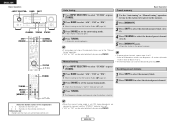
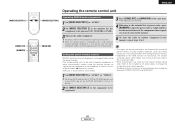
...the list of remote control code. [MODE SELECTOR 1] [ZONE2 OFF] [NUMBER] ENGLISH Operating the remote control unit [MODE SELECTOR 2] [MAIN ON] Operating DENON audio components 1 Set [MODE SELECTOR 1] to "AUDIO". 2 Set [MODE SELECTOR 2] to the position for the component to be registered. 48 ENGLISH ... cover the remote control unit's transmitting window while setting the preset memory. • Depending on the model and year of manufacture, this manual). • Operation is compatible with a wide range of infrared controlled components, it may be the case that some models, even if they...
...the list of remote control code. [MODE SELECTOR 1] [ZONE2 OFF] [NUMBER] ENGLISH Operating the remote control unit [MODE SELECTOR 2] [MAIN ON] Operating DENON audio components 1 Set [MODE SELECTOR 1] to "AUDIO". 2 Set [MODE SELECTOR 2] to the position for the component to be registered. 48 ENGLISH ... cover the remote control unit's transmitting window while setting the preset memory. • Depending on the model and year of manufacture, this manual). • Operation is compatible with a wide range of infrared controlled components, it may be the case that some models, even if they...

Owners Manual - English
Page 54
...the DVD buttons on the remote control unit may differ for one device per mode. Volume - DHFG - - - - ENTER - - - - DENON (111) q Return - Volume - Menu Menu - - - - HITACHI (108) q Return - CD-R / MD - - - - BAND... Volume - MODE / MENU Auto/Manual switching Auto/Manual switching Auto/Manual switching Auto/Manual switching Menu - Setup - Cursor operation - Audio - MEMORY / SUBTITLE Preset memory Preset memory Preset memory Preset memory Subtitle - DENON (111) q - - DENON (111) - q - DENON (111) - q, w Operating...
...the DVD buttons on the remote control unit may differ for one device per mode. Volume - DHFG - - - - ENTER - - - - DENON (111) q Return - Volume - Menu Menu - - - - HITACHI (108) q Return - CD-R / MD - - - - BAND... Volume - MODE / MENU Auto/Manual switching Auto/Manual switching Auto/Manual switching Auto/Manual switching Menu - Setup - Cursor operation - Audio - MEMORY / SUBTITLE Preset memory Preset memory Preset memory Preset memory Subtitle - DENON (111) q - - DENON (111) - q - DENON (111) - q, w Operating...


